
Choosing the Right Type of Clay
When it comes to making a clay vase without a wheel, the first step is to choose the right type of clay. The type of clay you use will directly impact the texture, durability, and appearance of your vase. Here are a few options to consider:
1. Earthenware Clay: Earthenware clay is a popular choice for hand-building projects like vases. It is known for its workability and beautiful finish. This type of clay is fired at a lower temperature, making it ideal for beginners or those without access to a kiln. Keep in mind that earthenware clay may not be as durable or suitable for holding water as other types of clay.
2. Stoneware Clay: Stoneware clay is more sturdy and water-resistant compared to earthenware clay. It is fired at a higher temperature, resulting in a strong and durable final product. If you plan on using your vase for holding water or want a more robust piece, stoneware clay is a great choice. However, it can be a bit trickier to work with due to its higher firing temperature.
3. Porcelain Clay: Porcelain clay is known for its delicate and translucent appearance. It is a high-fired clay that produces a refined and elegant finish. Porcelain is often used for creating intricate designs or adding a touch of sophistication to vases. However, it can be challenging to work with, as it requires precise handling and is more prone to cracking or warping.
When selecting the clay for your vase, take into consideration your skill level, firing capabilities, and the desired look and functionality of your finished piece. It’s essential to choose a clay that suits your needs and allows you to achieve your artistic vision.
Remember, clay can vary in texture and composition depending on the brand and supplier. It’s always a good idea to consult with experienced potters or pottery supply stores to get recommendations on the best clay for your specific project.
Preparing the Clay for Shaping
Once you have chosen the right type of clay for your vase, the next step is to properly prepare it for shaping. Preparing the clay involves a few essential steps to ensure its workability and remove any air or impurities. Here’s how to prepare the clay:
1. Wedging: Wedging is the process of kneading and removing air bubbles from the clay. Start by cutting a portion of the clay and slap it onto a clean work surface. Use your hands to push and fold the clay repeatedly, turning it in different directions. This motion helps to evenly distribute moisture and remove air pockets. Continue wedging until the clay becomes smooth and consistent in texture.
2. Adding Water: If the clay feels dry and stiff, you can add a small amount of water to soften it. Be cautious not to add too much water as it can make the clay too wet and difficult to work with. Use a spray bottle or damp cloth to lightly moisten the clay while wedging, gradually incorporating the water until the desired consistency is achieved.
3. Consistency Check: To ensure the clay is workable, perform a slump test. Shape a small portion of the clay into a cone-like form and gently tap the base. If the cone slumps or sags, the clay is too soft and needs more wedging. If the cone maintains its shape or cracks, the clay is too dry and may require a bit more water during wedging.
4. Resting: After the clay has been wedged and is at the desired consistency, allow it to rest for a short while. This resting period, known as “aging,” gives the clay time to settle and any added water to be absorbed uniformly. Place the clay in a plastic bag or cover it with a damp cloth to prevent it from drying out during this resting period.
By properly preparing the clay before shaping, you are ensuring its readiness and enhancing its workability. Taking the time to wedge, check the consistency, and let the clay rest will make the forming process smoother and help you achieve the desired shape for your clay vase.
Shaping the Base of the Vase
Now that you have prepared the clay for shaping, it’s time to begin forming the base of your clay vase. The base provides stability and sets the foundation for the rest of the vase. Here’s how to shape the base:
1. Start with a Slab: Roll out a slab of clay using a rolling pin or slab roller. The slab should be even in thickness and large enough to create the desired size of the vase base. Aim for a thickness of about 1/4 to 1/2 inch, depending on the desired weight and stability of the finished vase.
2. Create a Template: Use a cardboard or paper template to guide the shape of the base. Place the template on top of the rolled-out clay slab and trace around it with a needle tool or craft knife. This will provide a clear outline to follow while shaping.
3. Cut the Base Shape: Using the traced outline as a guide, carefully cut the clay slab into the desired base shape using a knife or clay-cutting tool. Remove any excess clay around the perimeter to ensure a clean and precise edge.
4. Support and Shape: Gently lift the cut clay base and place it on a flat surface. Use your fingers, a wooden paddle, or a smooth object to begin shaping the base. Press and smooth the clay to create an even thickness and a rounded or tapered shape, depending on your design preference.
5. Score and Slip: Before attaching the base to the walls of the vase, score both the base and the area where they will be joined. Scoring involves making shallow crosshatch marks, which provide texture and help the clay adhere better. Apply a thin layer of slip, a mixture of clay and water, to the scored areas to create a strong bond.
6. Attach the Base: Carefully align the base with the bottom of the vase, pressing it firmly but gently to attach. Smooth any visible seams with a wet finger or a smoothing tool to blend the two clay pieces together. Take care not to distort the shape of the base or push too hard, as this can cause the clay to warp.
Shaping the base is an important step in creating a sturdy and aesthetically pleasing clay vase. By following these steps and paying attention to details, you will lay the groundwork for the rest of the vase-building process.
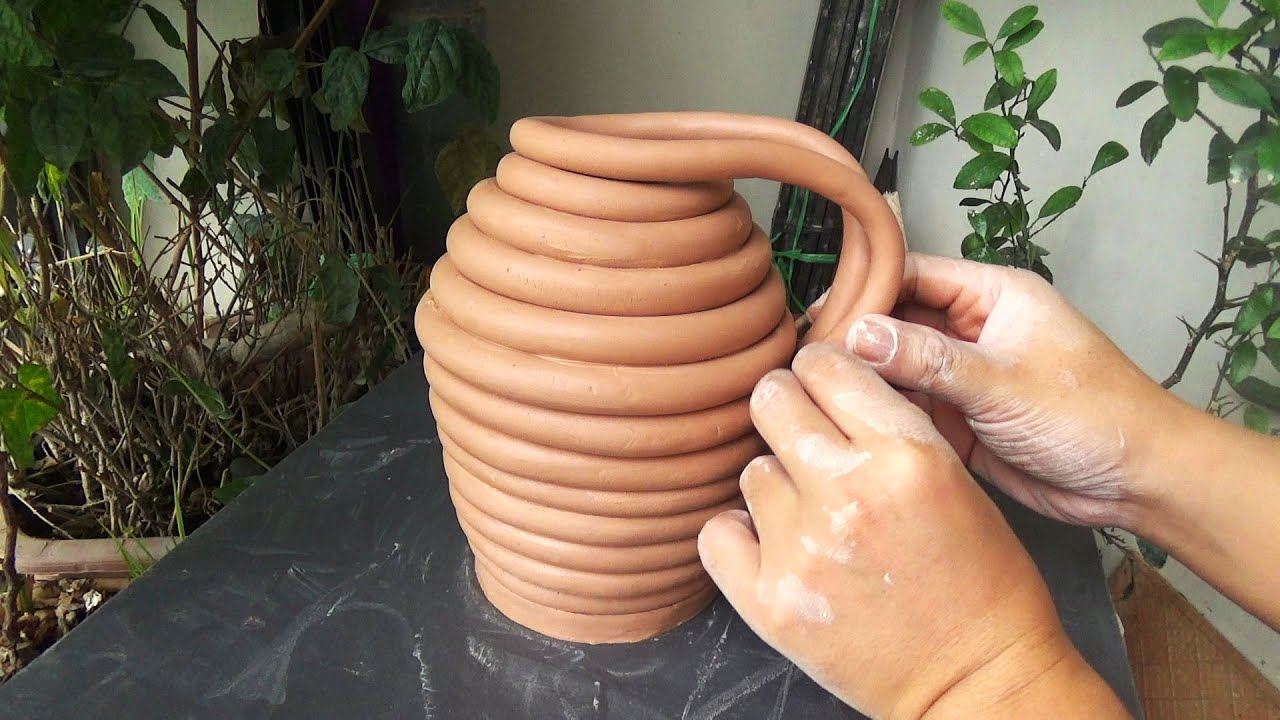
Creating the Walls of the Vase
Now that the base of your clay vase is complete, it’s time to move on to creating the walls. The walls of the vase provide height and shape to your final piece. Here’s how to create the walls:
1. Coil Method: One popular method for building the walls of a clay vase is the coil technique. Begin by rolling out coils of clay, similar to long ropes. The thickness and length of the coils will depend on the desired height and width of your vase. Make sure the coils are consistent in size for a balanced appearance.
2. Score and Slip: Just like when attaching the base, it’s important to score and slip the coils as you stack them to create the walls. Use a needle tool or fork to make shallow crosshatch marks on the ends of the coils, and apply a thin layer of slip to ensure a strong bond. Press the coils firmly together, using your fingers or a paddle to smooth and shape them as you go.
3. Smooth and Blend: As you add more coils and build the height of the walls, it’s crucial to smooth and blend the clay for a seamless look. Use a wet finger or a smoothing tool to gently smooth out any visible seams or rough edges. Take your time to ensure a uniform and consistent surface.
4. Thinning the Walls: If you prefer thinner walls for your vase, you can gently push and shape the clay as you build up the coils. Gradually thinning the walls can create elegant curves and a lighter overall appearance. However, be careful not to thin the walls too much, as this can weaken the structure of the vase.
5. Shaping the Opening: As you approach the desired height of the vase, you can start shaping the opening. Use your fingers or a wooden tool to carefully widen and shape the top of the vase. This will determine the final opening size and style, whether it’s a wide-mouthed vase or a narrow-necked design.
Creating the walls of a clay vase requires patience, precision, and attention to detail. By using the coil method and following these steps, you can build up the walls of your vase smoothly and achieve the desired height and shape.
Smoothing and Texturing the Surface
Once you have built the walls of your clay vase, it’s time to focus on smoothing and adding texture to the surface. Smoothing the surface creates a polished look, while adding texture can enhance the visual appeal and add dimension to your vase. Here’s how to achieve a smooth and textured surface:
1. Sponge and Water: Before smoothing the surface, lightly dampen a sponge or a soft cloth with water. Gently wipe the surface of the vase in circular motions to remove any excess clay particles, smoothing the surface and creating an even texture.
2. Metal Rib: Using a metal rib tool, such as a flexible steel rib, gently scrape the surface of the vase. This technique helps to smooth out any remaining edges, bumps, or imperfections. Begin at the bottom of the vase and work your way up, applying light pressure as you go.
3. Burnishing: To achieve a polished and smooth finish, you can use a burnishing tool or a smooth stone. Rub the burnishing tool over the surface of the vase in small circular motions. This action compresses the clay particles, resulting in a shiny and refined appearance. Pay extra attention to the areas where the coils meet to ensure a seamless look.
4. Texturing Tools: If you prefer to add texture to your vase, there are various tools and techniques you can use. Consider using a carving tool, a toothbrush, a sponge, or even natural objects like leaves or shells to create impressions on the clay surface. Experiment with different textures and patterns to achieve the desired effect.
5. Incising and Carving: Another way to add texture is by incising or carving patterns into the clay surface. You can use a pointed tool or a craft knife to carefully carve intricate designs, lines, or symbols. Be mindful of the depth and placement of the carvings, as they can affect the overall strength and balance of the vase.
By combining smoothing techniques with creative texturing, you can achieve a surface that is visually appealing and unique to your clay vase. Remember to take your time, work with care, and experiment with different tools and textures to bring your creative vision to life.
Adding Decorative Elements
Once you have achieved the desired smoothness and texture on the surface of your clay vase, it’s time to consider adding decorative elements. These elements will enhance the visual appeal and personalize your vase. Here are some creative ideas to consider:
1. Appliques: Appliques are decorative pieces of clay that can be attached to the surface of the vase. They can be made separately and then adhered using slip or scored and slipped directly onto the vase. Appliques can take the form of flowers, leaves, geometric shapes, or any other design that suits your aesthetic preferences.
2. Relief Sculptures: If you’re feeling adventurous, try creating relief sculptures on the surface of your vase. Relief sculptures can add depth and dimension to your piece. You can sculpt intricate designs or even depict scenes or symbols that hold personal meaning to you.
3. Piercing: Piercing involves creating small holes or patterns on the surface of the vase using a needle tool or other sharp object. This technique can create beautiful patterns and allow for more air circulation during firing. Be mindful of the structural integrity of the vase and avoid piercing too close to the edges or compromising the stability.
4. Clay Embossing: Embossing involves pressing various objects onto the clay surface to create texture and patterns. You can use items like lace, textured fabrics, or even natural objects like leaves or flowers. Press the object gently onto the clay and then carefully remove it to reveal the embossed pattern.
5. Add-Ons: Consider adding additional elements like handles, spouts, or decorative rims to your vase. These add-ons can be sculpted separately and attached using slip or scored and slipped onto the vase. They can give your vase a unique and functional touch.
Remember to consider the overall aesthetic and theme of your vase when adding decorative elements. It’s important to maintain a harmonious balance between the elements and the overall design. Take your time to incorporate these decorative touches with care and precision to create a truly personalized and visually stunning clay vase.
Drying the Vase Properly
After completing the decorative elements on your clay vase, it’s crucial to ensure proper drying to prevent cracks or warping during the firing process. Proper drying allows moisture to evaporate evenly from the clay. Here’s how to dry your vase properly:
1. Air Drying: Start by letting your vase air dry in a well-ventilated area. Place it on a clean, dry surface away from direct sunlight and drafts. This gradual drying process allows moisture to escape from the clay slowly. Turning the vase occasionally helps to ensure even drying on all sides.
2. Patience Is Key: Remember that the drying process is not to be rushed. Depending on the size and thickness of your vase, it may take several days to a couple of weeks for it to dry completely. Resist the temptation to speed up the process, as uneven drying can cause cracks or other structural issues.
3. Test for Dryness: To check if the vase is thoroughly dry, gently touch the surface. It should feel cool to the touch and should not leave any wet or sticky residue on your fingertips. If the surface still feels moist, continue air drying until the entire vessel is dry.
4. Leather-Hard Stage: As the vase dries, it will reach a stage known as leather-hard. At this stage, the clay is firm enough to handle without distorting its shape or leaving fingerprints. This is the ideal time to make any additional adjustments or refinements, such as smoothing rough areas or adding small details.
5. Drying Rack: To ensure proper airflow around the vase during drying, you can place it on a drying rack or use wooden supports to elevate it slightly. This allows air to circulate all around the vase, aiding in uniform drying and minimizing the risk of warping.
It’s important to exercise patience and give your vase ample time to dry properly. Rushing the drying process can lead to cracks or deformities, potentially ruining your hard work. By following these steps and allowing for sufficient drying time, you will increase the chances of a successful firing and achieve a beautiful finished clay vase.
Firing the Vase in the Kiln
Once your clay vase is completely dry, it’s time to fire it in the kiln. Firing gives the clay its final hardness and transforms it into a durable, ceramic piece. Firing requires careful preparation and adherence to proper kiln techniques. Here’s how to fire your clay vase:
1. Preparing the Kiln: Ensure that the kiln is clean and free from any debris. Check the kiln shelves and posts to ensure they are in good condition and properly positioned. Familiarize yourself with the kiln’s operating instructions and safety precautions.
2. Loading the Vase: Carefully place your dry vase onto a kiln shelf, ensuring there is enough space between it and other pottery. Avoid placing the vase too close to the kiln walls or other objects, as this can lead to uneven heat distribution and potential damage.
3. Firing Schedule: Follow a firing schedule appropriate for the type of clay you used. Each clay type has different temperature requirements. Set the kiln to the recommended firing temperature and allow the vase to heat gradually. Ramp up the temperature according to the firing schedule provided by the clay manufacturer or an experienced potter.
4. Firing Process: The firing process involves three stages: drying, bisque firing, and glaze firing. During the drying stage, any remaining moisture in the clay evaporates. The bisque firing brings the clay to a temperature at which it hardens and becomes porous. Finally, the glaze firing involves applying glazes to the vase, followed by a second firing to melt and fuse the glaze onto the clay surface.
5. Cooling Down: Once the firing process is complete, allow the kiln to cool down gradually. Rapid cooling can cause thermal shock and result in cracks or breakage. Avoid opening the kiln door while it is still hot. Let the kiln cool to room temperature before removing your finished vase.
Firing your clay vase in the kiln is a critical step in the pottery process. It requires patience, adherence to proper temperature schedules, and a good understanding of the specific clay being used. Following these guidelines will help ensure a successful firing and result in a beautifully transformed ceramic vase.
Sanding and Finishing Touches
After firing your clay vase and allowing it to cool, it’s time to focus on sanding and adding the finishing touches. Sanding helps to smooth any rough areas and creates a polished surface, while the finishing touches give your vase a professional and refined appearance. Here’s how to complete the final steps:
1. Sanding: Start by using fine-grit sandpaper to gently sand the surface of the vase. Sanding helps to remove any imperfections, rough edges, or glaze drips that may have occurred during firing. Use light, even pressure while sanding, and periodically wipe away any dust or debris to assess the smoothness of the surface. Continue sanding until you achieve the desired level of smoothness.
2. Wet Sanding: For an even smoother finish, wet sanding can be done after the initial sanding. Wet the surface of the vase and the sandpaper with water, and lightly sand in a circular motion. This technique helps to minimize dust and provides a finer finish. Remember to frequently rinse the vase and sandpaper to remove any clay residue.
3. Final Touch-Ups: Examine the vase closely for any remaining rough areas or blemishes. Use a damp sponge or a soft cloth to gently smooth out these areas. Take extra care around any decorative elements or delicate areas to avoid damaging them.
4. Inspecting the Base: Pay close attention to the base of the vase, as it should be smooth and level to ensure stability. Use a level or run your hand along the bottom to check for any uneven areas. If necessary, gently sand or smooth the base to create a level surface.
5. Cleaning the Vase: Once the sanding is complete, thoroughly clean the vase to remove any sanding residue. Rinse the vase with water and wipe it dry with a clean, lint-free cloth. This ensures that the vase is free from any dust or particles before proceeding with further finishing touches.
6. Adding a Varnish: If desired, you can apply a varnish or a sealant to give your vase a glossy or matte finish. Choose a varnish specifically formulated for pottery, and carefully apply it according to the manufacturer’s instructions. This step helps to protect the surface and adds a final touch of professional polish to your vase.
By sanding and adding the finishing touches to your clay vase, you can elevate its overall appearance and ensure a smooth surface. Take your time and pay attention to details to achieve a refined and professionally finished clay vase.
Painting and Glazing the Vase
After sanding and refining the surface of your clay vase, it’s time to add color and depth through painting and glazing. Painting allows you to express your creativity and add unique designs, while glazing adds a protective and decorative layer. Here’s how to paint and glaze your vase:
1. Choosing the Paint: Consider whether you want to use underglazes, ceramic paints, or oxides for painting your vase. Underglaze paints are specifically formulated for ceramics and come in a wide range of colors. Ceramic paints are similar to underglazes but may require additional firing to achieve the desired effect. Oxides, on the other hand, can create earthy tones and unique patterns when applied and fired.
2. Planning the Design: Before you start painting, plan your design by sketching it on paper or visualizing it in your mind. Consider the shape and size of your vase and how the design will complement it. Decide whether you want a simple pattern, intricate details, or a combination of both.
3. Painting Techniques: Paint your vase using a variety of techniques such as brushwork, sponging, or even splattering. Experiment with different brush sizes, textures, and colors to achieve the desired effect. Layering colors and blending techniques can add depth and dimension to your design. Remember to let each layer dry before applying the next.
4. Glaze Selection: After the paint has dried, you can choose to enhance and protect your design by applying a glaze. Glazes come in various finishes such as glossy, matte, or textured. Consider the desired effect and the overall aesthetic of your vase when selecting the glaze. Follow the manufacturer’s instructions for proper application and firing temperatures.
5. Applying the Glaze: Use a clean brush to apply the glaze to your vase, making sure to cover the entire surface evenly. Avoid applying the glaze too thickly as it can result in pooling or uneven coverage. Take care when glazing any decorative elements to preserve their details. Let the glaze dry completely before firing it in the kiln.
6. Firing the Glaze: Place your vase on a kiln shelf and follow the recommended firing schedule for the type of glaze you’re using. The firing temperature and duration will vary depending on the type of glaze and the desired effect. Ensure that the kiln has cooled down completely before removing your finished, glazed vase.
By painting and glazing your clay vase, you can add personality, color, and a protective layer to your creation. Take your time to plan and execute your design, allowing your artistic vision to come to life through intricate brushwork and the transformative power of glazes.
Curing and Finalizing the Vase
After painting and glazing your clay vase, it’s essential to properly cure and finalize the piece to ensure its longevity and beauty. Curing allows the paint and glaze to fully bond with the clay, creating a durable and finished artwork. Here’s how to complete the curing and finalization process:
1. Curing Time: Once the vase is fully painted and glazed, allow it to air dry for an extended period. The curing time will vary depending on the type of paint and glaze used. Follow the manufacturer’s instructions for the recommended curing duration. This step is crucial to ensure that the paint and glaze sets properly and becomes resistant to chipping or fading.
2. Sealing: After the curing period, consider sealing your vase with a ceramic sealant. A sealant helps protect the painted and glazed surface from fading, moisture, and general wear and tear. Apply the sealant according to the manufacturer’s instructions and allow it to dry completely. This extra step adds an additional layer of protection and longevity to your clay vase.
3. Inspecting for Flaws: Once the vase is fully cured and sealed, thoroughly inspect it for any flaws or imperfections. Look for any areas where the paint or glaze may have chipped or cracked during the curing process. If you notice any flaws, gently touch up the areas with a small brush and matching paint or glaze. Allow the touch-up to dry completely before proceeding.
4. Final Cleaning: Before displaying or using your finished vase, give it a final cleaning. Use a soft, damp cloth to wipe away any dust or residue that may have accumulated during the curing process. This step ensures that your vase looks its best and is ready to be showcased in its final form.
5. Displaying or Using: With the curing and finalizing steps completed, your clay vase is now ready to be displayed or used. Whether it becomes a centerpiece on a shelf, a functional piece for holding flowers, or a gift for someone special, take pride in the final result of your artistic creation.
By properly curing and finalizing your clay vase, you are ensuring that your hard work and creativity will last for years to come. Take the time to complete these steps with care and attention to detail, as they will contribute to the overall quality and durability of your finished piece.