
Supplies Needed
Before you begin installing a lamp cord switch, it’s important to gather all the necessary supplies. Having everything ready will ensure a smooth and efficient installation process. Here are the supplies you’ll need:
- Lamp cord with plug
- Lamp cord switch
- Wire strippers
- Electrical tape
- Small flat head screwdriver
Make sure you have all these supplies handy before you start working on your lamp. This will save you time and prevent any interruptions during the installation process.
The lamp cord should be appropriate for the voltage of your lamp and have a plug attached. You can find lamp cord switches at your local hardware store or online. Most lamp cord switches are compatible with standard lamp cords, but double-check the specifications to ensure a proper fit.
Wire strippers are essential for safely removing the insulation from the lamp cord wires. Electrical tape will be used to secure the connections and insulate the exposed wires. A small flat head screwdriver will help you attach and secure the lamp cord switch.
By gathering all the necessary supplies beforehand, you’ll be able to complete the installation process smoothly and efficiently. With everything you need at your fingertips, you can focus on the task at hand and have your lamp cord switch up and running in no time.
Step 1: Prepare the Lamp Cord and Switch
Before installing a lamp cord switch, it’s crucial to prepare both the lamp cord and the switch itself. This preparation step ensures a seamless installation process. Follow these steps to effectively prepare the lamp cord and switch:
- First, unplug the lamp from the power source. Safety should always be your top priority when working with electrical components.
- Next, remove the lampshade and any other decorative elements from the lamp. This will provide clear access to the lamp cord and switch.
- Inspect the lamp cord and switch for any damages or wear. If you notice any fraying, exposed wires, or other issues, it’s best to replace the entire lamp cord for safe and reliable operation.
- If the lamp cord is in good condition, locate the section of the cord where you want to install the switch. Usually, this is near the base of the lamp where the cord exits.
- Measure and mark the desired position for the switch on the lamp cord. It should be easily accessible and convenient to operate.
- Once you have marked the position, carefully cut the cord at that point. Make sure to make a clean and straight cut. Avoid any jagged edges or frayed wires.
- Now, take your lamp cord switch and unscrew the top plastic casing. This will reveal the internal components of the switch.
- Position the switch in the open position so that you can attach the lamp cord.
- Take the cut ends of the lamp cord and separate the two wires. Use wire strippers to strip about half an inch of insulation from the end of each wire.
- Twist the exposed wire strands to keep them neatly together.
- Finally, follow the instructions provided with your lamp cord switch to properly attach the lamp cord wires to the corresponding terminals on the switch. Usually, this involves wrapping the wire around the terminal screw and tightening it securely.
By carefully preparing the lamp cord and switch, you lay the foundation for a successful installation. Taking the time to assess the condition of the cord, marking the switch position, and properly attaching the wires will help ensure a safe and functional lamp cord switch.
Step 2: Strip the Insulation off the Lamp Cord
In order to properly install a lamp cord switch, you’ll need to strip the insulation off the lamp cord wires. This step allows for a secure and efficient connection with the switch. Follow these guidelines to strip the insulation safely and effectively:
- Ensure the lamp cord is unplugged from the power source to eliminate any risk of electric shock.
- Locate the section of the lamp cord where the insulation needs to be stripped. This is usually where you cut the cord in Step 1 or closer to the base of the lamp.
- Using wire strippers, choose the appropriate slot for the wire gauge of your lamp cord. The slots are typically labeled for different wire thicknesses.
- Insert the lamp cord into the chosen slot of the wire strippers, making sure to position it as far into the slot as possible.
- Hold the wire strippers firmly and apply gentle pressure while rotating them around the cord. This action will cut through the insulation without damaging the underlying wires.
- Continue rotating the wire strippers around the lamp cord until you complete at least one full revolution. Be cautious to prevent any movement that could potentially cut into the wires.
- Once you’ve made a full round, carefully pull the wire strippers away from the cord. The insulation should easily slide off, leaving the bare wires exposed.
- If there are any sections of insulation remaining, repeat the stripping process until all the necessary portions are free from insulation.
- After stripping the insulation, give the exposed wires a gentle tug to ensure they are securely attached to the cord. If they come loose, repeat the stripping process or consider replacing the cord.
Stripping the insulation off the lamp cord is a vital step in installing a lamp cord switch. By following these steps and taking care not to damage the underlying wires, you can confidently move forward with the installation process.
Step 3: Attach the Switch to the Cord
Once you have prepared the lamp cord and stripped off the insulation, it’s time to attach the switch to the cord. This step allows you to control the lamp’s on/off functionality with ease. Follow these steps to securely attach the switch:
- Take the lamp cord switch that you prepared in Step 1 and ensure that the top plastic casing is unscrewed to expose the internal components.
- Adjust the switch to its open position so that you can access the terminals and attach the lamp cord.
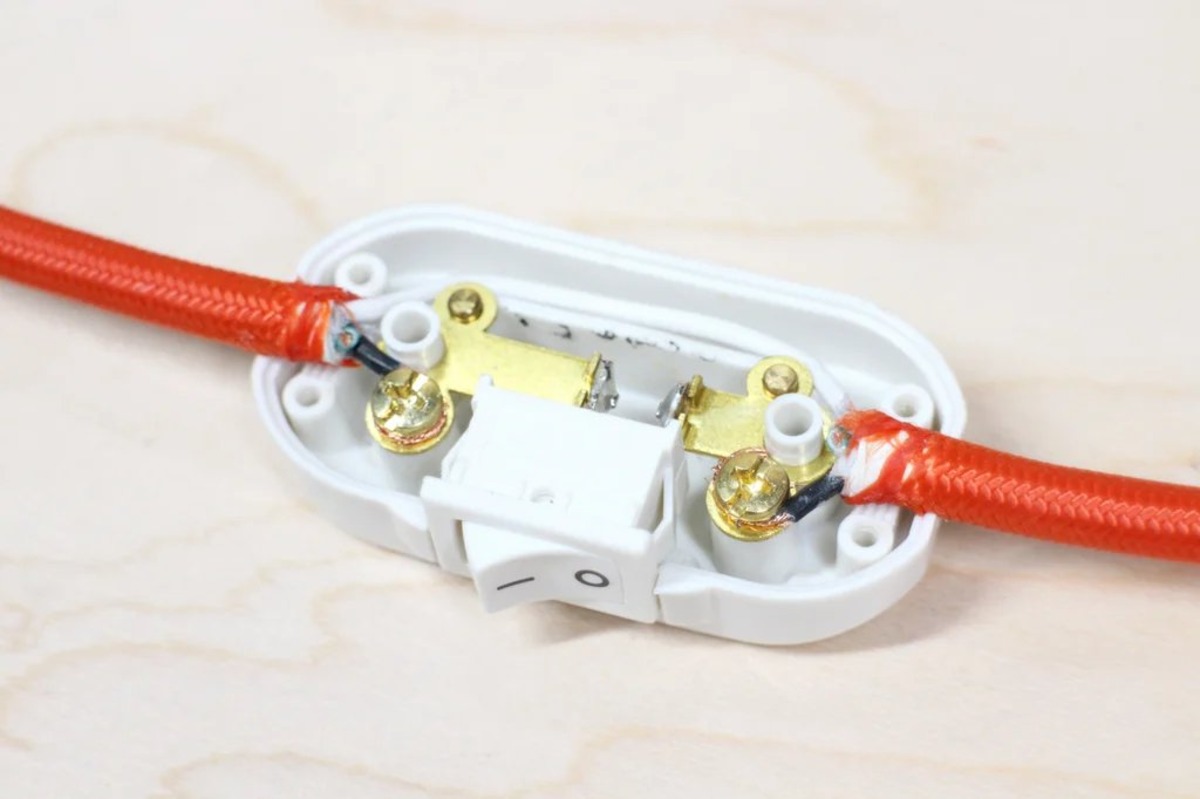
- Hold the lamp cord with the exposed wires and identify the two terminals on the switch. These terminals are typically labeled as “L” and “N” or “H” and “L,” indicating the line and neutral connections.
- Position the first wire, usually the line wire, around the corresponding terminal on the switch. Wrap the wire in a clockwise direction, ensuring a secure connection.
- Using a small flat-head screwdriver, tighten the terminal screw to securely hold the wire in place. Ensure the screw is tight enough to make proper contact but avoid over-tightening, as it can damage the wire.
- Repeat the previous two steps to attach the second wire, typically the neutral wire, to its corresponding terminal.
- Double-check that both wires are tightly secured to their respective switch terminals. Give them a gentle tug to ensure they are firmly attached.
- Once you’ve confirmed that both wires are properly connected, carefully push the switch back into its original position, making sure it snaps securely into place.
- If your lamp cord switch has a top plastic casing, screw it back on, ensuring it is tightened enough to hold the internal components firmly in place.
Attaching the switch to the lamp cord is a crucial step in the installation process. By following these steps and ensuring secure connections, you can proceed to the next stage of securing the switch in place.
Step 4: Secure the Switch in Place
After attaching the switch to the lamp cord, it’s important to secure it in place to ensure a stable and safe installation. By following these steps, you can effectively secure the switch:
- Take a moment to assess the positioning of the switch on the lamp cord. Ensure it is aligned in a way that is convenient to access and use.
- If your lamp cord switch comes with a screw or clamp mechanism, use a small flat-head screwdriver to tighten the screw or clamp around the cord. This will lock the switch securely in place.
- For switches without a built-in securing mechanism, use electrical tape to secure the switch to the lamp cord. Start by wrapping a strip of electrical tape around the cord just above the switch.
- Continue wrapping the electrical tape tightly around the switch and cord, ensuring it holds the switch securely without any excessive movement.
- Make sure to wrap the electrical tape several times to maintain a strong and durable hold. Additionally, overlap the tape with each wrap to create a secure layering effect.
- Once you’ve wrapped the switch with electrical tape, tear or cut the tape and press it firmly against the cord to secure the end.
- Gently tug on the switch to check its stability. If it feels loose or moves around, reevaluate the securing method and make necessary adjustments.
Securing the switch in place is essential for the overall functionality and safety of the lamp cord. Whether you use a screw or clamp mechanism or opt for electrical tape, ensure that the switch is firmly held in position and does not have any excessive movement that could potentially cause issues.
Step 5: Reassemble the Lamp
Now that you have successfully installed and secured the lamp cord switch, it’s time to reassemble the lamp. Follow these steps to put all the components back together:
- Start by reattaching any decorative elements, such as the lampshade or any other accessories you previously removed.
- Position the lamp cord neatly along the lamp base, ensuring it is not tangled or in a position where it could get pinched or damaged.
- If your lamp has a base cover or bottom plate, make sure to attach it securely, enclosing the base and hiding the internal components.
- Inspect the lamp for any loose or insecure parts. Check that all screws, bolts, or other fasteners are tightened appropriately.
- Double-check that the lamp cord switch is easily accessible and within reach for convenient operation.
- Plug the lamp into a power source and make sure it is functioning properly. Test the lamp by turning the switch on and off to ensure the cord switch is working as intended.
- If the lamp does not turn on or there are any issues, unplug it immediately and recheck the connections and installation steps. Double-check for any loose wires or improper attachment of the switch.
Reassembling the lamp is the final step in the installation process. By carefully putting all the components back together and performing a quick functionality test, you can ensure that your lamp is ready to be used with the newly installed cord switch.
Step 6: Test the Cord Switch
After reassembling the lamp, it’s important to test the cord switch to ensure its functionality. By following these steps, you can confirm that the switch is working as intended:
- Plug the lamp into a power source, ensuring that the switch is in the “off” position.
- Flick the cord switch to the “on” position. The lamp should illuminate, indicating a successful connection and functionality of the switch.
- Switch the cord switch back to the “off” position. The lamp should turn off, confirming that the switch is cutting off the power supply.
- Repeat the on/off test multiple times to ensure consistent performance of the cord switch.
- If the lamp fails to turn on or off when the cord switch is operated, unplug the lamp immediately and double-check the connections. Ensure the wires are securely attached to the appropriate terminals.
- If any issues persist, it may be necessary to revisit the installation steps or seek assistance from a professional electrician.
By testing the cord switch, you can verify its reliability and functionality. If the lamp responds correctly to the cord switch, you can have confidence that the installation was successful and enjoy the convenience of controlling your lamp”s power with ease.
Troubleshooting: Common Issues and Solutions
During the installation process of a lamp cord switch, you may encounter some common issues. Here are a few troubleshooting tips and solutions to help you overcome these challenges:
- Issue: Lamp does not turn on after installation.
– Solution: Double-check the wiring connections from the lamp cord to the switch. Ensure that the wires are securely attached to the correct terminals. If the connections are correct, examine the power source and ensure it is functioning properly. - Issue: Lamp does not turn off when the switch is in the “off” position.
– Solution: Verify the wiring connections. Make sure the wires are properly attached to the corresponding terminals on the switch. If the connections are correct, it may indicate a faulty switch. Consider replacing the switch with a new one. - Issue: Lamp flickers or has poor connectivity.
– Solution: Check the wiring connections to ensure they are secure and not loose. Make sure the wires are tightly wrapped around the switch terminals. If the issue persists, there may be a problem with the switch itself. Try replacing it with a new one. - Issue: Lamp cord switch feels loose or moves around.
– Solution: Ensure that you have securely attached the switch to the lamp cord. If the switch has a screw or clamp mechanism, tighten it further using a small flat-head screwdriver. If you used electrical tape for securing the switch, double-check that it is wrapped tightly and overlaps multiple times for a strong hold. - Issue: Inconsistent performance of the cord switch.
– Solution: Inspect the wiring connections to make sure they are properly connected. Check for any loose wires or loose terminal screws. Additionally, ensure that the switch is of good quality and suitable for the voltage of your lamp. Consider replacing the switch with a higher-quality one if necessary.
If you encounter any other issues during the installation of a lamp cord switch that are not addressed above, it is recommended to consult a qualified electrician for further assistance. They can help diagnose and resolve any complex problems that may arise while ensuring your safety and the proper functioning of your lamp.