
Choosing the Right Drip Tray for Your Traeger Grill
When it comes to grilling on your Traeger grill, having a drip tray is essential. A drip tray collects the excess grease and drippings, preventing flare-ups and keeping your grill clean. However, not all drip trays are created equal, and choosing the right one for your Traeger grill is crucial. Here are some factors to consider when selecting a drip tray:
- Size: The size of the drip tray should match the dimensions of your Traeger grill. It should fit seamlessly into the grill’s drip tray slot without any gaps.
- Material: Drip trays are usually made of aluminum or stainless steel. Both materials are durable and resistant to corrosion. Stainless steel trays are generally more expensive but offer better longevity and heat distribution.
- Compatibility: Check for compatibility with your specific Traeger grill model. Different Traeger grills may have slightly different dimensions or requirements for the drip tray.
- Easy to Clean: Look for drip trays that are easy to clean. Some trays have a non-stick coating or are dishwasher-safe, which simplifies the cleaning process.
Once you have identified the right drip tray for your Traeger grill, you can move on to the installation process. Gathering the necessary tools and materials will ensure a smooth installation experience. Let’s move on to the next section to learn more about the required equipment.
Gather the Necessary Tools and Materials
Before you begin the installation of your new drip tray on your Traeger grill, it’s essential to gather all the necessary tools and materials. Having everything at hand will make the process much more efficient and ensure that you have smooth and trouble-free installation. Here are the tools and materials you’ll need:
- New Drip Tray: Make sure you have the correct drip tray that matches your Traeger grill model and size.
- Phillips Head Screwdriver: A Phillips head screwdriver will be needed to remove any screws securing the old drip tray or to attach the new one if required.
- Cleaning Supplies: It’s always a good idea to have some cleaning supplies on hand. This includes a mild soap or detergent, warm water, and a sponge or cloth for cleaning the area around the drip tray.
- Pliers (Optional): In case there are any stubborn or hard-to-reach screws, a pair of pliers can be handy in assisting with their removal.
- Protective Gloves: Although not essential, wearing protective gloves can prevent any accidental cuts or injuries during the installation process.
Before you begin the installation, double-check that you have all the required tools and materials. This will save you time and frustration during the process. Once you have everything prepared, you can move on to the next section, which outlines how to prepare your grill for the drip tray installation.
Preparing Your Grill for Drip Tray Installation
Before installing the new drip tray on your Traeger grill, it’s important to properly prepare the grill to ensure a seamless installation process and optimal functionality. Here are the steps to follow when preparing your grill:
- Turn Off and Cool Down the Grill: Start by turning off your Traeger grill and allowing it to cool down completely. This will protect you from any accidental burns and make it easier to handle the grill components.
- Remove the Grill Grates: Take out the grill grates to access the drip tray area. Carefully lift the grates off the grill and set them aside in a safe place. Clean the grates if necessary.
- Remove the Grease Bucket: If your Traeger grill has a grease bucket, remove it from its position. Empty and clean it thoroughly before reinstalling it later.
- Clean the Drip Tray Area: Inspect the drip tray area for any debris or leftover grease. Clean the area with warm water, mild soap or detergent, and a sponge or cloth. Ensure that the area is completely dry before proceeding.
- Inspect the Drip Tray Slot: Take a look at the drip tray slot to ensure that it is clean and free from any obstructions. Remove any excess dirt or debris that may hinder the proper installation of the new drip tray.
By following these preparation steps, you will create an ideal environment for installing the new drip tray and ensure efficient functionality. Once you have prepared your grill, you can proceed to the next section, which will guide you through the process of removing the old drip tray (if applicable).
Removing the Old Drip Tray (If Applicable)
If you already have a drip tray installed in your Traeger grill and you’re looking to replace it, you’ll need to remove the old drip tray before installing the new one. Here’s how to remove the old drip tray:
- Locate the Old Drip Tray: Identify the position of the existing drip tray in your Traeger grill. It is typically located beneath the cooking grates, near the center or back of the grill.
- Check for Fasteners: Examine the drip tray to see if it is secured with any screws or bolts. If so, use a Phillips head screwdriver to remove the fasteners and detach the old drip tray from the grill.
- Take Careful Note of Positioning: As you remove the old drip tray, pay attention to its positioning and how it fits into the grill. This will help you when installing the new drip tray later.
- Clean the Area: Once the old drip tray is removed, take the time to clean the area beneath it. Remove any accumulated grease or debris using warm water, mild soap or detergent, and a sponge or cloth.
Once you have successfully removed the old drip tray and cleaned the area, you’re ready to proceed with the installation of the new drip tray. The next section will guide you through the steps for installing the new drip tray on your Traeger grill.
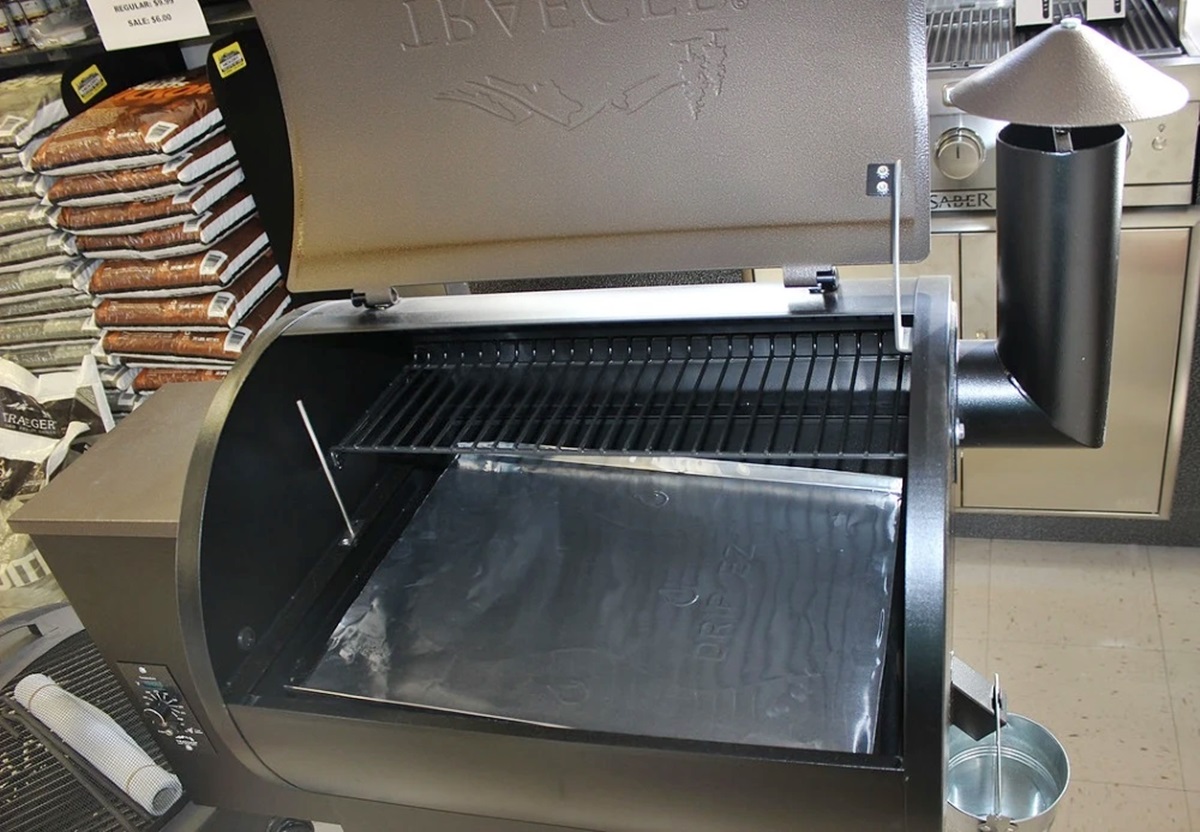
Installing the New Drip Tray
Now that you have prepared your grill and removed the old drip tray, it’s time to install the new drip tray onto your Traeger grill. Follow these steps to ensure a successful installation:
- Position the New Drip Tray: Take the new drip tray and position it correctly in the drip tray slot of your Traeger grill. Make sure it fits snugly and aligns with any screw holes or fastener slots.
- Secure the Drip Tray: If your new drip tray comes with screws or fasteners, use a Phillips head screwdriver to secure it in place. Tighten the screws firmly but avoid overtightening to prevent damaging the drip tray or grill.
- Check for Proper Fit: Once the drip tray is securely in place, double-check to ensure that it sits evenly and flush with the surrounding grill components. This ensures optimal functionality and prevents any potential leaks.
- Reinstall the Grease Bucket (If Applicable): If you removed the grease bucket during the preparation stage, now is the time to reinstall it. Slide it back into its designated position in the grill.
With the new drip tray installed, you have taken an important step towards maintaining a clean and efficient grilling experience. However, to ensure its effectiveness, it’s important to test the drip tray to verify proper functionality. Let’s proceed to the next section to learn more about testing the drip tray on your Traeger grill.
Testing the Drip Tray
After installing the new drip tray on your Traeger grill, it’s essential to test its functionality to ensure it is collecting grease and drippings effectively. Here’s how to test the drip tray:
- Heat Up the Grill: Turn on your Traeger grill and allow it to heat up to your desired grilling temperature.
- Monitor the Grease Collection: As you cook, keep an eye on the new drip tray to see if it is collecting the grease and drippings appropriately. Ideally, the tray should catch all the grease and prevent it from accumulating elsewhere in the grill.
- Check for Leaks: Inspect the drip tray and its surrounding area for any signs of leaks or spills. If you notice any leaks or excessive drippings escaping the tray, reposition it and ensure it is securely fastened.
- Clean the Drip Tray Regularly: To maintain optimal functionality, make it a habit to clean the drip tray regularly. Remove any collected grease and drippings and clean the tray with warm water, mild soap or detergent, and a sponge or cloth.
By testing the new drip tray and monitoring its performance, you can ensure that it is properly functioning and keeping your Traeger grill clean. If you encounter any issues or irregularities during the testing process, refer to the troubleshooting section for common problems and solutions.
Maintaining and Cleaning the Drip Tray
Maintaining and cleaning your drip tray is an important aspect of owning a Traeger grill. By keeping the drip tray clean, you can ensure optimal functionality and prevent any potential issues. Here are some tips for maintaining and cleaning your drip tray:
- Regularly Remove and Clean the Drip Tray: Regularly remove the drip tray from your Traeger grill and clean it thoroughly. Empty any accumulated grease and drippings, then wash the tray with warm water, mild soap or detergent, and a sponge or cloth. Rinse it thoroughly and allow it to dry completely before reinstalling.
- Use Aluminum Foil: To simplify cleaning, you can line the drip tray with aluminum foil. This will help trap grease and drippings, making it easier to dispose of and clean up.
- Inspect for Damage: Occasionally, inspect the drip tray for any damage or signs of wear. If you notice any cracks, dents, or other issues, consider replacing the drip tray to maintain its effectiveness.
- Keep the Drip Tray Slot Clean: In addition to cleaning the drip tray, ensure that the drip tray slot in your Traeger grill remains clean and free from obstructions. Regularly remove any debris or grease buildup to prevent clogs and ensure proper drainage.
- Follow Manufacturer’s Guidelines: Always refer to the manufacturer’s guidelines and instructions for specific maintenance and cleaning recommendations. Each model of Traeger grill may have slightly different care requirements.
By incorporating these maintenance tips into your grilling routine, you can prolong the lifespan of your drip tray and maintain a clean and efficient grilling experience. Regular cleaning and proper maintenance will also help avoid any issues that may arise from a neglected drip tray.
Troubleshooting Common Issues
While drip trays are designed to enhance your grilling experience, there may be instances where you encounter certain issues. Here are some common problems you may encounter with your Traeger grill drip tray and how to troubleshoot them:
- Leaking Drip Tray: If you notice that your drip tray is leaking or not collecting grease properly, check for proper installation. Ensure that the tray is securely positioned and that any screws or fasteners are tightened appropriately. If the issue persists, inspect the tray for any cracks or damage and consider replacing it.
- Drippings Overflowing: If your drip tray is overflowing with drippings, it may indicate a clog in the drainage system. Check the drip tray slot and ensure it is free from any debris or grease buildup. Clean the slot thoroughly to allow proper drainage. Additionally, make sure the tray is not overfilled with accumulated grease and drippings.
- Inadequate Grease Collection: If your drip tray is not effectively collecting grease and drippings, ensure that it is positioned correctly and aligns with the grill components. Check for any gaps or misalignments that may cause leaks or improper collection. Consider using a larger or deeper drip tray if needed.
- Rust or Corrosion: Over time, your drip tray may develop rust or corrosion, especially if it is made of aluminum. To prevent this, clean and dry the tray thoroughly after each use. If you notice significant rust or corrosion, consider replacing the tray with a stainless steel model for better durability and longevity.
- Uneven Heat Distribution: In some cases, a poorly functioning drip tray can lead to uneven heat distribution on the grill. If you notice hot spots or uneven cooking, double-check the positioning and secure installation of the drip tray. Ensure that there are no obstructions preventing proper heat circulation.
By troubleshooting these common issues, you can overcome any obstacles that may arise with your Traeger grill drip tray. If you encounter persistent problems or more severe issues, refer to the manufacturer’s guidelines or seek professional assistance.
Tips and Recommendations for Using a Drip Tray
To make the most out of your Traeger grill drip tray and ensure optimal performance, here are some tips and recommendations to keep in mind:
- Line the Drip Tray: Consider lining the drip tray with aluminum foil or using disposable drip tray liners. This will make cleanup easier and protect the tray from excessive grease accumulation.
- Regularly Check and Clean: Make it a habit to check and clean your drip tray after each grilling session. This will prevent grease buildup and ensure proper functionality.
- Place a Drip Pan Below the Drip Tray: To catch any drippings that may overflow from the drip tray, place a larger drip pan or aluminum foil beneath the drip tray. This will help prevent any mess and simplify cleanup.
- Adjust Drip Tray Positioning: If you notice that certain areas of your grill are prone to more grease buildup, adjust the positioning of the drip tray to ensure better collection in those areas.
- Use a Drip Tray Heat Shield: Some Traeger grill models offer the option of using a drip tray heat shield. This accessory helps prevent excess heat exposure to the drip tray, prolonging its lifespan.
- Regularly Inspect and Replace: Periodically inspect your drip tray for any signs of damage or wear. If you notice significant rust, corrosion, or cracks, consider replacing the tray to maintain optimum functionality.
- Follow Traeger Grill Guidelines: Always follow the guidelines provided by Traeger for your specific grill model. They may have specific recommendations or instructions for using and maintaining the drip tray.
By following these tips and recommendations, you can enhance your grilling experience and ensure that your Traeger grill drip tray functions effectively for years to come. Remember, proper care and maintenance will extend the life of your drip tray and contribute to a successful grilling experience.
Frequently Asked Questions
Here are some common questions and answers about the installation and use of drip trays on Traeger grills:
- Q: Do all Traeger grills come with a drip tray?
A: Yes, all Traeger grills come equipped with a drip tray as part of their design. - Q: Can I use a different brand’s drip tray on my Traeger grill?
A: It is recommended to use a drip tray specifically designed for your Traeger grill to ensure proper fit and functionality. - Q: How often should I clean the drip tray?
A: It is recommended to clean the drip tray after each grilling session to prevent grease buildup and maintain a clean grilling environment. - Q: Can I reuse the aluminum foil in the drip tray?
A: It is safe to reuse aluminum foil in the drip tray as long as it is not excessively soiled or damaged. - Q: Can I use my Traeger grill without a drip tray?
A: It is not recommended to use your Traeger grill without a drip tray, as it helps collect grease and drippings, preventing flare-ups and maintaining cleanliness. - Q: Can I wash the drip tray in the dishwasher?
A: It is important to check the manufacturer’s recommendations for your specific drip tray model. Some drip trays are dishwasher-safe, while others may require hand washing. - Q: How do I know if my drip tray needs to be replaced?
A: If you notice significant rust, corrosion, cracks, or damage on your drip tray, it is advisable to replace it for optimal functionality and hygiene.
If you have any additional questions or concerns about your Traeger grill’s drip tray, refer to the manufacturer’s guidelines or contact Traeger customer support for further assistance.