
Measuring Your Bay Window
Before installing curtain tracks for your bay window, it’s essential to accurately measure the window.
Follow these steps to ensure a precise fit:
- Start by measuring the width of the bay window. Use a tape measure to measure the distance between the outer edges of the window.
- Next, measure the height of the window. Start from the top of the window frame and measure down to the desired length for your curtains.
- Measure the depth of the window recess. This will help you determine if you need a track that sits inside or outside the recess.
- If you are opting for an inside mount, measure the width and height of each individual section of the bay window. This will help you determine if the tracks need to be adjusted to accommodate any variations.
- Take into consideration any obstructions such as window handles or radiators that may affect the positioning of the tracks.
It’s crucial to double-check your measurements to ensure accuracy. Remember to add a few extra inches to the width and height measurements to allow for overlap and floor clearance.
Once you have your measurements, you are ready to choose the right curtain tracks for your bay window.
Choosing the Right Curtain Tracks
When it comes to selecting the appropriate curtain tracks for your bay window, there are a few factors to consider. Take the following into account to ensure you make the right choice:
- Track type: There are various types of curtain tracks available, including single tracks, double tracks, and flexible tracks. Single tracks are suitable for lightweight curtains, while double tracks allow you to hang both sheer and heavy curtains. Flexible tracks are ideal for curved or irregularly shaped bay windows.
- Material: Curtain tracks come in different materials such as metal, plastic, or wood. Metal tracks are durable and offer a sleek look, while plastic tracks are more affordable and easy to install. Wood tracks provide a more traditional and elegant feel.
- Track length: Ensure that the curtain tracks you choose are long enough to cover the entire span of your bay window. Measure the total width of the window and select tracks that are slightly longer to allow for a proper overlap.
- Track compatibility: Consider the type of curtains you plan to hang. Some curtain tracks are designed for specific curtain styles, such as eyelet curtains or pencil pleat curtains. Ensure that the tracks you choose are compatible with your preferred curtain type.
- Installation: Take into account your level of DIY expertise and the ease of installation of the curtain tracks. Some tracks come with easy-to-follow instructions, while others may require professional installation.
Carefully assess these factors to make an informed decision. Once you have selected the right curtain tracks, you can move on to the installation process, ensuring a perfect fit for your bay window curtains.
Installing the First Track
Now that you have your measurements and chosen the right curtain tracks, it’s time to start the installation process. Begin with the first track, following these step-by-step instructions:
- Start by marking the position of the track brackets on the wall or window frame. Ensure that the brackets are evenly spaced and aligned. Use a level to make sure they are perfectly horizontal.
- Pre-drill holes for the brackets using a drill and the appropriate drill bit. Make sure to use wall plugs if you are installing the track on a wall instead of a window frame.
- Attach the brackets to the wall or window frame using screws or the hardware provided with the curtain tracks. Make sure they are securely fastened.
- Slot the first track into the brackets and secure it in place by tightening the screws on the brackets. Double-check that the track is level.
- Once the track is securely installed, test it by sliding the curtains along the track to ensure smooth movement.
- If you’re using a flexible track, follow the manufacturer’s instructions to bend it to fit the curve of your bay window. This may involve heating the track or using special bending tools.
By following these steps, you can successfully install the first track for your bay window curtains. Once you are satisfied with the positioning and stability of the track, you can proceed to install the remaining tracks.
Installing the Remaining Tracks
With the first track installed, you can now move on to installing the remaining tracks for your bay window curtains. Follow these steps to ensure a seamless installation process:
- Measure and mark the position of the remaining track brackets, ensuring they are evenly spaced and aligned with the first track. Use a level to ensure they are straight.
- Pre-drill holes for the brackets using a drill and the appropriate drill bit. Make sure to use wall plugs if needed.
- Attach the brackets to the wall or window frame using screws, making sure they are securely fastened.
- Slide the second track into the brackets and secure it in place by tightening the screws.
- Repeat the process for any additional tracks, ensuring they are level and properly aligned with the previous tracks.
If you are using a flexible track, it may require adjusting and bending to fit the curve of your bay window. Follow the manufacturer’s instructions carefully to ensure the best results.
As you install the remaining tracks, double-check that the curtains can slide smoothly along the entire length of the tracks. Adjust any brackets or screws as needed to ensure optimal functionality.
By diligently following these steps, you will be able to complete the installation of all the curtain tracks for your bay window. The next step is to connect the tracks and proceed with attaching the brackets.
Connecting the Tracks
After installing all the tracks for your bay window curtains, the next step is to connect them together to ensure a smooth and seamless curtain movement. Follow these steps to connect the tracks effectively:
- Carefully align the ends of the adjacent tracks, ensuring that they are flush and level.
- Depending on the type of curtain tracks you have, there are different methods for connecting them. For most tracks, you will find connecting bridges or joining pieces. Slide these pieces into the designated slots to connect the tracks together securely.
- Apply gentle pressure to ensure that the tracks are firmly connected. Give them a slight tug to make sure they are secure and won’t come apart easily.
- Once the tracks are connected, test the curtain movement to ensure that the curtains glide smoothly over the connected sections without any obstructions or jerks.
- If you notice any issues with the connected tracks, such as misalignment or difficulty in sliding the curtains, double-check the connection and make any necessary adjustments. It’s crucial to address these concerns before proceeding with the bracket attachment and curtain rod installation.
Taking the time to connect the tracks correctly will contribute to the overall functionality and aesthetics of your bay window curtains. Once you are satisfied with the track connection, you can move on to attaching the brackets for added stability.
Attaching the Brackets
Now that the curtain tracks are securely connected, the next step is to attach the brackets. These brackets provide additional support and stability to ensure that your bay window curtains remain in place. Follow these steps to attach the brackets properly:
- Measure and mark the position of the bracket placements along the curtain tracks. The number of brackets required will depend on the length and weight of your curtains. As a general rule of thumb, place brackets every 12-18 inches for optimal support.
- Ensure that the brackets are aligned with each other and are evenly spaced. Use a level to make sure they are straight.
- Depending on the type of brackets provided with your curtain tracks, follow the manufacturer’s instructions for attaching them. This may involve securing them with screws or sliding them into designated slots on the track.
- Double-check that the brackets are firmly attached and securely fastened to the curtain tracks. Give them a gentle tug to ensure they can withstand the weight of the curtains.
- If you are using adjustable brackets, take advantage of their flexibility to ensure the curtains hang at the desired height and position. Adjust the brackets accordingly, making sure they are in line with each other.
Attaching the brackets properly is essential for the long-term stability of your bay window curtains. It’s important to take your time during this step to ensure that the brackets are securely in place.
Once the brackets are attached, you are ready to move on to the final step of this installation process: mounting the curtain rods.
Mounting the Curtain Rods
After installing the curtain tracks and attaching the brackets, it’s time to mount the curtain rods. The curtain rods provide the support and structure for hanging your curtains. Follow these steps to mount the rods securely:
- Measure and mark the position for mounting the curtain rods. The height will depend on your personal preference and the length of your curtains. Typically, the rods are mounted a few inches above the top of the window frame.
- Use a measuring tape to ensure that the rods are evenly spaced and aligned. Use a level to make sure they are straight.
- If your curtain rods have adjustable brackets, adjust them to the desired width to accommodate the width of your bay window.
- Depending on the type of curtain rods and brackets you have, follow the manufacturer’s instructions for mounting them. It may involve securing the brackets to the wall using screws or placing them onto the curtain track brackets.
- Once the brackets are mounted, place the curtain rods onto the brackets and ensure they are securely in place. Give them a slight tug to make sure they can hold the weight of the curtains.
Mounting the curtain rods properly is crucial for the stability and functionality of your bay window curtains. Take your time during this step to ensure that the rods are securely installed and aligned.
With the curtain rods in place, you are now ready to move on to the final step: hanging the curtains and completing the installation process.
Hanging the Curtains
After completing the installation of the curtain tracks, attaching the brackets, and mounting the curtain rods, it’s time to hang your curtains and bring the final touch to your bay window. Follow these steps to effectively hang your curtains:
- Start by preparing your curtains. If they are new, give them a gentle ironing or steaming to remove any wrinkles.
- Slide the curtain hooks or rings onto the curtain rods. Make sure they are evenly spaced to create a uniform and aesthetically pleasing look.
- Carefully hang each curtain panel onto the curtain hooks or rings. Adjust the curtains along the curtain rod to ensure they are evenly spread and aligned.
- If your curtains have a header tape, use curtain hooks or rings to attach them to the header tape. Ensure that the curtain panels are evenly distributed along the rod.
- Double-check that the curtains hang at the desired length and position. Adjust the curtain rods or brackets if necessary.
- Test the curtain movement by gently opening and closing the curtains. Ensure that they glide smoothly along the curtain tracks without any obstructions.
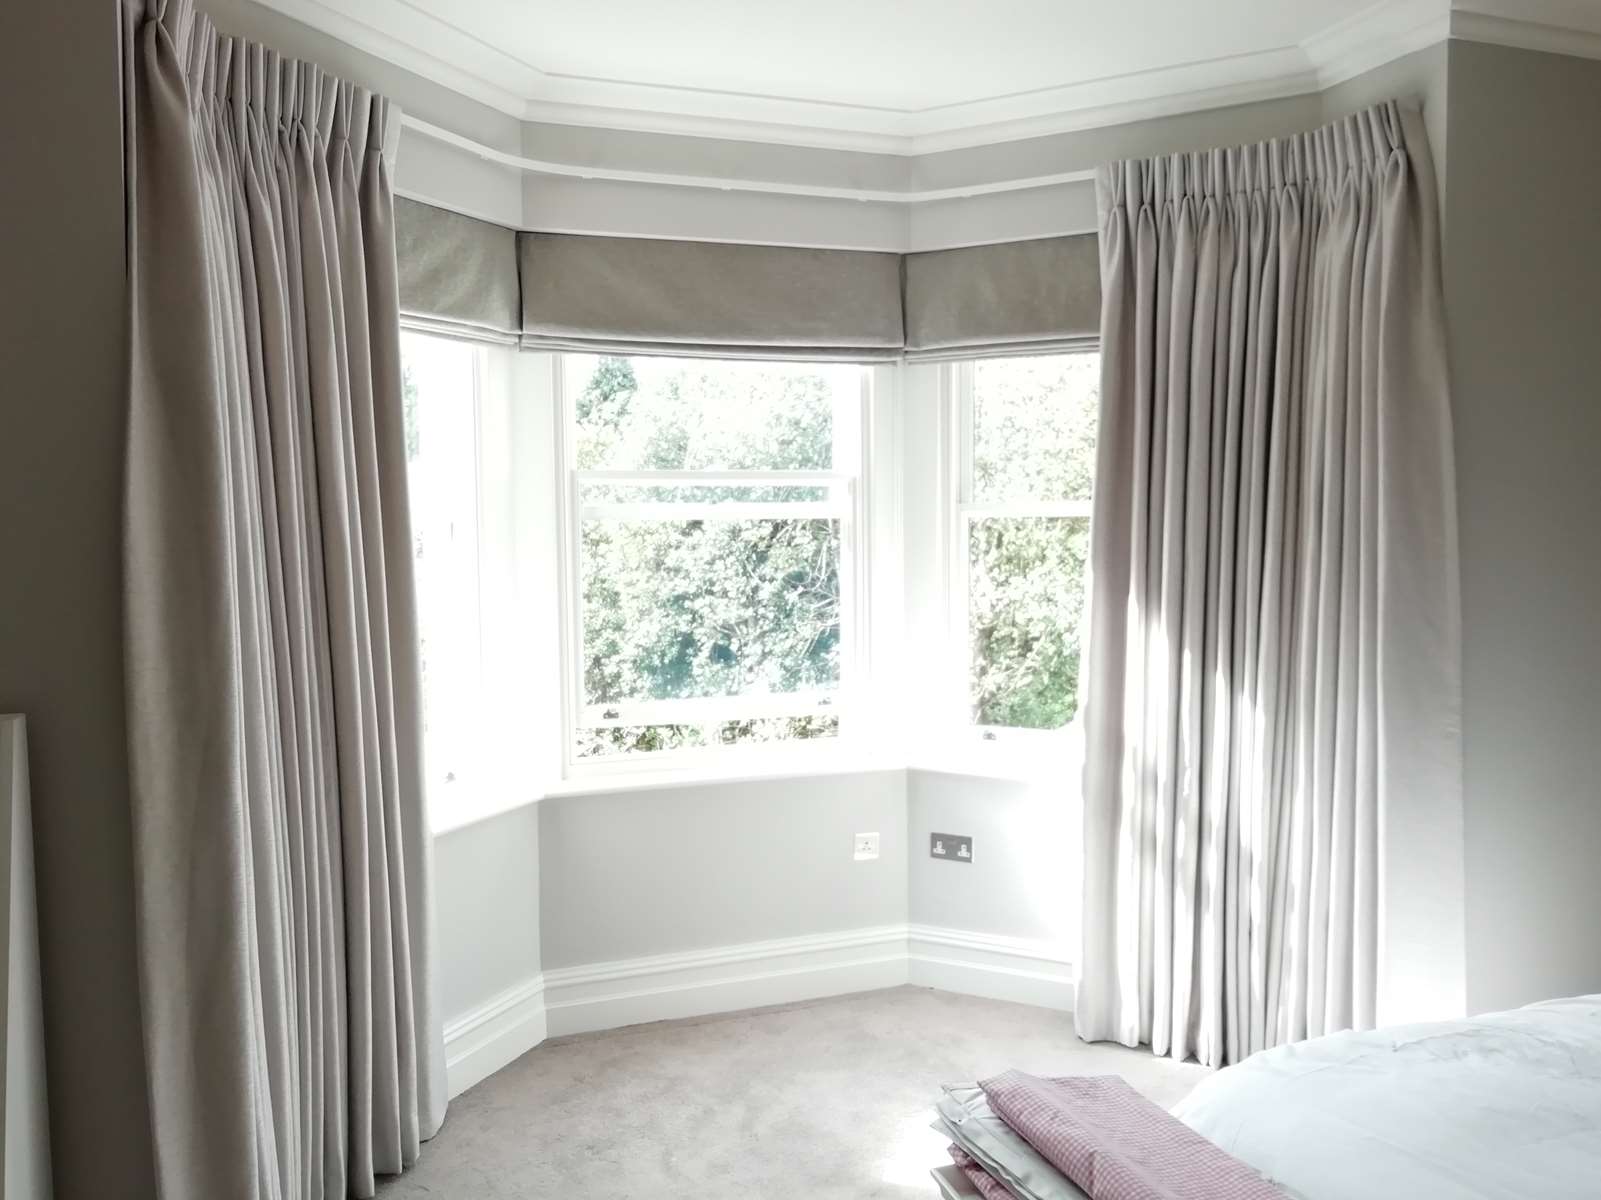
With the curtains successfully hung, step back and admire the final result. Your bay window now boasts beautiful curtains that enhance the overall look and feel of the space.
Remember to periodically clean and maintain your curtains to prolong their lifespan and keep them looking fresh and appealing.
Troubleshooting Tips and Tricks
While installing curtain tracks for bay windows can be a straightforward process, sometimes challenges may arise. Here are some helpful troubleshooting tips and tricks to overcome common issues:
- Uneven curtain movement: If you notice that your curtains are not sliding smoothly along the tracks, check for any obstructions such as dust or debris. Clean the tracks using a soft brush or cloth to ensure a clear path for the curtains.
- Difficulty in connecting tracks: If you’re having trouble connecting the tracks together, double-check that you are aligning them correctly. Apply gentle pressure and ensure that the connecting pieces or bridges are securely in place.
- Curtains not hanging at the desired length: If your curtains are too long or too short, adjust the curtain rod brackets accordingly to achieve the desired length. You can also consider hemming or altering the curtains to achieve the perfect fit.
- Tracks coming loose: If you notice any tracks becoming loose, tighten the screws on the brackets to secure them. For added stability, you can also use adhesive or additional screws to reinforce the tracks.
- Sagging curtain rods: If your curtain rods are sagging under the weight of the curtains, consider installing additional support brackets in the middle of the rod. This will help distribute the weight more evenly and prevent sagging.
- Curtain rod brackets not lining up: If the curtain rod brackets are not aligning properly, double-check their positions and use a level to ensure they are straight. Adjust the bracket placements if necessary.
Don’t get discouraged if you encounter any challenges during the installation process. With careful troubleshooting and attention to detail, you can overcome these issues and achieve the desired outcome for your bay window curtains.
If you are unsure or facing major difficulties, don’t hesitate to seek assistance from a professional installer or handyman. They can provide expertise and ensure a seamless installation for your bay window curtains.