
Selecting the Right Shower Tray
When it comes to fitting a shower tray, one of the most important steps is selecting the right one for your bathroom. The shower tray plays a crucial role in ensuring the functionality and aesthetics of your shower enclosure. With so many options available in the market, it can be overwhelming to make the right choice. Here are some factors to consider when selecting the right shower tray:
1. Size and Shape:
The size and shape of the shower tray should align with the available space in your bathroom and the design of your shower enclosure. Measure the dimensions carefully to ensure a proper fit and consider any space limitations or obstructions that may affect the installation process.
2. Material:
Shower trays come in various materials, including acrylic, stone resin, ceramic, and fiberglass. Each material has its own set of advantages and considerations. Acrylic trays are lightweight and affordable, while stone resin trays offer durability and a luxurious feel. Consider the maintenance requirements, longevity, and aesthetic appeal of the material before making a decision.
3. Height and Accessibility:
The height of the shower tray is an important consideration, especially for those with mobility issues or small children. Opt for a low-profile tray for easy access or a raised tray with a step for added safety. Additionally, ensure that the tray has slip-resistant properties to prevent accidents.
4. Waste Outlet:
Consider the location of the waste outlet in relation to your existing plumbing. Check if the tray you choose has a waste hole that aligns with your plumbing setup. It’s important to ensure proper drainage to prevent leaks or water pooling.
5. Style and Design:
Lastly, choose a shower tray that complements the overall style and design of your bathroom. Consider the color, texture, and finish of the tray to create a cohesive look. Some trays also come with customizable features like built-in shelving or a tiled effect, allowing you to personalize your shower space.
By taking these factors into account, you can select the perfect shower tray that meets your needs, fits seamlessly into your bathroom, and enhances your overall showering experience.
Checking the Existing Plumbing
Before proceeding with the installation of a new shower tray, it is crucial to check the existing plumbing to ensure that it is in good condition. A thorough inspection will help identify any issues or potential problems that may affect the installation process. Here are the steps to follow when checking the existing plumbing:
1. Turn off the Water Supply:
Begin by shutting off the water supply to the bathroom. Locate the main water valve and turn it off to prevent any water flow during the inspection. This will help you avoid any potential water damage or accidents.
2. Examine the Drainage System:
Inspect the drainage system to ensure that it is functioning properly. Check for any signs of clogs or blockages by pouring a small amount of water into the shower drain. Observe if the water drains efficiently or if it drains slowly, indicating a potential issue.
3. Inspect the Pipes:
Thoroughly examine the condition of the pipes connected to the shower area. Look for any signs of leaks, corrosion, or damage. Check the joints and connections to ensure they are tight and secure. If you notice any issues, such as leaks or rusted pipes, it is advisable to consult a professional plumber for further assessment and repairs.
4. Test the Water Pressure:
Turn on the shower to check the water pressure. Ensure that it is consistent and sufficient for comfortable showering. Low water pressure can indicate a problem with the plumbing, which may need to be addressed before installing the new shower tray.
5. Verify the Position of the Water Supply Pipes:
Check the position of the water supply pipes in relation to the intended installation area of the new shower tray. Ensure that the pipes do not obstruct the installation process or interfere with the placement of the tray. If necessary, make adjustments to the plumbing to accommodate the new shower tray.
By thoroughly examining the existing plumbing and addressing any potential issues, you can ensure a smooth and hassle-free installation process for your new shower tray. It is always recommended to consult a professional plumber for expert guidance and assistance, especially if you encounter any complex plumbing issues.
Removing the Old Shower Tray
Before installing a new shower tray, it’s essential to first remove the old one. Removing the old shower tray can be a challenging task, but with the right tools and techniques, it can be done efficiently. Here are the steps to follow when removing the old shower tray:
1. Turn off the Water Supply:
To ensure safety and prevent any water damage, start by turning off the water supply to the shower. Locate the main water valve and shut it off. This will ensure that there is no water flowing into the shower during the removal process.
2. Remove the Shower Screen or Doors:
If your shower has a screen or doors, remove them carefully. Most shower screens or doors can be easily detached by loosening screws or hinges. Keep track of the screws and components to reassemble them later if desired.
3. Disconnect the Waste Pipe:
The waste pipe is connected to the shower tray to facilitate drainage. Locate the waste pipe and disconnect it from the tray. This may involve unscrewing or loosening fittings. Place a towel or bucket underneath to catch any water that may spill during disconnection.
4. Remove Silicone Sealant:
Inspect the edges of the shower tray for any silicone sealant. Use a utility knife or a scraper to carefully cut and remove the sealant. Take caution not to damage the surrounding tiles or surfaces. Once the sealant is removed, the shower tray should be free from any adhesive attachments.
5. Lift and Remove the Shower Tray:
With the help of a partner or using lifting straps, carefully lift the shower tray and remove it from its position. Take caution as shower trays can be heavy and may require extra support. Lift gently, ensuring that no damage occurs to the surrounding walls or flooring.
Once the old shower tray is removed, it’s essential to clean the area and prepare it for the installation of the new shower tray. Remove any debris or old adhesive from the floor and wall surfaces. Ensure that the area is clean and level before proceeding with the installation process.
By following these steps, you can successfully remove the old shower tray and prepare the area for the installation of a new one. Take your time and exercise caution to avoid any damage or accidents during the removal process.
Preparing the Floor for Installation
Proper preparation of the floor is crucial for the successful installation of a new shower tray. By taking the time to prepare the floor, you can ensure a stable and secure base for the tray, promoting longevity and preventing future issues. Here are the steps to follow when preparing the floor for installation:
1. Remove any Existing Flooring:
If there is any existing flooring in the area where the new shower tray will be installed, it needs to be removed. This includes removing tiles, vinyl, or any other type of flooring material. Use a pry bar or chisel to carefully lift and remove the flooring, taking care not to damage the subfloor.
2. Inspect the Subfloor:
Once the flooring is removed, thoroughly inspect the subfloor for any damage or rot. This is particularly important in bathrooms, where moisture can often lead to subfloor problems. If you notice any issues, such as water damage or decayed sections, repair or replace the affected areas before proceeding with the installation.
3. Level the Subfloor:
It’s crucial to ensure that the subfloor is level before installing the new shower tray. Use a leveling tool, such as a straightedge or a level, to check for any unevenness. If you find any high or low spots, it may be necessary to use a self-leveling compound to even out the surface. Follow the manufacturer’s instructions for mixing and applying the compound.
4. Install a Waterproofing Membrane:
To protect the subfloor from moisture and prevent leaks, it’s recommended to install a waterproofing membrane. This membrane acts as a barrier and prevents water from seeping into the subfloor. Follow the manufacturer’s instructions for applying the membrane, ensuring complete coverage in the shower tray area.
5. Apply a Bedding Mix:
A bedding mix is a mixture of sand and cement that provides a stable and level base for the shower tray. Prepare the bedding mix according to the manufacturer’s instructions. Spread the mixture evenly over the waterproofing membrane, making sure it is level and of the required thickness for proper support.
By following these steps and preparing the floor properly, you can ensure a stable and secure foundation for the installation of the new shower tray. Taking the time to prepare the floor will contribute to the longevity and functionality of your shower enclosure.
Installing the Shower Tray
Once you have prepared the floor, it’s time to install the new shower tray. Proper installation is crucial for the functionality and stability of the shower enclosure. Here are the steps to follow when installing the shower tray:
1. Position the Shower Tray:
Carefully position the shower tray in the desired location. Ensure that it is aligned with the waste pipe and fits snugly against the walls or surrounding structure. Use a level to check if the tray is perfectly horizontal, making any necessary adjustments.
2. Secure the Shower Tray:
Once the shower tray is properly positioned, secure it in place. Depending on the specific instructions provided by the manufacturer, this may involve using screws, adhesive, or a combination of both. Ensure that the shower tray is securely fastened to prevent any movement or instability during use.
3. Check for Stability:
After securing the shower tray, check for stability by applying pressure in various areas. The tray should not rock or move when pressure is applied. If you notice any instability, adjust the fixing points or add additional support to ensure a stable and solid installation.
4. Attach the Waste Outlet:
Connect the waste outlet from the shower tray to the waste pipe. Follow the specific instructions provided by the manufacturer for attaching the waste outlet. Ensure a secure and watertight connection to prevent any leaks or drainage issues.
5. Test the Drainage:
Before proceeding further, test the drainage of the shower tray. Pour a small amount of water into the tray and observe if it drains properly. Check for any leaks or blockages in the waste pipe. Rectify any issues before proceeding with the rest of the installation process.
By following these steps and ensuring a proper installation, you can enjoy a functional and secure shower tray. Take your time to carefully position and secure the tray, making sure to follow the manufacturer’s instructions for the best results.
Connecting the Waste Pipe
Connecting the waste pipe is a crucial step in the installation of a shower tray. It ensures proper drainage and prevents any leaks or water pooling. Here are the steps to follow when connecting the waste pipe:
1. Measure and Cut the Waste Pipe:
Start by measuring and cutting the waste pipe to the appropriate length. Use a saw or pipe cutter for a clean and precise cut. Ensure that the pipe extends to the waste outlet of the shower tray with a proper fit.
2. Insert the Pipe into the Waste Outlet:
Insert the end of the waste pipe into the waste outlet of the shower tray. Check if it fits securely and snugly. Most waste outlets have a locking mechanism or a compression fitting to ensure a watertight seal. Follow the manufacturer’s instructions to properly secure the pipe into the waste outlet.
3. Attach the Trap and Connect the Pipes:
Next, attach the trap to the waste pipe. The trap is designed to prevent foul odors from entering the bathroom while still allowing water to flow freely. Connect the trap to the waste pipe using a compression fitting or locking mechanism. Ensure a tight seal by hand-tightening any connections.
4. Connect the Waste Pipe to the Existing Plumbing:
Connect the other end of the waste pipe to the existing plumbing system. This is typically done by fitting the waste pipe into the soil pipe or connecting it to an existing drain. Use an appropriate connector, such as a rubber coupling, to ensure a secure and leak-free connection. Tighten any fittings as necessary to create a watertight seal.
5. Test for Leaks:
Once the waste pipe is connected, test the system for leaks. Pour a small amount of water into the shower tray and observe if any water escapes or if there are any signs of leakage around the waste pipe. If there are any leaks, adjust the fittings or connections and retest until a secure and leak-free connection is achieved.
By following these steps and ensuring a secure connection, you can prevent any drainage issues and ensure efficient water flow from the shower tray. Take your time to measure accurately, use proper fittings, and test for leaks to achieve a successful waste pipe connection.
Sealing the Edges of the Shower Tray
Properly sealing the edges of the shower tray is essential to prevent water leaks and ensure the longevity of your shower enclosure. By creating a watertight seal, you can protect the surrounding areas from water damage. Here are the steps to follow when sealing the edges of the shower tray:
1. Clean the Edges:
Start by cleaning the edges of the shower tray to remove any dirt, dust, or debris. Use a mild cleaning solution and a sponge or cloth to thoroughly clean the surface. Ensure that the edges are dry before proceeding with the sealing process.
2. Choose the Right Sealant:
Select a high-quality sealant that is specifically designed for bathroom use. Silicone sealant is commonly used for sealing shower tray edges due to its flexibility, water resistance, and durability. Ensure that the sealant is compatible with the materials of your shower tray and surrounding surfaces.
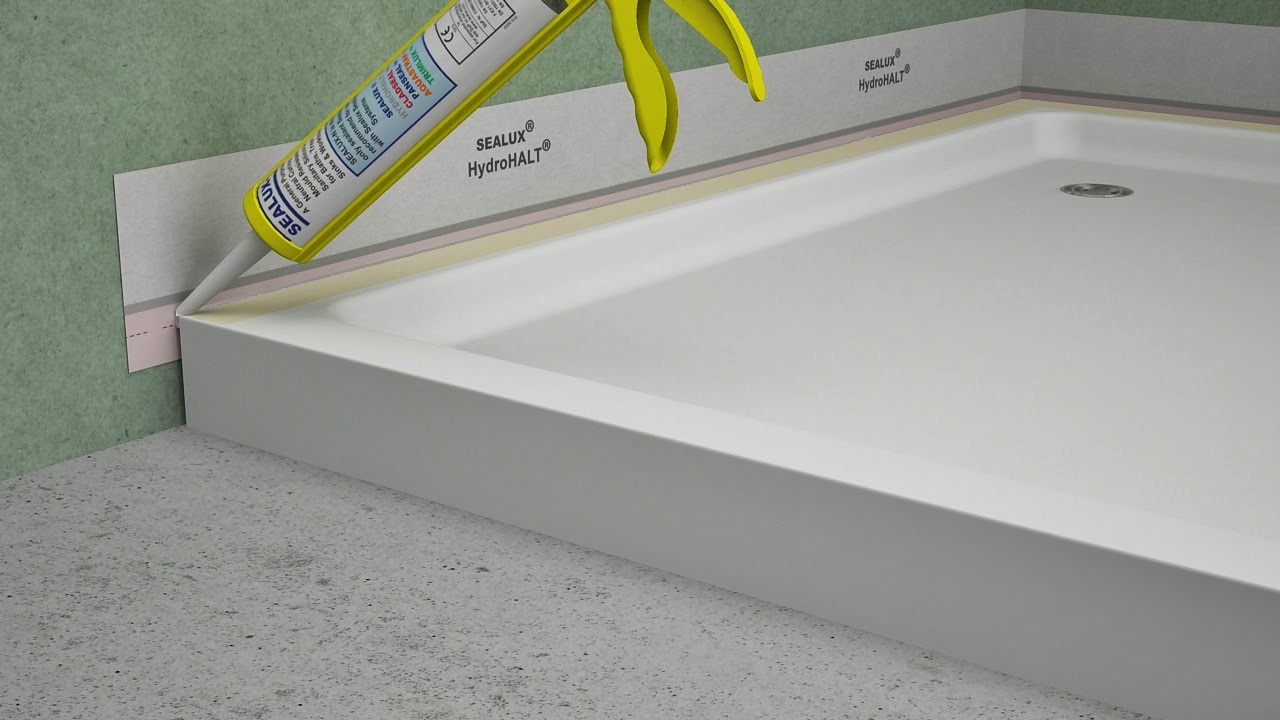
3. Apply the Sealant:
Using a caulking gun, apply a smooth and even bead of sealant along the edges of the shower tray. Start from one corner and slowly work your way around, applying consistent pressure on the caulking gun. Ensure that you cover the entire perimeter of the tray. Smooth the sealant surface using a wet finger or a sealant smoothing tool to achieve a neat and professional finish.
4. Allow the Sealant to Cure:
Allow the sealant to cure as per the manufacturer’s instructions. This typically takes around 24 hours, but it’s important to refer to the specific drying time mentioned on the sealant packaging. Avoid using the shower during this curing period to ensure that the sealant properly sets and forms a strong seal.
5. Check for any Gaps or Imperfections:
Once the sealant has cured, inspect the edges of the shower tray for any gaps or imperfections. If you notice any areas that were missed or where the sealant did not adhere properly, apply additional sealant to fill those gaps. Smooth out the sealant once again for a seamless finish.
By following these steps and properly sealing the edges of the shower tray, you can prevent water leakage and maintain the integrity of your shower enclosure. Regularly check the sealant for any signs of wear or damage, and reapply as necessary to ensure ongoing protection and functionality.
Testing the Shower Tray for Leaks
Testing the shower tray for leaks is a crucial step to ensure that it has been properly installed and sealed. By conducting a thorough leak test, you can identify and address any potential issues before they cause water damage or other complications. Here are the steps to follow when testing the shower tray for leaks:
1. Fill the Tray with Water:
Start by filling the shower tray with water. Ensure that the water level is sufficient to cover the area where leaks are most likely to occur, such as around the edges or seams of the tray. Use a bucket or a hose to fill the tray until the desired water level is reached.
2. Observe for Water Leakage:
Once the shower tray is filled with water, carefully observe for any signs of leakage. Pay close attention to the areas where the tray connects to the walls or surrounding surfaces. Look for visible water seepage or drips, as well as any water pooling on the floor or in adjacent areas.
3. Check the Waste Outlet:
Inspect the waste outlet, including the connections and seals, for any signs of leakage. Ensure that there are no water drips or seepage around the waste pipe or trap. If you notice any leaks, tighten the fittings or adjust the connections as necessary to create a watertight seal.
4. Test the Shower Head and Fixtures:
In addition to the tray itself, test the shower head and fixtures for leaks. Turn on the shower and observe if there are any water leaks around the showerhead, knobs, or other fixtures. Check the connections and seals to ensure that they are secure and properly sealed.
5. Repair and Re-test:
If you discover any leaks during the testing process, take the necessary steps to address and fix the issue. This may involve re-sealing the edges of the tray or adjusting the fittings of the waste pipe. Once the necessary repairs are made, re-test the shower tray to ensure that the leaks have been effectively resolved.
By conducting a thorough leak test and addressing any issues promptly, you can ensure a watertight and reliable shower tray. Regularly conduct maintenance checks and re-test the tray periodically to ensure long-lasting performance and to prevent any potential water damage.
Finishing Touches and Cleanup
Once you have successfully installed and tested the shower tray, it’s time to add the finishing touches and complete the cleanup process. Taking care of these final details will help enhance the overall appearance and functionality of your shower enclosure. Here are the steps to follow for the finishing touches and cleanup:
1. Reinstall Shower Screen or Doors:
If you removed the shower screen or doors during the installation process, now is the time to reinstall them. Carefully align the screen or doors and secure them using the appropriate screws or hinges. Ensure that they are properly aligned and open and close smoothly.
2. Apply Sealant around the Edges:
Inspect the edges of the shower tray and apply a final bead of sealant, if needed. This will ensure that there is a watertight seal between the tray and the surrounding surfaces. Smooth the sealant surface using a wet finger or a sealant smoothing tool to achieve a neat and professional finish.
3. Clean the Shower Tray:
Thoroughly clean the shower tray using a mild bathroom cleaner and a sponge or cloth. Remove any construction debris, dust, or residual sealant. Rinse the tray with clean water and dry it properly to prevent water spots or streaks. This will leave your shower tray sparkling clean and ready for use.
4. Restore the Bathroom:
Restore the rest of the bathroom to its original state. Wipe down any surfaces that may have been affected by the installation process, such as walls or flooring. Remove any protective coverings or tarps that were used to protect the bathroom during the installation. Put away any tools or equipment and organize the area.
5. Perform a Final Inspection:
Take the time to perform a final inspection of the shower tray installation. Ensure that all connections are secure, there are no signs of leaks, and the tray is stable and level. Test the shower and check for proper water flow and drainage. Make any necessary adjustments or repairs before considering the project complete.
By attending to these finishing touches and completing the cleanup process, you can enjoy a fully functional and aesthetically pleasing shower enclosure. Regularly maintain and clean the shower tray to ensure its longevity and keep it looking its best.