Materials Needed
Before starting the process of etching a mirror, it’s important to gather all the necessary materials. Here is a list of items you will need:
- Mirror: Choose a mirror that you want to etch. Make sure it is clean and free of any dust or debris.
- Etching Cream: This is the key ingredient for etching the mirror. Look for a cream specifically designed for glass etching.
- Brush: Select a brush that is suitable for applying the etching cream. A foam brush or a soft bristle brush works well.
- Protective Gear: It’s important to ensure your safety while working with chemicals. Wear gloves to protect your hands and safety goggles to shield your eyes.
- Tape or Stencil: If you want to create a specific design or pattern, you will need tape or a stencil. This will help you achieve precise and accurate etching.
- Water: You will need water to rinse off the etching cream once the etching process is complete.
- Paper Towels: Keep some paper towels handy for drying the mirror and cleaning up any spills.
- Optional: Design or Pattern: If you want to add a personal touch to the etched mirror, you can use a design or pattern. You can either draw it freehand or use a pre-made stencil.
- Optional: Sealant: If you want to protect the etching and make it more durable, you can use a sealant. This will help preserve the design and prevent any smudging or fading over time.
Once you have gathered all the necessary materials, you are ready to begin the etching process. Ensure that your workspace is well-ventilated and free from any distractions. Follow the remaining steps to transform your mirror into a unique and personalized piece of art.
Step 1: Prepare the Workspace
Preparing your workspace before you start etching a mirror is essential for a smooth and successful process. Follow these steps to ensure your workspace is ready:
- Clean the Area: Clear the surface area where you will be working. Remove any objects that could obstruct your movement or potentially get in the way.
- Protect the Surface: Cover your work surface with a plastic or vinyl tablecloth or use old newspapers. This will protect the surface from any accidental spills or drips of etching cream.
- Ventilation: Etching cream can have a strong smell and contain chemicals, so make sure to work in a well-ventilated area. Open windows or use a fan to keep the air circulating during the process.
- Lighting: Ensure that you have adequate lighting in your workspace. This will help you see the details of your etching and ensure precision while working on the mirror.
- Arrange the Materials: Organize all the materials you gathered for the etching process. Have them within easy reach so that you won’t have to search for them while working.
- Protective Gear: Before you begin, put on your protective gear. Wear gloves to protect your hands and safety goggles to shield your eyes from any potential splashes or spills of the etching cream.
By preparing your workspace properly, you will create a suitable environment for etching a mirror. This will ensure your safety, as well as help you maintain a clean and well-organized work area. Now that your workspace is ready, you can move on to the next step of the etching process.
Step 2: Clean the Mirror
Before you begin the etching process, it’s crucial to clean the mirror thoroughly. Any dirt, fingerprints, or smudges on the surface can interfere with the etching and prevent it from adhering evenly. Follow these steps to clean the mirror:
- Remove Dust: Start by removing any dust particles from the mirror’s surface. You can use a soft cloth or a duster to gently wipe away the dust.
- Prepare Cleaning Solution: Mix a small amount of mild glass cleaner with water in a spray bottle. Avoid using ammonia-based cleaners, as they can leave residue on the mirror.
- Spray and Wipe: Spray the cleaning solution onto a microfiber cloth or a lint-free cloth. Gently wipe the mirror in a circular motion, covering the entire surface. Be careful not to apply too much pressure, as this can leave streaks or damage the mirror.
- Focus on Problem Areas: If there are any stubborn stains or spots on the mirror, apply a little extra cleaning solution and gently rub them with a cloth. Take care not to scratch the mirror’s surface.
- Dry the Mirror: Once you have cleaned the entire mirror, use a clean, dry cloth to dry the surface. This will ensure that no water spots or streaks are left behind.
By thoroughly cleaning the mirror, you will create a smooth and pristine surface for the etching process. This will help the etching cream adhere evenly and produce a clear and defined design on the mirror. Now that your mirror is clean and ready, you can proceed to the next step of applying the etching cream.
Step 3: Apply Etching Cream
Now that you have prepared the workspace and cleaned the mirror, it’s time to apply the etching cream. The cream contains chemicals that will create a frosted or etched effect on the glass surface. Follow these steps to apply the etching cream:
- Put on Protective Gear: Before handling the etching cream, remember to wear gloves and safety goggles to protect your skin and eyes.
- Stir the Etching Cream: Open the jar of etching cream and use a stir stick or a utensil to mix the cream thoroughly. This will ensure consistency and proper application.
- Apply the Cream: Using a brush, apply a generous layer of the etching cream onto the mirror’s surface. Work in smooth and even strokes, covering the area where you want the etching to appear.
- Pay Attention to Details: If you are using a tape or stencil to create a specific design or pattern, make sure the edges of the tape or stencil are secure and there are no gaps where the cream could seep through.
- Avoid Dripping or Spilling: Be cautious not to allow the etching cream to drip or spill onto the areas of the mirror where you don’t want the etching to occur. Use a steady hand and take your time during the application process.
By following these steps, you will apply the etching cream evenly and ensure that the desired areas of the mirror receive the desired etched effect. Once you have applied the cream, leave it undisturbed according to the instructions provided with the etching cream, allowing it to work its magic and etch the mirror effectively. The next step will involve removing the etching cream and revealing the etched design.
Step 4: Let It Sit
After applying the etching cream to the mirror, it’s crucial to allow it to sit and work its magic. The duration and specific instructions for how long the etching cream needs to sit will vary depending on the brand and the desired etched effect. Follow these steps to ensure the etching cream works effectively:
- Read the Instructions: Refer to the instructions provided with the etching cream to determine the recommended waiting time. This can range from a few minutes to several hours.
- Set a Timer: Once you have determined the waiting time, set a timer or use a stopwatch to keep track of the duration. This will help you ensure that you don’t leave the etching cream on for too long or remove it too early.
- Leave It Undisturbed: While the etching cream sits on the mirror, avoid touching or disturbing it. This can disrupt the etching process and result in an uneven or incomplete etched effect.
- Check Periodically: If the etching cream allows for it, you can check the mirror periodically to see if the desired etched effect has been achieved. Use caution when doing so, and if the etching isn’t complete, quickly return the cream to its original state.
By giving the etching cream the necessary time to work, you will ensure that the mirror achieves the desired frosted or etched effect. Once the recommended waiting time has elapsed, you can move on to the next step of removing the etching cream from the mirror and revealing the final result.
Step 5: Remove the Etching Cream
Now that the etching cream has had sufficient time to work its magic, it’s time to remove it from the mirror. Removing the cream properly will ensure a clean and well-defined etched design. Follow these steps to remove the etching cream:
- Put on Protective Gear: Before removing the etching cream, make sure to put on your gloves and safety goggles to protect your skin and eyes.
- Scrape off the Cream: Take a plastic scraper or an old credit card and gently scrape off the etching cream from the mirror’s surface. Be careful not to scratch the mirror or apply too much pressure.
- Clean and Collect the Cream: As you scrape off the cream, collect it in a disposable container or a paper towel. Properly dispose of the cream according to your local regulations.
- Use a Damp Cloth: Once most of the cream has been removed, use a damp cloth to wipe away any remaining residue. Make sure to clean the mirror thoroughly so that no remnants of the cream are left behind.
- Dry the Mirror: After cleaning, use a dry cloth or a paper towel to dry the mirror’s surface. This will prevent any water spots or streaks from forming.
By following these steps, you will remove the etching cream carefully and effectively, revealing the beautifully etched design on the mirror. Make sure to clean up any spilled or leftover cream properly, as it contains chemicals that should be disposed of correctly. With the etching cream removed, you can now move on to the next step of rinsing the mirror to ensure all remnants of the cream are gone.
Step 6: Rinse the Mirror
After removing the etching cream and cleaning off any residue, it’s important to rinse the mirror to ensure that all remnants of the cream are completely removed. This step will help reveal the final etched design and prepare the mirror for the next stages. Follow these steps to rinse the mirror:
- Prepare a Water Basin: Fill a basin or sink with warm water. Make sure the basin is big enough to accommodate the size of the mirror.
- Submerge the Mirror: Carefully submerge the mirror into the water and gently swish it around. This will help remove any remaining etching cream and residue from the surface.
- Rinse the Mirror: While the mirror is submerged, use your hands or a soft cloth to gently rinse and rub the surface of the mirror. This will ensure that all traces of the etching cream are washed away.
- Inspect the Mirror: Remove the mirror from the water and inspect it closely to ensure that there are no remaining traces of the etching cream. If necessary, repeat the rinsing process until the mirror is completely clean.
- Dry the Mirror: Once you are satisfied that the mirror is free from any etching cream residue, use a clean, lint-free cloth to gently dry the surface. Be careful not to rub too forcefully to avoid smudging or scratching the mirror.
By rinsing the mirror thoroughly, you will remove any traces of the etching cream and reveal the pristine etched design. Take your time during this step to ensure that the mirror is completely clean. Now that the mirror is rinsed and dried, you can move on to the next step of cleaning and preparing the mirror for display.
Step 7: Dry and Clean the Mirror
After rinsing the mirror, it’s important to properly dry and clean it to ensure a pristine finish. This step will help remove any remaining water droplets or streaks and prepare the mirror for display. Follow these steps to dry and clean the mirror:
- Pat Dry: Use a clean, lint-free cloth to gently pat the mirror dry. Start from the top and work your way down, ensuring that the entire surface is thoroughly dried.
- Wipe with a Microfiber Cloth: Once the mirror is mostly dry, use a microfiber cloth to wipe the surface in long, straight strokes. This will help remove any remaining moisture and leave the mirror streak-free.
- Check for Residue: Inspect the mirror closely to ensure that there are no residues or smudges left behind. If you notice any, use a clean, damp cloth to gently wipe them away.
- Detail the Edges: Pay attention to the edges of the mirror and make sure they are clean and free from any water spots or streaks. Use a corner of the microfiber cloth or a cotton swab to address any areas that need extra attention.
- Polish the Surface: For an extra touch of shine, you can use a glass cleaner specifically designed for mirrors to polish the surface. Spray the cleaner onto a lint-free cloth and gently buff the mirror, following the instructions provided with the cleaner.
By properly drying and cleaning the mirror, you will ensure a clear, streak-free finish that highlights the beautifully etched design. Take your time during this step to achieve the desired result. With the mirror dry and clean, you can now move on to the optional steps of adding a design or pattern and sealing the etching, if desired.
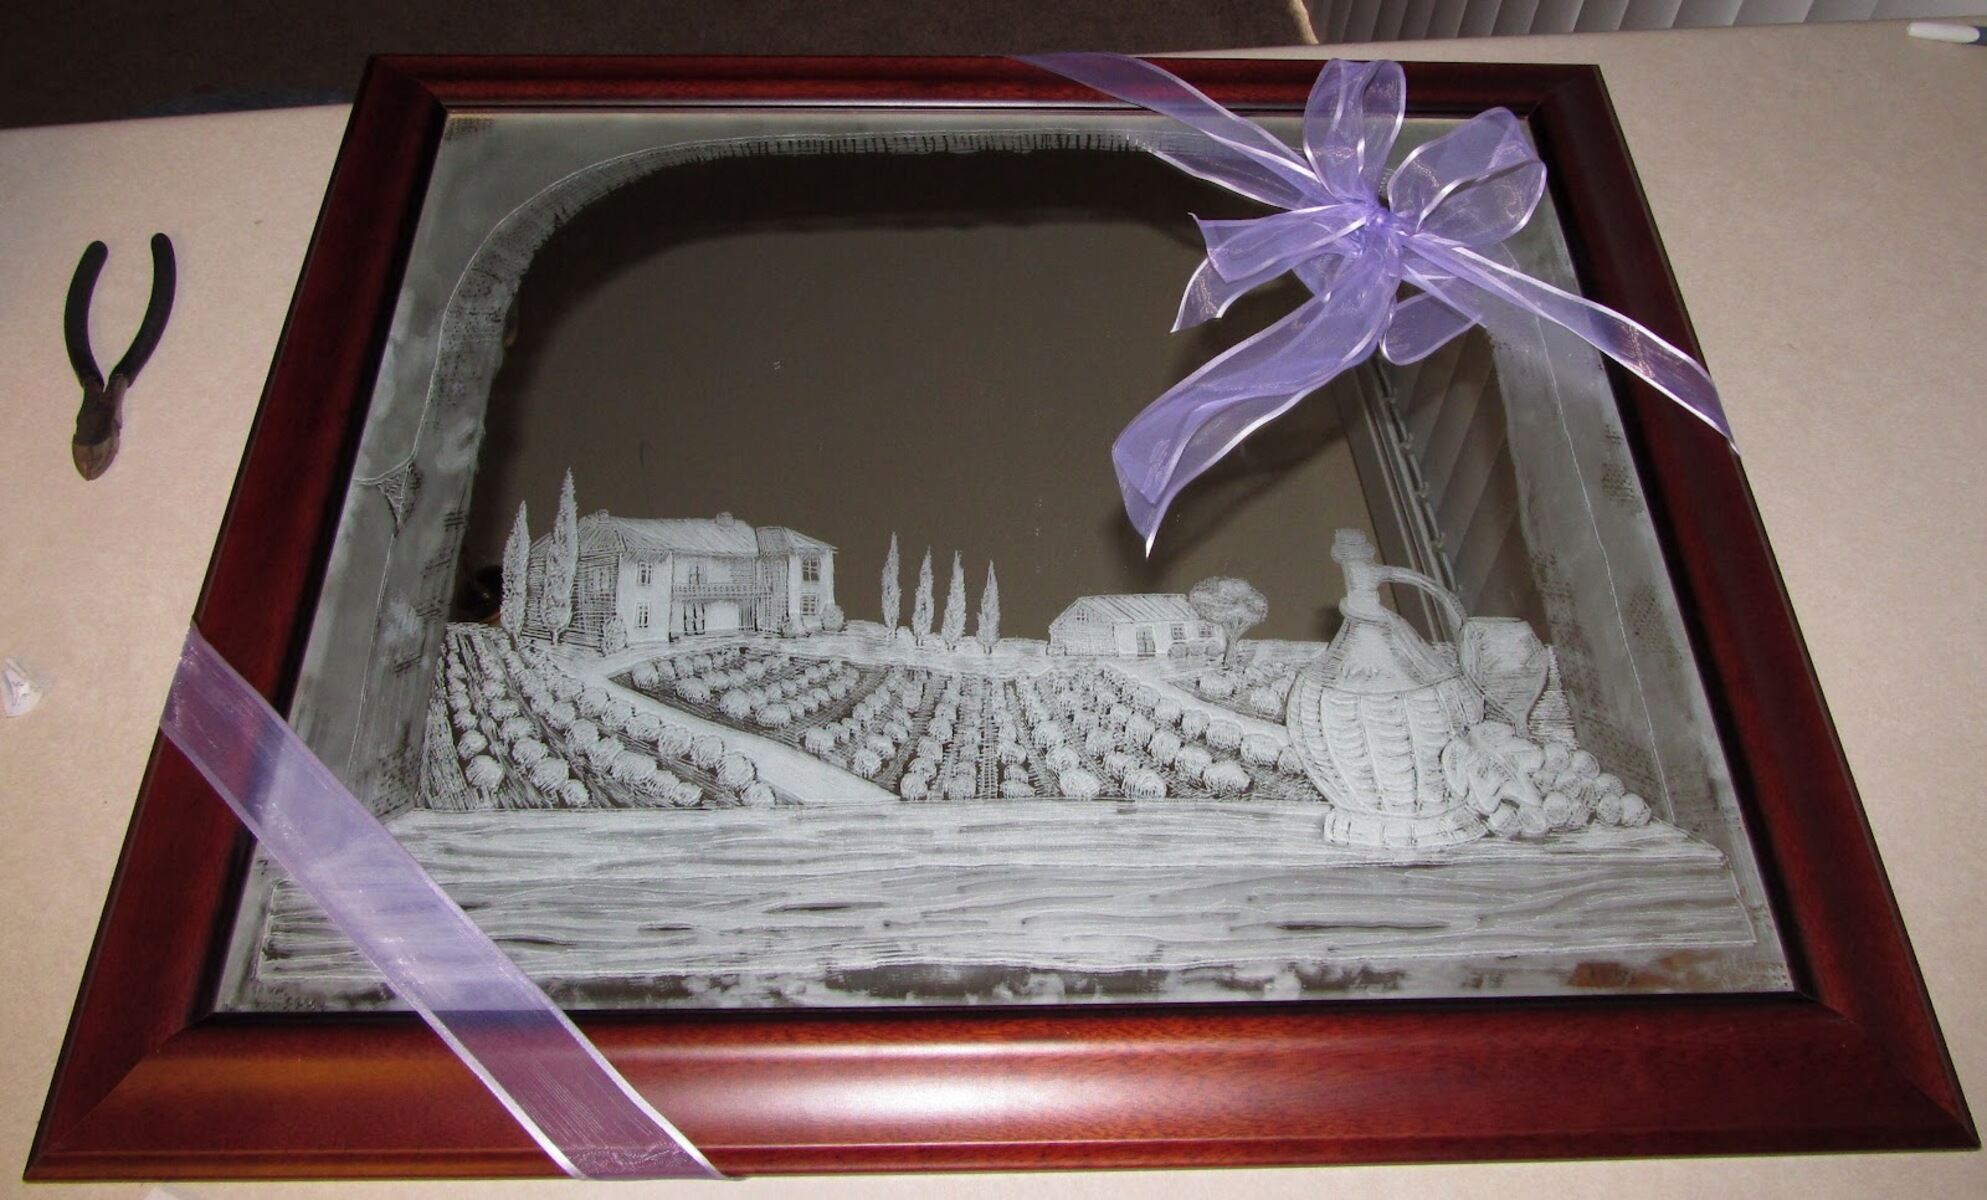
Step 8: Optional: Add a Design or Pattern
If you want to further personalize your etched mirror, you have the option to add a design or pattern to enhance its visual appeal. You can create a unique and customized mirror by incorporating your creativity into the etched surface. Follow these steps to add a design or pattern:
- Select a Design: Decide on the design or pattern you want to add to the mirror. You can either draw a design freehand or use a pre-made stencil for more precise results.
- Secure the Design: If you are using a stencil, carefully position it on the mirror’s surface and secure it in place with painter’s tape or adhesive. Make sure the stencil is firmly attached to prevent any bleeding of the etching cream.
- Apply the Etching Cream: Using a brush, apply a layer of etching cream over the design or pattern. Make sure to cover the entire area and apply the cream evenly. Follow the instructions on the etching cream for the recommended waiting time.
- Remove the Etching Cream: After the recommended waiting time, remove the etching cream by following the steps outlined in the previous sections of this guide. Be careful not to disturb the design while removing the cream.
- Rinse and Clean: Rinse the mirror carefully to remove any residue from the etching cream. Clean and dry the mirror as instructed in the previous steps to ensure it is free from any remaining cream.
- Inspect and Perfect: Check the design or pattern for any imperfections or smudges. If necessary, use a damp cloth to gently clean or touch up any areas that need adjustments.
By adding a design or pattern to your etched mirror, you can make it truly unique and showcase your artistic flair. Whether it’s a simple monogram, an intricate pattern, or a meaningful symbol, the added design will add a personalized touch to the etched mirror. Once you are satisfied with the design, you can proceed to the optional step of sealing the etching if desired.
Step 9: Optional: Seal the Etching
While not necessary, sealing the etching on your mirror can provide added protection and longevity to the design. It can help preserve the etched pattern and prevent any smudging or fading over time. If you choose to seal the etching, follow these steps:
- Select a Sealant: Choose a sealant specifically designed for glass or mirrors. Look for one that is transparent and UV-resistant to ensure it doesn’t alter the appearance of the etching.
- Prepare the Mirror: Ensure the mirror is clean and completely dry before applying the sealant. Any moisture or residue on the surface can affect the adhesion and clarity of the sealer.
- Apply the Sealant: Follow the instructions provided with the sealant to apply it to the etched surface. Use a brush or a foam applicator to cover the entire etched area in smooth, even strokes. Take care not to let the sealant overlap onto the non-etched areas of the mirror.
- Allow Drying Time: Allow the sealant to dry completely according to the instructions provided by the manufacturer. Ensure the mirror is placed in a well-ventilated area to facilitate the drying process.
- Inspect and Repeat (if necessary): Once the sealant is dry, inspect the mirror for any missed spots or areas that require additional sealing. If necessary, repeat the process of applying the sealant and allow it to dry again.
Sealing the etching is an optional step, but it can provide added protection and durability to your etched mirror. The sealant will help safeguard the design from external factors, such as dust, moisture, and UV rays, ensuring that the etching remains vibrant and intact for a longer period of time. With the sealant applied and dried, your etched mirror is now ready for display and enjoyment.
Step 10: Display and Enjoy
After completing all the previous steps and achieving your desired etched design, it’s time to display and enjoy your beautiful masterpiece. Here is what you need to do:
- Clean the Mirror: Give your etched mirror a final cleaning to ensure it is free from any fingerprints, smudges, or dust particles. Use a lint-free cloth or a microfiber cloth to gently wipe the surface.
- Choose the Perfect Location: Select a suitable location to showcase your etched mirror. Consider factors like lighting, visibility, and the overall aesthetic of the space.
- Mount or Hang the Mirror: Depending on the size and weight of your mirror, use appropriate hooks, brackets, or mounting hardware to securely attach it to the wall or stand it on a shelf or table.
- Enhance the Surroundings: Consider decorating the area around the mirror to highlight its beauty and complement the etched design. You can use decorative items, lighting, or other artwork to create an appealing display.
- Show it Off: Once your etched mirror is securely in place, step back and admire your handiwork. Share it with friends and family or simply revel in the pride of creating a unique and personalized piece of art.
- Take Proper Care: To ensure the longevity of your etched mirror, avoid using harsh chemicals or abrasive cleaning agents. Instead, gently dust it regularly and clean with a gentle glass cleaner, if needed.
By displaying and enjoying your etched mirror, you can showcase your creativity and add a touch of elegance to any space. Whether it’s in the living room, hallway, or bathroom, your etched mirror will serve as a stunning focal point and conversation starter. Take a moment to appreciate the intricate design and the effort you put into creating this unique piece. Enjoy the beauty it brings to your surroundings for years to come.