
Materials Needed
Before you start building your PVC pipe storage rack out of wood, make sure you have the following materials on hand:
- Wood: Choose a sturdy and durable wood, such as pine or plywood. Measure and cut the wood according to the size of the rack you want to build.
- PVC pipes: Select the appropriate diameter and length of PVC pipes for your storage needs. Consider the size and weight of the items you plan to store on the rack.
- Wood screws: Use screws that are long enough to securely attach the wood pieces together. Choose screws with a flat head to prevent any protrusions.
- Power drill: To drill holes and drive the screws into the wood, you’ll need a power drill with the appropriate drill bits and screwdriver attachments.
- Saw: Depending on the complexity of your design, you may need a saw to cut the wood pieces to the desired length.
- Tape measure: Accurate measurements are crucial for a precise and stable storage rack. Make sure you have a tape measure to ensure proper dimensions.
- Sandpaper: Smooth out any rough edges or surfaces of the wood pieces with sandpaper, ensuring a polished and professional-looking finish.
- Paint or stain: Optional but recommended, paint or stain can add a touch of color or enhance the aesthetics of your PVC pipe storage rack.
- Paintbrushes or rollers: If you decide to paint or stain the rack, make sure you have the appropriate tools to apply an even and smooth coat.
- Level: To ensure the rack is straight and level when installing it on the wall, have a level handy to guide you.
By gathering all of these materials before you start the project, you’ll have everything you need to build a sturdy and functional PVC pipe storage rack out of wood.
Step 1: Measure and Cut the Wood
Before you begin assembling your PVC pipe storage rack, you need to measure and cut the wood pieces to the appropriate size. Follow these steps to ensure accurate dimensions:
- Determine the dimensions: Measure the space where you plan to install the rack. Consider the height, width, and depth you want for your storage needs.
- Mark the measurements: Use a pencil and a tape measure to mark the desired length and width on the wood pieces. Double-check the measurements to avoid any errors.
- Cut the wood: Use a saw to carefully cut the wood pieces according to the marked measurements. Take your time and use steady, controlled movements for clean and precise cuts.
- Sand the edges: After cutting the wood, use sandpaper to smooth out any rough edges. This will prevent splinters and give the rack a polished look.
By taking the time to measure and cut the wood accurately, you’ll ensure that your PVC pipe storage rack fits perfectly into your desired space. This step is crucial for the stability and overall appearance of the final product.
Step 2: Prep the PVC Pipes
Once you have measured and cut the wood for your PVC pipe storage rack, it’s time to prepare the PVC pipes. Follow these steps to get the pipes ready for assembly:
- Clean the pipes: Start by wiping down the PVC pipes with a clean cloth to remove any dirt or debris. This will ensure a clean and smooth surface for the next steps.
- Measure and mark: Determine the desired length for each PVC pipe section. Use a tape measure and a pencil to mark the measurements clearly.
- Cut the pipes: Use a hacksaw or a PVC pipe cutter to cut the pipes according to the marked measurements. Make sure to cut the pipes with smooth, straight cuts.
- Deburr the edges: After cutting the PVC pipes, use a deburring tool or sandpaper to remove any rough edges or burrs. Smooth out the edges to prevent any snagging or scratching of your stored items.
- Apply primer and glue: If you want a more secure and permanent connection between the PVC pipes and the wood frame, consider using PVC primer and glue. Follow the manufacturer’s instructions to apply the primer and glue properly.
Prepping the PVC pipes is essential to ensure a proper and secure assembly of your storage rack. By cleaning, measuring, cutting, deburring, and applying primer and glue if desired, you’ll be one step closer to a sturdy and functional PVC pipe storage rack.
Step 3: Assemble the Wood Frame
Now that you’ve prepared the PVC pipes, it’s time to assemble the wood frame for your PVC pipe storage rack. Follow these steps for a secure and stable frame:
- Position the wood pieces: Lay out the cut wood pieces on a flat surface. Arrange them according to the design and dimensions you want for your storage rack.
- Align the edges: Ensure that the edges of the wood pieces are flush and properly aligned. Use clamps or weights, if necessary, to hold the pieces in place during assembly.
- Drill pilot holes: Mark the areas where you’ll need to attach the wood pieces together. Use a power drill and the appropriate drill bit size to create pilot holes.
- Attach the wood pieces: With the pilot holes in place, use wood screws to securely attach the wood pieces together. Start with one corner and gradually work your way around the frame.
- Check for stability: Once all the wood pieces are connected, test the stability of the frame. Gently shake or apply pressure to ensure that the joints are secure and there is no wobbling.
Assembling the wood frame is a crucial step in creating a sturdy and reliable PVC pipe storage rack. By properly aligning the edges, drilling pilot holes, and securely attaching the wood pieces together, you’ll have a solid foundation for the next stage of the assembly process.
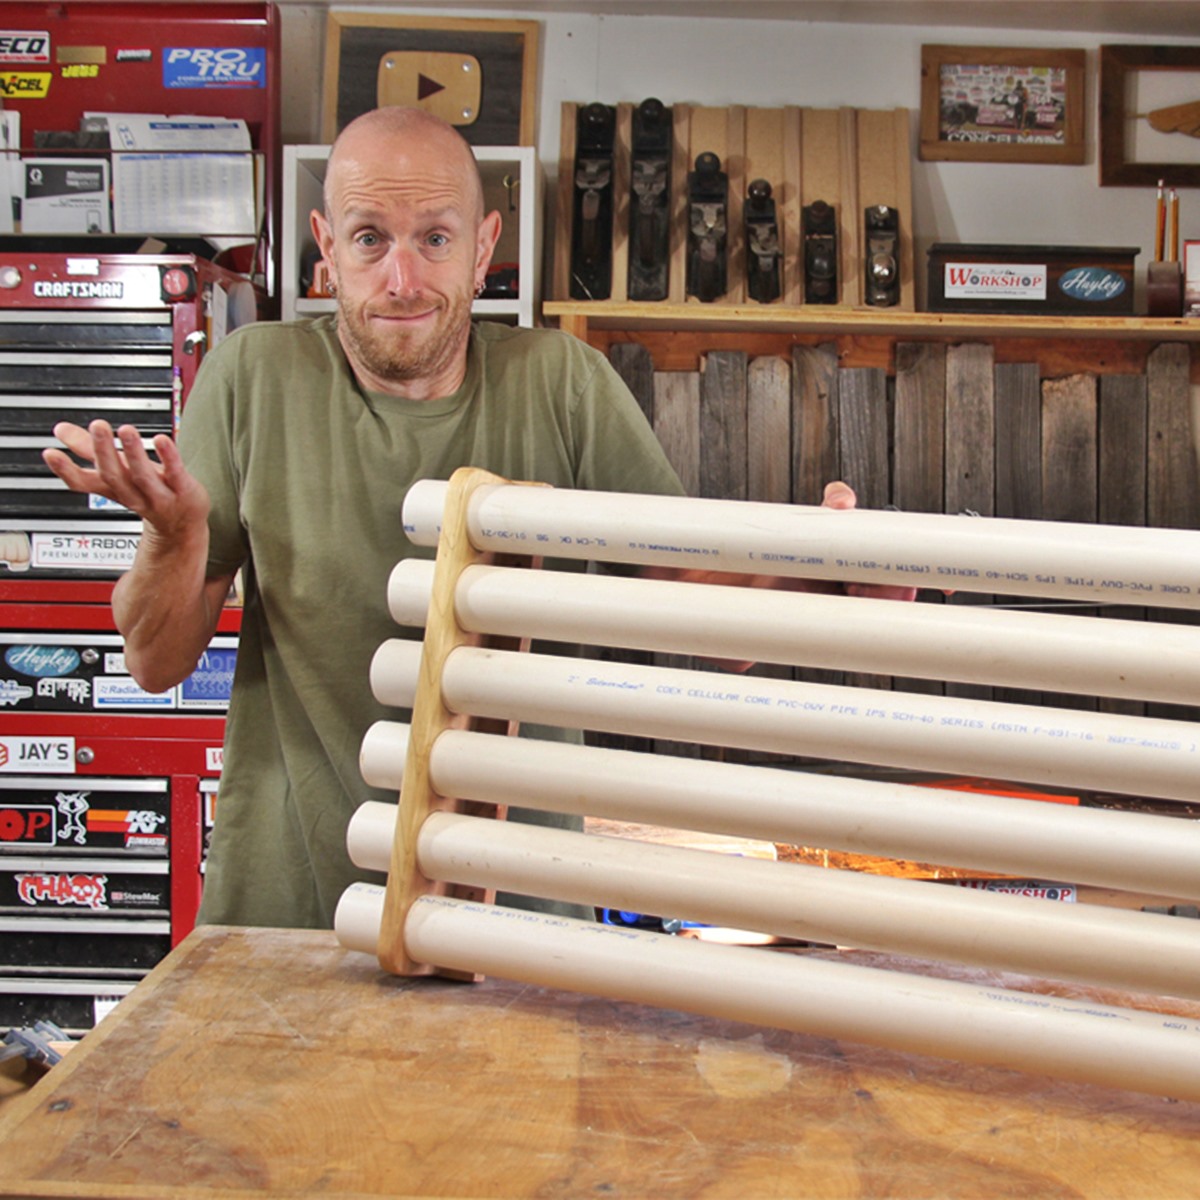
Step 4: Attach the PVC Pipes
With the wood frame assembled, it’s time to attach the PVC pipes to complete your PVC pipe storage rack. Follow these steps for a secure attachment:
- Determine the placement: Decide where you want to position the PVC pipes on the wood frame. Consider the size and weight of the items you’ll be storing and space them accordingly.
- Mark the placement: Use a pencil to mark the desired positions for the PVC pipes on the wood frame. Make sure the marks are visible and accurate.
- Drill holes: Use a power drill and the appropriate drill bit size to create holes in the wood frame where you marked the placement for the PVC pipes.
- Insert the PVC pipes: Insert the cut PVC pipes into the drilled holes, making sure they fit snugly and securely in place.
- Secure the pipes: Use PVC glue or adhesive to secure the PVC pipes inside the drilled holes on the wood frame. Follow the manufacturer’s instructions for proper application and drying time.
Attaching the PVC pipes is a critical step in completing your PVC pipe storage rack. By accurately marking the placement, drilling holes, inserting the pipes, and securing them with glue or adhesive, you’ll ensure a sturdy and reliable attachment that can support the weight of your stored items.
Step 5: Secure the Rack to the Wall
Once you have assembled the PVC pipe storage rack, it’s important to secure it to the wall to ensure stability and safety. Follow these steps to securely attach the rack to the wall:
- Select the mounting location: Determine the ideal location on the wall where you want to install the rack. Consider factors such as accessibility, weight distribution, and available space.
- Locate wall studs: Use a stud finder to locate the wall studs in the chosen mounting location. This step is crucial as it will provide the necessary support for the weight of the rack and the items you’ll be storing.
- Mark the stud locations: Mark the positions of the wall studs on the wall using a pencil or masking tape. These markings will guide you when attaching the rack.
- Drill pilot holes: Use a power drill and a drill bit that matches the size of the screws you’ll be using. Drill pilot holes into the wood frame at the marked stud locations.
- Attach the rack to the wall: With the pilot holes in place, align the rack with the marked stud locations. Securely attach the rack to the wall using screws and a screwdriver or power drill.
Securing the PVC pipe storage rack to the wall is essential for stability and preventing accidents. By carefully selecting the mounting location, locating wall studs, drilling pilot holes, and attaching the rack securely, you can have peace of mind knowing that your storage rack is safely mounted to the wall.
Step 6: Test and Adjust the Rack
After securing the PVC pipe storage rack to the wall, it’s important to test its stability and make any necessary adjustments. Follow these steps to ensure your rack is secure and properly aligned:
- Load the rack: Begin by placing a few lightweight items on the rack to test its weight-bearing capacity. Gradually add more weight to see how the rack handles different loads.
- Check for stability: Gently shake the rack to test its stability. Ensure that all connections are secure and there is no wobbling or shifting.
- Adjust as needed: If you notice any instability or misalignment, make the necessary adjustments. Tighten any loose screws, reposition the PVC pipes, or reinforce weak points to improve stability.
- Test weight capacity: Slowly increase the weight on the rack to its intended capacity. Ensure that it remains stable and can support the desired load without any issues.
- Make final adjustments: Once you are satisfied with the stability and weight-bearing capacity of the rack, make any final adjustments as needed. This includes tightening screws, checking alignment, and reinforcing any weak points.
Testing and adjusting the PVC pipe storage rack is crucial to ensure its reliability and safety. By loading the rack, checking for stability, making necessary adjustments, and testing its weight capacity, you can have confidence in the stability of your storage rack.
Step 7: Paint or Stain the Rack
Adding a coat of paint or stain to your PVC pipe storage rack can enhance its appearance and protect the wood from damage. Follow these steps to paint or stain your rack:
- Clean the rack: Before applying any paint or stain, make sure the rack is clean and free from dust or debris. Use a damp cloth to wipe down the wood surfaces.
- Prepare the surface: If there are any rough spots or imperfections on the wood, use sandpaper to smooth them out. This will ensure a smooth and even finish.
- Choose your finish: Decide whether you want to use paint or stain for your rack. Consider factors such as the desired color, the overall aesthetic, and the level of protection you want for the wood.
- Apply the paint or stain: Using a paintbrush or roller, apply a thin and even coat of paint or stain to the wood surfaces of the rack. Work in long, smooth strokes and make sure to cover all areas.
- Allow for drying time: Follow the manufacturer’s instructions for drying time. Give the paint or stain sufficient time to dry and cure properly before moving or using the rack.
- Add additional coats: If necessary, apply additional coats of paint or stain to achieve the desired color and finish. Allow each coat to dry completely before applying the next one.
Painting or staining your PVC pipe storage rack not only enhances its visual appeal but also adds a layer of protection to the wood. By properly cleaning the rack, preparing the surface, choosing the desired finish, applying it evenly, and allowing for sufficient drying time, you can achieve a professional and long-lasting look for your storage rack.
Step 8: Organize Your PVC Pipes
Once you have completed building and finishing your PVC pipe storage rack, it’s time to organize your PVC pipes for maximum efficiency and easy access. Follow these steps to effectively organize your PVC pipes:
- Sort and categorize: Begin by sorting your PVC pipes based on their size, length, or any other relevant criteria. This will help you easily identify and locate the pipes you need.
- Utilize storage accessories: Consider using storage accessories such as hooks, clips, or straps to secure the PVC pipes to the rack. This will prevent them from rolling or falling off the rack.
- Label or color-code: To further enhance organization, consider labeling or color-coding your PVC pipes. You can use labels, stickers, or colored tape to make identification quick and easy.
- Arrange by frequency of use: Place the PVC pipes that you use most frequently within easy reach. This will save you time and effort when accessing them.
- Leave space for expansion: If you anticipate acquiring more PVC pipes in the future, leave some space on the rack to accommodate additional storage needs.
- Maintain cleanliness: Regularly clean the rack and the PVC pipes to remove dust and debris. This will help keep your storage area tidy and prolong the life of your PVC pipes.
By organizing your PVC pipes effectively, you can maximize the functionality of your storage rack and reduce the time and effort spent searching for specific pipes. By sorting, utilizing storage accessories, labeling or color-coding, arranging by frequency of use, leaving space for expansion, and maintaining cleanliness, you can create a well-organized and efficient PVC pipe storage system.