
Materials Needed
To build a wing storage rack for Aeronca wings, you will require the following materials:
- Pressure-treated lumber (2×4 or similar) – for the base and uprights
- Galvanized steel pipes (1 inch diameter) – for the supports
- Wood screws – for attaching the pieces together
- Metal brackets – for additional support
- Measuring tape – for accurate measurements
- Pencil – for marking the lumber
- Saw – for cutting the lumber and pipes to size
- Drill – for creating pilot holes and screwing in the screws
- Screwdriver – for driving the screws in
- Level – for ensuring the rack is straight and balanced
Ensure the pressure-treated lumber is of sufficient length and quantity to accommodate the wings you intend to store. The galvanized steel pipes should be long enough to span the width of the wings and provide ample support.
Having all these materials readily available will help you complete the wing storage rack project efficiently and effectively.
Step-by-Step Instructions
Follow these step-by-step instructions to build your own wing storage rack for Aeronca wings:
-
Measure and cut the base: Begin by measuring and cutting the pressure-treated lumber to the desired length for the base of the wing storage rack. Use a saw to make precise cuts.
-
Position the uprights: Place the cut lumber pieces parallel to each other and position them at a suitable distance apart to accommodate the width of the wings. Make sure they are aligned evenly.
-
Secure the base: Attach the base to the uprights using wood screws. This will provide stability and support for the wings. Use a drill with a suitable drill bit to create pilot holes before driving in the screws.
-
Add supports: Cut additional pieces of pressure-treated lumber to serve as horizontal supports. Position them perpendicular to the base and attach them to the uprights using wood screws and metal brackets for added strength. Ensure they are evenly spaced along the length of the base.
-
Install the steel pipes: Measure and cut the galvanized steel pipes to the desired lengths. These pipes will act as the supports for the wings. Place them on the horizontal supports, evenly spaced, and secure them using metal brackets or pipe clamps.
-
Test the stability: Once all the components are securely attached, check the stability of the rack. Ensure it is balanced and level. Make any necessary adjustments to ensure the rack is sturdy and secure.
-
Place the wings: Gently lift and place the Aeronca wings onto the steel pipes. Make sure they are centered and supported by the pipes to prevent any damage or sagging.
Following these step-by-step instructions will help you build a reliable and functional wing storage rack for your Aeronca wings. Remember to take your time, measure accurately, and use proper safety precautions throughout the construction process.
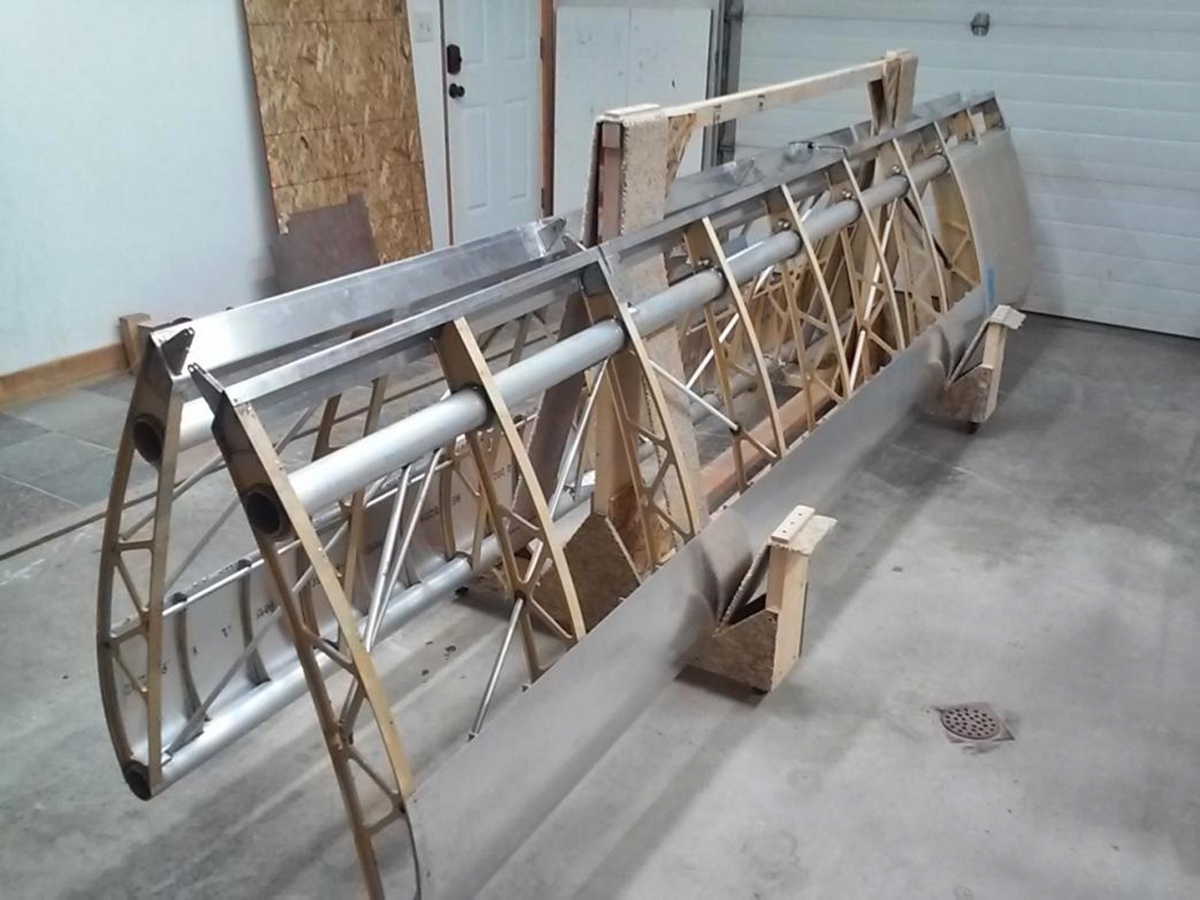
Building the Base
The base of the wing storage rack is an essential component that provides stability and support for the Aeronca wings. Follow these steps to construct the base:
-
Measure and cut the lumber: Start by measuring the desired length for the base of your wing storage rack. Use a measuring tape to ensure accurate measurements. Mark the measurements on the pressure-treated lumber using a pencil.
-
Cut the lumber: With the measurements marked, carefully cut the lumber using a saw. Take your time to make precise and straight cuts. Ensure the ends of the cut pieces are smooth and free from splinters.
-
Position the lumber: Place the cut lumber pieces parallel to each other, ensuring they are aligned evenly. The distance between them should be suitable to accommodate the width of the Aeronca wings.
-
Secure the base: To secure the base, use wood screws to attach the horizontally positioned lumber pieces to the upright supports. For added stability and strength, consider using metal brackets at the corners where the base and upright supports meet.
It’s important to ensure that the base is solid and well-constructed. Check for any wobbling or instability by gently rocking the base after securing the pieces together. If you notice any movement, reinforce the joints with additional screws or brackets.
Remember to take accurate measurements and make precise cuts to ensure the base is the correct size and properly aligned. Once the base is securely constructed, you can proceed to the next steps in building your wing storage rack.
Adding the Uprights
Now that the base of your wing storage rack is complete, it’s time to add the upright supports. These supports will provide stability and ensure the wings are securely held in place. Follow these steps to add the uprights:
-
Position the uprights: Place the cut lumber pieces vertically on each end of the base. Ensure that they are positioned parallel to each other and aligned evenly. The distance between the uprights should be suitable to accommodate the width of the Aeronca wings.
-
Attach the uprights: Using wood screws, secure the uprights to the base. Start by creating pilot holes with a drill to prevent the wood from splitting. Then, drive in the screws to firmly attach the uprights to the base.
It’s important to ensure that the uprights are straight and securely attached to the base. Use a level to check and adjust the alignment as necessary. This will help ensure the stability and balance of the wing storage rack.
By adding the upright supports, you are creating a solid structure that will properly hold the Aeronca wings. With the base and uprights securely in place, you are now ready to proceed with the next steps of building your wing storage rack.
Attaching the Supports
Once the base and upright supports are in place, the next step in building your Aeronca wing storage rack is attaching the horizontal supports. These supports will provide additional stability and help evenly distribute the weight of the wings. Follow these steps to attach the supports:
-
Cut the horizontal supports: Measure and cut additional pieces of pressure-treated lumber to serve as horizontal supports. These pieces should be perpendicular to the base and evenly spaced along its length.
-
Position the supports: Place each cut piece of lumber on the upright supports, aligning them with the top edges of the uprights. Ensure that they are evenly spaced to provide balanced support for the wings.
-
Secure the supports: To attach the horizontal supports, use wood screws and metal brackets for added support. Start by creating pilot holes in the lumber and then drive in the screws to secure the supports to the uprights. Use metal brackets at the corners for additional strength and stability.
It’s important to ensure that the horizontal supports are securely attached and evenly spaced. This will prevent any sagging or imbalance when the wings are placed on the rack.
Take your time to accurately measure and cut the horizontal supports. Double-check the alignment and spacing before securing them to the uprights. Once the supports are firmly attached, you are one step closer to completing your Aeronca wing storage rack.
Securing the Wings
Securing the wings onto the Aeronca wing storage rack is a crucial step to ensure their stability and prevent any potential damage. Follow these steps to securely fasten the wings:
-
Prepare the steel pipes: Measure and cut the galvanized steel pipes to the appropriate lengths. These pipes will serve as the supports for the wings.
-
Place the pipes on the supports: Carefully position the cut steel pipes on the horizontal supports of the rack. Ensure they are evenly spaced and align them with the appropriate attachment points.
-
Attach the wings: Lift each Aeronca wing and place it onto the steel pipes. Center the wings and ensure they rest securely on the pipes. Check that the wings are aligned parallel to the base and that they are supported along their entire length.
It’s important to handle the wings with care to avoid any damage while placing them onto the rack. Make sure to center each wing and distribute its weight evenly on the steel pipes to prevent any excessive stress or strain.
Once the wings are securely positioned on the rack, check for any signs of sagging or imbalance. If necessary, adjust the placement of the wings or reinforce the support points to ensure they are stable and well-supported.
Securing the wings properly onto the Aeronca wing storage rack will not only protect them from any potential damage but will also keep them organized and easily accessible for future use.
Finishing Touches
Once you have securely attached the wings to your Aeronca wing storage rack, you can add some finishing touches to improve the overall functionality and aesthetic appeal. Consider the following suggestions:
-
Smooth the edges: Use sandpaper to smooth any rough or sharp edges on the lumber and steel pipes. This will minimize the risk of accidental injuries when handling the rack.
-
Paint or stain: Apply a coat of paint or stain to the lumber to protect it from weathering and add a polished look. Choose a color that complements your workspace or hangar.
-
Label the wings: Attach labels or tags to each wing indicating the aircraft model, wing position (left or right), or other relevant information. This will help you quickly locate the desired wing when needed.
-
Add padding: Consider placing foam padding or pipe insulation on the steel pipes to provide additional cushioning and protection for the wings.
-
Create a storage area: If you have additional storage space on the rack, you can use it to store smaller items such as wingtip covers, wing struts, or other accessories.
These finishing touches will not only enhance the functionality and safety of your wing storage rack but will also give it a more professional and organized appearance.
Remember to regularly inspect and maintain your Aeronca wing storage rack to ensure its continued durability and effectiveness. With the finishing touches complete, your wing storage rack is now ready to securely hold and protect your valuable Aeronca wings.
Optional Additions
While a basic wing storage rack for Aeronca wings provides a practical solution for organizing and protecting your aircraft components, there are some optional additions you can consider to further enhance its functionality and convenience. These additions include:
-
Swivel wheels: Adding swivel wheels to the base of the rack can allow for easy maneuverability and repositioning of the wings. This can be particularly useful if you need to frequently access different areas of your workspace or hangar.
-
Locking mechanism: Installing a locking mechanism on the rack can help secure the wings and prevent unauthorized access or tampering. This is especially important if you store your aircraft in a shared space or public area.
-
Adjustable supports: Consider using adjustable supports for the steel pipes to accommodate wings of different sizes or configurations. This flexibility allows you to adapt the rack according to your specific needs.
-
Shelving: Adding shelves above or below the wings can create additional storage space for tools, manuals, or spare parts. This can help keep your work area tidy and streamline your aircraft maintenance tasks.
-
Weatherproof covering: If your wing storage rack is located in an outdoor area, consider adding a weatherproof covering, such as a tarp or canopy, to protect the wings from the elements. This will help prevent corrosion and damage caused by exposure to rain, sun, or snow.
These optional additions can be customized based on your specific requirements and the available space in your hangar or workspace. Remember to carefully consider the practicality, cost, and long-term benefits of these additions before implementing them.
By incorporating these optional additions, you can maximize the functionality and convenience of your wing storage rack, further improving the efficiency of your aircraft maintenance and storage processes.
Safety Considerations
When constructing and using a wing storage rack for Aeronca wings, it is important to prioritize safety. Keep the following safety considerations in mind:
-
Weight capacity: Ensure that the rack is designed and built to handle the weight of the Aeronca wings you plan to store. Exceeding the weight capacity can compromise the structural integrity of the rack and pose a safety risk.
-
Stability: Check that the rack is stable and level before placing the wings onto it. Ensure all components are securely fastened, and the rack is properly aligned. Any wobbling or imbalance can lead to accidents or damage to the wings.
-
Proper lifting techniques: When placing the wings onto the rack, use proper lifting techniques to prevent injuries. Lift with your legs, not your back, and ask for assistance if the wings are heavy or awkward to handle.
-
Clear walkways: Keep the area around the wing storage rack clear of any obstructions or debris. This will prevent trips, slips, and falls when accessing or maneuvering around the rack.
-
Regular inspections: Regularly inspect the rack for any signs of damage, such as loose screws or weakened components. Address any issues promptly to maintain the safety and integrity of the rack.
-
Fire safety: If you are storing the wing rack in a hangar or storage facility, ensure the area complies with fire safety regulations. Install fire extinguishers and maintain clear access to them.
It is imperative to prioritize safety at all times and adhere to best practices when using the wing storage rack. By taking these precautions, you can protect yourself, others, and your valuable Aeronca wings from potential accidents or damage.
If you have any concerns or questions regarding the safety of your wing storage rack, consult with a professional or experienced individual with knowledge in construction and aviation maintenance.