
How to Access Your DVR Recordings on Hulu
One of the great features of Hulu’s DVR service is the ability to record and save your favorite shows to watch later. Whether you’re catching up on a missed episode or storing an entire season, accessing your DVR recordings on Hulu is a breeze.
To begin, launch the Hulu app on your preferred device – this could be your smart TV, streaming media player, or even your smartphone or tablet. Make sure you’re signed in to your Hulu account.
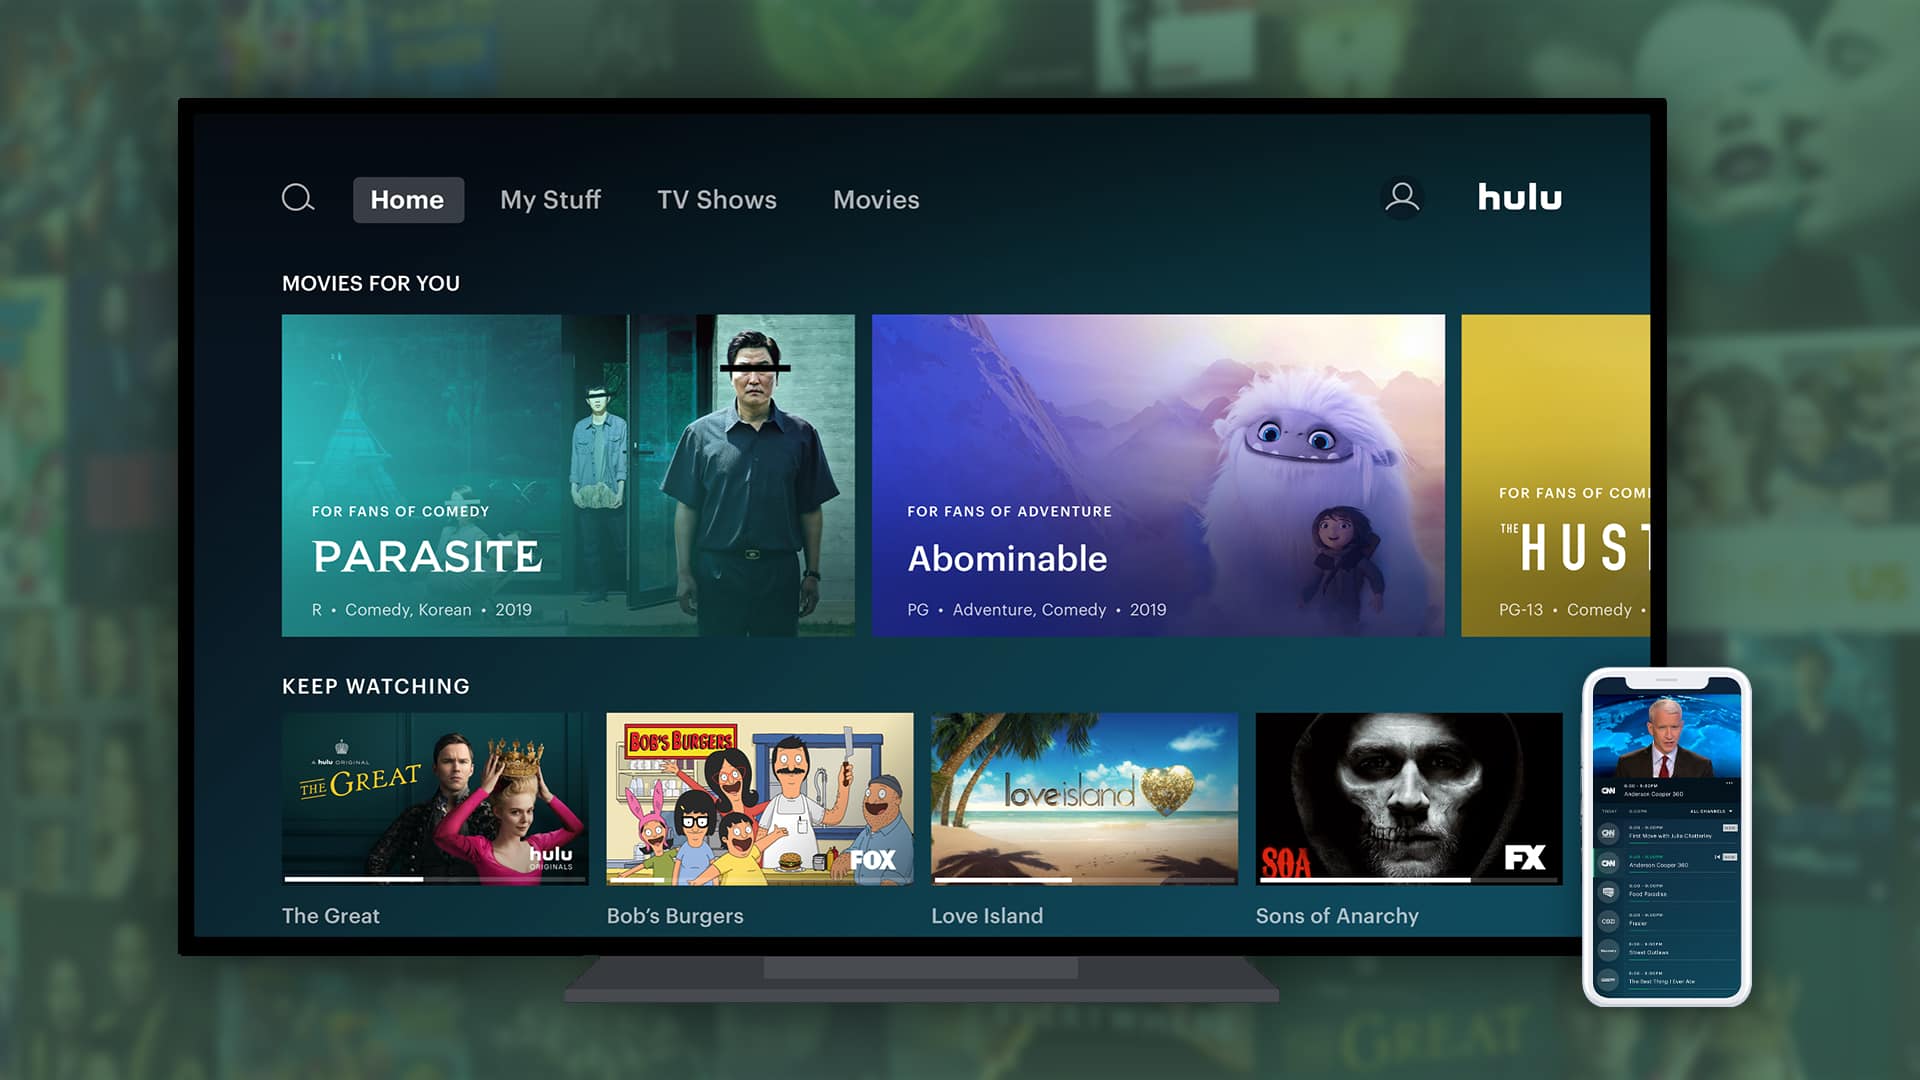
Once you’re in the Hulu app, navigate to the home screen. Here, you’ll find various sections like “Home,” “My Stuff,” and “Browse.” Look for the “My Stuff” section, as this is where your DVR recordings are stored.
Click or tap on “My Stuff,” and you’ll be taken to your personalized content library. Here, you’ll find a list of all your saved DVR recordings. If you have multiple DVR-enabled profiles within your Hulu account, make sure you select the appropriate profile to access your specific recordings.
Within the “My Stuff” section, you’ll find your DVR recordings organized by the most recent additions. Scroll through the list to find the show you want to watch and click or tap on it.
Once you select a specific show, you’ll be taken to its dedicated page. Here, you’ll see all available episodes, including the ones you’ve recorded. To access your DVR recording, simply click or tap on the episode you want to watch.
If you’ve recorded multiple episodes of the same show, Hulu will typically display them in a chronological order. This allows you to easily navigate through the different episodes and seasons as per your preference.
Now that you know how to access your DVR recordings on Hulu, you can enjoy your favorite shows at your convenience. Whether you’re on-the-go or relaxing at home, Hulu’s DVR feature gives you the flexibility to watch content on your own terms.
Step-by-Step Guide: Watching Recorded Shows on Hulu
Once you’ve accessed your DVR recordings on Hulu, it’s time to sit back, relax, and enjoy your favorite shows. Follow this step-by-step guide to successfully watch your recorded shows on Hulu:
- From the “My Stuff” section of the Hulu app, select the show you want to watch. This will take you to the show’s dedicated page.
- On the show’s page, you’ll see all the available episodes, including the ones you’ve recorded. Click or tap on the specific episode you wish to watch.
- Once you’ve chosen an episode, it will start playing on your screen. You can use the playback controls to pause, play, and adjust the volume as needed. If you need to step away or take a break, simply pause the episode and resume watching when you’re ready.
- If you want to fast forward or rewind through the episode, use the playback bar at the bottom of the screen. Simply drag the slider forward or backward to skip or go back in time. This feature is useful for skipping commercials or rewatching a particular scene.
- While watching a recorded show on Hulu, you might encounter ad breaks. However, Hulu offers the option to skip commercials on certain recordings. Keep an eye out for the “Skip Ads” button, which will appear during eligible ad breaks. Just click or tap on it to continue watching without interruptions.
- After you’ve finished watching an episode, you can go back to the show’s main page and select the next episode to continue your binge-watching session. Hulu conveniently organizes your recorded episodes in a sequential order, making it easy to navigate through seasons and choose the next episode.
With this step-by-step guide, you can make the most of Hulu’s DVR feature and enjoy your favorite recorded shows with ease. Take control of your viewing experience by accessing and watching your DVR recordings on Hulu whenever and wherever you want.
Discovering Your DVR Library on Hulu
Hulu’s DVR feature allows you to save and access your favorite shows at your convenience. To discover your DVR library on Hulu, follow these simple steps:
- Launch the Hulu app on your preferred device and sign in to your Hulu account.
- Once you’re logged in, navigate to the home screen of the Hulu app. Look for the “My Stuff” section, which houses your personalized content library.
- Click or tap on the “My Stuff” section, and you’ll be taken to your DVR library. Here, you’ll find a list of all your recorded shows, organized by the most recent additions.
- Browse through the list to discover the shows you’ve recorded. The titles and thumbnails will give you a visual representation of your recorded content.
- If you have multiple profiles within your Hulu account, make sure you select the appropriate profile to see the specific DVR library for that profile. This is especially important if you’re sharing your Hulu account with family or friends.
- For easy navigation, Hulu provides various filter and sorting options within the DVR library. You can filter recordings by genre, view only unwatched episodes, or sort them alphabetically if you prefer a specific order.
- Click or tap on a show to see all the available episodes that you’ve recorded. From this point, you can start watching a specific episode, mark episodes as watched, or even remove recordings from your library if you no longer need them.
- Enjoy exploring your DVR library on Hulu and discovering all the amazing shows you’ve recorded. From comedy and drama to reality TV and documentaries, your DVR library has all your favorite entertainment waiting for you.
By following these steps, you can easily navigate and discover your DVR library on Hulu. Make the most of this feature to keep up with your favorite shows and never miss a moment of entertainment.
Playing, Pausing, and Resuming Recordings on Hulu
Once you’ve accessed your DVR recordings on Hulu, you can easily play, pause, and resume watching your favorite shows at your convenience. Here’s a guide on how to control playback:
- From your DVR library on Hulu, select the show you want to watch by clicking or tapping on it. This will take you to the show’s dedicated page.
- On the show’s page, you’ll see a list of available episodes, including the ones you’ve recorded. Choose the specific episode you wish to watch by clicking or tapping on it.
- Once you’ve selected an episode, it will start playing on your screen. You can use the playback controls to pause the episode whenever you need to take a break. Simply click or tap on the pause button, usually represented by two vertical bars.
- If you wish to resume playback, click or tap on the play button, typically indicated by a right-facing triangle. This will continue playing the episode from where you left off.
- In case you want to go back to a certain point in the episode, use the scrubbing bar located at the bottom of the screen. Drag the slider forward or backward to fast forward or rewind to a desired timestamp. This feature allows you to easily skip through parts of the episode or revisit a particular scene.
- Adjust the volume of the playback using the volume controls on your device or within the Hulu app. Increase or decrease the volume as needed to suit your preference.
- While watching a recorded show on Hulu, you’ll come across ad breaks. However, some recordings may offer the option to skip commercials. Look out for the “Skip Ads” button, if available, which allows you to seamlessly continue watching without any interruptions.
- If you need to step away or switch to another device, Hulu offers the ability to pause playback on one device and resume watching on a different device. Simply log in to your Hulu account on the other device, access your DVR library, and continue watching from where you left off.
With these playback controls, you have the freedom to pause, resume, rewind, and skip through your DVR recordings on Hulu. Take control of your viewing experience and enjoy your favorite shows on your own schedule.
How to Fast Forward and Rewind Recorded Shows on Hulu
When watching recorded shows on Hulu, you have the flexibility to fast forward and rewind through episodes to skip or rewatch specific scenes. Here’s a step-by-step guide on how to control playback with fast forward and rewind options:
- After accessing your DVR recordings on Hulu and selecting the show you want to watch, choose the specific episode you wish to view by clicking or tapping on it.
- Once the episode starts playing, locate the scrubbing bar, which is usually located at the bottom of the screen. This bar represents the playback progress of the episode.
- To fast forward through the episode, drag the slider on the scrubbing bar towards the right. This action allows you to skip forward and jump to a later part of the episode. You can speed up the fast forward action by dragging the slider further to the right.
- If you want to rewind and go back to an earlier part of the episode, drag the slider on the scrubbing bar towards the left. This action allows you to quickly backtrack and revisit a specific moment in the episode. Similarly, you can increase the rewind speed by dragging the slider further to the left.
- While fast forwarding or rewinding, keep an eye on the video player to determine your desired timestamp. The playback will show a preview of the scene as you navigate through the episode using the scrubbing bar.
- Once you’ve reached the desired point in the episode, release the slider on the scrubbing bar to resume normal playback from that timestamp. You can adjust the playback speed by either releasing the slider slowly or quickly, depending on how far ahead or behind you want to jump.
- Remember that during the fast forward or rewind action, you might encounter ad breaks. However, some recordings on Hulu offer the option to skip commercials. If eligible, keep an eye out for the “Skip Ads” button which allows you to seamlessly continue watching without any interruptions.
- Enjoy the flexibility to fast forward and rewind through your recorded shows on Hulu, allowing you to tailor your viewing experience and watch your favorite moments at your own pace.
With these easy-to-follow steps, you can fast forward and rewind through your DVR recordings on Hulu, ensuring that you never miss a moment of your favorite shows.
Managing Your DVR Recordings on Hulu
In addition to watching your recorded shows on Hulu, the platform provides you with options to manage your DVR recordings. Here’s a guide on how to effectively manage your DVR recordings on Hulu:
- After accessing your DVR library on Hulu, locate the show for which you want to manage the recordings by clicking or tapping on it.
- On the show’s dedicated page, you’ll see a list of available episodes, including the ones you’ve recorded. Take a moment to review the episodes and seasons present in the show’s library.
- If you want to mark an episode as watched, hover over or long-press on the episode and look for the “Mark as Watched” option. This allows you to keep track of your viewing progress and easily identify which episodes you’ve completed.
- On the other hand, if you want to remove a recorded episode from your DVR library, find the “Remove from DVR” or “Delete Recording” option. Click or tap on it to confirm the deletion. Keep in mind that deleting a recording removes it from your library permanently.
- If you’re managing a series with multiple seasons, you may come across the option to “Remove All” recordings. This option allows you to delete all the episodes of a particular show from your DVR library at once.
- When removing or deleting recordings, Hulu may prompt you with a confirmation message to ensure you want to proceed. Take a moment to review the message and confirm your action to complete the management process.
- For added convenience, Hulu automatically manages your DVR storage by removing the oldest recorded episodes to make room for new ones. This ensures that you have sufficient space to continue recording and saving your favorite shows.
- Periodically review your DVR library to manage your recordings and keep it organized. By marking episodes as watched or removing recordings you no longer need, you can maintain an updated and clutter-free DVR library.
- Enjoy the ability to manage your DVR recordings on Hulu, allowing you to customize your library and ensure that it contains only the shows you want to keep.
By following these steps, you can easily manage your DVR recordings on Hulu, keeping your library organized and tailored to your preferences. Take control of your recorded content and optimize your viewing experience on Hulu.
Deleting DVR Recordings on Hulu
Hulu’s DVR feature allows you to record and save your favorite shows, giving you the freedom to watch them at your convenience. However, there may come a time when you want to delete certain DVR recordings. Here’s a guide on how to easily delete DVR recordings on Hulu:
- Access your DVR library on Hulu by navigating to the “My Stuff” section of the app. Here, you’ll find a list of all your recorded shows.
- Browse through the list and select the show for which you want to delete the recordings. Click or tap on the show to view its episodes.
- On the show’s dedicated page, you’ll see a list of available episodes, including the ones you’ve recorded. Identify the specific episode(s) you wish to delete.
- Hover over or long-press on the episode you want to delete. Look for the “Remove from DVR” or “Delete Recording” option, and click or tap on it.
- A confirmation prompt may appear to ensure you want to proceed with the deletion. Review the prompt and click or tap on “Confirm” to delete the recording.
- If you want to delete all recorded episodes of a particular show, look for the option to “Remove All” recordings. Click or tap on it to delete all episodes of the show from your DVR library.
- Keep in mind that deleting a recording removes it from your DVR library permanently. Once deleted, you will no longer have access to the episode(s) unless they are available for streaming on Hulu.
- Periodically review your DVR library to delete recordings you no longer need. This will help to free up storage space and keep your library organized with shows you truly want to keep.
- Enjoy the freedom to delete DVR recordings on Hulu, allowing you to manage your content and customize your DVR library based on your preferences.
By following these steps, you can easily delete DVR recordings on Hulu, giving you control over the content you save in your library. Keep your library organized and make room for new recordings so you can continue enjoying your favorite shows hassle-free.
Ad-Skipping on Hulu: How to Skip Commercials on Recorded Shows
One of the advantages of Hulu’s DVR feature is the ability to skip commercials on certain recorded shows. While some episodes may still have ads, Hulu offers an ad-skipping option for eligible recordings. Here’s how to skip commercials on recorded shows on Hulu:
- Access your DVR library on Hulu by navigating to the “My Stuff” section of the app. Here, you’ll find all your recorded shows.
- Browse through the list and select the show for which you want to watch a recorded episode. Click or tap on the show to view its episodes.
- On the show’s dedicated page, identify the specific episode you wish to watch. Click or tap on the episode to begin playback.
- While watching the recorded show, pay attention to the ad breaks. There may be advertisements during the episode, depending on the licensing agreements with the content providers.
- If the recorded episode is eligible for ad-skipping, you’ll notice a “Skip Ads” button that appears during the commercial breaks. Look for this button to skip the commercials and continue watching the episode uninterrupted.
- When the “Skip Ads” button appears, click or tap on it to skip the commercials. The episode will resume playing immediately after, allowing you to enjoy the show without the interruptions of advertisements.
- Keep in mind that not all recorded shows on Hulu are eligible for ad-skipping. The availability of this feature depends on Hulu’s licensing agreements and the specific content you’re watching.
- While ad-skipping enhances your viewing experience on certain recordings, it’s important to support content creators and the sustainability of the streaming industry by watching advertisements when they are present.
By following these steps, you can take advantage of the ad-skipping feature on Hulu, allowing you to enjoy your recorded shows without the interruptions of commercials. While not available for all episodes, ad-skipping enhances your viewing experience and lets you focus on the content you love.
Troubleshooting: Common Issues with Watching Recorded Shows on Hulu
While Hulu’s DVR feature offers a great way to record and watch your favorite shows, you may encounter some common issues when trying to play back recorded shows. Here are some troubleshooting tips to address these common issues:
- Playback Errors: If you encounter playback errors while trying to watch a recorded show, first try refreshing the page or app. If the issue persists, check your internet connection to ensure it’s stable. You can also try clearing your browser cache or reinstalling the Hulu app to resolve any technical issues.
- Missing Recordings: Sometimes, recorded shows may appear to be missing from your DVR library. Ensure that you are logged in to the correct Hulu account and profile that was used to record the show. Additionally, check if the show is still available on Hulu’s streaming library or if it has expired due to licensing restrictions.
- Partial Recordings: If your recorded show plays only a portion of the episode or stops abruptly, it may indicate that there was an issue during the recording process. Check if the show is still available for streaming on Hulu and try recording it again.
- Ad Skipping Unavailable: While Hulu offers ad-skipping for certain recordings, there may be cases where ad-skipping is not available. This depends on the licensing agreements with content providers. If you’re unable to skip ads on a recorded show, it’s likely due to the specific terms set for that show.
- Playback Quality: If you notice that the playback quality of your recorded show is poor, it could be due to a slow or unstable internet connection. Try connecting to a different network or check if there are any issues with your internet service provider. Alternatively, you can adjust the playback quality settings within Hulu to match your internet speed and device capabilities.
- Device Compatibility: Not all devices may support Hulu’s DVR feature. Before recording shows, ensure that your device is compatible with Hulu’s DVR service. You can check Hulu’s official website for a list of supported devices and make sure your device meets the required specifications.
- Contact Hulu Support: If you’ve tried troubleshooting steps and are still experiencing issues with watching recorded shows on Hulu, consider reaching out to Hulu’s customer support. They can provide further assistance and troubleshoot specific issues you may be facing.
By following these troubleshooting tips, you can address common issues that may arise when watching recorded shows on Hulu. Enjoy uninterrupted playback and make the most out of your DVR feature on Hulu.