
Setting the Time and Date on a Timex Ironman Watch
If you’ve just purchased a Timex Ironman watch and need to set the time and date, don’t worry – it’s a simple process. In this guide, we’ll take you through the step-by-step instructions to ensure your watch is set accurately. So let’s get started on getting your Timex Ironman ready to go!
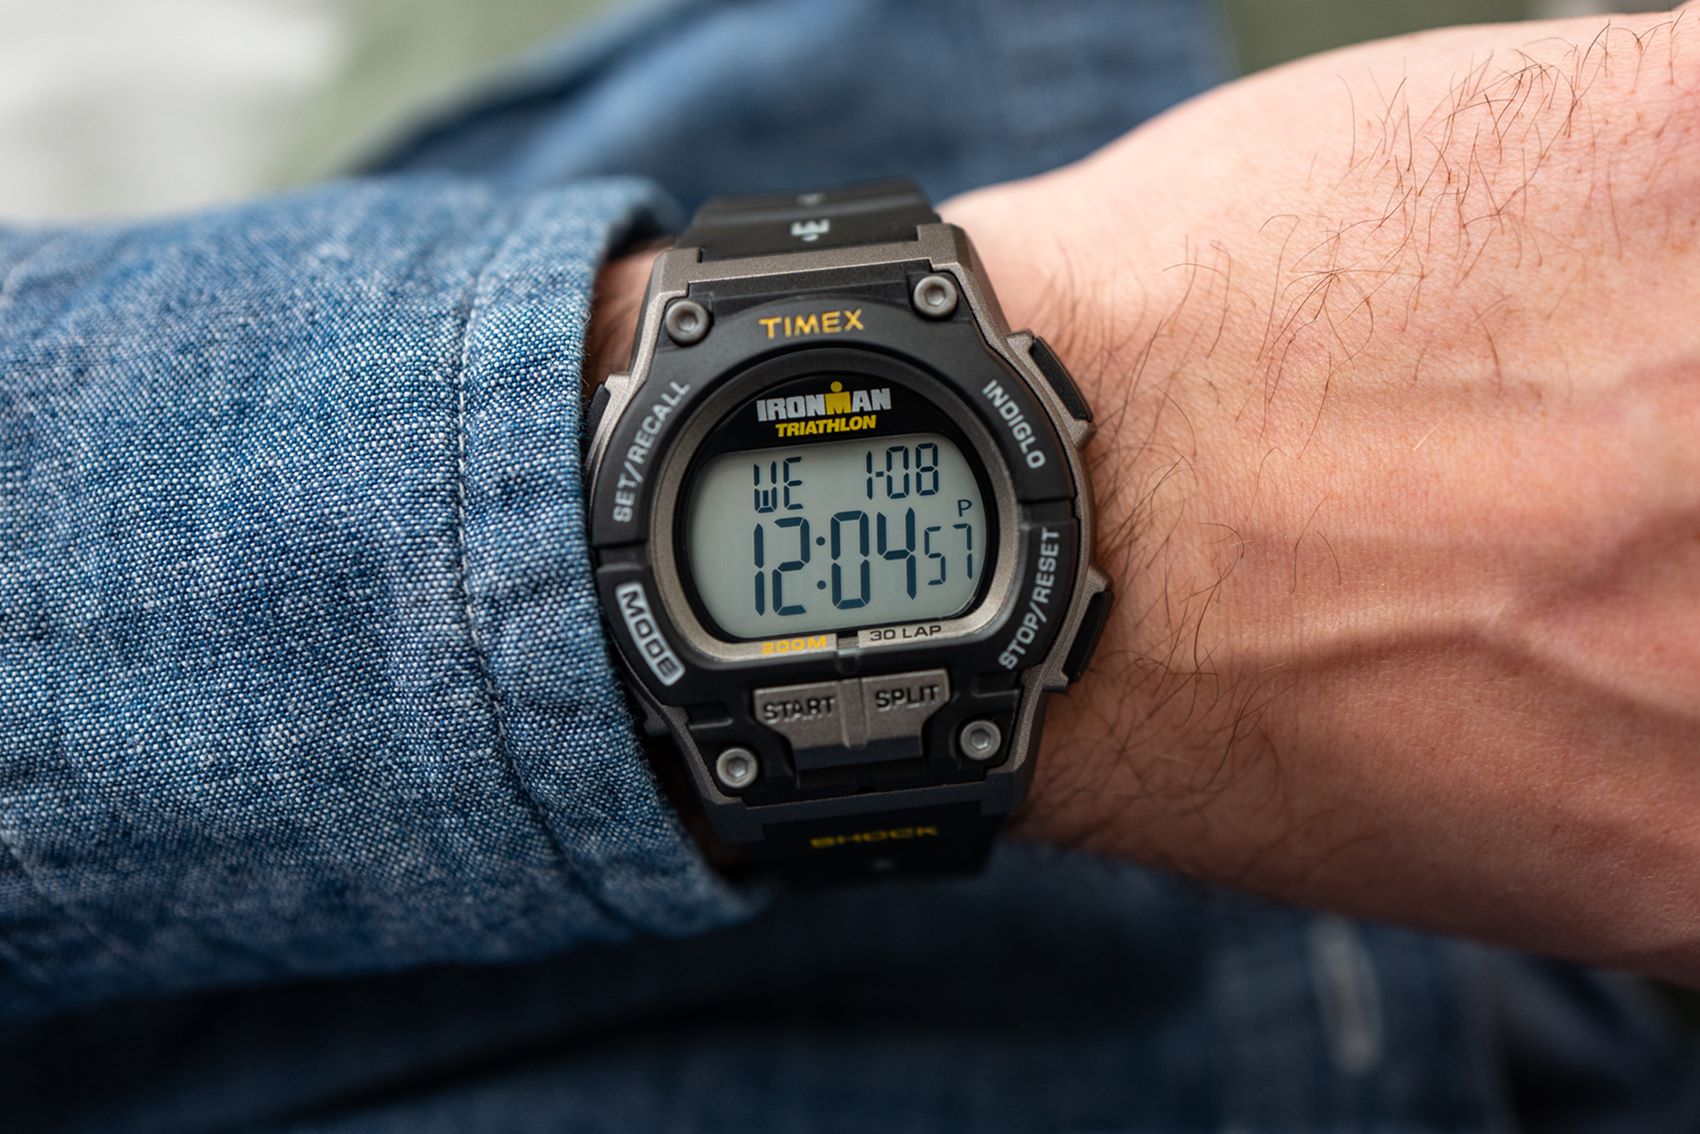
To begin, make sure your watch is in “Time Set” mode. Look for the mode button, usually located on the side of the watch, and press it until the display reads “Set.” This indicates that you can now adjust the time and date.
Next, you’ll want to adjust the hour. Press the appropriate buttons to increase or decrease the hour until it corresponds to the current time. Pay attention to whether it’s AM or PM, as you’ll want to select the correct setting.
After setting the hour, move on to adjusting the minutes. Use the designated buttons to increase or decrease the minutes until they match the current time. Take your time to ensure the accuracy of this step, as precise timing is essential.
Now, let’s set the date. Use the buttons provided to increase or decrease the date until it accurately reflects the current day. Some watches may have the option to set the month as well, so be sure to adjust this if necessary.
Depending on your preference, you may need to choose the correct time format. For 12-hour format, make sure the display indicates AM or PM accordingly. For 24-hour format, there is no need to worry about AM or PM.
Once you have completed all the necessary adjustments, it’s time to exit the “Time Set” mode. Press and hold the mode button again until the display returns to the regular timekeeping mode.
If your Timex Ironman watch has a date feature, you can activate it by pressing the designated button or sequence of buttons. Consult the user manual for specific instructions on how to enable this feature on your model.
Additionally, if your watch has an alarm function, you can set it to your desired time by following the instructions in the user manual. This can be handy for reminders or waking up in the morning.
Finally, if you own a Timex Run Trainer GPS watch, refer to the user manual for detailed instructions on adjusting various settings, such as GPS functionality and workout preferences.
With these easy-to-follow steps, you can now confidently set the time and date on your Timex Ironman watch. Whether it’s for daily use or specific activities, having an accurate watch will ensure you stay on track and punctual. Enjoy the features and reliability that the Timex Ironman watch offers!
Step 1: Put the watch into “Time Set” Mode
Before you can begin setting the time and date on your Timex Ironman watch, you need to put it into “Time Set” mode. This mode allows you to make adjustments to the timekeeping function of the watch. Here’s how you can do it:
1. Locate the mode button on your Timex Ironman watch. Typically, it is located on the side of the watch along with other control buttons.
2. Press the mode button until the display on your watch shows “Set.” This indicates that you have successfully entered the “Time Set” mode.
Putting your Timex Ironman watch into “Time Set” mode is a crucial first step in setting the time and date accurately. By entering this mode, you gain control over the watch’s settings and ensure that the changes you make are applied correctly. Remember to consult your watch’s user manual for specific instructions if you have difficulty locating the mode button.
With your watch in “Time Set” mode, you’re now ready to move on to the next step of adjusting the hour. Be sure to follow the instructions carefully to ensure that your Timex Ironman watch displays the correct time and date.
Step 2: Adjust the Hour
Now that your Timex Ironman watch is in “Time Set” mode, it’s time to adjust the hour to match the current time. Follow these simple steps to ensure accuracy:
1. Look for the designated buttons on your watch that allow you to increase or decrease the hour. These buttons are usually labeled with “+” and “-” symbols or specific icons.
2. Press the appropriate button to adjust the hour. If it’s currently showing an incorrect hour, press the “-” button to decrease the hour or the “+” button to increase it.
3. Pay close attention to whether the hour displayed is AM or PM. Depending on your preference, make sure you set the correct time format.
4. Continue pressing the buttons until the hour on your Timex Ironman watch corresponds to the current hour.
By adjusting the hour accurately, you ensure that your watch displays the correct time. This step is essential for keeping track of events, meetings, and appointments. Remember to regularly synchronize the time on your Timex Ironman watch with an accurate time source to maintain precision.
Now that you’ve set the hour, it’s time to move on to the next step – adjusting the minutes. Stay tuned for the instructions on how to do so in the upcoming section.
Step 3: Adjust the Minutes
After setting the correct hour on your Timex Ironman watch, it’s time to move on to adjusting the minutes. Follow these simple steps to ensure accuracy:
1. Locate the designated buttons on your watch that allow you to increase or decrease the minutes. These buttons are typically labeled with “+” and “-” symbols or specific icons.
2. Press the appropriate button to adjust the minutes. If the minutes displayed are incorrect, press the “-” button to decrease them or the “+” button to increase them.
3. Take your time to carefully adjust the minutes and ensure accuracy. Paying attention to the details will ensure that your watch displays the correct time.
4. Continue pressing the buttons until the minutes on your Timex Ironman watch match the current minutes.
Setting the minutes accurately is crucial for keeping track of time with precision. Whether it’s for meeting deadlines or planning your day, having the correct minutes on your watch is essential.
Now that you’ve successfully adjusted the minutes, you’re one step closer to setting the time and date on your Timex Ironman watch. Stay tuned for the next section to learn how to set the date and choose the correct time format.
Step 4: Set the Date
Now that you have set the correct time on your Timex Ironman watch, it’s time to move on to setting the date. Follow these simple steps to ensure accuracy:
1. Look for the designated buttons on your watch that allow you to increase or decrease the date. These buttons are typically labeled with “+” and “-” symbols or specific icons.
2. Press the appropriate button to adjust the date. If the date displayed is incorrect, press the “-” button to decrease the date or the “+” button to increase it.
3. Take your time to carefully adjust the date and ensure accuracy. Pay attention to both the day and the month to ensure they correspond to the current date.
4. Continue pressing the buttons until the date on your Timex Ironman watch matches the current date.
Setting the date correctly on your watch is important for staying organized and keeping track of appointments, events, and other important deadlines. By ensuring that the date is accurate, you can easily plan and manage your activities.
Now that you’ve successfully set the date, your Timex Ironman watch is ready to keep you on track with both the time and the day. In the next step, we’ll delve into choosing the correct time format to match your preference. Stay tuned!
Step 5: Choose the Correct Time Format
Now that you have set the time and date on your Timex Ironman watch, it’s time to choose the correct time format. Depending on your preference or regional convention, you can select between a 12-hour or 24-hour time format. Here’s how you can do it:
1. Look for the designated button or setting that allows you to toggle between the time formats. This may be labeled as “12/24” or something similar.
2. Press the button or navigate to the setting to choose your desired time format.
3. If you prefer a 12-hour time format, make sure the display on your watch indicates AM or PM accordingly. This will help you distinguish between morning and afternoon or evening hours.
4. If you prefer a 24-hour time format, there is no need to worry about AM or PM indicators. The watch will display the time in a continuous 24-hour cycle.
Selecting the correct time format ensures that your Timex Ironman watch displays the time in a way that is most convenient for you. Whether you prefer the familiar 12-hour format with AM and PM indicators or the simplicity of the 24-hour format, choosing the right time format helps you read the time at a glance.
With the time format chosen, your Timex Ironman watch is now perfectly set to match your preferred way of telling time. In the next step, we’ll learn how to exit the “Time Set” mode to return to regular timekeeping. Keep reading!
Step 6: Exit the “Time Set” Mode
After setting the time, date, and selecting the correct time format on your Timex Ironman watch, it’s important to exit the “Time Set” mode in order to return to regular timekeeping. Follow these simple steps:
1. Locate the mode button on your Timex Ironman watch. This button is usually found on the side of the watch along with the other control buttons.
2. Press and hold the mode button until the display on your watch changes or returns to the regular timekeeping mode.
3. Release the mode button once the display shows the current time and date, indicating that you have successfully exited the “Time Set” mode.
Exiting the “Time Set” mode is important to ensure that any changes you made to the time and date settings are saved and applied. By returning to the regular timekeeping mode, you can now enjoy the accurate time and date on your Timex Ironman watch.
With the “Time Set” mode properly exited, you can confidently rely on your Timex Ironman watch to keep you on track throughout the day. In the next step, we will explore optional features such as activating the date feature and setting the alarm. Keep reading to learn more!
Step 7: Activate the Date Feature (Optional)
If your Timex Ironman watch has a date feature, you have the option to activate it. The date feature displays the current day of the month, allowing you to easily keep track of not only the time but also the date. Here’s how you can activate the date feature:
1. Refer to the user manual of your Timex Ironman watch to identify the specific button or sequence of buttons that activates the date feature.
2. Once you have located the appropriate button, press it or follow the necessary sequence to activate the date display on your watch.
3. Check the display on your watch to ensure that the current day of the month is now being shown.
Activating the date feature is beneficial for those who frequently need to reference the current date. It can be particularly useful for scheduling appointments, meetings, or simply staying organized.
Keep in mind that not all Timex Ironman watch models may have a date feature. If your watch does not come equipped with this feature, you can still rely on the accurate timekeeping capabilities. Refer to your watch’s user manual for specific information regarding its features and functionalities.
In the next step, we will explore the option to set the alarm on your Timex Ironman watch. Stay tuned for more functionality and features!
Step 8: Set the Alarm (Optional)
If your Timex Ironman watch comes with an alarm function, you have the option to set it to your desired time. The alarm feature is perfect for reminders or waking up in the morning. Follow these steps to set the alarm on your watch:
1. Consult the user manual of your Timex Ironman watch to identify the specific button or sequence of buttons for setting the alarm.
2. Once you have located the appropriate button, press it or follow the necessary sequence to enter the alarm setting mode.
3. Use the designated buttons on your watch to increase or decrease the desired alarm time. Some watches may have separate buttons for setting the hour and minute, while others may require a combination of keys.
4. Pay attention to whether the alarm time is set for AM or PM, depending on your preference.
5. Continue adjusting the alarm time until it matches your desired wake-up or reminder time.
6. Once you have set the alarm, exit the alarm setting mode by following the instructions provided in the user manual.
Setting the alarm on your Timex Ironman watch is a convenient feature that helps you stay organized and on schedule. Whether you need a gentle reminder for important tasks or a reliable wake-up call, the alarm function ensures you never miss a beat.
Not all Timex Ironman watch models may include an alarm feature. If your watch does not have this function, you can still rely on the accurate timekeeping capabilities and other useful features it offers.
In the next step, we will cover specific instructions for adjusting the Timex Run Trainer GPS watch. Stay tuned for more guidance on utilizing the full functionality of your watch!
Step 9: Adjust the Timex Run Trainer GPS Watch
If you own a Timex Run Trainer GPS watch, it comes with advanced features specifically designed for tracking your workouts and monitoring your fitness progress. Here’s how you can adjust various settings on your Timex Run Trainer GPS watch:
1. Consult the user manual provided with your Timex Run Trainer GPS watch for specific instructions on navigating the menu options and buttons.
2. Familiarize yourself with the different settings available on your watch, such as GPS functionality, workout preferences, and data display.
3. Take your time to understand the navigation buttons and how they work. This will allow you to easily access the desired settings and make adjustments as needed.
4. Use the menu options to select and adjust GPS-related settings, such as enabling or disabling the GPS feature, setting up waypoints or routes, and adjusting location and distance settings.
5. Explore the workout preferences and customize them according to your specific needs. These preferences may include workout alerts, lap settings, heart rate monitoring, and more.
6. Adjust the data display to personalize the information shown on your watch during workouts. You can choose to display metrics like time, distance, pace, heart rate, and more.
7. Take advantage of any additional features your Timex Run Trainer GPS watch offers, such as activity tracking, interval workouts, and virtual partner functions.
Adjusting the settings on your Timex Run Trainer GPS watch allows you to personalize your training experience and optimize your workout tracking. By understanding and utilizing the various features, you can make the most out of your fitness journey.
Refer to the user manual for detailed instructions specific to your Timex Run Trainer GPS watch model. The manual will provide a comprehensive guide on adjusting all the available settings and maximizing the performance of your watch.
With these steps, you have successfully familiarized yourself with adjusting the Timex Run Trainer GPS watch. Enjoy exploring all the features and functionality it offers to enhance your fitness experience!