
Tools and Materials Needed
When it comes to replacing the battery in a watch, having the right tools and materials is essential. Here’s a list of what you’ll need:
- A small flathead screwdriver or a watch case opener tool
- Tweezers or a pair of small, fine-pointed pliers
- A lint-free cloth or microfiber cloth
- A new battery that is suitable for your specific watch model
- A magnifying glass or jeweler’s loupe for better visibility
- A work mat or soft surface to protect your watch from scratches
The small flathead screwdriver or watch case opener tool will be used to open the watch case, making it easy to access the battery compartment. Tweezers or small, fine-pointed pliers will help you handle the battery and any small components with precision. Ensure that the cloth you use is lint-free to avoid leaving fibers behind and potentially damaging the watch’s mechanisms.
It is crucial to choose the right battery size and type for your watch model. Check the watch’s manufacturer instructions or consult a professional if you are unsure about the required battery. Additionally, a magnifying glass or jeweler’s loupe will aid in properly identifying and handling tiny components and intricate details within the watch.
To protect the watch from scratches or damage, use a work mat or soft surface. This will provide a cushioning layer and prevent any accidental slips or falls. It is crucial to have a clean and uncluttered work area to ensure that you can work comfortably and reduce the chance of losing any small parts.
By gathering these tools and materials beforehand, you’ll be well-prepared to replace the battery in your watch with ease and accuracy.
Step 1: Determine the Type of Battery
Before you can replace the battery in your watch, it is essential to determine the type of battery it requires. Each watch model may have different battery requirements, so it’s crucial to identify the specific battery type to ensure compatibility and optimal performance. Here’s how you can determine the type of battery for your watch:
1. Refer to the manufacturer’s instructions: Start by checking the user manual or any documentation that came with your watch. The manufacturer often specifies the battery type and size required for your specific watch model. Look for a section dedicated to battery replacement or a list of compatible batteries.
2. Inspect the watch case: If you don’t have access to the manufacturer’s instructions, you can inspect the watch case itself. Look for any markings, engravings, or symbols that indicate the type or size of the battery. Common battery codes include CR2016, SR626SW, and LR44. However, keep in mind that not all watches feature visible battery information on the case, so this method may not always be reliable.
3. Consult a professional: If you are unable to determine the battery type through the user manual or by inspecting the watch case, it may be best to consult a professional watchmaker or a jeweler. They have the expertise and knowledge to identify the correct battery for your watch model accurately.
It’s crucial not to guess or assume the battery type, as using the wrong battery could damage the watch or result in poor performance. Improperly fitting batteries can also lead to short circuiting or fluid leaks, which can be harmful to both the watch and your skin. Ensuring that you have the correct battery type will help extend the longevity of your timepiece and maintain its accuracy.
Step 2: Prepare the Work Area
Preparing the work area before replacing the battery in your watch is crucial for a smooth and organized process. By following these steps, you can create an environment that is conducive to a successful battery replacement:
1. Find a well-lit and clean space: Choose a location with ample lighting so that you can clearly see the tiny components and markings on your watch. It’s important to work in a clean area to minimize the risk of dirt or debris getting into the watch mechanisms.
2. Gather all the necessary tools and materials: Before you start, make sure you have all the required tools and materials mentioned earlier in this guide. Having everything readily available will prevent unnecessary interruptions during the battery replacement process.
3. Get organized: Use a small tray or container to keep the screws, battery, and any other small parts in one place. This will help you stay organized and reduce the risk of losing important components.
4. Remove any distractions: Ensure that the work area is free from distractions. Turn off any electronics or devices that could divert your attention and potentially lead to mistakes.
5. Take precautions: If you’re working on a valuable or sentimental watch, you may want to lay down a soft cloth or work mat to protect the watch’s surface from scratches or damage.
By taking the time to prepare the work area properly, you’ll create a comfortable and organized space to perform the battery replacement. This will help minimize the chance of errors and ensure that your watch remains in optimal condition throughout the process.
Step 3: Choose a Proper Working Surface
Selecting the right working surface is crucial when replacing the battery in your watch. By choosing a suitable surface, you can ensure stability, minimize the risk of slipping or dropping your watch, and protect both the watch and the working area. Follow these guidelines to choose a proper working surface:
1. Use a flat and stable surface: Find a solid and level surface to work on, such as a table or a desk. This will provide stability and prevent accidental movements or shifts while working on your watch.
2. Cover the surface: Consider covering the working surface with a soft cloth or a non-slip mat. This acts as a cushioning layer and helps protect the watch from scratches or damage that may occur due to accidental drops or slips.
3. Prevent static electricity: Avoid working on surfaces that generate static electricity, such as carpeted areas or surfaces made of synthetic materials. Static electricity can interfere with sensitive watch components and potentially cause damage.
4. Provide ample space: Ensure that you have enough space on the working surface to comfortably lay out your tools, materials, and the watch itself. This will prevent overcrowding and reduce the chance of losing any small parts during the battery replacement process.
5. Consider a dedicated watch repair mat: If you plan to work on watches regularly, investing in a dedicated watch repair mat may be beneficial. These mats often come with compartments and markings to keep your tools organized and make the process more efficient.
By selecting a proper working surface, you set the foundation for a successful and safe battery replacement. Taking the time to create an ideal working environment will help streamline the process and ensure the longevity of your watch.
Step 4: Open the Watch Case
To replace the battery in your watch, you’ll need to open the watch case to access the battery compartment. Follow these steps to safely open the watch case:
1. Determine the type of watch case: Watches typically have either a screw-down case back or a press-fit (snap-on) case back. Identify the type of case your watch has before proceeding.
– For a screw-down case back: Look for small notches or slots on the case back. You’ll need a small flathead screwdriver or a watch case opener tool specifically designed for screw-down case backs.
– For a press-fit (snap-on) case back: These case backs do not have visible screws. You’ll need a watch case opener tool or a case knife with a thin blade to open a press-fit case back safely.
2. Position the watch securely: Hold the watch securely with one hand to ensure it doesn’t slip or fall during the opening process. Use a soft cloth or a pair of watch case holders to provide a firm grip without scratching the watch.
3. Align the tool or knife: If you have a screw-down case back, insert the notched end of the tool or the flathead screwdriver into the slots on the case back. For a press-fit case back, insert the thin blade of the case knife or the case opener tool into the gap between the case back and the watch case’s edge.
4. Apply gentle pressure: Rotate the tool counterclockwise for a screw-down case back or carefully insert the tool under the case back edge and lift it up for a press-fit case back. Apply steady and even pressure, but be cautious not to use excessive force, as this could damage the case or the watch’s components.
5. Continue opening the case: Once you have successfully loosened the case back, carefully lift it away from the watch case. You may need to repeat the process from different points around the case back if it is a press-fit style.
Opening the watch case can be challenging, especially if it has not been done before or if it’s a tightly sealed case back. If you’re unsure or uncomfortable doing it yourself, it’s best to seek assistance from a professional watchmaker or jeweler to avoid any damage to your valuable timepiece.
Step 5: Identify the Battery Compartment
Once you have successfully opened the watch case, the next step is to identify the battery compartment. This is where the old battery is located and where you will insert the new battery. Follow these steps to locate the battery compartment in your watch:
1. Examine the watch movement: The battery compartment is typically located near the watch movement, which is the heart of the watch that powers its functions. Look for a small compartment or recessed area within the watch where the battery is housed.
2. Refer to the user manual or manufacturer’s instructions: If you have the user manual or any documentation that came with your watch, consult it for specific information on the battery compartment’s location. The manufacturer may provide detailed instructions or illustrations to help you locate it.
3. Observe for markings or labels: Some watches have markings, labels, or indications that point to the battery compartment. Look for words like “Battery” or battery-related symbols, such as a “+” and “-” sign, to guide you.
4. Use a magnifying glass or jeweler’s loupe: In some cases, the battery compartment may be small and difficult to see with the naked eye. To get a clearer view, use a magnifying glass or a jeweler’s loupe. These tools can help you spot the battery compartment with greater precision.
5. Be cautious with delicate components: While locating the battery compartment, be careful not to touch or disturb any other delicate components in the watch, such as the balance wheel or the escapement mechanism. These parts are crucial for the watch’s proper functioning and should be handled with care.
If you’re having trouble identifying the battery compartment, it is advisable to seek professional help. A watchmaker or a jeweler with experience in watch repairs can assist you in locating the battery compartment and guide you through the next steps of the battery replacement process.
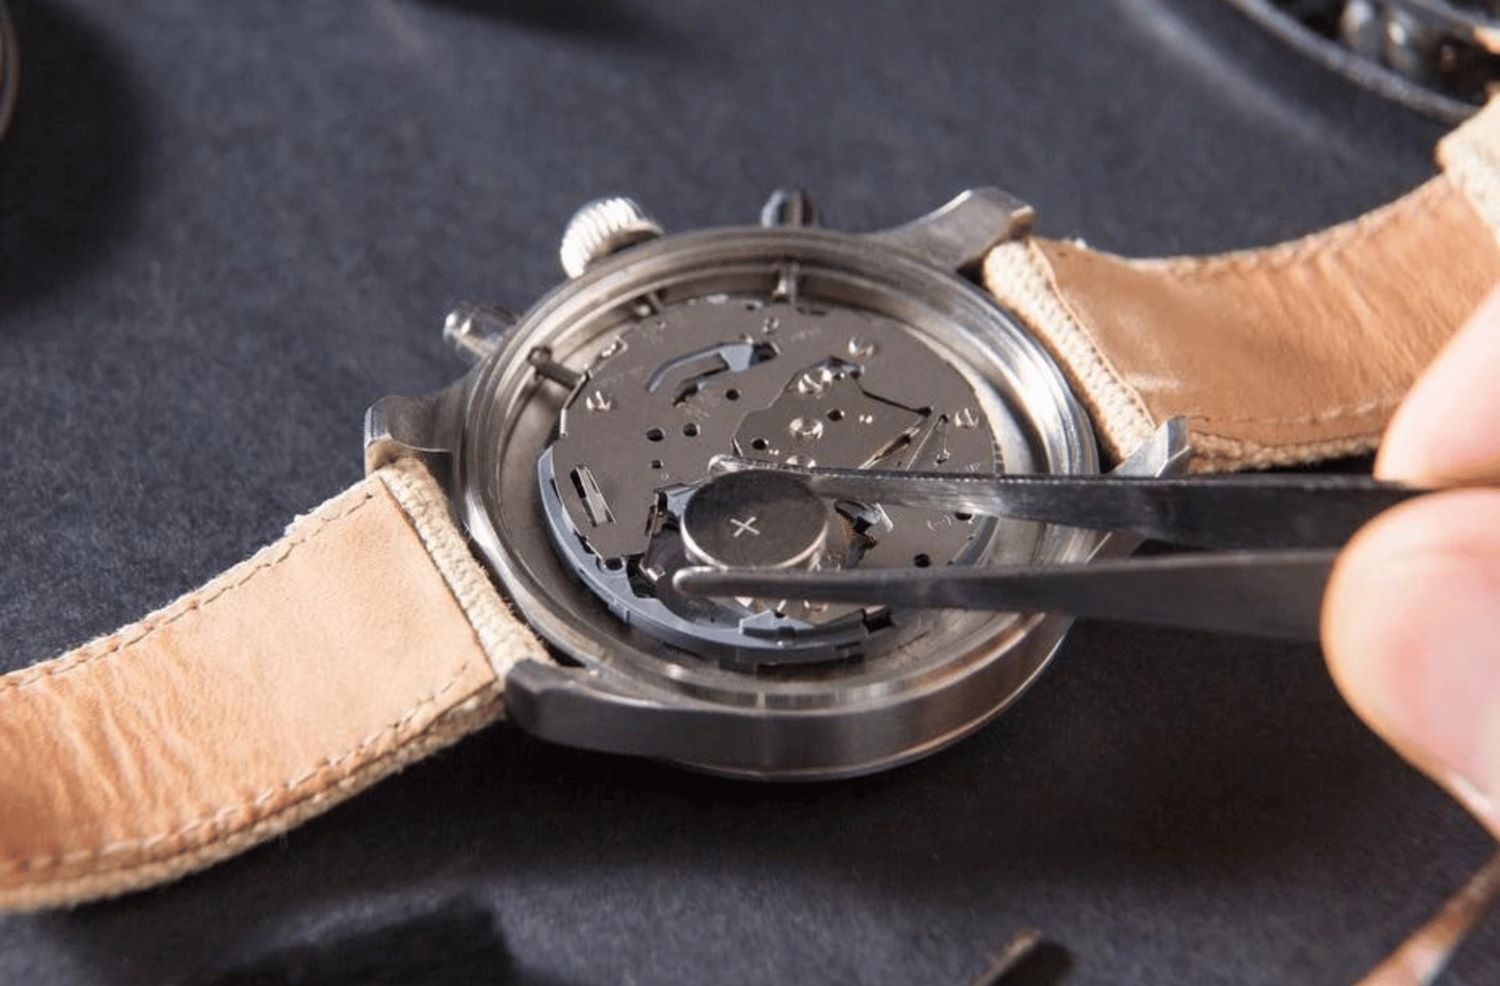
Step 6: Remove the Old Battery
With the battery compartment located, the next step is to remove the old battery from your watch. Follow these steps to safely remove the old battery:
1. Take precautions: Before handling the old battery, take precautions to avoid electric shock or damage. Ensure your hands are clean and dry, and consider wearing gloves to prevent any contact with chemicals or oils on the skin.
2. Use tweezers or pliers: Depending on the size and accessibility of the battery, you can use a pair of tweezers or small, fine-pointed pliers to remove it. Gently grasp the battery at the edges and carefully lift it out of the battery compartment.
3. Pay attention to the battery orientation: Take note of the battery’s orientation before removing it. Most watch batteries have markings, such as a “+” and “-” symbol, to indicate the correct polarity. Make note of which side is facing up or down, as the new battery will need to be inserted in the same orientation.
4. Dispose of the old battery properly: Once you have removed the old battery, it is essential to dispose of it in an environmentally friendly manner. Old batteries should not be thrown in regular waste bins. Check with your local recycling center for proper disposal methods or find battery recycling programs in your area.
5. Inspect for any corrosion or damage: While the battery is removed, inspect the battery compartment for any signs of corrosion, leakage, or damage. If you notice any issues, it may be necessary to clean the compartment before proceeding with the battery replacement.
By following these steps, you will safely remove the old battery from your watch. Remember to handle the old battery with care and dispose of it properly to minimize environmental impact.
Step 7: Clean the Battery Compartment
After removing the old battery from your watch, it’s essential to clean the battery compartment before inserting the new battery. Cleaning the battery compartment helps ensure a good connection between the battery and the watch, promoting optimal performance. Follow these steps to effectively clean the battery compartment:
1. Inspect the battery compartment: Take a close look at the battery compartment for any signs of dirt, debris, or corrosion. Use a magnifying glass or jeweler’s loupe if needed to get a clear view.
2. Remove visible debris: If you notice any visible debris or dust particles, use a soft, lint-free cloth or a brush specifically designed for watch cleaning to gently wipe or brush away the dirt. Be careful not to apply excessive pressure or use sharp tools that could scratch or damage the watch.
3. Address corrosion: If you observe any signs of corrosion such as green or white residue in the battery compartment, it is important to address it. Dip a cotton swab in rubbing alcohol or a specialized watch cleaning solution, and gently clean the affected areas. Take caution not to let any liquid seep into other components of the watch.
4. Dry the compartment: After cleaning, use a dry, lint-free cloth to thoroughly dry the battery compartment. Ensure that there is no moisture remaining before proceeding with the battery replacement process.
5. Professional assistance: If you are unsure about cleaning the battery compartment or if you encounter excessive corrosion, it is recommended to seek professional help from a watchmaker or a jeweler. They have the expertise and tools to effectively clean the compartment without causing any damage to the watch.
By taking the time to clean the battery compartment, you ensure that the new battery will have a proper and secure connection, maximizing the longevity and performance of your watch.
Step 8: Insert the New Battery
With the battery compartment cleaned, it’s time to insert the new battery into your watch. Follow these steps to properly insert the new battery:
1. Check the battery orientation: Examine the old battery that you removed earlier and take note of its orientation. Most watch batteries have markings, such as a “+” and “-” symbol, to indicate the correct polarity. Ensure that you insert the new battery in the same orientation.
2. Handle the new battery with care: Before handling the new battery, ensure that your hands are clean and dry. Avoid touching the battery terminals directly, as oils and dirt on your fingers can interfere with its performance. Hold the battery by the edges to minimize contact with the terminals.
3. Align the battery correctly: Gently place the new battery into the battery compartment, aligning it according to the correct polarity as indicated by the markings inside the compartment. Ensure that the battery sits securely and fully in place, making proper contact with the watch’s battery contacts.
4. Apply slight pressure if necessary: Depending on the design of the watch, you may need to apply slight pressure to ensure the battery is seated properly. Be careful not to use excessive force, as it can damage the battery or the watch’s delicate mechanisms.
5. Test the battery connection: Once the new battery is inserted, test for proper battery connection by gently pressing the watch’s crown or a specific function button. The watch should display some activity, such as the second hand moving or the digital display illuminating. This indicates that the new battery is functioning correctly.
It’s important to note that watch batteries have a limited lifespan, and their performance can vary. If your watch does not show any activity or if the display is irregular after inserting the new battery, it may be necessary to seek professional assistance to troubleshoot and address any potential issues.
By following these steps, you can successfully insert the new battery into your watch and ensure that it is properly connected and functioning as expected.
Step 9: Test the Watch
After inserting the new battery, it’s important to test your watch to ensure it is functioning correctly. Follow these steps to test the watch after battery replacement:
1. Set the time: If your watch has stopped or its time is no longer accurate, set the correct time using the crown or any other designated watch buttons. Refer to the user manual or manufacturer’s instructions for specific guidance on setting the time for your watch model.
2. Observe the watch’s functions: Pay attention to the different functions and features of your watch, such as the second hand movement, digital display, or any other complications specific to your timepiece. Make sure that all functions are working as intended.
3. Check for accuracy: Allow the watch to run for at least 24 hours and compare the time displayed on your watch with a reliable time source, such as an atomic clock or your smartphone. Note any significant discrepancies in timekeeping accuracy.
4. Test additional features (if applicable): If your watch has additional features such as a date or chronograph function, test those functions to ensure they are operating properly. Set the date and observe its change at midnight, or activate the chronograph and check if all the sub-dials are functioning as expected.
5. Assess power reserve: If your watch has a power reserve indicator, verify that it is displaying the appropriate level of charge. This is especially important for mechanical or automatic watches that rely on the stored energy from the mainspring.
If you encounter any issues during the testing process, such as functions not working correctly or significant timekeeping discrepancies, it may be necessary to seek professional assistance from a watchmaker or technician. They can diagnose and address any potential issues with the watch’s mechanisms or circuitry.
By thoroughly testing your watch after replacing the battery, you ensure that it is in proper working order and ready to continue keeping time accurately.
Step 10: Close the Watch Case
After successfully inserting the new battery and testing the watch functions, it’s time to close the watch case. Follow these steps to securely close the watch case:
1. Align the case back: Ensure that the case back is properly aligned with the watch case. Look for any indentations, grooves, or markings that indicate the correct position for the case back closure.
2. Apply gentle pressure: Hold the watch firmly in one hand and use your other hand to apply gentle and even pressure to the case back. For a screw-down case back, rotate it clockwise using a small flathead screwdriver or a watch case opener tool. For a press-fit (snap-on) case back, apply steady pressure to push the case back into place.
3. Listen or feel for a click: As you apply pressure, listen for a distinct click or feel a slight resistance. This indicates that the case back is securely closed. If you’re closing a screw-down case back, ensure that it is tightened enough to be water-resistant but not overly tight.
4. Check for proper alignment: After closing the case back, visually inspect the watch to ensure that the case back is aligned evenly with the watch case. It should fit flush and not appear lopsided or tilted.
It’s important to note that some watches may require specific tools or techniques to close the case back properly. If you’re unsure or uncomfortable closing the case back yourself, it’s advisable to consult a professional watchmaker or jeweler for assistance.
By securely closing the watch case, you protect the internal components from dust, moisture, and other potential damage. This helps maintain the watch’s longevity and preserves its functionality for years to come.
Step 11: Calibrate the Watch (if necessary)
After closing the watch case, it’s a good idea to calibrate the watch to ensure accurate timekeeping. Calibrating the watch may be necessary if you noticed significant time discrepancies during the testing phase or if the watch has been inactive for an extended period. Follow these steps to calibrate your watch:
1. Set the watch to a reliable time source: Synchronize the watch’s time with a reliable time source, such as an atomic clock or your smartphone. Ensure that the time source you choose is accurate and reliable.
2. Adjust the hands (if applicable): If your watch has hands (analog display), use the crown to adjust the hands to match the correct time. You may need to pull out the crown to a specific position, based on the watch’s mechanism, to make precise adjustments.
3. Set the digital display (if applicable): For watches with a digital display, use the designated buttons or controls to set the time precisely according to the reliable time source you selected.
4. Observe accuracy over time: Allow the watch to run for at least 24 hours and monitor its accuracy compared to the reliable time source. Note any significant deviations in timekeeping and make further adjustments if necessary.
If you continue to experience significant timekeeping issues despite calibration efforts, it may indicate an underlying problem with the watch’s mechanism. In such cases, it is recommended to consult a professional watchmaker or jeweler for assistance in diagnosing and resolving the issue.
Calibrating the watch ensures that it keeps accurate time, enhancing its reliability and functionality. Regular calibration, along with periodic maintenance and servicing, contributes to the long-term performance and longevity of your watch.
Step 12: Make Sure Everything is Tight and Secure
Before considering the battery replacement process complete, it’s crucial to ensure that everything is tight and secure in your watch. This final step ensures that all components are properly in place and reduces the risk of any loose or moving parts. Follow these steps to make sure everything is tight and secure in your watch:
1. Check the case back: Double-check that the case back is securely closed and fastened. Give it a gentle twist or press to confirm that it is properly aligned and tightly sealed. For a screw-down case back, ensure that it is tightened sufficiently without over-tightening.
2. Verify the crown position: If your watch has a screw-down or push-pull crown, ensure that it is fully pushed in or screwed down to its original position. This helps maintain water resistance and prevents any accidental date or time setting changes.
3. Examine the fastening of the bracelet or strap: If your watch has a bracelet or strap, check that it is securely fastened to the watch case. Ensure that the pins and buckles are aligned properly, and there are no loose or misaligned links. Give the bracelet or strap a gentle tug to ensure that it holds firmly.
4. Test for any excessive movement or rattling: Gently shake the watch and listen for any unusual sounds or excessive movement. A well-assembled watch should not have any loose or rattling components. If you notice any unusual movement or noise, it may indicate a loose part that requires further attention.
5. Verify water resistance (if applicable): If your watch is water-resistant or designed for immersion, ensure that the seals and gaskets are clean, intact, and properly positioned. Refer to the manufacturer’s instructions for recommended water resistance precautions and limitations.
By making sure everything is tight and secure, you reduce the risk of damage to your watch and ensure its continued performance and durability. If you encounter any concerns or difficulties during this process, it is advisable to consult a professional watchmaker or jeweler for assistance and guidance.
Step 13: Clean Up and Dispose of the Old Battery Properly
Once you have completed the battery replacement process, it’s important to properly clean up and dispose of the old battery. Disposing of batteries in an appropriate manner is crucial for both environmental and safety reasons. Follow these steps to clean up and dispose of the old battery properly:
1. Clean up any debris: Inspect your work area and clean up any debris, such as battery packaging or tools, to maintain a tidy and organized space. Dispose of any materials related to the battery replacement process that are no longer needed.
2. Avoid touching the old battery directly: When handling the old battery, be cautious and avoid direct contact with your bare hands. Wear gloves if available, or use a pair of tweezers or pliers to handle the battery. This helps prevent any potential skin contact with harmful chemicals or substances.
3. Place the old battery in a suitable container: Use a small, sealable plastic bag or a battery recycling container to store the old battery. This helps contain any potential leaks or spills and prevents the battery from coming into contact with other objects, particularly metals that can cause short circuits.
4. Find a battery recycling center: Look for a local battery recycling center or hazardous waste disposal facility in your area. These designated facilities have the proper processes to handle and dispose of batteries safely and in an environmentally friendly manner. Do not throw the old battery in regular waste bins or recycling bins.
5. Follow local regulations and guidelines: Different regions may have specific guidelines and regulations regarding the proper disposal of batteries. Familiarize yourself with the regulations in your area and ensure that you adhere to them accordingly.
Disposing of batteries responsibly helps protect the environment from potential pollution and reduces the risk of harm to human health. By following the steps outlined above, you can ensure that the old battery is safely contained and disposed of in an appropriate manner.