
Why Fix Your Watch Band?
Having a broken or damaged watch band might seem like a small inconvenience, but it can greatly impact your daily routine. Your watch is not only a timekeeping device but also a fashion statement. A damaged watch band can make your watch look unattractive or even unwearable. In addition, an ill-fitting or broken watch band can be uncomfortable to wear, causing irritation or discomfort on your wrist.
Fixing your watch band allows you to restore its functionality and maintain its appearance. Instead of spending money on a new watch or a replacement band, you can save both time and money by repairing the existing band yourself.
Furthermore, fixing your watch band gives you a sense of accomplishment and satisfaction. It allows you to take control of the situation and become more self-sufficient. Learning how to repair your watch band not only saves you money in the long run but also adds a valuable skill to your repertoire.
Lastly, some watch bands hold sentimental value. If your watch band has sentimental significance, repairing it can help preserve its emotional connection. Whether it’s a family heirloom or a gift from a loved one, fixing your watch band allows you to continue wearing and cherishing a meaningful piece of jewelry.
Remember, a well-maintained and functional watch band not only enhances the overall look of your watch but also ensures a comfortable and hassle-free experience. So, why settle for a damaged or ill-fitting watch band when you can easily fix it yourself?
Tools You’ll Need
Before you begin repairing your watch band, it’s important to gather the necessary tools. Having the right tools on hand will make the process much easier and more efficient. Here are the tools you’ll need:
- Spring bar tool: This tool is essential for removing and inserting spring bars, which hold the watch band in place.
- Pliers: Look for a pair of small, needle-nose pliers that can grip and manipulate small parts.
- Pin pusher: A pin pusher helps push out the pins in certain watch bands, allowing for easy link removal.
- Watch case opener: If you need to access the inner workings of your watch band, a watch case opener is necessary to safely remove the back of the watch.
- Jeweler’s loupe: This magnifying tool will come in handy when working with small components and intricate details.
- Cleaning materials: Depending on the material of your watch band, you may need cleaning solutions or wipes to remove dirt, grime, and tarnish.
- Replacement parts: If you are planning to replace any components of your watch band, such as links or a clasp, make sure you have the appropriate replacement parts on hand.
It’s important to note that the specific tools you’ll need can vary depending on the type of watch band and the nature of the repair. Some repairs may require specialized tools or additional equipment. It’s always a good idea to consult online resources or watch repair guides to determine the exact tools needed for your specific watch band.
Now that you have all the necessary tools, you’re ready to start repairing your watch band and getting it back to its original, functional state.
Step 1: Determine the Problem
Before diving into the repair process, it’s crucial to thoroughly assess and determine the problem with your watch band. Identifying the specific issue will guide your repair strategy and ensure that you focus on the necessary repairs. Here’s how to determine the problem:
- Inspect the clasp: Check if the clasp is loose, broken, or not functioning properly. Look for any visible damage or signs of wear.
- Examine the links: If your watch band has links, inspect them closely for any loose or damaged links. Look for any missing pins, misaligned links, or bent pieces.
- Check the fit: Put on the watch band and test how it fits on your wrist. Pay attention to any discomfort or looseness. If the band is too tight or too loose, it may need adjustment.
- Assess the materials: Take note of the materials used in your watch band, such as metal, leather, or fabric. Different materials may have specific issues or require unique repair approaches.
By carefully examining and determining the problem, you’ll have a clear understanding of what needs to be fixed. This will help you proceed with the appropriate repair techniques and ensure a successful outcome.
If you’re unsure about the exact problem or if the damage is extensive, it’s recommended to consult a professional watch repair service. They can provide expert advice and guidance, especially for intricate or delicate repairs.
Once you have identified the problem, you can move on to the next steps and begin repairing your watch band accordingly.
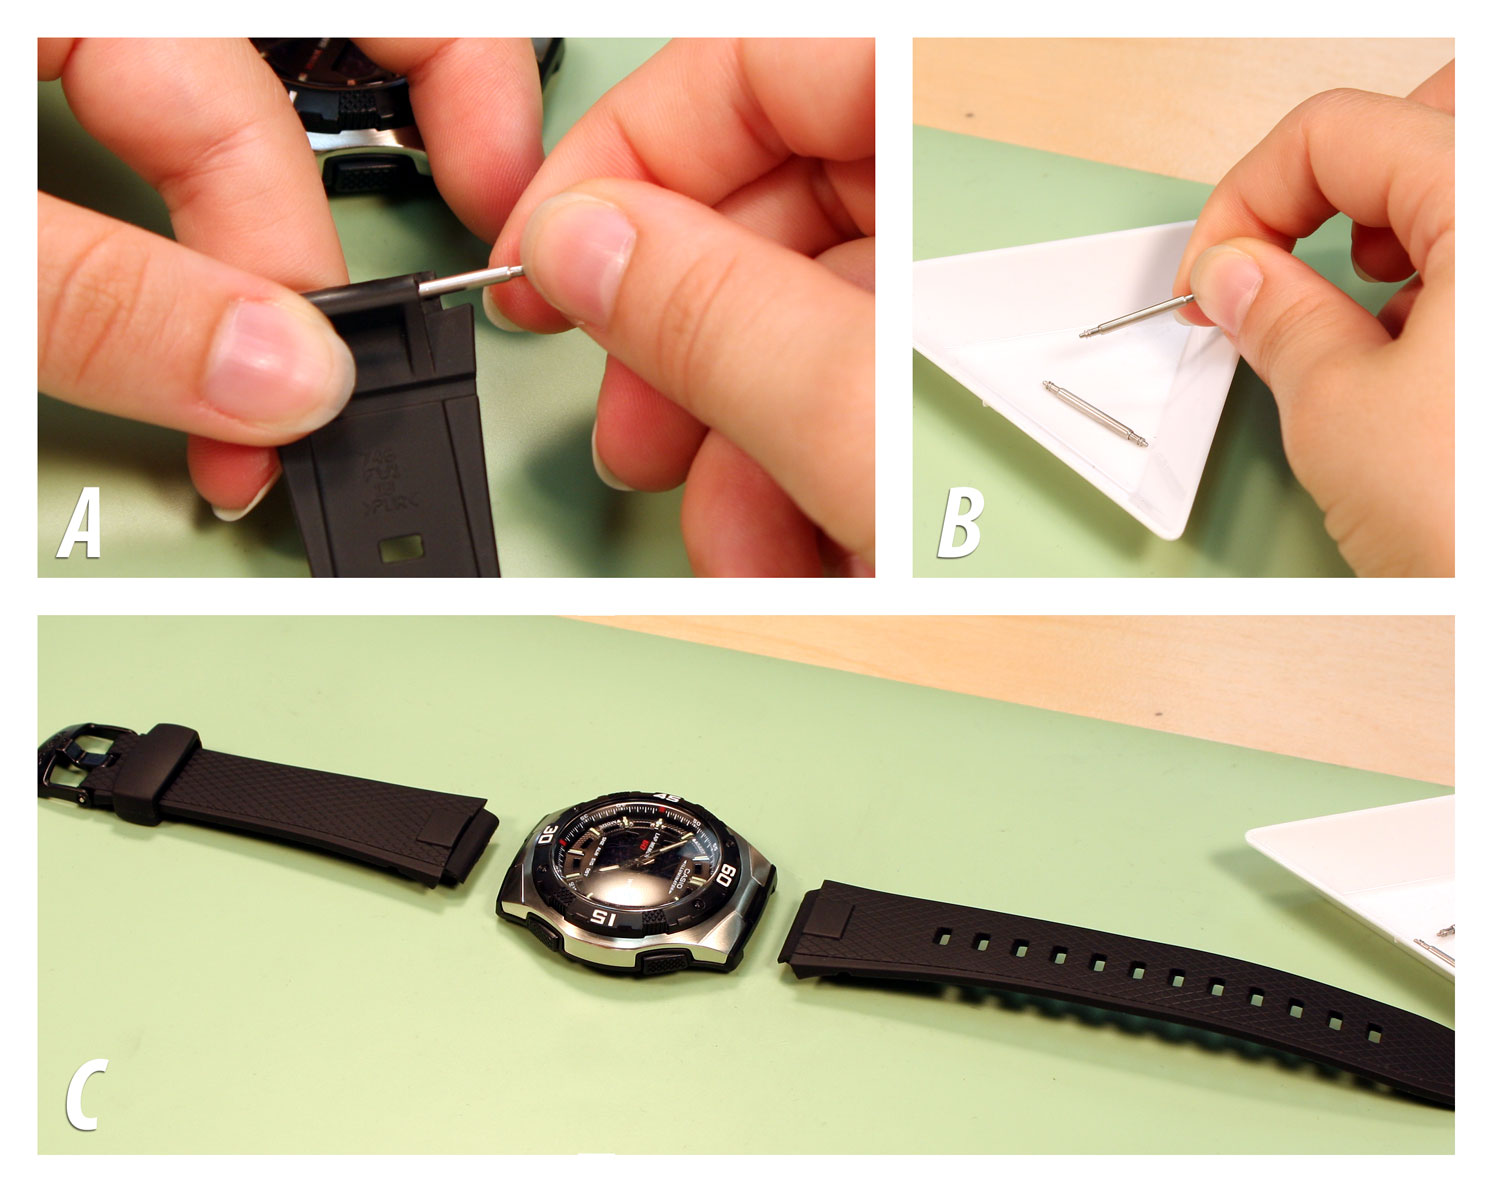
Step 2: Remove the Watch Band
Before you can repair or replace the components of your watch band, you’ll need to remove it from the watch case. Here’s how to safely remove the watch band:
- Preparation: Find a clean and well-lit workspace to prevent any small parts from getting lost. It’s also a good idea to lay down a soft cloth or towel to protect the watch and prevent scratches.
- Locate the spring bars: Most watch bands are held in place by spring bars. These small, spring-loaded pins secure the band to the watch case. Look for the notches or small holes on the side of the case where the spring bars are inserted.
- Use a spring bar tool: Take your spring bar tool and insert the forked end into the space between the watch band and the watch case. Apply gentle pressure to compress the spring bar, releasing it from its position.
- Repeat for the other side: Once you have removed one end of the watch band, repeat the process for the other side. Be careful not to let the watch band snap back into place, as it may cause damage or injury.
- Remove the watch band: With both spring bars released, carefully slide the watch band out of the notches on the watch case. Keep track of any small pins or components that may come loose during this process.
It’s important to handle the watch band and spring bars with care to avoid bending or damaging them. If you encounter any difficulty during the removal process, refer to your watch’s user manual or consult online resources for specific instructions.
Once the watch band is completely detached, you can proceed to the next steps of repairing or replacing the necessary components.
Step 3: Assess the Damage
Now that you have removed the watch band, it’s time to assess the extent of the damage and determine the necessary repairs. Carefully examine the watch band and its components to identify any issues or areas that need attention. Here’s how to assess the damage:
- Inspect the clasp: Examine the clasp for any visible damage, such as cracks, loose hinges, or broken parts. Check if the clasp is functioning correctly, ensuring that it opens and closes securely.
- Examine the links: If your watch band has links, closely inspect each one for any signs of damage. Look for bent or misaligned links, missing pins, or loose connections between the links.
- Check for loose or missing screws: If your watch band has screws, make sure they are tightened securely. Look for any missing screws that need to be replaced.
- Assess the overall condition: Take note of the general wear and tear on the watch band. Look for scratches, tarnish, or other cosmetic issues that may need attention.
- Consider any previous repairs: If the watch band has been repaired or modified in the past, take into account the quality of the previous work and whether it needs further repairs or adjustments.
By thoroughly assessing the damage, you’ll have a clear understanding of the repairs needed. Make a list of the specific issues and prioritize them based on importance and feasibility of repair. This will help guide you through the next steps of the repair process.
If you’re uncertain about the extent of the damage or if you’re not confident in your repair skills, it’s advisable to seek professional assistance from a reputable watch repair service. They can provide a more comprehensive assessment and ensure that the necessary repairs are carried out correctly.
With a clear understanding of the damage, you’re ready to proceed with repairing or replacing the components of your watch band.
Step 4: Repair or Replace the Clasp
The clasp of your watch band is a crucial component that ensures a secure and comfortable fit. If you have identified any issues with the clasp during the assessment, it’s time to repair or replace it. Here’s what you can do:
- Inspect the clasp: Determine the specific problem with the clasp. It could be a loose hinge, a broken latch, or a worn-out mechanism.
- If the clasp is loose: Use small pliers to tighten any screws or pins that may have come loose. Ensure that all parts of the clasp are securely fastened. If the issue persists, you may need to replace the clasp entirely.
- If the clasp is broken: Depending on the severity of the damage, you may be able to repair the clasp by replacing a specific portion, such as the latch or a broken hinge. Refer to watch band repair kits or consult a professional for the appropriate replacement parts and repair techniques.
- If the clasp is beyond repair: In some cases, the damage to the clasp may be irreversible. If that’s the case, it’s best to replace the clasp entirely. You can find replacement clasps that match the style and material of your watch band. Make sure to measure the width of your watch band to ensure a proper fit.
- Be patient and precise while making repairs: When performing repairs, pay attention to the details and follow instructions carefully. Use the appropriate tools and take your time to ensure a proper fix. If you’re unsure about the repair process, consult a professional watch repair service for guidance.
Repairing or replacing the clasp of your watch band will provide a secure and reliable closure, making it comfortable and functional. Take the necessary steps to address any clasp-related issues before moving on to the next repairs.
Remember, if you’re not confident in your repair skills or if the damage is extensive, seeking professional help from a watch repair specialist is always a viable option.
Step 5: Repair or Replace the Links
If your watch band has individual links, they may require repair or replacement to ensure a proper fit and functionality. Follow these steps to repair or replace the links:
- Identify the problematic links: Inspect each link carefully for any signs of damage, such as bent or misaligned pieces, missing pins, or loose connections.
- If a link is loose or misaligned: Use pliers to gently tighten any screws or pins that hold the link together. Be cautious not to overtighten or damage the link further. If the issue persists, you may need to consider replacing the link.
- If a link is damaged beyond repair: If a link is severely bent, broken, or missing, it’s best to replace it entirely. You can search for replacement links that match the style and material of your watch band. Make sure to measure the width of your watch band to ensure a proper fit.
- If removing links for adjustment: If the watch band is too loose, you can remove links to achieve a better fit. Use a pin pusher or a small tool to drive out the pins that hold the links together. Start with one side of the link and gently push the pin out. Keep track of any small parts that may come loose during this process.
- Adjusting the links: Once you have removed the necessary links, reassemble the watch band by aligning the remaining links and reinserting the pins. Ensure that the pins are securely in place.
- If uncertain, consult a professional: If you’re unsure about repairing or adjusting the links yourself, it’s advisable to seek assistance from a professional watch repair service. They have the necessary expertise and tools to handle delicate link repairs.
Repairing or replacing the links of your watch band will help you achieve a comfortable and secure fit. Take your time and exercise caution during the repair process to prevent any further damage.
Remember, if you’re not confident in your repair skills or if the damage is extensive, seeking professional help from a watch repair specialist is always a viable option.
Step 6: Reassemble the Watch Band
After completing the necessary repairs or replacements, it’s time to reassemble your watch band. Follow these steps to ensure a proper reassembly:
- Clean the components: Before reassembling, make sure to clean any dirt, dust, or residue from the watch band, clasp, and links. Use a soft cloth or appropriate cleaning solution to restore the shine and cleanliness of the components.
- Align the components: If you have replaced any links or the clasp, ensure that they are aligned correctly with the rest of the watch band. Take care to match the style and material to ensure a seamless appearance.
- Insert the spring bars: Take your spring bar tool and insert one end of the spring bar into the notch or hole on the watch case. Apply gentle pressure to compress the spring bar and slide the watch band into place. Repeat the process for the other end of the watch band.
- Secure the spring bars: Once the watch band is in place, release the pressure on the spring bars. They should snap into position, securely holding the watch band to the watch case. Give the watch band a gentle tug to ensure it is properly attached and won’t come loose.
- Double-check the fit: Put the watch on your wrist and check the fit. Ensure that it is comfortable and secure. If necessary, make any additional adjustments to the links or clasp to achieve the desired fit.
Take your time during the reassembly process to ensure that all components are properly aligned and securely fastened. This will help prevent any issues or further damage to your watch band.
If you encounter any challenges or difficulties while reassembling your watch band, consider consulting instructional videos or guides specific to your watch model or reach out to a professional watch repair service for assistance.
Once you have successfully reassembled your watch band, you can move on to the final steps of testing and adjusting.
Step 7: Test and Adjust
After reassembling your watch band, it’s essential to test its functionality and make any necessary adjustments to ensure a perfect fit. Follow these steps to properly test and adjust your watch band:
- Check the clasp: Ensure that the clasp securely locks and unlocks without any issues. It should be easy to open and close, providing a reliable and secure closure.
- Wear the watch: Put on the watch and assess its comfort on your wrist. Make sure it is not too tight, causing discomfort, or too loose, risking slippage.
- Observe movement: Pay attention to how the watch band moves on your wrist throughout the day. It should stay in place without excessive shifting or discomfort.
- Make necessary adjustments: If the watch band is too loose, you can remove additional links or adjust the clasp for a tighter fit. Conversely, if it’s too tight, add a link or adjust the clasp for more comfort.
- Ensure proper alignment: Check that the links are aligned correctly and that the watch band sits evenly on your wrist. Adjust any misaligned links or the clasp as needed.
- Perform functional tests: Test any additional functions or features of your watch, such as date adjustment or chronograph operation, to ensure they are working correctly with the repaired watch band.
Take your time with the testing and adjustment process, as it’s crucial to have a properly functioning and comfortable watch band. Make necessary changes gradually, ensuring that each adjustment brings you closer to the desired fit and functionality.
If you encounter any persistent problems or are unsure about the adjustments, it’s recommended to seek professional assistance from a watch repair specialist. They can provide expert advice and make the necessary adjustments for you.
By thoroughly testing and adjusting your watch band, you can enjoy a comfortable and reliable experience when wearing your watch.
Step 8: Maintain Your Watch Band
Once you have repaired and adjusted your watch band, it’s important to maintain its condition to ensure its longevity and continued functionality. Proper maintenance will help keep your watch band looking and performing its best. Here are some tips for maintaining your watch band:
- Clean regularly: Wipe down your watch band with a soft cloth regularly to remove dirt, oils, and sweat that can accumulate. For metal bands, you can use a mild soap and water mixture to gently clean them. For leather or fabric bands, follow the manufacturer’s recommendations for cleaning.
- Avoid water damage: Be cautious about exposing your watch band to water, especially if it’s not water-resistant. Avoid wearing your watch in the shower, while swimming, or during other water-related activities to prevent damage to the band.
- Protect from extreme conditions: Keep your watch band away from extreme temperatures, excessive sunlight exposure, and harsh chemicals. These factors can potentially damage or discolor the band material.
- Store properly: When you’re not wearing your watch, store it in a clean and dry place. Avoid tossing it in a drawer where it can get scratched or tangled with other jewelry or objects.
- Service regularly: Consider getting your watch serviced by a professional watchmaker every few years. They can clean and perform maintenance on the internal components of the watch, ensuring its proper function and longevity.
- Inspect for wear and tear: Regularly examine your watch band for any signs of wear, such as loose links, frayed fabric, or cracks in leather. Address any issues promptly to prevent further damage.
By following these maintenance practices, you can extend the life of your watch band and keep it looking and functioning its best for years to come.
Remember, each watch band may have specific care instructions depending on its material, so it’s always a good idea to consult the manufacturer’s recommendations to ensure proper maintenance.
With proper care and maintenance, your watch band will continue to complement your watch and provide you with reliable performance and style.