
Safety Precautions
Before embarking on the task of replacing the charging port cover on your Xperia Z3V, it's crucial to prioritize safety. By adhering to the following precautions, you can ensure a smooth and secure process while safeguarding your device from any potential harm.
-
Power Off the Device: Before initiating any repair or maintenance task, always power off your Xperia Z3V. This simple yet essential step prevents the risk of electrical shock and minimizes the chances of accidental damage to the device during the replacement process.
-
Work in a Well-Lit Area: Opt for a well-lit and spacious workspace to carry out the charging port cover replacement. Ample lighting not only facilitates clear visibility but also reduces the likelihood of errors or mishandling.
-
Use Proper Tools: Ensure that you have the necessary tools at your disposal before commencing the replacement procedure. This includes a precision screwdriver set, a plastic opening tool, and a replacement charging port cover specifically designed for the Xperia Z3V.
-
Handle Components with Care: Throughout the replacement process, handle the device and its components with utmost care. Avoid applying excessive force or pressure, as this can lead to unintended damage to the device or its internal components.
-
Beware of Static Electricity: Static electricity can pose a significant threat to electronic devices. To mitigate this risk, it's advisable to work on a static-free surface and use an anti-static wrist strap if available. This precaution helps prevent static discharge that could potentially harm the delicate internal circuitry of the Xperia Z3V.
-
Refer to a Reliable Guide: Prior to initiating the replacement, familiarize yourself with a comprehensive and reliable guide specific to the Xperia Z3V charging port cover. By following a trusted resource, you can gain valuable insights and step-by-step instructions, thereby reducing the likelihood of errors or complications.
By prioritizing these safety precautions, you can approach the charging port cover replacement for your Xperia Z3V with confidence and peace of mind. These measures not only safeguard your device from potential harm but also contribute to a smooth and successful replacement process.
Tools and Materials Needed
When undertaking the replacement of the charging port cover on your Xperia Z3V, it's essential to have the appropriate tools and materials at your disposal. By ensuring that you are well-equipped, you can streamline the replacement process and minimize the risk of encountering unforeseen challenges. Here's a detailed overview of the tools and materials you will need:
Precision Screwdriver Set
A precision screwdriver set is indispensable for accessing and disassembling the components of your Xperia Z3V. It typically includes a variety of screwdriver heads, such as Phillips and Torx, tailored to fit the specific screws used in the device. These precision screwdrivers enable you to safely remove the existing charging port cover and install the new one without causing damage to the surrounding components.
Plastic Opening Tool
A plastic opening tool is crucial for prying open the housing of the Xperia Z3V without causing scratches or dents. This specialized tool is designed to gently separate the device's components, such as the back cover and the internal frame, allowing you to access the charging port area with precision and care. Using a plastic opening tool reduces the risk of cosmetic damage to your device during the replacement process.
Replacement Charging Port Cover
Obtaining a replacement charging port cover specifically designed for the Xperia Z3V is paramount. Ensure that the replacement cover is compatible with your device model to guarantee a proper fit and optimal functionality. It's advisable to acquire a high-quality replacement cover from a reputable source to ensure its durability and longevity, thereby providing reliable protection for the charging port.
Anti-Static Wrist Strap (Optional)
While not essential, an anti-static wrist strap can be beneficial for mitigating the risk of static electricity damage during the replacement process. This strap helps dissipate any built-up static charge from your body, minimizing the potential for electrostatic discharge that could harm the delicate internal circuitry of the Xperia Z3V. If available, using an anti-static wrist strap adds an extra layer of protection to safeguard your device.
By assembling these essential tools and materials, you can effectively prepare for the task of replacing the charging port cover on your Xperia Z3V. Equipping yourself with the right tools and a compatible replacement cover sets the stage for a successful and hassle-free replacement process, ensuring that your device remains safeguarded and fully functional.
Step 1: Power Off the Xperia Z3V
Before initiating the process of replacing the charging port cover on your Xperia Z3V, it is imperative to power off the device to ensure safety and prevent potential damage. Powering off the device minimizes the risk of electrical shock and safeguards the internal components from accidental harm during the replacement procedure.
To power off your Xperia Z3V, follow these simple steps:
-
Locate the Power Button: Identify the power button, typically located on the right side of the device. It is essential to familiarize yourself with the location of the power button to ensure a smooth power-off process.
-
Press and Hold the Power Button: Firmly press and hold the power button until the power-off menu appears on the screen. This action prompts the device to initiate the shutdown sequence.
-
Select "Power Off": Once the power-off menu is displayed, select the "Power Off" option by tapping on the screen. This command instructs the device to begin the shutdown process, ensuring that all active processes are safely terminated.
-
Confirm the Power-Off Process: After selecting "Power Off," the device prompts you to confirm the action. Confirm the power-off process to proceed with shutting down the Xperia Z3V completely.
-
Wait for Shutdown: Allow the device sufficient time to power off completely. During this period, the device undergoes a systematic shutdown process, ensuring that all functions and processes are safely halted.
By following these steps, you can effectively power off your Xperia Z3V in preparation for the subsequent stages of the charging port cover replacement process. Ensuring that the device is completely powered off mitigates the risk of electrical hazards and facilitates a secure environment for carrying out the replacement procedure with precision and confidence.
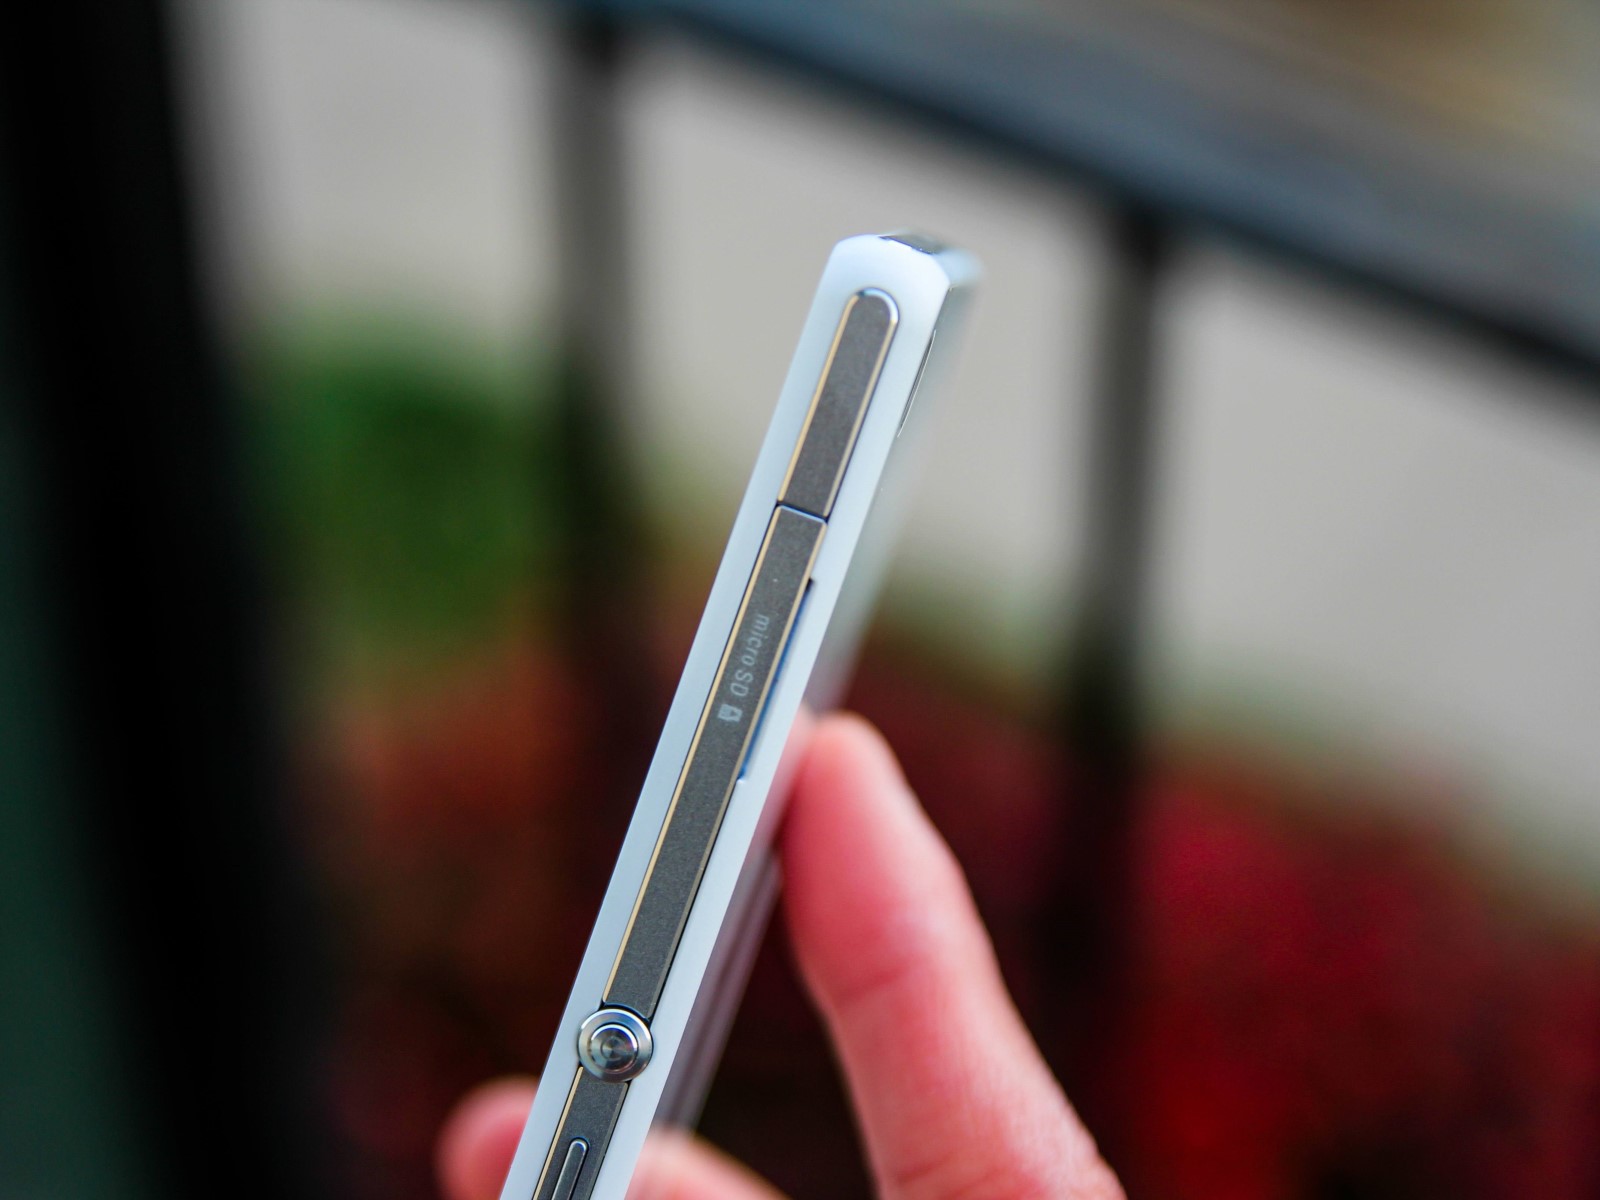
Step 2: Remove the Old Charging Port Cover
Removing the old charging port cover from your Xperia Z3V is a crucial step in the replacement process. By carefully executing this step, you can pave the way for the installation of the new cover, ensuring optimal functionality and protection for the device's charging port. Here's a detailed guide on how to effectively remove the old charging port cover:
1. Gather the Necessary Tools
Before commencing the removal process, ensure that you have the required tools readily available. This includes a precision screwdriver set and a plastic opening tool, which are essential for disassembling the device and accessing the charging port area with precision and care.
2. Power Off the Device
As a safety precaution, ensure that your Xperia Z3V is powered off before proceeding with the removal of the old charging port cover. This minimizes the risk of electrical shock and provides a secure environment for the replacement process.
3. Identify the Charging Port Cover
Locate the existing charging port cover on your Xperia Z3V. The cover is typically positioned at the bottom of the device and serves as a protective barrier for the charging port, safeguarding it from dust, debris, and moisture.
4. Utilize the Plastic Opening Tool
Carefully insert the plastic opening tool into the seam surrounding the old charging port cover. Gently pry the cover open, applying even pressure to gradually release it from its housing. Exercise caution to avoid using excessive force, as this may cause damage to the device's exterior.
5. Remove the Old Cover
Once the old charging port cover has been loosened, carefully lift it away from the device, ensuring that no cables or connectors are still attached. Take note of any retaining clips or adhesive that may be securing the cover in place, and gently disengage them to facilitate the removal process.
6. Inspect the Charging Port Area
Upon removing the old cover, inspect the charging port area for any accumulated debris or signs of damage. Use a soft, lint-free cloth to gently clean the area, ensuring that the charging port is free from obstructions before proceeding with the installation of the new cover.
By diligently following these steps, you can successfully remove the old charging port cover from your Xperia Z3V, setting the stage for the subsequent installation of the new cover. This meticulous approach ensures that the device's charging port is adequately prepared for the seamless integration of the replacement cover, thereby maintaining its functionality and longevity.
Step 3: Install the New Charging Port Cover
With the old charging port cover successfully removed from your Xperia Z3V, the next pivotal step involves the precise installation of the new charging port cover. This process demands attention to detail and a methodical approach to ensure that the replacement cover is seamlessly integrated, providing reliable protection for the device's charging port. Here's a comprehensive guide on how to effectively install the new charging port cover:
-
Prepare the Replacement Cover: Prior to installation, carefully inspect the new charging port cover to ensure its compatibility with the Xperia Z3V. Verify that the cover aligns with the dimensions and specifications of the original component, guaranteeing a proper fit and optimal functionality. Additionally, check for any included adhesive or retaining clips that may be required for secure attachment.
-
Align the Replacement Cover: Position the new charging port cover at the designated area on the device, ensuring precise alignment with the port opening. Take note of any guiding markers or alignment indicators that facilitate accurate placement. Aligning the cover meticulously sets the stage for a seamless integration process, minimizing the need for subsequent adjustments.
-
Secure the Cover in Place: Once aligned, gently press the replacement cover into position, ensuring a snug and secure fit. If the cover includes adhesive, carefully adhere it to the device's housing, applying even pressure to promote proper bonding. In the case of retaining clips, engage them with precision, ensuring that the cover is firmly secured without impeding the functionality of the charging port.
-
Verify Proper Seating: After securing the replacement cover, inspect the edges and corners to confirm that the cover is seated flush with the device's housing. A uniform and seamless integration is essential to maintain the device's aesthetic appeal while effectively safeguarding the charging port from external elements.
-
Test the Cover Mechanism: Verify that the new charging port cover operates smoothly and effectively. Open and close the cover multiple times to ensure that it functions as intended, providing reliable protection for the charging port while remaining easily accessible for charging purposes.
By meticulously following these steps, you can proficiently install the new charging port cover on your Xperia Z3V, ensuring that the device's charging port is effectively shielded from potential damage. This meticulous approach guarantees a seamless integration process, preserving the functionality and longevity of the charging port while upholding the device's overall integrity.
Step 4: Test the New Charging Port Cover
Upon successfully installing the new charging port cover on your Xperia Z3V, it is imperative to conduct comprehensive testing to ensure its functionality and effectiveness in safeguarding the device's charging port. Thorough testing not only validates the seamless integration of the replacement cover but also guarantees that the charging port remains adequately protected from external elements. Here's a detailed guide on how to effectively test the new charging port cover:
-
Operational Assessment: Begin by assessing the operational functionality of the new charging port cover. Open and close the cover multiple times to evaluate its responsiveness and smooth operation. A well-functioning cover should open effortlessly to allow access to the charging port and securely close to provide protection when not in use.
-
Charging Port Accessibility: Verify that the new cover does not impede the accessibility of the charging port. Attempt to connect the charging cable to the port with the cover in the closed position. Ensure that the cover does not obstruct the insertion of the charging cable and that it seamlessly accommodates the connection, allowing for uninterrupted charging functionality.
-
Environmental Protection: Test the cover's effectiveness in safeguarding the charging port from environmental elements. Expose the device to simulated conditions such as light splashes of water or dust particles while the cover is closed. Verify that the cover provides a reliable barrier, preventing moisture and debris from infiltrating the charging port and potentially causing damage.
-
Durability and Resilience: Assess the durability and resilience of the new cover by subjecting it to gentle pressure and handling. Verify that the cover maintains its structural integrity and remains securely attached to the device's housing. Additionally, ensure that repeated opening and closing of the cover do not compromise its functionality or structural stability.
-
Visual Inspection: Conduct a visual inspection of the installed cover to identify any signs of misalignment, damage, or irregularities. Verify that the cover sits flush with the device's housing and exhibits a uniform appearance, contributing to the overall aesthetic appeal of the Xperia Z3V.
By meticulously testing the new charging port cover using these comprehensive criteria, you can ascertain its reliability and effectiveness in safeguarding the device's charging port. This meticulous approach ensures that the replacement cover seamlessly integrates with the device, providing optimal protection while maintaining the accessibility and functionality of the charging port.
Step 5: Power On the Xperia Z3V
After successfully installing and testing the new charging port cover on your Xperia Z3V, the final step involves powering on the device to resume its functionality. This crucial phase marks the completion of the replacement process and ensures that the device is ready for regular use. Here's a detailed guide on how to power on your Xperia Z3V:
-
Verify Proper Cover Installation: Before proceeding with powering on the device, perform a quick visual inspection to confirm that the new charging port cover is securely installed and aligned with the device's housing. This verification step ensures that the cover is in place, providing reliable protection for the charging port.
-
Press and Hold the Power Button: Locate the power button, typically positioned on the right side of the device. To power on the Xperia Z3V, firmly press and hold the power button until the device's screen displays the startup sequence. This action initiates the boot-up process, prompting the device to power on and initialize its operating system.
-
Observe the Startup Sequence: As the device powers on, observe the startup sequence displayed on the screen. The Xperia Z3V logo and accompanying animations indicate that the device is successfully booting up. This phase signifies that the device's internal components are initializing, preparing the device for regular operation.
-
Unlock the Device: Once the startup sequence is complete, the device prompts you to unlock the screen to access the home screen and functionality. Depending on your security settings, you may need to enter a PIN, pattern, or biometric authentication to unlock the device and gain access to its features.
-
Functional Verification: Upon unlocking the device, verify its functionality by navigating through the home screen, accessing apps, and confirming that essential features such as connectivity, camera, and basic functions are operational. This verification step ensures that the device is fully functional following the charging port cover replacement.
By meticulously following these steps, you can effectively power on your Xperia Z3V after completing the charging port cover replacement process. This final phase signifies the successful culmination of the replacement procedure, ensuring that the device is restored to full functionality with the newly installed charging port cover providing reliable protection.