
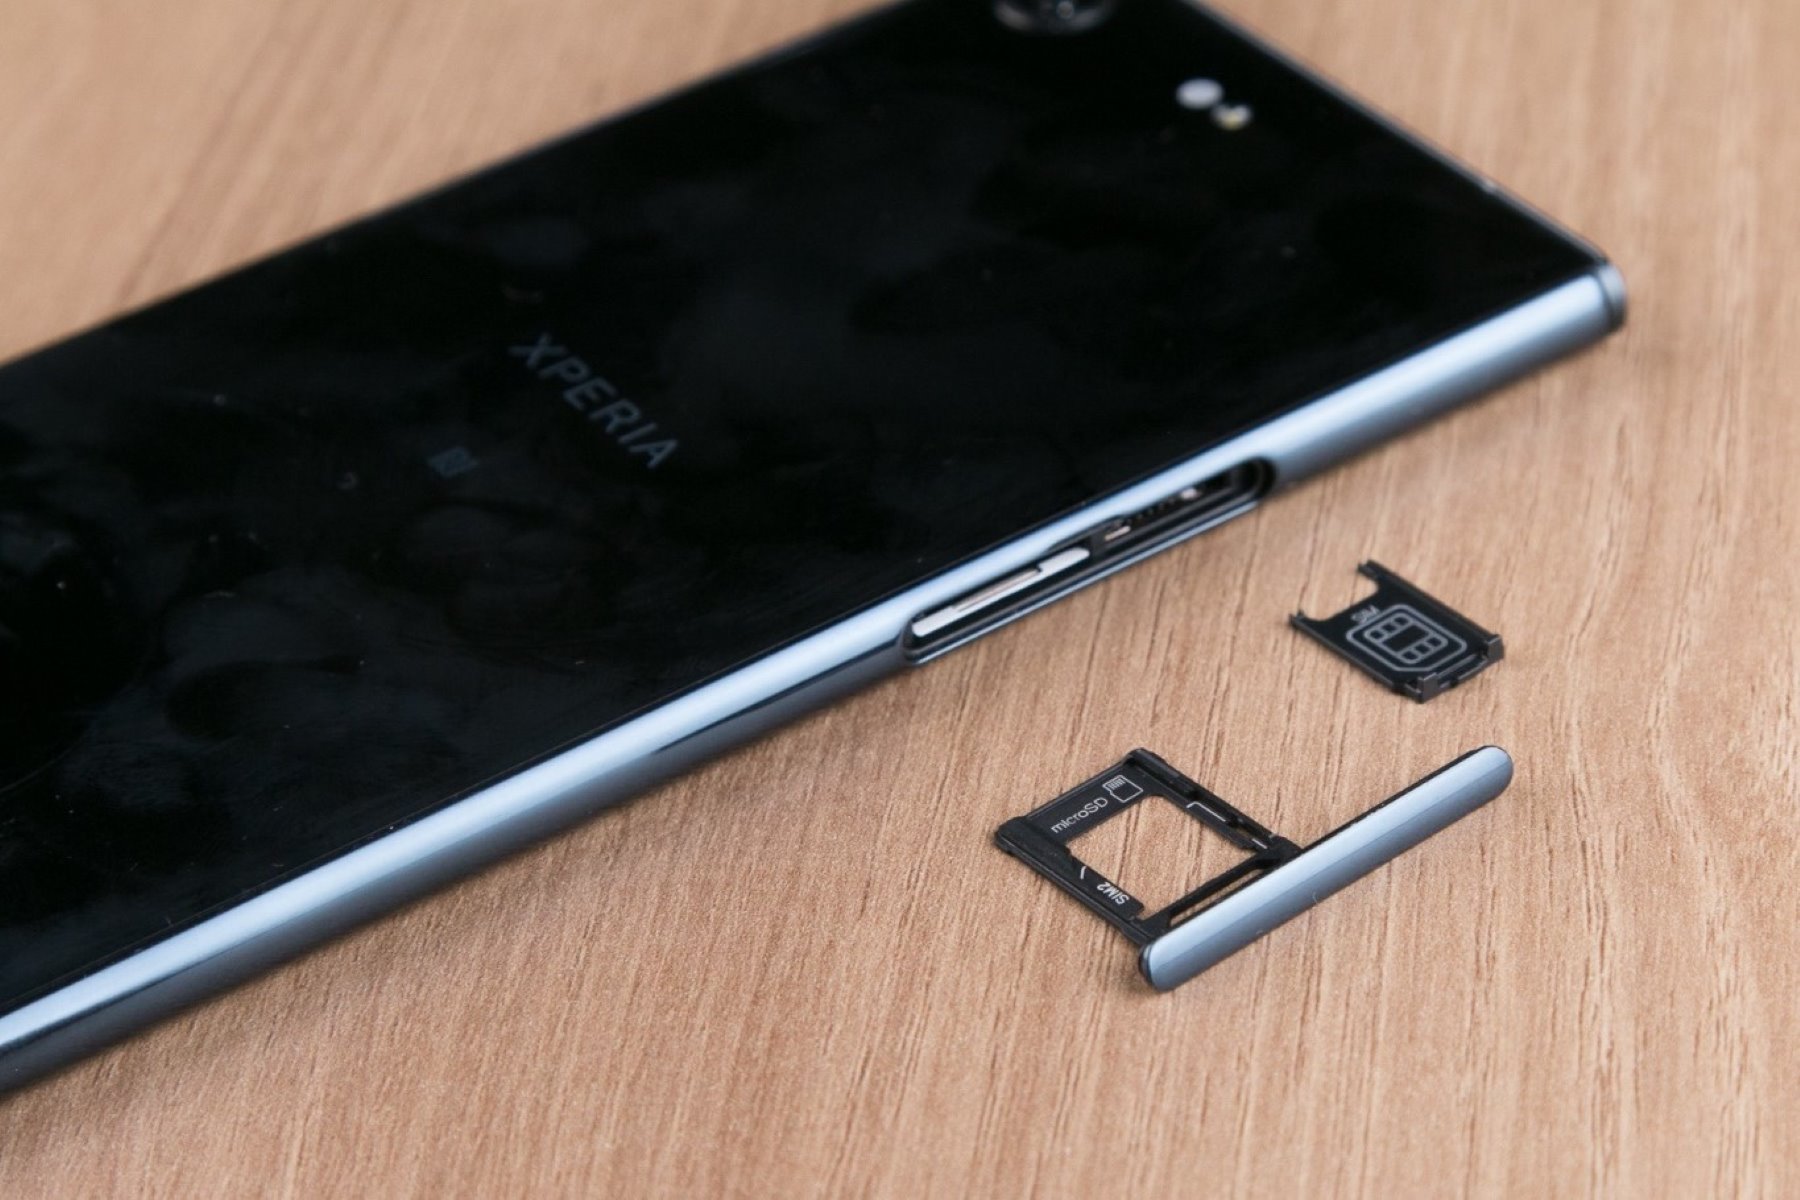
Checking the SIM Card Slot
Before diving into the process of installing a SIM card into your Xperia XZ Premium, it's crucial to begin by locating the SIM card slot. The SIM card slot on the Xperia XZ Premium is typically situated on the side of the device. The location may vary slightly depending on the specific model, but it is commonly positioned on the left-hand side, adjacent to the volume buttons.
Upon identifying the slot, it's important to ensure that the device is powered off before proceeding. This precautionary step is essential to prevent any potential damage to the device or the SIM card itself. Once the device is turned off, you can then proceed to the next step with confidence, knowing that you are taking the necessary precautions to safeguard your device and SIM card.
By locating the SIM card slot and powering off the device, you are now ready to progress to the subsequent steps of removing the SIM card tray, inserting the SIM card, and replacing the SIM card tray. Each of these steps plays a pivotal role in ensuring a seamless and successful SIM card installation process, and by starting with the simple act of checking the SIM card slot, you are setting the stage for a smooth and hassle-free experience.
With the SIM card slot successfully located and the device powered off, you are now prepared to move forward with the subsequent steps, which will be covered in detail in the following sections. These steps will guide you through the process of removing the SIM card tray, inserting the SIM card, and replacing the SIM card tray, ultimately enabling you to complete the SIM card installation process with ease and confidence.
As you embark on this journey of installing a SIM card into your Xperia XZ Premium, the initial step of checking the SIM card slot serves as a foundational building block, setting the tone for the subsequent stages of the process. With this essential step completed, you are now equipped to progress further and successfully install your SIM card, ensuring that your device is fully functional and ready to connect you with the digital world.
Removing the SIM Card Tray
The next step in the process of installing a SIM card into your Xperia XZ Premium involves removing the SIM card tray. This is a crucial step that requires precision and care to ensure that the SIM card tray is safely and effectively removed from the device.
To begin, locate the SIM card slot on the side of your Xperia XZ Premium. Once you have identified the slot, you will notice a small pinhole adjacent to it. This pinhole is designed to accommodate the SIM card removal tool, which is typically provided with the device or can be obtained separately. The SIM card removal tool is a small, needle-like instrument that enables you to eject the SIM card tray from the device.
Insert the SIM card removal tool into the pinhole and gently apply pressure. As you do so, you will feel a slight resistance, indicating that the tool has engaged with the internal mechanism. Continue to exert gentle pressure until you feel the SIM card tray begin to protrude from the device. Once the tray is partially ejected, carefully grasp it and slide it out from the device, taking care not to apply excessive force or damage the tray in the process.
With the SIM card tray removed, you will now have clear access to the slot where the SIM card will be inserted. Take a moment to inspect the tray and slot, ensuring that there are no obstructions or debris that could impede the smooth insertion of the SIM card. This brief inspection can help to prevent potential issues and streamline the subsequent steps of the installation process.
As you remove the SIM card tray from your Xperia XZ Premium, it's important to handle it with care and avoid exerting unnecessary force. By approaching this step with patience and precision, you can effectively remove the tray without causing any damage to the device or the tray itself. This mindful approach sets the stage for the seamless insertion of the SIM card, which will be covered in the next section.
With the SIM card tray successfully removed from your Xperia XZ Premium, you are now poised to progress to the next stage of the SIM card installation process. The careful removal of the tray lays the groundwork for the subsequent steps, ensuring that you are well-prepared to insert the SIM card with ease and precision.
By following these detailed instructions, you can confidently navigate the process of removing the SIM card tray from your Xperia XZ Premium, setting the stage for a successful SIM card installation experience.
Inserting the SIM Card
With the SIM card tray successfully removed from your Xperia XZ Premium, you are now ready to proceed with the pivotal step of inserting the SIM card. This step is essential for enabling your device to connect to a mobile network and access various communication and data services.
Begin by carefully examining the SIM card and the slot within the tray. Most SIM cards are designed with a notched corner, which aligns with a corresponding notch within the SIM card tray. This design ensures that the SIM card is inserted in the correct orientation, preventing any potential issues with connectivity or functionality.
Hold the SIM card with the notched corner positioned as indicated on the tray. Gently place the SIM card into the designated area within the tray, ensuring that it fits snugly and securely. Take care to avoid applying excessive force, as the SIM card should slide into place smoothly without any resistance.
Once the SIM card is seated within the tray, inspect it to confirm that it is positioned correctly and sits flush within the designated area. This visual check can help to ensure that the SIM card is aligned properly and is ready to be inserted back into the device.
With the SIM card securely in place within the tray, carefully align the tray with the slot on your Xperia XZ Premium. Slide the tray back into the device, ensuring that it moves smoothly and effortlessly into position. Exercise caution to avoid any jarring movements or misalignment during this process, as it is crucial to maintain the integrity of both the device and the SIM card.
As the tray slides back into place, you will feel a subtle click, indicating that it has been securely reinserted into the device. This reassuring sensation signifies that the SIM card is now properly installed and ready to facilitate your device's connectivity.
By following these detailed steps, you have successfully inserted the SIM card into your Xperia XZ Premium, laying the groundwork for seamless access to mobile network services and communication capabilities. This pivotal step sets the stage for the final phase of the installation process, which involves replacing the SIM card tray and ensuring that your device is fully prepared to connect you with the digital world.
Replacing the SIM Card Tray
After successfully inserting the SIM card into your Xperia XZ Premium, the final step in the SIM card installation process involves replacing the SIM card tray. This step is crucial for securing the SIM card within the device and ensuring that it remains firmly in place during everyday use.
Begin by carefully aligning the SIM card tray with the slot on your Xperia XZ Premium. Take note of the orientation of the tray to ensure that it is positioned correctly before insertion. The tray should slide smoothly into the device without any resistance. It's important to approach this step with precision, as misalignment or forceful insertion could potentially damage the device or the SIM card tray.
As the tray glides back into place, you will sense a subtle click, indicating that it has been securely reinserted into the device. This reassuring click signifies that the SIM card is now firmly positioned within the device, ready to facilitate seamless connectivity and communication capabilities.
Once the SIM card tray is back in place, take a moment to visually confirm that it is flush with the device and sits seamlessly within the designated slot. This visual inspection serves as a final check to ensure that the tray is properly aligned and fully inserted, ready to support the functionality of the SIM card.
With the SIM card tray successfully replaced, power on your Xperia XZ Premium to initiate the device's startup sequence. As the device powers up, it will recognize the newly installed SIM card and establish connectivity with the mobile network. This pivotal step marks the culmination of the SIM card installation process, signaling that your device is now fully equipped to keep you connected and engaged with the digital world.
By following these detailed steps, you have effectively replaced the SIM card tray in your Xperia XZ Premium, securing the SIM card within the device and preparing it to deliver seamless connectivity and communication capabilities. This final phase of the installation process ensures that your device is fully equipped to support your digital lifestyle, enabling you to stay connected and engaged with ease.