
Microphone
A crucial piece of equipment for podcasting is a high-quality microphone. The microphone is responsible for capturing your voice clearly and accurately, ensuring that your audience can hear and understand you without any distractions. There are various types of microphones available, but the two most common options for podcasting are dynamic and condenser microphones.
Dynamic microphones, such as the popular Shure SM58, are more rugged and versatile, making them perfect for recording in different environments, including noisy spaces. They are less sensitive to background noise and can handle high sound pressure levels, making them suitable for recording interviews or group discussions.
On the other hand, condenser microphones, like the Audio-Technica AT2020, are more sensitive and deliver a more detailed and natural sound. They are ideal for solo podcasts or controlled recording environments where background noise can be minimized. Condenser microphones often require an external power source, such as phantom power, provided by an audio interface or a mixer.
When choosing a microphone, consider factors such as your podcasting environment, budget, and intended use. It’s also worth investing in a microphone with a cardioid or supercardioid pickup pattern, as they help reduce unwanted noise and focus on capturing your voice from the front while minimizing sound from the sides and back.
Once you have chosen your microphone, it’s essential to experiment with placement and technique to find the optimal distance and angle for capturing the best sound. Using a microphone stand or boom arm can help you position the microphone at a comfortable distance from your mouth while maintaining a consistent sound quality throughout your episodes.
Headphones
Another essential piece of equipment for podcasting is a good pair of headphones. While regular earbuds or consumer-grade headphones might suffice, investing in a pair specifically designed for audio monitoring is highly recommended.
Podcast headphones should provide accurate and detailed sound reproduction, allowing you to hear your recordings with clarity and precision. They should have a wide frequency response range, ensuring that you can pick up any subtle nuances or audio issues that may require editing.
When choosing headphones, consider opting for closed-back models, as they offer better noise isolation, preventing sound leakage and minimizing distractions from external noises. Closed-back headphones also help create a more immersive experience, allowing you to focus on the audio without any interference.
Comfort is another crucial factor to consider, as podcasting sessions can sometimes extend for long periods. Look for headphones with padded ear cups and an adjustable headband, ensuring a snug fit without causing discomfort or fatigue.
It’s important to note that headphones are not only used for monitoring during recording but also during the editing process. They allow you to listen closely to your audio tracks, identify any issues, and make accurate adjustments to improve the overall sound quality of your podcast.
Additionally, wearing headphones can help prevent audio feedback or echo during remote interviews or group discussions, ensuring smooth and uninterrupted communication.
Remember, headphones are not just for listening; they are an essential tool for podcasters to craft high-quality audio content. By investing in a reliable pair of headphones, you can ensure that your listeners have an immersive and enjoyable experience while engaging with your podcast.
Audio Interface
An audio interface is a crucial component of a podcasting setup, especially if you are using a microphone that requires external power, such as a condenser microphone. It serves as the bridge between your microphone and your computer, allowing you to capture high-quality audio and process it through your digital audio workstation (DAW).
Audio interfaces come in various shapes and sizes, with different input and output options. The most common type of audio interface for podcasters is a USB interface, which connects to your computer via a USB cable. USB interfaces are convenient and easy to set up since they don’t require any additional power source or complicated installation.
When choosing an audio interface, consider the number of microphone inputs you need. If you plan on recording solo or with one guest, a single-channel interface will suffice. However, if you anticipate hosting interviews or discussions with multiple participants, opt for an interface with two or more microphone inputs.
Audio interfaces also offer features like gain control, headphone output, and built-in preamps. Gain control allows you to adjust the sensitivity of your microphone, ensuring that the audio signal is neither too weak nor distorted. A headphone output allows you to monitor your recordings in real-time, while preamps boost the microphone signal and provide clean and clear sound quality.
Additionally, some audio interfaces offer phantom power, which is necessary for powering condenser microphones. Make sure your chosen interface provides phantom power if you plan on using a condenser microphone.
Before purchasing an audio interface, check the compatibility with your computer’s operating system and ensure it is compatible with your recording software. It is also worth considering factors such as latency, build quality, and customer reviews to make an informed decision.
An audio interface is a vital tool for recording professional-grade podcast episodes. It allows you to capture clean and clear audio from your microphone and provides essential features for monitoring and processing your recordings. Investing in a reputable audio interface can greatly enhance the overall quality of your podcast.
Pop Filter
A pop filter is a must-have accessory for podcasters as it helps eliminate or minimize the plosive sounds that are produced when certain consonant sounds, like “p” and “b,” are pronounced near the microphone. These plosive sounds can create unwanted bursts of air that can distort the audio and be distracting to listeners.
A pop filter typically consists of a fine mesh screen that is placed between the speaker and the microphone. It acts as a barrier, dispersing the airflow and reducing the impact of the plosive sounds on the microphone. This results in cleaner, clearer audio with fewer harsh plosive sounds.
Using a pop filter helps improve the overall sound quality of your podcast by minimizing the need for post-production editing to remove plosive sounds. It saves you time and effort in the editing process, allowing you to focus on producing content rather than fixing audio issues.
When selecting a pop filter, make sure it is compatible with your microphone and easy to attach and adjust. Some pop filters come with a flexible gooseneck arm, making it easier to position it at the proper distance from the microphone. This adjustability allows you to find the optimal placement for effective plosive sound reduction.
It’s important to note that using a pop filter does require proper microphone technique as well. Positioning the microphone slightly to the side of the pop filter and speaking slightly off-axis helps further minimize plosive sounds, enhancing the effectiveness of the pop filter.
Overall, a pop filter is a relatively inexpensive solution that can significantly improve the clarity and quality of your podcast audio. By reducing plosive sounds, you create a more enjoyable listening experience for your audience, helping your podcast sound more professional and polished.
Mic Stand or Boom Arm
A mic stand or boom arm is an essential accessory for podcasters, providing stability and convenience during recording sessions. It allows you to position your microphone at the optimal height and angle, ensuring consistent sound quality and reducing handling noise.
A mic stand is a basic tool that holds your microphone securely in place. It typically consists of a telescopic tube with an adjustable boom arm that can be extended or retracted to suit your needs. Mic stands are versatile and suitable for various recording setups, from solo podcasts to group discussions.
On the other hand, a boom arm offers greater flexibility and adjustability. It attaches to your desk or table with a clamp or a mounting system, allowing you to place your microphone in any desired position. A boom arm eliminates the need for a floor stand, freeing up valuable space and providing a cleaner aesthetic.
Using a mic stand or boom arm has several advantages. Firstly, it helps maintain a consistent microphone position. This is crucial for achieving a consistent sound throughout your podcast episodes, as moving or adjusting the microphone without a stand can lead to variations in audio quality.
Secondly, a mic stand or boom arm helps reduce handling noise. When you hold the microphone in your hand or place it on a desk, any movement or vibration can be picked up by the microphone and result in unwanted noise in your recordings. With a stable stand or boom arm, you can minimize these vibrations and ensure cleaner audio.
Furthermore, a mic stand or boom arm provides better ergonomics. Having the microphone at the proper height and angle eliminates the need to hunch over or strain your neck during recording sessions. This promotes a more comfortable and natural posture, allowing you to focus on your content and deliver a confident performance.
When choosing a mic stand or boom arm, consider factors such as stability, adjustability, and build quality. Look for models with sturdy construction and reliable locking mechanisms to ensure that your microphone stays securely in place.
Overall, investing in a mic stand or boom arm is a wise choice for podcasters. It offers convenience, stability, and improved audio quality, allowing you to focus on creating compelling content without distractions.
XLR Cables
XLR cables are an essential component of any professional podcasting setup. These cables are used to connect your microphone to the audio interface or mixer, ensuring a balanced and high-quality audio signal transfer.
One of the main advantages of XLR cables is their balanced nature. Unlike unbalanced cables, which are prone to interference and noise pickup, XLR cables have three pins that carry the audio signal. This balanced design helps reject unwanted noise and provides a clean and clear audio signal.
When selecting XLR cables for your podcasting setup, consider the length and quality of the cables. It’s important to choose cables of sufficient length to allow flexibility in your recording environment without sacrificing signal quality. However, avoid excessively long cables as they can introduce signal degradation.
Quality is another crucial factor to consider. Invest in well-built XLR cables with sturdy connectors and reliable shielding to minimize signal loss and interference. High-quality cables are more durable and less likely to develop connectivity issues over time, ensuring a consistent and reliable connection for your microphone.
Using XLR cables also allows you to take advantage of the phantom power provided by your audio interface or mixer. Phantom power is necessary for powering condenser microphones and other equipment that require additional electrical power. XLR cables are designed to carry this phantom power safely and efficiently.
Furthermore, XLR cables offer locking mechanisms that ensure a secure connection between your microphone and your audio interface or mixer. This feature helps prevent accidental disconnections during recording sessions and provides added peace of mind and reliability.
It’s worth noting that XLR cables should be handled with care to avoid any damage or kinks that can affect signal integrity. Regularly inspect your cables for any signs of wear and tear and replace them if necessary.
Shock Mount
A shock mount is a valuable accessory for podcasters that helps reduce or eliminate vibrations and handling noise from transferring to the microphone. It is designed to hold the microphone securely while providing isolation from physical disturbances, resulting in cleaner and more professional audio recordings.
Handling noise can occur when the microphone picks up vibrations from movements, bumps, or accidental touches. This can result in unwanted rumbling sounds or a hollow, resonant quality to the audio. A shock mount prevents these vibrations from reaching the microphone by suspending it with elastic bands or other isolation mechanisms.
Using a shock mount has numerous benefits. Firstly, it helps maintain a stable and consistent positioning of the microphone. It prevents the microphone from shifting or moving unintentionally during recording sessions, ensuring a consistent distance and angle from the sound source. This consistency is crucial for maintaining the desired sound quality throughout your podcast episodes.
Secondly, a shock mount significantly reduces handling noise. Any vibrations or movements that occur around the microphone, such as tapping a desk or adjusting the microphone stand, are isolated from the microphone. This helps produce clean and uninterrupted audio, enhancing the overall professional sound of your podcast.
Additionally, a shock mount is particularly useful if you use a boom arm or a flexible microphone stand. These setups may be prone to transmitting vibrations from their joints or from accidentally bumping into the microphone. With a shock mount, these vibrations are effectively absorbed, ensuring a pristine audio recording.
When selecting a shock mount, consider the compatibility with your microphone model. Different microphones have different shapes and sizes, so it’s important to choose a shock mount that is specifically designed for your microphone. Ensure that the shock mount is adjustable and can securely hold your microphone without any risk of it slipping or falling out.
Lastly, it’s worth noting that a shock mount is not a solution for all audio issues. It primarily addresses handling noise and vibrations, but other factors such as room acoustics and microphone technique also play a significant role in achieving high-quality audio recordings.
Foam Windscreen
A foam windscreen is a simple yet essential accessory for podcasters. It is designed to reduce or eliminate wind and plosive sounds that can be picked up by the microphone during recordings. A foam windscreen acts as a protective layer, preventing air currents and bursts from directly hitting the microphone’s sensitive diaphragm.
Wind noise is a common issue when recording outdoors or in spaces with drafts or air conditioning. Even a gentle breeze can cause unwanted rumbling or rustling sounds in your recordings. A foam windscreen helps minimize these wind noises, ensuring cleaner and more professional audio.
Additionally, a foam windscreen helps reduce plosive sounds, which are produced when pronouncing certain consonants, like “p” or “b,” in close proximity to the microphone. These plosive sounds can create bursts of air that distort the audio and can be distracting to listeners. The foam windscreen acts as a barrier, dispersing the airflow and reducing the impact of these plosive sounds on the microphone.
Using a foam windscreen is straightforward. Simply slide the windscreen over the microphone’s grille, ensuring a snug and secure fit. The foam material is acoustically transparent, meaning that it allows sound to pass through without affecting the overall frequency response. This ensures that your voice sounds clear and natural while reducing unwanted noise.
When choosing a foam windscreen, make sure it is compatible with your microphone model. Different microphones have varying sizes and shapes, so it’s essential to select a windscreen that fits your specific microphone snugly. This ensures that the windscreen remains securely in place during recording sessions.
Furthermore, it’s important to keep your foam windscreen clean. Over time, the windscreen can accumulate dirt, dust, or moisture, which can affect the audio quality. Regularly inspect and clean the windscreen according to the manufacturer’s instructions to ensure optimal performance.
Remember, a foam windscreen is not a substitute for proper microphone technique or a dedicated pop filter, but it is a valuable tool for minimizing wind noise and plosive sounds. By using a foam windscreen, you can enhance the overall audio quality of your podcast and provide your listeners with a better listening experience.
Portable Recorder
A portable recorder is a versatile and essential tool for podcasters who want to record interviews and episodes on-the-go or in locations where a computer setup is not practical. It allows you to capture high-quality audio directly onto the device, providing flexibility and convenience for remote recordings or recording in unconventional environments.
Portable recorders are compact, lightweight, and battery-powered, making them easy to carry and operate. They typically come with built-in microphones, although some models offer the ability to connect external microphones for improved audio quality and versatility.
Using a portable recorder offers several advantages. Firstly, it allows you to record interviews, field recordings, or live events without the need for a computer or additional equipment. This is particularly useful when you’re on the move or outside of a studio setting, where a full recording setup might be cumbersome or impractical.
Secondly, portable recorders provide high-quality audio recording capabilities. Many models offer adjustable recording settings, allowing you to choose the appropriate resolution, sample rate, and file format for your specific needs. This ensures that you capture clean and clear audio, even in challenging recording environments.
Additionally, portable recorders often come equipped with features like built-in microphones with adjustable angles, preamps, and onboard controls for monitoring and adjusting recording levels. These features help you achieve optimal sound quality while giving you real-time control over the recording process.
When selecting a portable recorder, consider factors such as the recording quality, battery life, storage capacity, and ease of use. Look for models with intuitive interfaces and versatile connectivity options, such as USB or SD card slots. This allows for easy transferring and editing of recorded audio files.
It’s worth noting that while portable recorders provide convenience, they may not always match the audio quality of a dedicated studio setup. However, advancements in technology have made portable recorders capable of delivering impressive results, suitable for most podcasting needs.
Whether you’re conducting on-location interviews, capturing ambient sounds for immersive storytelling, or simply recording episodes away from your usual setup, a portable recorder is an invaluable tool that expands the possibilities of your podcasting endeavors.
Acoustic Treatment
Acoustic treatment is a vital consideration for podcasters seeking to achieve optimal sound quality in their recordings. It involves the use of specific materials and techniques to control and enhance the acoustics of a recording space, ensuring clean, clear, and professional-sounding audio.
One of the primary goals of acoustic treatment is to minimize unwanted echo and reverberation. Echoes can occur when sound waves bounce off hard surfaces in a room and arrive at the microphone at different times, resulting in a muddled and less intelligible audio. By strategically placing acoustic panels or foam in the room, you can absorb and diffuse these sound reflections, reducing echo and improving clarity.
Acoustic treatment also helps address issues with excessive room modes or resonances. Room modes are low-frequency standing waves that can cause certain frequencies to be amplified or canceled out. By placing bass traps in the corners of the room, you can minimize these room modes and achieve a more accurate and balanced sound reproduction.
When considering acoustic treatment, start by assessing your recording space. Identify any hard surfaces that could potentially cause echo or reflections, such as bare walls, windows, or tiled floors. Determine the most critical areas to focus on, such as the wall behind the microphone or the corners of the room, and strategically place absorptive materials accordingly.
There are various types of acoustic treatment available, including foam panels, diffusers, bass traps, and acoustic ceiling tiles. Each type serves a specific purpose in addressing different acoustic issues. Depending on your budget and specific needs, you can decide which elements to incorporate into your recording space.
It’s important to note that acoustic treatment is not only beneficial for podcasters recording in dedicated studios but also for those operating in less controlled environments, such as home offices or bedrooms. Even small adjustments, such as placing foam panels behind the microphone or using a reflection filter, can significantly enhance the sound quality of your recordings.
Remember, achieving the perfect acoustic treatment takes some experimentation and adjustment based on your particular room and recording setup. Don’t be afraid to fine-tune and iterate until you achieve the desired sound. With proper acoustic treatment, you can create a more professional and enjoyable listening experience for your audience.
Mic Preamp
A mic preamp, short for microphone preamplifier, is an essential component in a podcasting setup. It amplifies the low-level signal from your microphone to a suitable level for recording or further processing. The quality of the mic preamp can significantly impact the overall sound quality of your recordings.
One of the key functions of a mic preamp is to provide clean and transparent gain. It boosts the microphone signal while maintaining a low noise floor, ensuring that your recordings have a high signal-to-noise ratio. This is particularly important when working with dynamic or ribbon microphones, which have lower signal output levels compared to condenser microphones.
A good mic preamp also helps preserve the integrity of the microphone’s original sound. It captures the nuances and subtleties of your voice with accuracy and fidelity, allowing the true character of your microphone to shine through. This is especially important for capturing detailed vocals, musical instruments, or any other audio source with clarity and precision.
When selecting a mic preamp, consider factors such as gain control, impedance matching, and connectivity options. Gain control allows you to adjust the signal level, accommodating different microphones and recording situations. Impedance matching ensures that the microphone and preamp work together optimally, avoiding any distortion or signal degradation. Connectivity options such as XLR or USB inputs provide versatility in connecting your microphones and other audio devices.
While some audio interfaces or mixers come with built-in mic preamps, dedicated standalone preamps often offer higher quality and more control. External mic preamps allow you to have a separate and dedicated unit solely focused on amplifying the microphone signal, resulting in improved audio performance.
It’s worth noting that investing in a high-quality mic preamp can make a significant difference in your recording setup. However, the impact of a preamp may be more noticeable on higher-end microphones. If you are using entry-level or budget-friendly microphones, the differences might be more subtle.
Lastly, keep in mind that the mic preamp is just one piece of the puzzle when it comes to achieving professional-grade sound. Other factors such as microphone selection, room acoustics, and post-production processing also play vital roles in creating exceptional audio.
By incorporating a quality mic preamp into your podcasting setup, you can ensure optimal signal amplification, improved clarity, and enhanced audio quality for your recordings. It allows you to capture your voice or any audio source with precision and fidelity, creating a more immersive and engaging experience for your listeners.
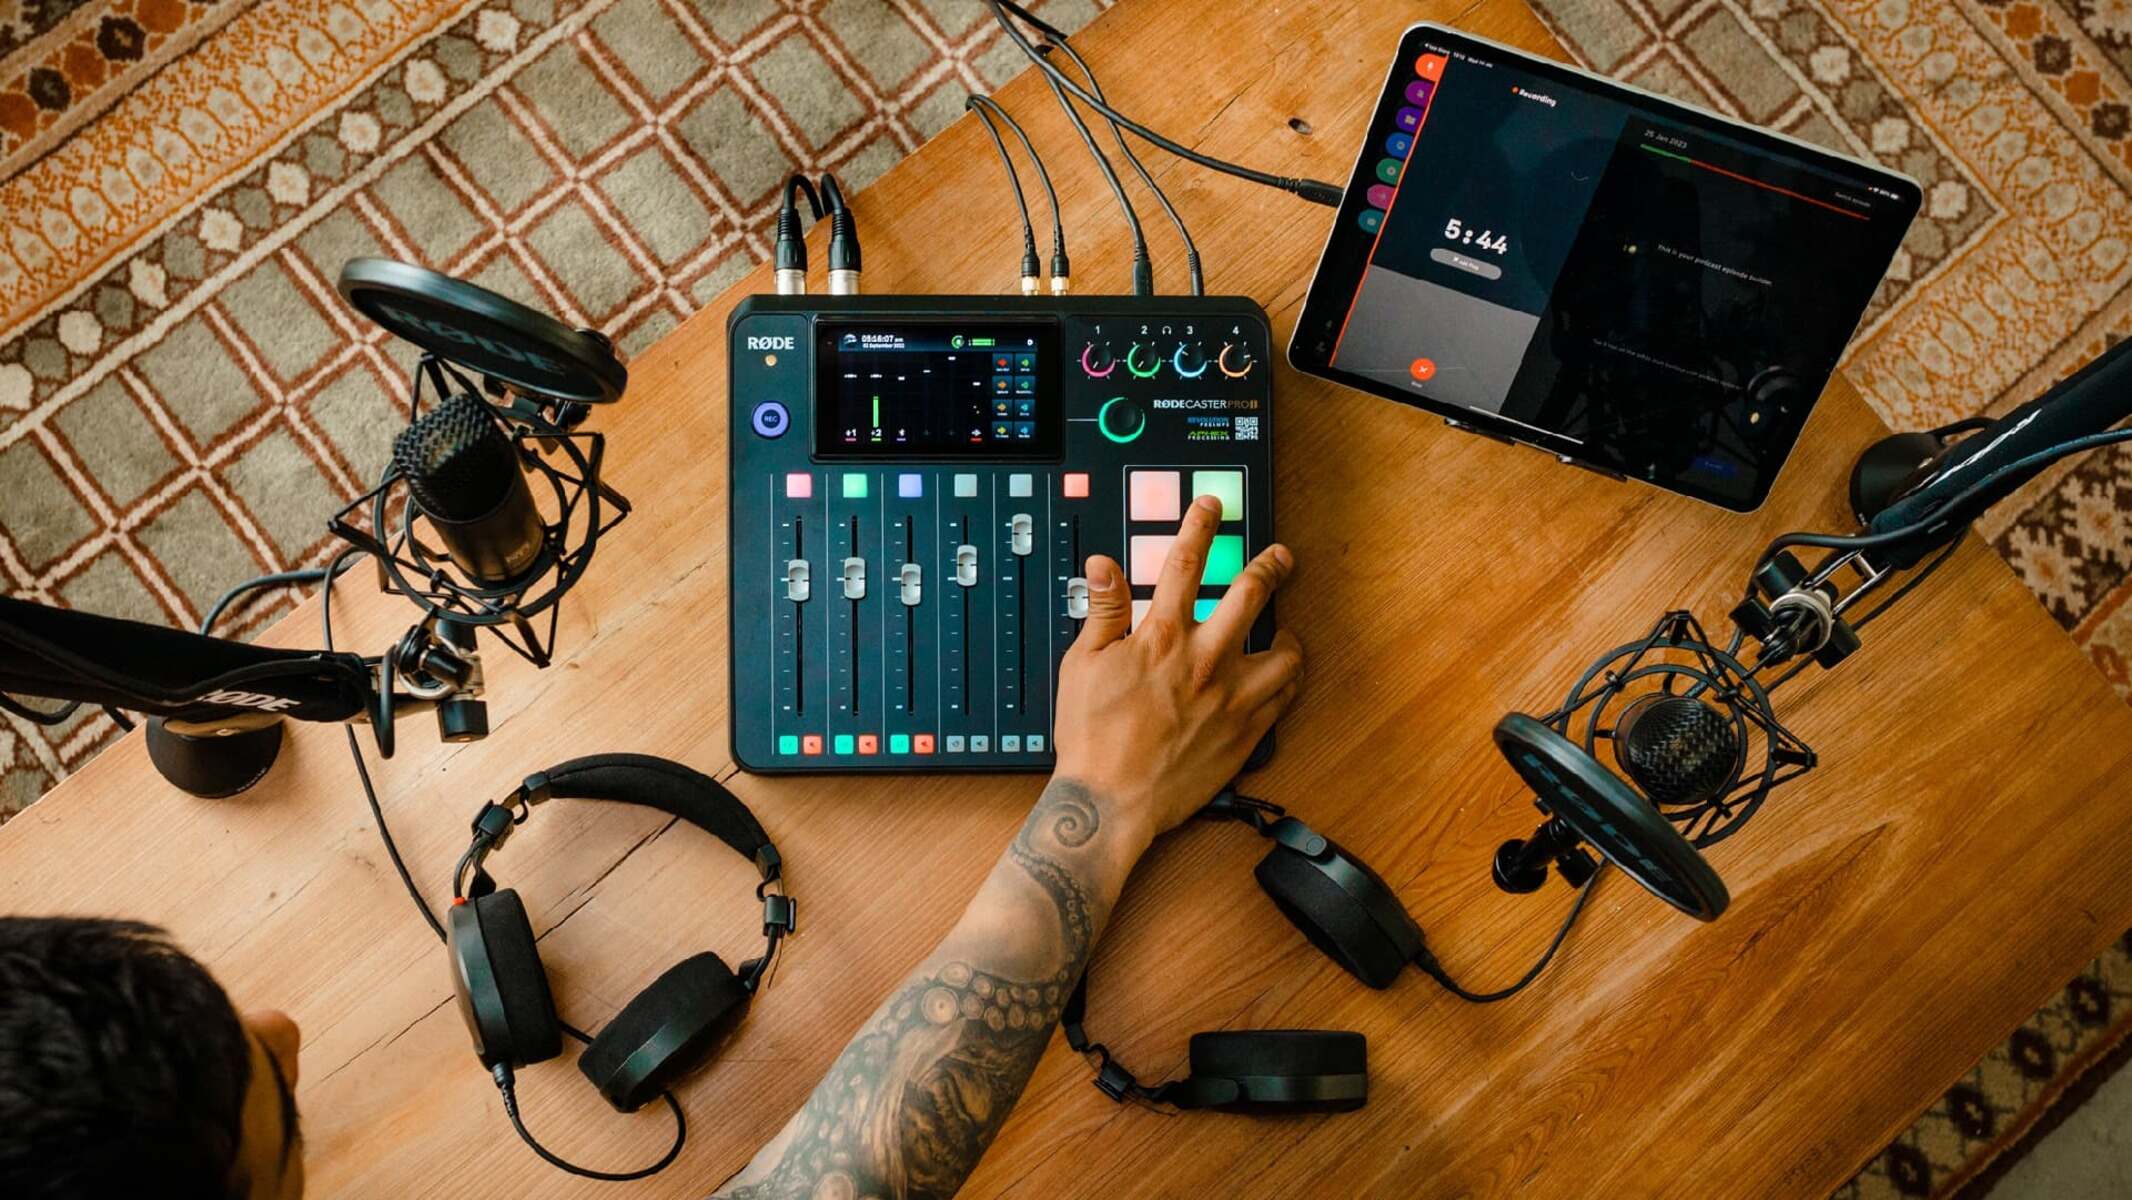
Mixer
A mixer is a versatile and powerful tool for podcasters, allowing you to control and fine-tune multiple audio sources in your recording setup. It serves as a central hub, enabling you to connect and adjust the levels of microphones, audio interfaces, sound effects, music, and other audio devices.
One of the primary functions of a mixer is to provide control over audio levels. It allows you to adjust the volume of each audio source independently, ensuring that all voices and sounds are balanced and blend well together. This is particularly useful when recording interviews or discussions with multiple participants or when incorporating music and sound effects into your podcast episodes.
In addition to volume control, a mixer often offers features such as EQ (equalization), pan, and effects. EQ controls allow you to shape the tonal characteristics of each input, enhancing clarity and addressing frequency imbalances. Pan controls determine the stereo placement of each audio source, enabling you to position voices and sounds in the stereo field. Effects, such as reverb or compression, can be applied to enhance the audio quality or add creative elements.
Mixers typically come in different sizes and configurations, ranging from compact models designed for a few inputs to larger, more comprehensive consoles for advanced audio production. The number of inputs and outputs you require will depend on the complexity of your podcasting setup and the number of audio sources you want to manage.
A mixer can connect to other devices such as microphones, audio interfaces, headphones, and recording equipment. It allows for seamless integration of your entire audio setup, providing routing options that direct signals to the appropriate destination, such as headphones or an audio interface for recording.
It’s worth noting that while mixers offer extensive control and flexibility, they can also be complex to operate. Investing time in learning and becoming familiar with the functions and features of your mixer will help you maximize its potential and achieve the desired audio results.
While not essential for every podcaster, a mixer becomes more valuable as your podcasting setup grows in complexity. If you have multiple microphones and want full control over your audio sources, a mixer can streamline your workflow and allow for greater creativity in your productions.
By incorporating a mixer into your podcasting setup, you gain greater control over audio levels, tonal balance, and creative effects. It simplifies the management of multiple audio sources, resulting in a polished and professional sound for your podcast episodes.
Digital Audio Workstation
A digital audio workstation (DAW) is a powerful software application that serves as the central tool for recording, editing, and mixing your podcast episodes. It provides a comprehensive set of features and tools that allow you to manipulate and enhance your audio recordings, ensuring professional-grade production quality.
One of the primary functions of a DAW is to record and edit audio. It allows you to import and arrange your recorded audio files, providing a visual representation of the waveform. With precise editing tools, you can cut, trim, and arrange your recordings, removing any mistakes or unwanted sections.
Additionally, a DAW offers a wide range of audio effects and processing tools. This includes EQ, compression, reverb, delay, and more. These effects can help enhance the tonal quality of your voice, reduce background noise, add depth and ambiance, and create a more polished and enjoyable listening experience.
A DAW also provides features for mixing your podcast episodes. It allows you to adjust the volume levels of individual tracks, apply pan controls for stereo placement, and fine-tune the overall balance and blending of your audio elements. This ensures that each voice, music, and sound effect is properly balanced and positioned in the final mix.
Many DAWs also offer advanced features like automation, which allows you to create smooth and precise changes in volume, effects, or other parameters over time. This is particularly useful for adding fades, transitions, or more complex audio movements in your podcast episodes.
Furthermore, a DAW provides multiple tracks for layering and organizing your audio elements. This allows you to easily manage different audio sources, such as multiple microphones, background music, sound effects, and intros/outros, ensuring efficient workflow and organization during the editing process.
When choosing a DAW, consider factors such as compatibility with your operating system, user interface, available features, and budget. There are many options available, ranging from free and beginner-friendly DAWs to professional-grade software used by industry experts. Experiment with different DAWs to find the one that suits your specific needs and workflow.
While a DAW is a powerful tool, it does require a learning curve to fully harness its capabilities. Invest time in exploring tutorials, online resources, and experimenting with the various features to optimize your audio production workflow.
By utilizing a digital audio workstation, you can take control over the entire production process of your podcast episodes. It allows you to record, edit, mix, and enhance your audio recordings with precision, resulting in professional-quality podcasts that captivate and engage your audience.
Soundproofing Materials
Soundproofing materials are essential for podcasters looking to create a quiet and controlled recording environment. They help minimize the intrusion of external noises and reduce sound reflections within the room, resulting in cleaner and more professional audio recordings.
One of the primary goals of soundproofing is to block or absorb unwanted external sounds. This can include noises from outside traffic, neighbors, or other activities within the building. Soundproofing materials such as acoustic panels, foam, or insulation are used to create a barrier that prevents sound from entering or exiting the recording space.
Acoustic panels are a common choice for soundproofing. They are typically made of acoustic foam or fiberglass and are designed to absorb sound waves, reducing echo and reverberation within the room. These panels can be mounted on walls or placed strategically around the recording area to absorb unwanted reflections and improve the acoustic quality of the space.
Foam panels, like those made from polyurethane foam, are popular options for sound absorption. They help minimize flutter echoes and reverberations by absorbing sound waves that bounce off hard surfaces. Foam panels are available in various sizes and designs, allowing for flexibility in placement and customization of the recording environment.
Insulation materials, such as mineral wool or mass-loaded vinyl, are used to improve the sound isolation of the room. These materials are denser and help block or reduce the transmission of sound waves through walls, floors, or ceilings. They are particularly effective in reducing low-frequency noise and providing a more controlled and quiet recording environment.
When soundproofing your recording space, it’s important to identify the areas where sound is likely to enter or escape. This includes doors, windows, gaps, or any cracks in the walls. Applying weatherstripping, acoustic seals, or using soundproof curtains can help seal these areas and further enhance the soundproofing performance of your space.
It’s important to note that absolute soundproofing, where all external noises are eliminated entirely, is incredibly challenging to achieve. However, by addressing common entry points and using suitable soundproofing materials, you can significantly reduce unwanted noise and create a more controlled recording environment.
Remember that soundproofing is just one aspect of creating a great recording space. Other factors, such as microphone technique and room acoustics, also play essential roles in capturing high-quality audio. However, by incorporating soundproofing materials, you can minimize distractions, reduce the need for excessive post-production editing, and achieve more professional-sounding podcast episodes.
Editing Software
Editing software is a crucial tool for podcasters, allowing you to enhance the quality and polish of your recorded audio. It provides a range of features and tools that enable you to edit, arrange, and refine your podcast episodes, resulting in a professional and engaging final product.
One of the primary functions of editing software is to trim and rearrange your recorded audio files. It allows you to remove any mistakes, long pauses, or irrelevant content, ensuring a smooth and concise listening experience. You can cut, copy, paste, and arrange audio segments with precision, creating a coherent and well-structured podcast episode.
Moreover, editing software offers various tools for improving the audio quality. You can apply equalization (EQ) to enhance the tonal balance, reducing any harsh frequencies or boosting certain ranges to achieve clarity and warmth. Additionally, it allows you to apply compression to even out the dynamic range of your audio, minimizing the disparity between loud and soft parts, resulting in a more balanced and professional sound.
Effects and plugins are also available in editing software, offering a wide range of creative possibilities. You can add reverb or delay for a more spacious sound, apply noise reduction to eliminate background noise, and experiment with different modulation effects to add depth and interest to your podcast audio.
Another key feature of editing software is the ability to incorporate music, sound effects, and intros/outros. This allows you to create a more immersive and engaging listening experience for your audience. You can import royalty-free music tracks, create customized sound effects, or record professional voiceovers to add a professional touch to your podcast episodes.
Most editing software provides visual waveforms that represent your audio, making it easier to identify specific sections and align multiple tracks. This visual feedback facilitates precise editing, ensuring seamless transitions, and eliminating any timing inconsistencies.
When choosing editing software, consider factors such as ease of use, available features, compatibility with your operating system, and your budget constraints. There are various options available, from free and beginner-friendly software to more advanced and professional-grade applications.
Editing software is a valuable tool for podcasters to refine their recordings and create engaging content. By utilizing the features and tools available, you can ensure that your podcast episodes have a polished and professional sound, captivating your listeners and enhancing their overall experience.