
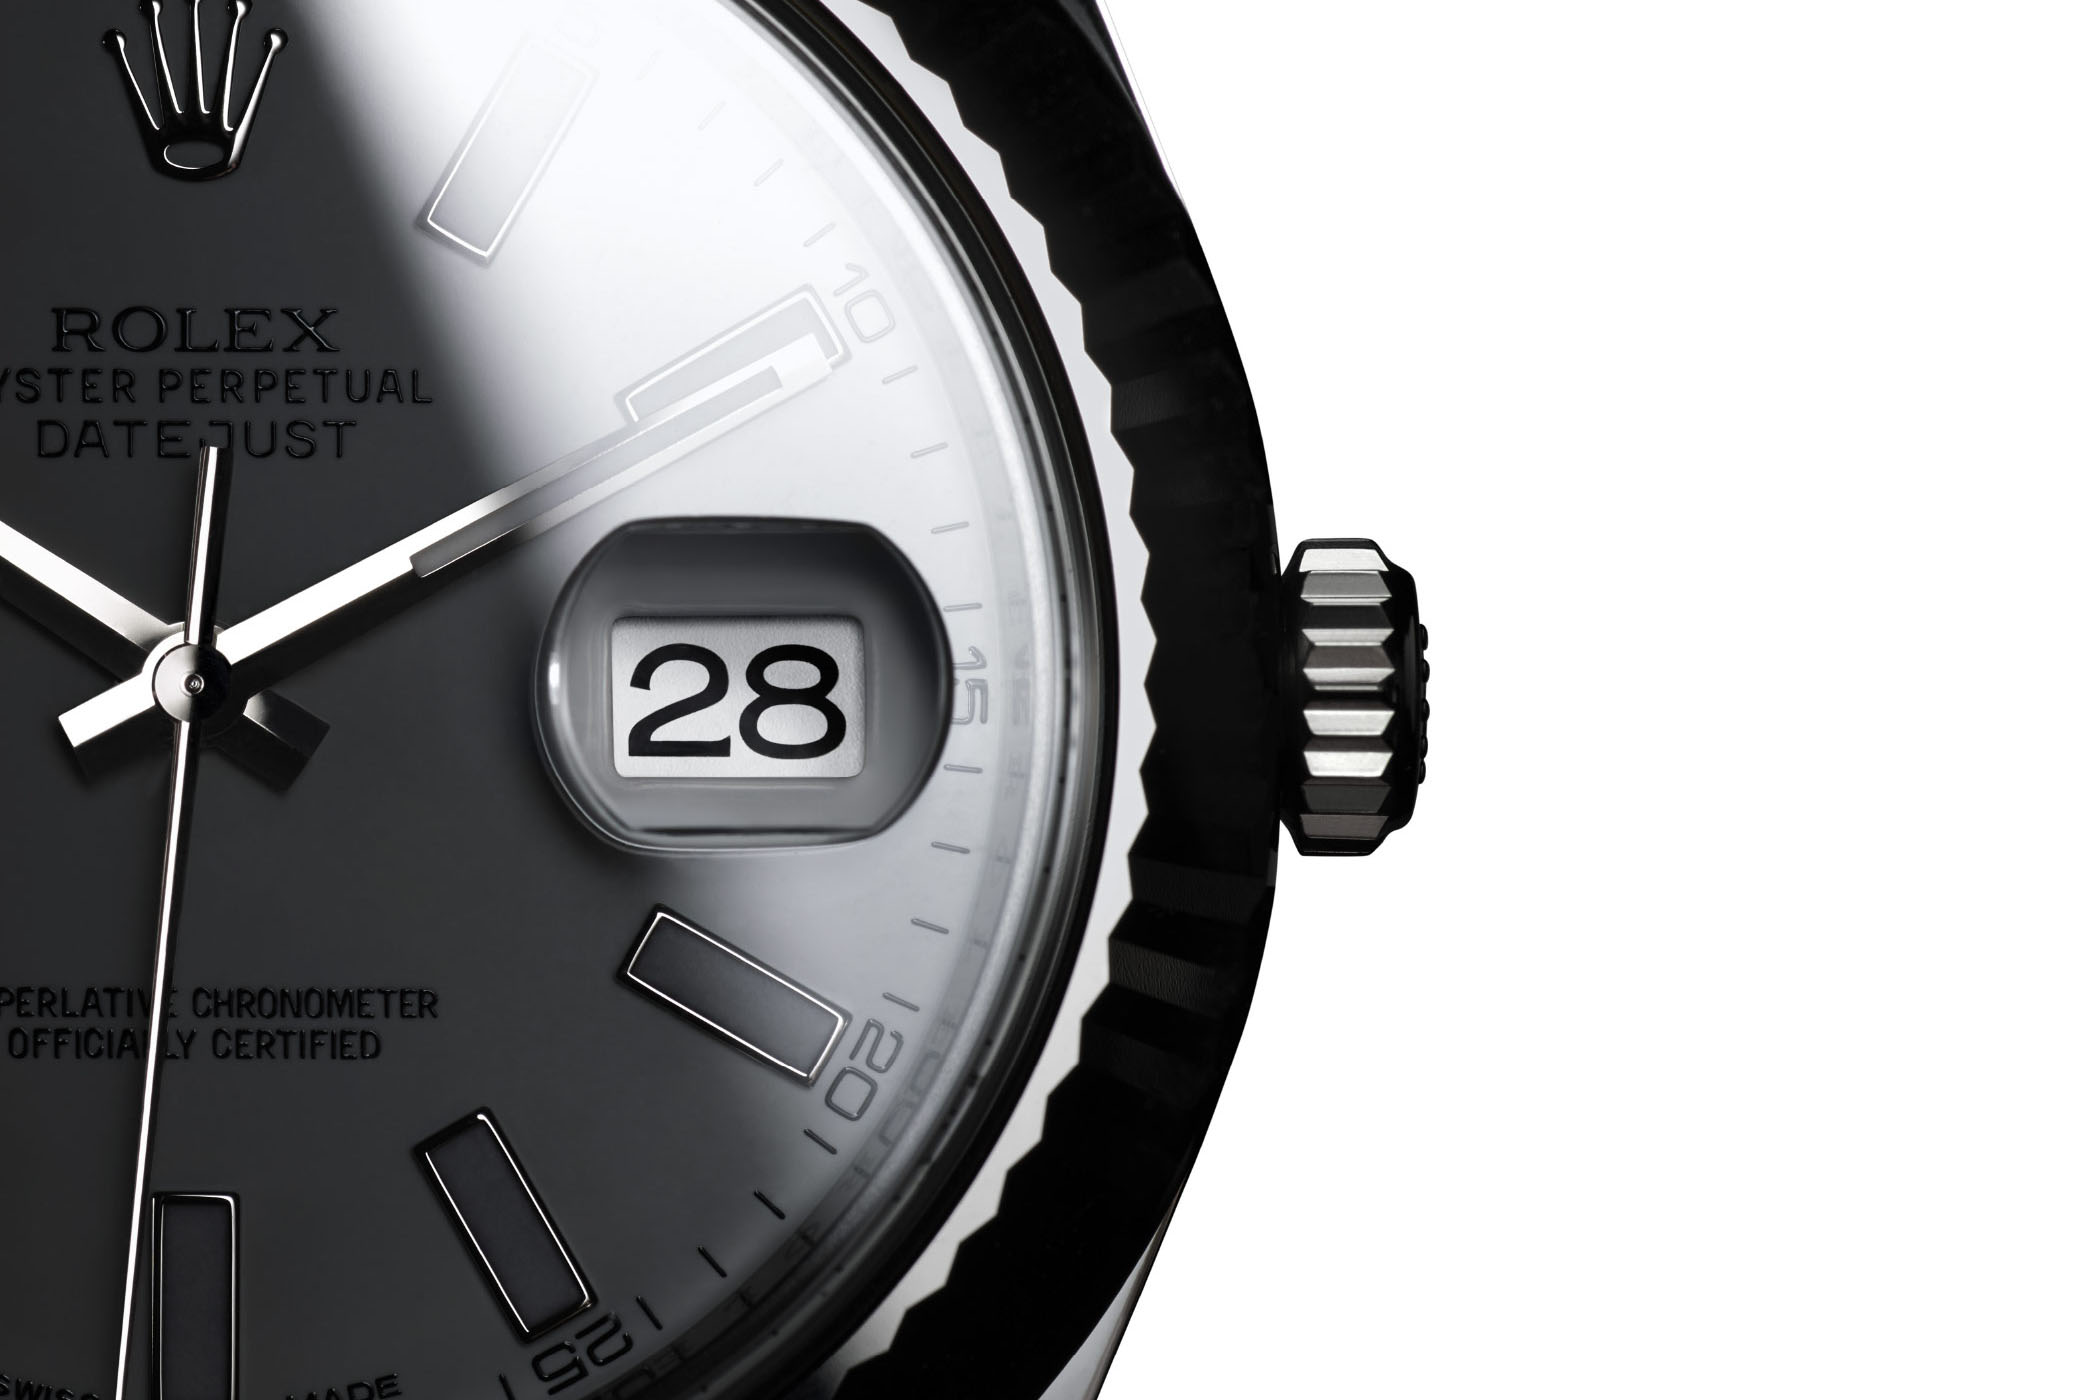
Why Remove the Date Magnifier?
The date magnifier, also known as the cyclops, is a small, convex lens typically found on the crystal of a watch, positioned directly over the date window. While it serves the functional purpose of magnifying the date for easier readability, there are several reasons why one might consider removing it.
Aesthetics
The presence of a date magnifier can significantly alter the overall appearance of a watch. Some individuals prefer a sleek, minimalist look without any additional protrusions on the crystal. By removing the date magnifier, the watch can achieve a more streamlined and classic aesthetic.
Maintenance
The date magnifier can accumulate dust, dirt, or moisture over time, detracting from the crystal's clarity and potentially affecting the legibility of the date. Removing the magnifier allows for thorough cleaning and maintenance of the crystal, ensuring a clear and unobstructed view of the dial.
Personal Preference
For some watch enthusiasts, the presence of a date magnifier may simply not align with their personal taste or style. By removing it, they can customize the appearance of their timepiece to better reflect their individual preferences and aesthetic sensibilities.
Reduced Distortion
In certain instances, the date magnifier can create a slight distortion or visual aberration when viewing the date through the crystal. By removing the magnifier, the date window can be observed without any magnification-induced distortion, providing a clear and unaltered view of the date display.
Enhanced Crystal Clarity
Removing the date magnifier can improve the overall clarity and transparency of the crystal, allowing for a pristine view of the dial and its intricate details. This can be particularly beneficial for individuals who prioritize crystal clarity and visual crispness in their timepieces.
In the following sections, we will explore the step-by-step process of safely removing the date magnifier from your watch, providing insights into the tools needed and the meticulous techniques required for this task.
Tools Needed
Before embarking on the task of removing the date magnifier from your watch, it’s essential to gather the necessary tools to ensure a safe and successful process. Here are the tools you will need:
Watchmaker’s Case Back Opener
A watchmaker’s case back opener is a specialized tool designed to safely remove the back of a watch case, providing access to the internal components. It comes in various types, including wrench-style and knife-style openers, each suited for different case designs. Selecting the appropriate opener for your specific watch case is crucial to prevent damage during the removal process.
Microfiber Cloth
A soft microfiber cloth is indispensable for handling the watch components and ensuring a clean workspace. It is essential for gently wiping the watch and crystal to remove any dust, fingerprints, or debris that may interfere with the removal process or compromise the watch’s cleanliness.
Precision Tweezers
Precision tweezers are invaluable for delicately manipulating small components within the watch. When removing the date magnifier, precision tweezers enable careful handling without causing damage to the crystal or other delicate parts of the timepiece.
Plastic Pry Tool
A plastic pry tool, designed specifically for watch repairs, is crucial for safely prying the date magnifier from the crystal without scratching or damaging the surrounding areas. It provides the necessary leverage to detach the magnifier while minimizing the risk of cosmetic or structural harm to the watch.
Adhesive Remover (Optional)
If the date magnifier is secured with adhesive, a specialized adhesive remover may be required to dissolve the adhesive and facilitate the gentle removal of the magnifier from the crystal. This step is essential for minimizing the risk of crystal damage during the extraction process.
With these essential tools at your disposal, you will be well-equipped to proceed with the meticulous task of removing the date magnifier from your watch, ensuring a careful and precise approach to watch maintenance and customization.
Step 1: Prepare Your Workspace
Before initiating the process of removing the date magnifier from your watch, it is crucial to establish a well-prepared and organized workspace to ensure the safety of the watch and its components. Follow these essential steps to create an ideal environment for this delicate task:
Gather Necessary Tools
Ensure that you have all the required tools readily available, including the watchmaker’s case back opener, microfiber cloth, precision tweezers, plastic pry tool, and adhesive remover if necessary. Having these tools within reach will streamline the process and minimize the risk of misplacing essential items during the task.
Clean and Well-Lit Area
Choose a clean, well-lit workspace with ample lighting to facilitate clear visibility and precision during the removal process. A clutter-free environment reduces the likelihood of misplacing small components and ensures that the task can be carried out with focused attention and meticulous care.
Secure the Watch
Place the watch on a soft, non-abrasive surface, such as a microfiber cloth, to prevent scratches or damage to the watch case and crystal. Securing the watch in a stable position will enable steady and controlled manipulation of the components during the removal of the date magnifier.
Organize Components
Prior to commencing the removal process, organize the tools and components in a systematic manner, ensuring that each item is easily accessible and identifiable. This organization minimizes the risk of confusion or fumbling for tools mid-task, allowing for a smooth and uninterrupted workflow.
Exercise Patience
Approach the task with a patient and focused mindset, as removing the date magnifier requires precision and diligence. Rushing through the process can lead to inadvertent damage to the watch, so take the time to prepare the workspace thoroughly before proceeding with the subsequent steps.
By diligently preparing your workspace in accordance with these guidelines, you will set the stage for a methodical and successful endeavor to remove the date magnifier from your watch, ensuring the safety and integrity of your timepiece throughout the maintenance process.
Step 2: Remove the Watch Back
Removing the back of the watch case is a crucial initial step in gaining access to the internal components, including the date magnifier. Follow these meticulous steps to safely remove the watch back without compromising the integrity of the timepiece:
Select the Appropriate Case Back Opener
Identify the type of case back opener required for your specific watch case. Depending on the design, you may need a wrench-style or knife-style opener. Choosing the correct tool is essential to prevent slippage or damage to the case back during the removal process.
Secure the Watch
Steadily hold the watch in place, ensuring that it is positioned securely on a soft, non-abrasive surface. This stability is vital to prevent any accidental movement or shifting of the watch during the application of pressure to remove the case back.
Apply Even Pressure
With the selected case back opener, apply even and controlled pressure to the designated points on the case back, aligning the tool securely to avoid slipping. Exercise caution and patience, as excessive force or uneven pressure can lead to damage to the case back or the tool itself.
Rotate and Unscrew
If the watch case features a screw-down back, carefully rotate the case back opener in the appropriate direction to unscrew and release the back. Maintain a steady grip and gradual motion to ensure a smooth and controlled removal process, taking care to avoid sudden movements that may cause slipping or mishandling.
Handle with Care
Upon successful removal of the watch back, handle it with utmost care to prevent any accidental drops or impacts. Place the back in a secure location, ensuring that it is protected from potential damage or contamination during the subsequent steps of the maintenance process.
By meticulously following these steps, you will effectively remove the watch back, paving the way for the subsequent phases of the maintenance process, including the careful extraction of the date magnifier from the watch’s crystal.
Step 3: Locate the Date Magnifier
Once the watch back has been successfully removed, the next crucial step is to locate the position of the date magnifier on the watch’s crystal. This meticulous process requires attention to detail and a steady hand to ensure the safe and precise identification of the date magnifier. Follow these steps to effectively locate the date magnifier:
Inspect the Crystal
Thoroughly examine the surface of the crystal to identify the location of the date window and the corresponding position of the date magnifier. The magnifier is typically positioned directly above the date window, protruding slightly from the crystal’s surface. Take your time to carefully observe and orient yourself to the layout of the dial and crystal.
Utilize Adequate Lighting
Ensure that your workspace is well-lit to facilitate clear visibility of the dial and crystal. Proper lighting is essential for identifying the precise location of the date magnifier and assessing any potential adhesive or securing mechanisms that may be present, ensuring that the removal process can be executed with precision.
Verify Magnification Effect
Inspect the date window through the crystal to confirm the magnification effect produced by the date magnifier. This visual verification serves to reaffirm the position of the magnifier and aids in planning the subsequent steps for its safe removal, taking into account any adhesive or securing methods that may be in place.
Note Surrounding Components
Take note of any surrounding components or features near the date magnifier, such as indices, logos, or additional complications on the watch dial. This awareness is essential for ensuring that the removal process is carried out with precision and care, minimizing the risk of inadvertently impacting other elements of the timepiece.
Exercise Caution
Approach the process of locating the date magnifier with a gentle and cautious demeanor, ensuring that the watch and its components are handled with the utmost care and attention to detail. By maintaining a steady and deliberate approach, you will effectively prepare for the subsequent steps of removing the date magnifier from the watch’s crystal.
By diligently following these steps, you will successfully locate the date magnifier, laying the groundwork for the meticulous process of safely and skillfully removing this component from your watch.
Step 4: Gently Pry the Date Magnifier
With the date magnifier located and its position confirmed, the next critical step involves delicately prying the magnifier from the watch’s crystal. This process demands precision and care to prevent damage to the crystal and surrounding components. Follow these meticulous steps to safely and skillfully remove the date magnifier:
Assess Adhesive or Securing Mechanisms
Inspect the perimeter of the date magnifier to determine if it is affixed to the crystal with adhesive or other securing mechanisms. If adhesive is present, exercise caution and consider using an adhesive remover to dissolve the bond, facilitating the gentle separation of the magnifier from the crystal without causing damage.
Utilize the Plastic Pry Tool
Select a plastic pry tool suitable for watch repairs, ensuring that it is designed to minimize the risk of scratching or marring the crystal’s surface. Position the pry tool at a strategic point along the edge of the date magnifier, applying gentle and even pressure to initiate the separation process without sudden or forceful movements.
Work Methodically Around the Magnifier
Gradually maneuver the plastic pry tool around the circumference of the date magnifier, maintaining a steady and controlled motion to gradually release it from the crystal. Exercise patience and attentiveness, ensuring that the prying process is carried out with meticulous care to avoid unintended damage to the crystal or surrounding areas.
Monitor Resistance and Adjust Technique
Be mindful of any resistance encountered during the prying process, adjusting the technique and pressure applied as needed to navigate around the magnifier’s perimeter. It is essential to proceed with a gentle and methodical approach, prioritizing the preservation of the crystal’s integrity throughout the removal process.
Ensure Even Disengagement
Continuously assess the even disengagement of the date magnifier from the crystal, ensuring that it is gradually and uniformly released without excessive force or sudden movements. This careful approach minimizes the risk of damage and maintains the pristine condition of the crystal’s surface during the extraction of the magnifier.
By meticulously following these steps, you will effectively and safely pry the date magnifier from the watch’s crystal, setting the stage for the subsequent phases of the maintenance process and the meticulous cleaning of the area surrounding the date window.
Step 5: Clean the Area
After the successful removal of the date magnifier, the next essential step involves meticulously cleaning the area surrounding the date window and the crystal to ensure a pristine and unobstructed view of the dial. This meticulous cleaning process is crucial for maintaining the visual clarity and integrity of the watch. Follow these meticulous steps to effectively clean the area:
Inspect for Residual Adhesive or Debris
Thoroughly examine the area where the date magnifier was positioned, checking for any residual adhesive, dust, or debris that may have accumulated during the removal process. This careful inspection is essential for identifying and addressing any remnants that could affect the clarity of the crystal or interfere with the date display.
Utilize a Microfiber Cloth
Gently wipe the area surrounding the date window and the crystal with a soft, lint-free microfiber cloth. Ensure that the cloth is clean and free of any abrasive particles that could potentially scratch or mar the surface of the crystal, maintaining a delicate touch to remove any remaining particles or smudges.
Consider a Watch-Safe Cleaning Solution
If necessary, lightly moisten a corner of the microfiber cloth with a watch-safe cleaning solution specifically formulated for delicate timepiece components. Exercise caution and apply the solution sparingly, focusing on areas that require additional cleaning without exposing the watch to excessive moisture.
Ensure Thorough Drying
If a cleaning solution is used, allow the area to thoroughly dry before reassembling the watch. Patience is key to ensure that the crystal and surrounding components are free from any moisture or residue, preventing potential complications during the reassembly process and preserving the pristine condition of the watch.
Verify Clarity and Cleanliness
Upon completing the cleaning process, visually inspect the area surrounding the date window to ensure that it exhibits optimal clarity and cleanliness. Confirm that the crystal is free from any smudges, residue, or obstructions, providing a clear and unobstructed view of the dial and the date display.
By meticulously following these steps, you will effectively clean the area surrounding the date window, ensuring that the watch maintains its visual integrity and pristine appearance following the removal of the date magnifier.
Step 6: Reassemble the Watch
After completing the meticulous process of removing the date magnifier and cleaning the area surrounding the date window, the final critical step involves reassembling the watch to restore its functionality and visual appeal. Follow these meticulous steps to effectively and safely reassemble the watch:
Inspect the Components
Prior to reassembly, carefully inspect the components, including the watch back, date magnifier (if intended for reinstallation), and any additional elements that were removed during the maintenance process. Verify that each component is clean, undamaged, and ready for reintegration into the timepiece.
Position the Date Magnifier (If Applicable)
If the decision has been made to reinstall the date magnifier, align it precisely over the date window, ensuring that it is oriented correctly and securely positioned on the crystal. Exercise caution and patience to achieve a seamless and symmetrical placement of the magnifier, enhancing the visual appeal of the watch.
Secure the Watch Back
Carefully position the watch back over the internal components, aligning it accurately with the case and ensuring a snug fit. If the watch back features a screw-down design, rotate it in the appropriate direction to secure it in place, exercising care to avoid cross-threading and ensuring a proper seal to maintain the watch’s water resistance, if applicable.
Utilize Appropriate Tools
If specialized tools were used during the removal process, such as a case back opener or plastic pry tool, ensure that they are safely stowed and accounted for before completing the reassembly. Properly storing the tools prevents misplacement and ensures that they are readily available for future maintenance needs.
Verify Functionality and Aesthetics
Upon reassembly, carefully verify that the watch functions as intended, including the date display if applicable. Additionally, assess the overall aesthetics of the timepiece to ensure that the reassembly process has resulted in a visually appealing and seamlessly restored watch appearance.
By meticulously following these steps, you will effectively reassemble the watch, culminating in the successful restoration of its functionality and aesthetic appeal following the meticulous removal of the date magnifier and subsequent cleaning process.