
Getting Started with the Yunteng Self Picture Monopod
So, you’ve got your hands on the Yunteng Self Picture Monopod, and you’re eager to capture some amazing selfies and group photos. Before you dive into the world of creative photography, let’s start with the basics. The Yunteng Self Picture Monopod is a versatile and user-friendly tool that can take your photography to the next level. Here’s a step-by-step guide to help you get started:
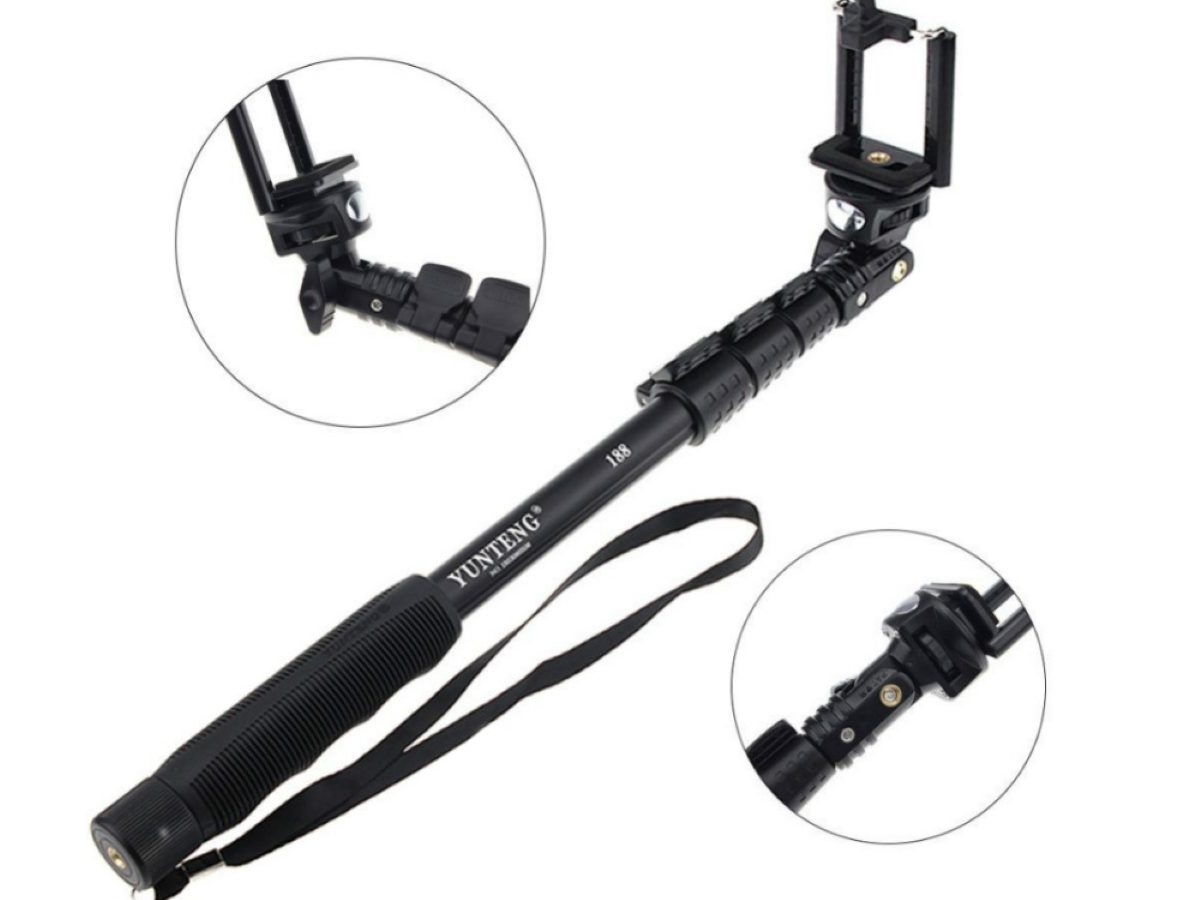
- Unboxing and Assembly: When you first unbox your Yunteng Self Picture Monopod, you’ll find the main monopod, a phone holder, and a Bluetooth remote control. Begin by assembling the monopod by extending the sections to your desired length and securing them in place. Attach the phone holder to the top of the monopod, ensuring it’s firmly in place.
- Mounting Your Smartphone: Once the monopod is assembled, it’s time to mount your smartphone. Place your phone securely in the holder, ensuring that it’s stable and won’t wobble during use. The adjustable phone holder can accommodate various smartphone sizes, so you can capture stunning photos with any device.
- Charging the Bluetooth Remote Control: The Bluetooth remote control is a convenient feature that allows you to capture photos without touching your phone. Before using it, make sure it’s fully charged. The remote control pairs easily with your smartphone and provides a seamless way to take photos from a distance.
With these initial steps, you’re now ready to start using the Yunteng Self Picture Monopod. Whether you’re an experienced photographer or just getting started with selfies, this versatile tool will open up a world of creative possibilities. Next, we’ll explore how to adjust the monopod to suit your specific photography needs.
Adjusting the Yunteng Self Picture Monopod for Your Needs
One of the key features of the Yunteng Self Picture Monopod is its versatility, allowing you to customize it to suit your specific photography requirements. Whether you’re shooting solo selfies, group photos, or capturing stunning landscapes, the monopod can be adjusted to enhance your photography experience. Here’s how to tailor the monopod to your needs:
- Adjusting the Height: The Yunteng Self Picture Monopod is designed with extendable sections, enabling you to adjust the height according to your preferences. Whether you want to capture a wide-angle group photo or a dramatic solo shot, the adjustable height provides flexibility to frame your photos perfectly.
- Rotating the Phone Holder: To achieve the ideal angle for your shots, the phone holder can be rotated 360 degrees. This feature is particularly useful when switching between portrait and landscape orientations, ensuring that you can capture photos in the desired format without any restrictions.
- Securing the Monopod: Stability is crucial for capturing clear and sharp images. The Yunteng Self Picture Monopod is equipped with a secure locking mechanism to keep the extended sections stable while you’re shooting. This feature is especially beneficial when capturing photos in outdoor settings or crowded environments.
By adjusting the Yunteng Self Picture Monopod to meet your specific needs, you can elevate your photography game and unleash your creativity. Whether you’re a travel enthusiast, a social media influencer, or simply someone who loves taking photos, this versatile tool offers endless possibilities for creating stunning visual content. Next, we’ll delve into using the Bluetooth remote control to enhance your photography experience.
Using the Bluetooth Remote Control with the Yunteng Self Picture Monopod
The Bluetooth remote control is a game-changer when it comes to capturing photos with the Yunteng Self Picture Monopod. This wireless feature empowers you to take photos from a distance, adding convenience and creativity to your photography sessions. Here’s how to make the most of the Bluetooth remote control:
- Pairing with Your Smartphone: Before using the remote control, ensure that it’s paired with your smartphone. The pairing process is simple and typically involves activating the Bluetooth function on your phone and following the instructions provided with the remote control. Once paired, the remote control allows you to trigger the camera shutter without needing to touch your phone.
- Remote Control Range: The Bluetooth remote control offers an impressive range, allowing you to capture photos from a distance of up to 30 feet (10 meters) away. This extended range is particularly useful for group photos or capturing shots in dynamic environments where you want to maintain a certain distance from your smartphone.
- Remote Control Button Functions: The remote control features a single button for capturing photos. Pressing this button triggers the shutter on your smartphone’s camera, enabling you to take photos with ease. The intuitive design of the remote control ensures that you can focus on composing your shots without the hassle of physically tapping the phone screen.
With the Bluetooth remote control at your disposal, you have the freedom to experiment with different angles and compositions, all while maintaining control over the photo-taking process. Whether you’re exploring scenic landscapes, capturing candid moments with friends, or simply seeking the perfect selfie, the remote control enhances your ability to express your creativity through photography. Now, let’s explore some valuable tips for capturing exceptional selfies and group photos with the Yunteng Self Picture Monopod.
Tips for Taking Great Selfies and Group Photos with the Yunteng Self Picture Monopod
Mastering the art of capturing exceptional selfies and group photos with the Yunteng Self Picture Monopod involves a blend of creativity, technique, and a touch of experimentation. Whether you’re aiming for the perfect solo portrait or a lively group shot, these tips will help you make the most of your photography sessions:
- Find the Perfect Lighting: Lighting can make or break a photo. When taking selfies or group photos, look for soft, natural light that flatters your subjects. Avoid harsh shadows by positioning yourself facing the light source, whether it’s natural sunlight or well-distributed indoor lighting.
- Experiment with Angles and Perspectives: The Yunteng Self Picture Monopod allows you to explore various angles and perspectives. Tilt the monopod slightly to achieve dynamic compositions, and experiment with different heights and distances to add depth and visual interest to your photos.
- Engage Your Subjects: For group photos, encourage interaction and genuine expressions among your subjects. Candid moments often result in the most captivating images. Create a relaxed and fun atmosphere to capture authentic emotions and connections within the group.
- Utilize Timer Mode and Burst Shots: Take advantage of your smartphone’s timer mode when using the Yunteng Self Picture Monopod. Set a brief delay to allow for natural, unposed shots. Additionally, consider using burst mode to capture a series of rapid-fire images, increasing the likelihood of obtaining the perfect shot.
- Incorporate the Surroundings: Whether you’re in a bustling urban setting or surrounded by nature’s beauty, incorporate the surroundings into your photos. Showcase iconic landmarks, stunning landscapes, or vibrant cityscapes as backdrops to add context and visual appeal to your images.
By implementing these tips, you’ll elevate your selfie and group photo game with the Yunteng Self Picture Monopod. Embrace creativity, adapt to different shooting scenarios, and don’t be afraid to push the boundaries of conventional photography. With the right approach and a dash of spontaneity, you’ll capture memorable moments that truly stand out. Now, armed with these insights, it’s time to unleash your creativity and embark on a captivating photographic journey with the Yunteng Self Picture Monopod.