
Checking the Package Contents
Before diving into the setup process, it’s essential to ensure that all the necessary components are included in the Targus docking station package. This step will help you avoid any potential setbacks during the configuration process.
Here’s a quick rundown of the items you should find in the package:
- The Targus docking station
- A power adapter
- A USB cable or USB-C cable, depending on the model
- An HDMI or DisplayPort cable for video output
- Documentation, including a user manual and warranty information
Upon unboxing the Targus docking station, carefully inspect each item to ensure that nothing is missing or damaged. If any components are absent or appear to be flawed, promptly contact the retailer or Targus customer support for assistance.
By confirming the presence and condition of all the package contents, you can proceed with confidence, knowing that you have everything needed to set up your Targus docking station seamlessly.
Connecting the Docking Station to Your Laptop
Once you’ve verified the package contents, it’s time to connect the Targus docking station to your laptop. This straightforward process involves a few simple steps to establish a reliable connection between the two devices.
To begin, identify an available USB port on your laptop. Depending on the model of the Targus docking station, you may need to use a USB-A or USB-C port. Next, connect one end of the provided USB cable to the corresponding port on the docking station and the other end to your laptop’s USB port. Ensure that the connection is secure to avoid any potential disruptions during use.
Following the USB connection, locate the power adapter included in the package. Connect one end of the power adapter to the docking station and the other end to a power outlet. This step is crucial for providing the necessary power to the docking station, enabling it to function optimally.
Once the USB and power connections are established, position the docking station within convenient reach of your laptop. This placement will allow for easy access to the additional ports and features provided by the docking station.
With the physical connections in place, power on your laptop. The docking station should seamlessly integrate with your laptop, extending its capabilities and providing access to a range of peripherals and external displays.
By successfully connecting the docking station to your laptop, you’ve laid the foundation for a more efficient and versatile computing experience. The next step involves installing the Targus docking station driver to ensure seamless compatibility and functionality.
Installing the Targus Docking Station Driver
With the physical connection between the Targus docking station and your laptop established, the next crucial step is to install the necessary driver to enable seamless communication and functionality between the devices.
Begin by navigating to the official Targus website or the provided documentation to locate the specific driver for your docking station model. Once identified, download the driver onto your laptop, ensuring that you select the appropriate version compatible with your operating system.
After downloading the driver, locate the file and initiate the installation process. Follow the on-screen prompts to complete the installation, ensuring that you carefully review and accept any relevant terms and conditions.
Upon successful installation, restart your laptop to allow the driver to integrate fully with the operating system. This step is essential for ensuring that the docking station’s features and capabilities are recognized and accessible.
Once your laptop has restarted, verify that the driver installation was successful by checking the device manager or system information. Look for the Targus docking station and associated components to confirm that they are recognized and functioning correctly.
By installing the Targus docking station driver, you have effectively established seamless compatibility between the docking station and your laptop. This crucial software integration unlocks the full potential of the docking station, allowing you to leverage its diverse range of features and peripherals with confidence.
Configuring the Display Settings
Upon successfully connecting the Targus docking station to your laptop and installing the necessary driver, it’s time to configure the display settings to optimize your viewing experience and productivity.
Start by connecting your external monitor or monitors to the docking station using the provided HDMI or DisplayPort cables. Once the monitors are connected, power them on and ensure that they are recognized by your laptop. Depending on your operating system, you may need to access the display settings through the control panel or system preferences.
Navigate to the display settings menu on your laptop and locate the section pertaining to multiple displays or external monitors. Here, you can customize the arrangement and orientation of the external displays to suit your preferences. You may choose to extend your desktop across multiple monitors, duplicate the display for presentations, or select a primary display for your workspace.
Furthermore, explore the display resolution and scaling options to ensure that the external monitors are optimized for clarity and visual comfort. Adjust the resolution settings to match the native resolution of your monitors, providing crisp and detailed imagery for your workflow and entertainment needs.
Depending on your specific requirements, you can also configure additional display settings, such as refresh rate, color calibration, and screen orientation. These adjustments allow you to tailor the external display setup to align with your professional tasks, creative endeavors, or immersive entertainment experiences.
By effectively configuring the display settings, you harness the full potential of the Targus docking station, transforming your laptop into a versatile workstation with expansive visual real estate. This enhanced display setup fosters productivity, creativity, and seamless multitasking, empowering you to accomplish more with ease.
Connecting Additional Peripherals
Expanding the functionality of your Targus docking station involves connecting a diverse array of peripherals to enhance your productivity and streamline your workflow. With the docking station serving as a central hub for your laptop, integrating additional peripherals is a straightforward process that significantly augments your computing experience.
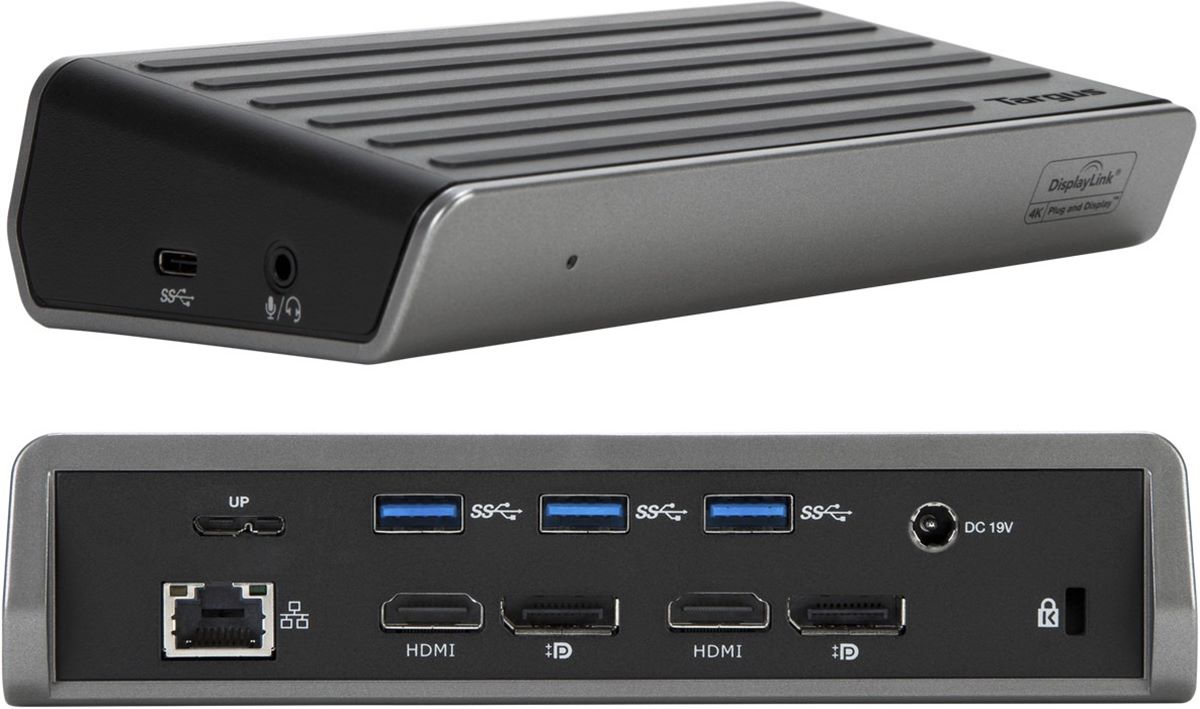
Begin by identifying the available ports on the Targus docking station, which may include USB-A, USB-C, HDMI, DisplayPort, Ethernet, audio, and more, depending on the model. These versatile ports accommodate various peripherals, such as external storage devices, printers, scanners, audio equipment, and networking accessories.
Connect your desired peripherals to the corresponding ports on the docking station, ensuring a secure and snug fit for each connection. Whether you’re integrating a high-speed external hard drive for seamless data transfers, a reliable printer for document management, or an immersive audio system for enhanced multimedia experiences, the docking station facilitates effortless connectivity for a wide range of peripherals.
Once the peripherals are connected, your laptop gains immediate access to these devices, seamlessly extending its capabilities and versatility. Whether you’re in a professional setting, creative environment, or entertainment space, the integrated peripherals empower you to accomplish tasks with efficiency and precision.
Furthermore, the docking station’s ability to support multiple displays allows for a dynamic and immersive workstation setup, ideal for multitasking, content creation, and collaborative projects. By leveraging the additional display outputs, you can expand your digital workspace, compare documents side by side, or immerse yourself in vibrant multimedia content.
Overall, the process of connecting additional peripherals to the Targus docking station enriches your computing experience, fostering a seamless and integrated environment that adapts to your unique needs and preferences. This comprehensive peripheral integration amplifies your productivity, creativity, and enjoyment, positioning your laptop as a versatile powerhouse for diverse tasks and pursuits.
Troubleshooting Common Issues
While setting up your Targus docking station, you may encounter common issues that can be resolved through straightforward troubleshooting steps. By addressing these challenges proactively, you can ensure a seamless and efficient experience with your docking station and connected peripherals.
1. Connectivity Problems: If you experience issues with the docking station’s connectivity, ensure that all cables are securely connected to the appropriate ports on both the docking station and your laptop. Additionally, verify that the power adapter is properly connected and the docking station is receiving power.
2. Display Issues: In the event of display problems, confirm that the external monitors are powered on and connected correctly to the docking station. Check the display settings on your laptop to ensure that the monitors are recognized and configured appropriately for your desired setup.
3. Driver Compatibility: If you encounter compatibility issues after installing the docking station driver, visit the Targus website to download the latest driver updates compatible with your operating system. Updating the driver can resolve compatibility conflicts and ensure optimal functionality.
4. Peripheral Recognition: Should connected peripherals, such as external hard drives or printers, not be recognized by your laptop, verify that the devices are powered on and securely connected to the docking station. Additionally, check the device manager or system information to confirm that the peripherals are detected by the operating system.
5. Audio and Networking Troubles: If you encounter challenges with audio output or network connectivity through the docking station, inspect the audio and Ethernet ports for any physical damage or debris that may impede proper functionality. Additionally, ensure that the correct audio output and network settings are selected on your laptop.
By addressing these common issues through systematic troubleshooting, you can swiftly resolve any hiccups encountered during the setup and utilization of your Targus docking station. In the rare event that persistent issues persist, don’t hesitate to reach out to Targus customer support for expert assistance and guidance.