
Check the User Manual
Before attempting to remove the battery from your Lenovo laptop, it’s crucial to consult the user manual for specific instructions tailored to your device model. The user manual serves as a comprehensive guide provided by the manufacturer, offering valuable insights into the internal components and proper maintenance procedures.
Lenovo laptops come in various models, each with distinct features and designs. The user manual contains essential information on the battery type, location, and the recommended removal process. Additionally, it outlines safety precautions and potential risks associated with mishandling the battery, ensuring that users are well-informed before proceeding with any maintenance tasks.
By referring to the user manual, you can gain a deeper understanding of the internal layout of your laptop and the intricacies of the battery compartment. This knowledge is instrumental in avoiding accidental damage to the device and mitigating the risk of electrical hazards during the removal process.
Furthermore, the user manual may provide specific steps for safely disconnecting the battery to prevent potential short circuits or other electrical issues. Following the manufacturer’s guidelines outlined in the user manual is essential for maintaining the integrity of your Lenovo laptop and ensuring a smooth battery removal process.
Shut Down the Laptop
Prior to removing the battery from your Lenovo laptop, it’s imperative to initiate a proper shutdown sequence to prevent data loss and ensure the safety of the device during the removal process. Shutting down the laptop correctly helps safeguard the integrity of the operating system and minimizes the risk of potential hardware malfunctions.
When shutting down the laptop, it’s essential to close all open applications and save any ongoing work to prevent data loss or corruption. This ensures that the system is in a stable state before the battery removal procedure commences. Additionally, closing all active programs reduces the risk of encountering errors or complications during the shutdown process.
Initiate the shutdown sequence by clicking on the “Start” menu in the bottom-left corner of the screen and selecting the “Shut down” option from the power menu. Alternatively, pressing the power button for a few seconds may prompt the system to initiate the shutdown process. It’s crucial to allow the laptop to complete the shutdown procedure entirely before proceeding to the next step.
By following the proper shutdown protocol, you can safeguard your data and ensure that the laptop is in a stable state before removing the battery. This precautionary measure minimizes the risk of encountering system errors or data corruption, ultimately contributing to a smooth and secure battery removal process.
Unplug the Power Adapter
Prior to removing the battery from your Lenovo laptop, it is essential to disconnect the power adapter to ensure the safety of the device and the individual performing the maintenance. Unplugging the power adapter eliminates the risk of electrical shock and minimizes the potential for damage to the laptop’s internal components during the battery removal process.
Begin by locating the power adapter, which is typically connected to the laptop’s charging port. Gently grasp the connector at the end of the power adapter cable and carefully unplug it from the laptop. It’s important to handle the connector and cable with care to avoid causing any damage to the power adapter or the laptop’s charging port.
Once the power adapter is disconnected from the laptop, it’s advisable to also unplug it from the power source to ensure complete isolation from the electrical supply. This precautionary step mitigates the risk of electrical hazards and provides a safe working environment for the battery removal procedure.
Verifying that the power adapter is fully unplugged from both the laptop and the power source is crucial before proceeding with the battery removal process. This precautionary measure ensures that the laptop is solely reliant on its internal battery, if present, and is not connected to any external power sources, thereby minimizing the risk of electrical mishaps during the maintenance procedure.
By unplugging the power adapter, you create a safer working environment and reduce the likelihood of electrical accidents or damage to the laptop. This essential step sets the stage for a secure and seamless battery removal process, prioritizing the well-being of both the device and the individual performing the maintenance.
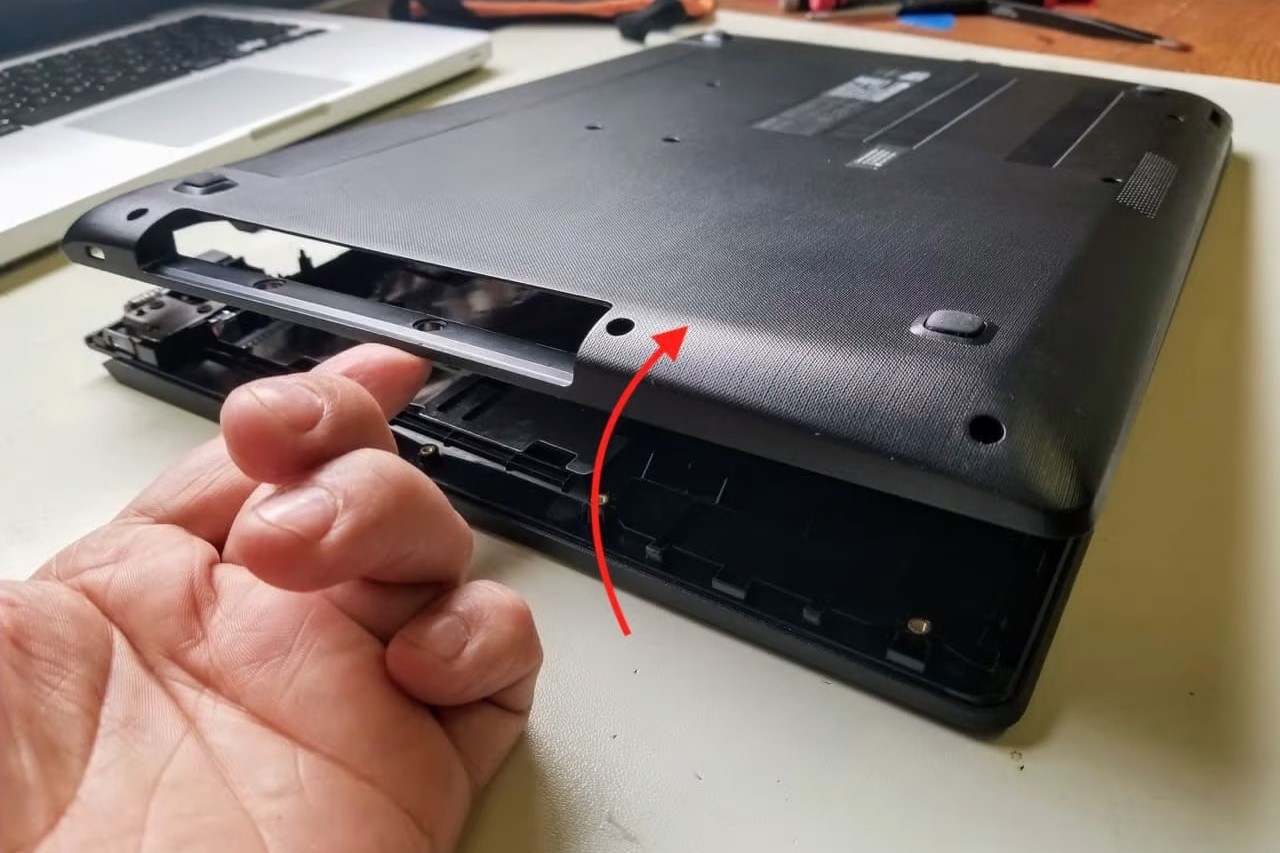
Remove the Bottom Cover
Before accessing the battery of your Lenovo laptop, you may need to remove the bottom cover to gain entry to the internal components. This process allows you to locate the battery and prepare for its safe removal. However, it’s important to note that not all Lenovo laptop models feature a user-removable battery or a bottom cover that can be easily accessed. In such cases, it’s advisable to consult the user manual or seek professional assistance.
To begin, ensure that the laptop is placed on a clean, flat surface to prevent any damage during the removal process. Next, identify the screws securing the bottom cover in place. These screws are typically located along the perimeter of the laptop’s underside. Using a suitable screwdriver, carefully loosen and remove the screws, keeping them in a secure location to prevent misplacement.
After removing the screws, gently pry open the bottom cover using a plastic opening tool or a similar non-metallic implement. Exercise caution to avoid applying excessive force, as this may cause damage to the cover or the internal components. Gradually work your way around the edges of the bottom cover, releasing any clips or fastenings that may be securing it in place.
Once the bottom cover is detached, set it aside in a safe and clean area. Take note of any internal components or cables that may be exposed upon removing the cover, and handle them with care to prevent accidental damage. With the bottom cover removed, you can now proceed to locate the battery within the laptop.
It’s important to approach the removal of the bottom cover with precision and patience, ensuring that no components are damaged in the process. By following these steps, you can gain access to the internal components of your Lenovo laptop, setting the stage for the safe and efficient removal of the battery.
Locate the Battery
After successfully removing the bottom cover of your Lenovo laptop, the next step is to locate the battery within the device. The battery is a crucial component that powers the laptop and is essential for its portability. However, it’s important to note that some modern laptop models, including certain Lenovo devices, feature internal, non-removable batteries. In such cases, it’s advisable to consult the user manual or seek professional guidance for battery-related maintenance.
Upon gaining access to the internal components of the laptop, visually inspect the area to identify the battery. In most Lenovo laptop models with removable batteries, the battery is typically situated near the center or bottom of the device, secured in place by connectors and mounting mechanisms. It may be labeled with pertinent information such as the model number and voltage rating.
Take note of any cables or connectors attached to the battery, as well as any retaining clips or screws that may be securing it in place. Carefully observe the layout of the internal components to ensure a clear understanding of the battery’s positioning and any surrounding elements that may require attention during the removal process.
If the battery is not immediately visible upon removing the bottom cover, refer to the user manual for specific instructions on its location within your laptop model. The manual provides valuable insights into the internal layout of the device and aids in identifying the battery and its associated components.
By locating the battery within your Lenovo laptop, you can familiarize yourself with its positioning and the necessary steps for safe removal. This preparatory phase sets the stage for a methodical and secure battery removal process, ensuring that the device is handled with care and precision.
Disconnect the Battery Connector
Once the battery is located within your Lenovo laptop, the next crucial step in the removal process is to disconnect the battery connector. This connector serves as the link between the battery and the laptop’s internal circuitry, and disconnecting it is essential to ensure the safe and proper removal of the battery.
Begin by identifying the battery connector, which is typically a cable attached to the battery and secured to the laptop’s motherboard or power distribution board. Depending on the laptop model, the connector may feature a latch, clip, or a simple friction fit mechanism. Carefully examine the connector and its attachment to the motherboard to determine the appropriate method for disconnection.
Before proceeding, it’s crucial to exercise caution and ensure that the laptop is powered off and unplugged from any external power sources. This precautionary measure minimizes the risk of electrical shock and protects the internal components from potential damage during the disconnection process.
If the connector features a latch or clip, carefully release it by gently applying pressure to the designated release mechanism. Take care to avoid applying excessive force, as this may damage the connector or the motherboard. If the connector utilizes a friction fit, delicately grasp the connector near its base and slowly wiggle it from side to side while applying gentle upward pressure to detach it from the motherboard.
Upon successful disconnection, carefully route the battery connector away from the motherboard and any surrounding components to prevent accidental contact or interference during the subsequent steps of the battery removal process. Take note of the connector’s orientation and position to facilitate reconnection if necessary.
By disconnecting the battery connector with precision and care, you ensure a safe and systematic approach to the battery removal process, mitigating the risk of damage to the laptop’s internal components and promoting a smooth transition to the final step of removing the battery.
Remove the Battery
With the battery connector safely disconnected, you are now ready to proceed with the final step of removing the battery from your Lenovo laptop. This step is crucial for various reasons, including battery replacement, maintenance, or troubleshooting hardware issues. However, it’s important to note that some modern laptops, including certain Lenovo models, feature internal, non-removable batteries, and in such cases, it’s advisable to seek professional assistance for battery-related maintenance.
Before physically removing the battery, take a moment to inspect the surrounding area to ensure that there are no obstructions or components that may impede the removal process. Clear any cables or obstructions near the battery to facilitate a smooth extraction. Additionally, verify that the laptop is placed on a stable and level surface to prevent any accidental damage during the battery removal procedure.
When handling the battery, it’s essential to exercise caution and precision to avoid causing damage to the battery or the laptop’s internal components. Depending on the laptop model, the battery may be secured in place by screws, clips, or retention mechanisms. Carefully examine the battery’s mounting and retention features to determine the appropriate method for removal.
If the battery is secured by screws, utilize a suitable screwdriver to carefully loosen and remove them, ensuring that they are safely stored to prevent misplacement. In the case of retention clips or mechanisms, delicately disengage them while providing support to the battery to prevent it from falling or sustaining damage during the removal process.
Once any securing elements are addressed, gently lift the battery from its compartment, taking care to maintain a steady grip and avoiding excessive force. If the battery is connected to any remaining cables or connectors, ensure that these are carefully disengaged to facilitate the complete removal of the battery from the laptop.
Upon successful removal, place the battery in a safe and secure location, away from any potential sources of damage or interference. Take note of the battery’s orientation and positioning within the laptop to facilitate the reinstallation process, if necessary.
By carefully removing the battery from your Lenovo laptop, you conclude the essential process of battery removal, setting the stage for potential replacement or further maintenance. This meticulous approach ensures that the battery and the laptop’s internal components are handled with care and precision, promoting a smooth and secure battery removal procedure.