
Checking the Battery Level
Before embarking on the task of replacing the battery in your VR controller, it’s crucial to assess the current battery level. This simple yet essential step ensures that the replacement is indeed necessary and prevents the unnecessary removal of a functional battery. To check the battery level, follow these steps:
- Turn on your VR headset and ensure that the VR controller is powered on.
- Access the settings menu on your VR headset and navigate to the controller settings.
- Locate the battery indicator or battery level option within the controller settings. This may be represented by a visual icon or a percentage display.
- Take note of the indicated battery level to gauge whether it is sufficiently low to warrant a replacement.
By performing this preliminary check, you can determine whether the battery truly requires replacement, saving time and effort in the process. Additionally, it allows you to plan the replacement conveniently without any interruptions during your VR experience.
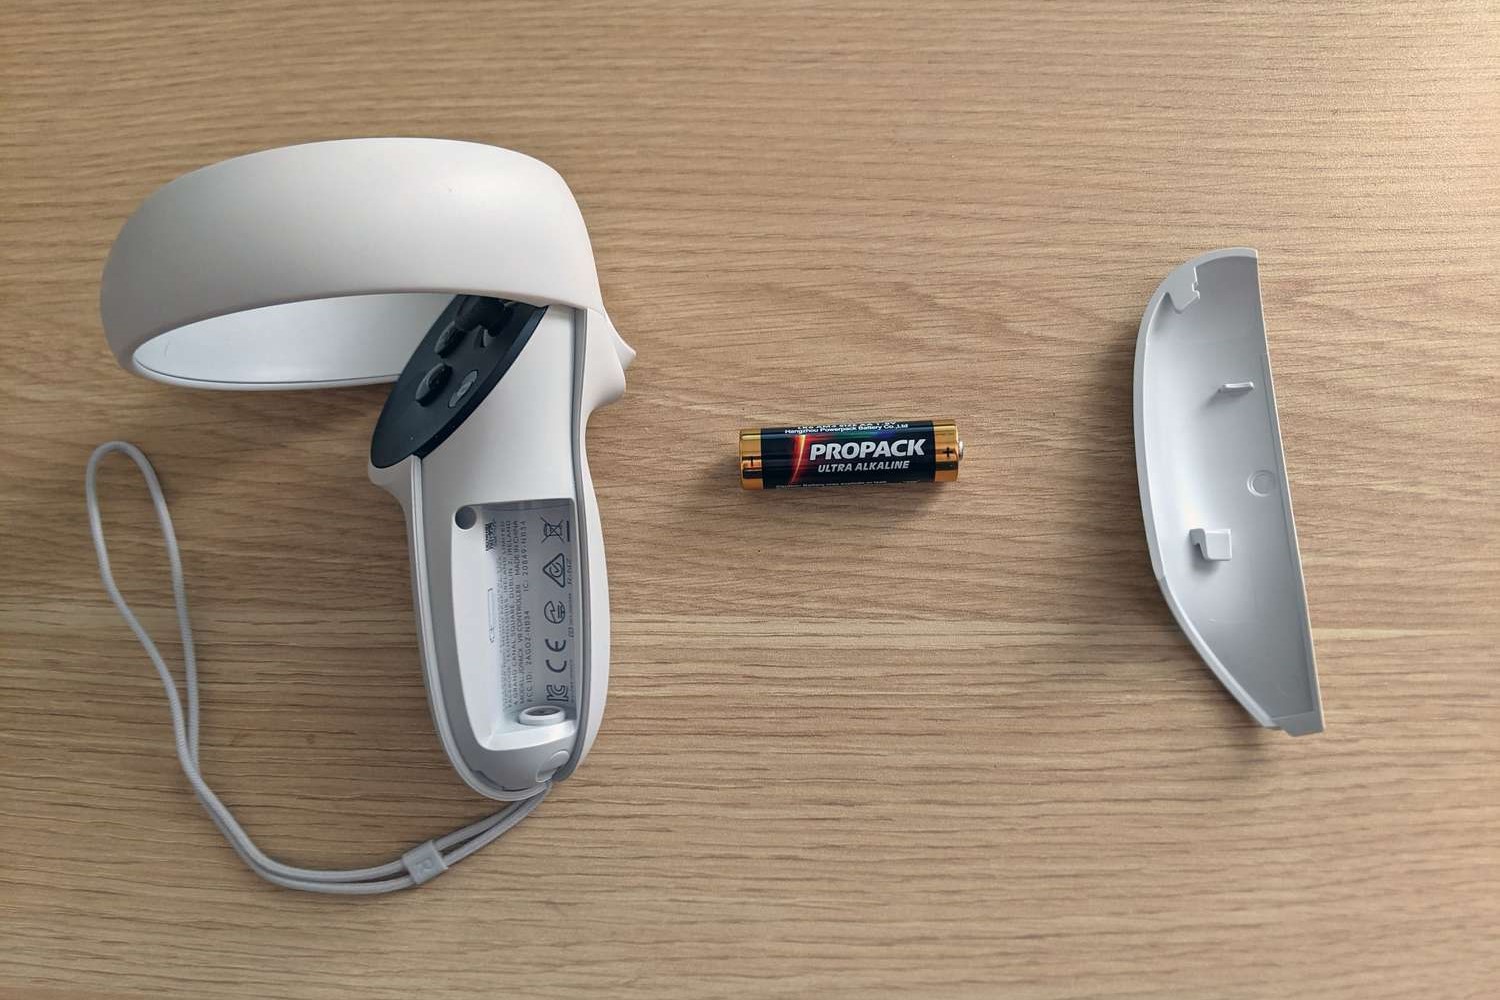
Removing the Battery Cover
Once you’ve confirmed the need to replace the battery in your VR controller, the next step is to remove the battery cover. This process may vary slightly depending on the specific model of your VR controller, but the general steps are as follows:
- Turn off your VR controller to prevent any accidental inputs during the battery replacement process.
- Inspect the controller to locate the battery cover. In most cases, the cover is situated on the back of the controller and is designed to be easily accessible.
- Identify the mechanism used to secure the battery cover. This may involve sliding a latch, pressing a release button, or gently prying the cover off with your fingers.
- Follow the specific instructions provided in the user manual for your VR controller, as different models may have unique methods for removing the battery cover.
By carefully following these steps, you can safely remove the battery cover without causing any damage to the controller. It’s essential to exercise caution and patience during this process to avoid any mishaps that could impact the functionality of the controller.
Removing the Old Battery
With the battery cover successfully removed, the next step in the battery replacement process is to extract the old battery from the VR controller. This task requires precision and care to avoid damaging the internal components of the controller. Follow these steps to remove the old battery:
- Inspect the interior of the battery compartment to locate the old battery. Depending on the design of the controller, the battery may be secured in place with a small latch or holder.
- Gently dislodge the old battery from its position, taking care not to apply excessive force that could cause damage to the battery or the controller.
- If the battery is connected to any wires or terminals, carefully detach the connections according to the instructions provided in the user manual.
- Once the old battery is free from any securing mechanisms and connections, safely remove it from the controller and set it aside for proper disposal or recycling.
By methodically following these steps, you can ensure the safe removal of the old battery from your VR controller. It’s important to handle the old battery with care and dispose of it responsibly in accordance with local regulations for electronic waste disposal.
Inserting the New Battery
Now that the old battery has been removed, it’s time to insert a new battery into your VR controller. This step is crucial for restoring the functionality of the controller and ensuring uninterrupted use during your virtual reality experiences. Follow these steps to safely insert the new battery:
- Retrieve the replacement battery that is compatible with your VR controller. Refer to the user manual or manufacturer’s guidelines to ensure that you select the correct type and size of battery.
- Inspect the battery compartment in the controller to identify the correct orientation for inserting the new battery. Most controllers feature markings or diagrams to indicate the proper alignment.
- Carefully position the new battery in the designated compartment, ensuring that it fits securely and aligns with the polarity markings or indicators within the compartment.
- If the new battery is equipped with connecting wires or terminals, follow the instructions provided in the user manual to reattach the connections, ensuring a secure and proper fit.
- Gently press the new battery into place, taking care to avoid applying excessive force that could potentially damage the battery or the internal components of the controller.
By methodically following these steps, you can successfully insert the new battery into your VR controller, preparing it for seamless operation. It’s essential to handle the new battery with care and attention to detail to ensure that it is properly installed and ready to power your VR experiences.
Replacing the Battery Cover
After successfully inserting the new battery into your VR controller, the next step is to secure the battery cover back onto the controller. This final step is essential for protecting the battery and internal components while ensuring the overall integrity of the controller. Follow these steps to securely replace the battery cover:
- Retrieve the battery cover and position it correctly over the battery compartment on the back of the controller. Ensure that it aligns properly with the controller’s body, allowing for a seamless fit.
- Gently press the battery cover into place, taking care to engage any securing mechanisms or latches that are designed to hold it in position. Pay attention to any audible clicks or indications that the cover is securely fastened.
- Inspect the edges of the battery cover to confirm that it sits flush with the controller’s body, preventing any gaps or misalignment that could compromise the cover’s stability.
- If the battery cover features any locking mechanisms or screws, follow the specific instructions provided in the user manual to secure it in place, ensuring a snug and reliable fit.
By diligently following these steps, you can effectively replace the battery cover on your VR controller, safeguarding the new battery and ensuring that the controller’s functionality remains intact. It’s important to take your time and exercise care during this process to prevent any damage to the controller’s exterior or the newly installed battery.
Testing the Controller
With the new battery securely in place and the battery cover properly reattached, it’s time to test the functionality of your VR controller. This critical step allows you to confirm that the new battery is operating as expected and that the controller is ready for use. Follow these steps to test the controller:
- Turn on your VR headset and ensure that the VR controller is powered on, ready to be paired with the headset.
- Check for any visual or auditory indicators on the controller that signal its successful power-up. This may include LED lights, display screens, or sound effects that confirm the controller’s activation.
- Perform basic functions with the controller, such as navigating menus, selecting options, or interacting with virtual environments, to verify that it responds accurately to your inputs.
- Pay attention to any warning indicators or notifications that may appear on the VR headset or the controller itself, as these could provide valuable information about the status of the new battery and the overall performance of the controller.
By methodically following these steps, you can effectively test the VR controller to ensure that the new battery is functioning correctly and that the controller is ready for use. It’s important to conduct this testing process in a controlled environment to identify any potential issues and address them promptly before engaging in immersive VR experiences.