
Enabling the Resume Feature
The Resume feature in Mac OS is a convenient functionality that allows you to pick up right where you left off when reopening an application or restarting your Mac. It saves your current document state, window positions, and even the cursor location, giving you a seamless experience when returning to your task.
To enable the Resume feature, follow these simple steps:
- Click on the Apple menu located in the top-left corner of your screen.
- Select “System Preferences” from the drop-down menu.
- In the System Preferences window, click on the “General” icon.
- Look for the “Close windows when quitting an app” option and make sure it is unchecked. This ensures that the Resume feature is activated.
- Close the System Preferences window.
Once enabled, the Resume feature will automatically save the state of your applications when you quit them, allowing for a quick and seamless transition when you reopen them. It is a time-saving feature that enhances productivity and makes it easier for you to pick up where you left off.
It’s worth noting that not all applications support the Resume feature. Some older or third-party applications might not have this functionality built-in. However, most Apple native applications and popular third-party apps are compatible with Resume.
Enabling the Resume feature is a simple process that can greatly enhance your workflow by reducing the need to manually save and restore your application states. Take a moment to enable this feature on your Mac and enjoy the convenience it offers.
Disabling the Resume Feature
The Resume feature in Mac OS can be a useful tool for many users, allowing them to resume their work quickly and efficiently. However, there may be instances where you want to disable this feature, either to have more control over your application states or to troubleshoot any issues you may be experiencing.
To disable the Resume feature, follow these steps:
- Click on the Apple menu located in the top-left corner of your screen.
- Select “System Preferences” from the drop-down menu.
- In the System Preferences window, click on the “General” icon.
- Look for the “Close windows when quitting an app” option and make sure it is checked. This will disable the Resume feature.
- Close the System Preferences window.
Once the Resume feature is disabled, applications will no longer save their states when you quit them. Instead, they will start with a clean slate each time you open them. This can be beneficial if you prefer a fresh and organized workspace or if you want to troubleshoot any issues related to application states.
It’s important to note that disabling the Resume feature is a system-wide setting, which means it will apply to all applications on your Mac. If you only want to disable Resume for specific applications, you may need to explore additional settings or preferences within those applications.
If you ever decide to re-enable the Resume feature, simply follow the same steps as above and uncheck the “Close windows when quitting an app” option in the General preferences.
Disabling the Resume feature gives you more control over how your applications behave and can be beneficial in certain situations. Take advantage of this option if it aligns with your workflow preferences or troubleshooting needs.
Understanding the Resume Feature
The Resume feature in Mac OS is designed to provide a seamless and efficient experience by saving the state of your applications when you quit them. Understanding how this feature works can help you make the most out of it and take full advantage of its benefits.
When you quit an application that supports Resume, the Resume feature automatically saves its current state, including open documents, window positions, and even the cursor location. This allows you to pick up right where you left off when you reopen the application.
Resume goes beyond just reopening the application. It restores the exact state the application was in when you last closed it, giving you a continuity of work. This can be particularly useful when you are working on multiple tasks or projects simultaneously and need to quickly switch between them.
It’s important to note that some applications may have slightly different behaviors with the Resume feature. While most applications will restore your entire workspace, including unpinned toolbars and open dialog boxes, some may have limitations or specific settings that determine what gets restored.
Resume also extends to the restart process on your Mac. If you have the Resume feature enabled and you restart your Mac, the applications that were previously open will automatically reopen in the same state they were in before the restart. This can save you time and effort by avoiding the need to manually reopen each application and locate the documents you were working on.
Additionally, if you want to preserve the state of a specific application before quitting or restarting your Mac, you can use the Quit option from the application menu instead of closing the windows directly. This will allow you to resume exactly where you left off when you return to the application.
Understanding the Resume feature and how it saves and restores application states can enhance your productivity and streamline your workflow. Take advantage of this feature to effortlessly pick up where you left off and avoid the hassle of manually restoring your workspace.
Clearing Resume’s Saved State for an Application
There may be instances where you want to start fresh with an application and clear the saved state that Resume uses to restore its previous state. Whether you want to improve performance, troubleshoot issues, or simply have a clean slate, clearing Resume’s saved state for an application is a straightforward process.
To clear Resume’s saved state for a specific application, follow these steps:
- Ensure that the application you want to clear the saved state for is not currently running. If it is, quit the application.
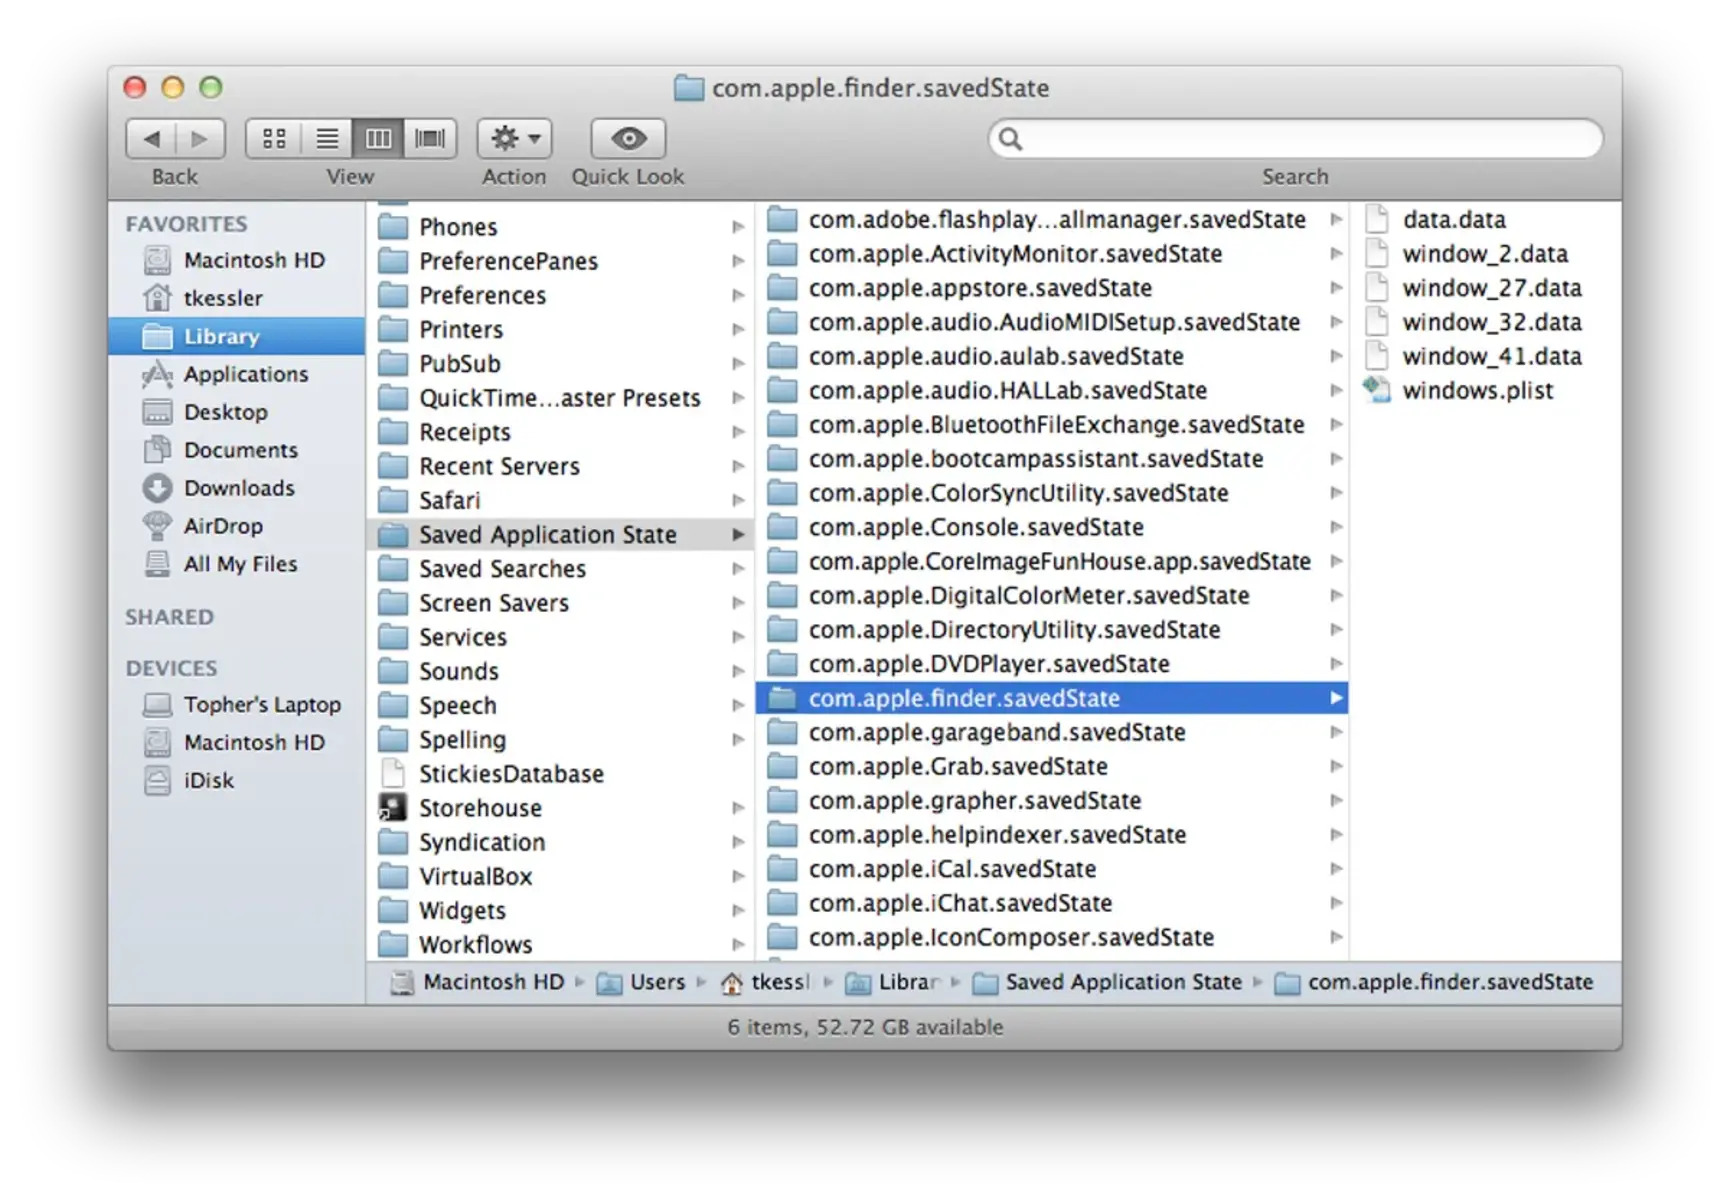
- Open a Finder window and navigate to the “~/Library/Saved Application State/” folder. You can do this by clicking on the “Go” menu in the Finder menu bar, selecting “Go to Folder,” and entering “~/Library/Saved Application State/” in the text field.
- Within the “Saved Application State” folder, locate the folder corresponding to the application you want to clear the saved state for. The folder names typically follow a format similar to “com.example.application.savedState”.
- Delete the folder corresponding to the application you want to clear the saved state for.
Once you have deleted the folder, the saved state for that application is cleared. The next time you open the application, it will start with a clean slate and no longer restore its previous state.
It’s important to note that clearing the saved state for an application will remove all information related to its previous state, including open documents, window positions, and any unsaved changes. Make sure you have saved any important work before proceeding with clearing the saved state.
If you ever want to restore the Resume functionality for the application, you can simply quit and reopen the application. Mac OS will automatically recreate the corresponding folder in the “Saved Application State” directory, allowing the application to resume its state upon reopening.
Clearing the saved state for an application gives you a fresh start and can help resolve any issues or improve performance. Take advantage of this option when needed to have full control over how your applications behave.
Clearing Resume’s Saved State for All Applications
If you’re looking to clear the saved state for all applications at once, Mac OS provides a convenient method to achieve this. By clearing Resume’s saved state for all applications, you can ensure a fresh start for every application on your Mac and resolve any issues related to restoring previous states.
Here’s how you can clear Resume’s saved state for all applications:
- Quit all applications currently running on your Mac.
- Open a Finder window and navigate to the “~/Library/Saved Application State/” folder. You can do this by clicking on the “Go” menu in the Finder menu bar, selecting “Go to Folder,” and entering “~/Library/Saved Application State/” in the text field.
- Within the “Saved Application State” folder, select all the folders by pressing “Command + A” or by dragging a selection box around them.
- Delete all the selected folders by either right-clicking and selecting “Move to Trash” or by pressing “Command + Delete”.
By deleting all the folders within the “Saved Application State” directory, you are effectively clearing the saved state for all applications on your Mac. The next time you open any application, it will no longer restore its previous state.
Keep in mind that clearing Resume’s saved state for all applications means that all unsaved changes, open documents, and window positions will be lost. Make sure to save any important work before proceeding with this step.
If you want to restore the Resume functionality for all applications, you can simply quit and reopen them individually. Mac OS will recreate the necessary folders within the “Saved Application State” directory, allowing each application to resume its state upon reopening.
Clearing Resume’s saved state for all applications is a useful troubleshooting step when you encounter issues related to restoring previous states or if you simply want to start fresh. It can effectively resolve issues and provide a clean slate for your entire application ecosystem.
Managing Resume Preferences for Individual Applications
Mac OS allows you to manage the Resume feature’s behavior on a per-application basis, giving you more control over which applications resume their previous states and which ones start fresh each time they are opened. This can be useful if you have specific preferences for certain applications or if you want to conserve system resources by disabling Resume for resource-intensive applications.
To manage the Resume preferences for individual applications, follow these steps:
- Open the application for which you want to manage the Resume preferences.
- Click on the application name in the menu bar, located at the top of the screen.
- From the drop-down menu, select “Preferences” or “Options,” depending on the application.
- In the preferences or options window, navigate to the “General” or “Startup” tab.
- Look for an option related to Resume or restoring previous states. This may be labeled differently in each application, but it typically allows you to enable or disable Resume for that specific application.
- Toggle the Resume option according to your preference. Enabling it will allow the application to resume its previous state, while disabling it will start the application fresh each time.
- Once you have made your changes, close the preferences or options window.
By managing the Resume preferences for individual applications, you can customize how each application behaves when opened. You can choose to enable Resume for productivity apps like text editors or graphic design tools to easily pick up where you left off, while disabling it for resource-intensive apps like video editing software to optimize performance.
It’s important to note that not all applications provide the option to manage Resume preferences. Some applications may have a fixed behavior where they always restore their previous states or always start fresh. Additionally, some applications may have their own custom settings or preferences related to resuming states, so be sure to explore the application’s documentation or support resources for more information.
Managing Resume preferences for individual applications provides a personalized experience tailored to your workflow and preferences. Take advantage of this feature to optimize how each application behaves when opened and enhance your productivity.
Using the Resume Feature with Multiple Displays
If you use multiple displays with your Mac, you’ll be pleased to know that the Resume feature seamlessly extends its functionality across all connected screens. This means that when you quit an application on one display, it will resume its state on the same display when you reopen it, preserving your workspace and providing a consistent experience.
Here are a few considerations and tips for using the Resume feature with multiple displays:
- When quitting an application, make sure it is located on the display you want it to resume on. The Resume feature remembers the last screen where the application was active and restores it accordingly.
- If you have an application window spanning across multiple displays when you quit, the Resume feature will attempt to restore the window on the same layout when reopened. However, in some cases, especially if the screen configuration changes, the window might move to a different display or resize. Adjust the window as needed after reopening the application.
- If you frequently switch between different screen layouts or disconnect/reconnect displays, the Resume feature might not work as expected. In such cases, you can manually rearrange or resize the application windows to fit your desired screen setup.
- Some applications might have their own display-specific settings or preferences that affect how they resume on multiple screens. Explore the application’s documentation or preferences to customize the behavior according to your preferences.
The Resume feature with multiple displays adds convenience and continuity to your workflow. It ensures that your applications reopen intelligently on the appropriate display, allowing you to seamlessly resume your work. However, it’s important to be mindful of any changes to your screen configuration and make necessary adjustments to maintain an optimal workspace.
If you experience any difficulties or inconsistencies with the Resume feature across multiple displays, you can try closing and reopening the application or perform a system restart to see if it resolves the issue. Additionally, updating your Mac’s software to the latest version can also help ensure smooth operation of the Resume feature.
With the Resume feature’s compatibility with multiple displays, you can confidently work across different screens, knowing that your applications will resume exactly where you left off, regardless of the display setup.
Customizing the Resume Feature’s Behavior
The Resume feature in Mac OS provides a convenient way to pick up where you left off when reopening applications. However, you may want to customize its behavior to better suit your preferences and workflow. Fortunately, Mac OS offers a few options to tweak the Resume feature’s behavior and tailor it to your needs.
Here are some ways you can customize the Resume feature:
- Change the default Resume setting: By default, Mac OS saves the state of all applications when you quit them. However, you can change this default behavior by going to “System Preferences” > “General” and checking or unchecking the “Close windows when quitting an app” option. Enabling this option will disable Resume for all applications, while disabling it will enable Resume for all applications.
- Modify Resume preferences for individual applications: As mentioned earlier, some applications allow you to manage Resume preferences on a per-application basis. Open the application’s preferences or options window and look for an option related to Resume or restoring previous states. Toggle the option according to your desired behavior to customize how the application behaves when opened.
- Disable Resume temporarily: If you want to temporarily prevent applications from resuming their previous states, you can hold down the Option key while quitting the application. This bypasses the Resume feature and starts the application fresh the next time you open it.
- Remove specific documents from Resume: If you have a specific document or file that you don’t want to be resumed by the Resume feature, you can close the document and then immediately move it to another location before quitting the application. This way, the Resume feature won’t be able to locate the document and won’t attempt to restore it.
By customizing the Resume feature’s behavior, you can personalize how applications reopen and tailor it to your workflow. Whether you want to disable Resume for all applications, fine-tune preferences for individual applications, temporarily override the feature, or exclude specific documents, Mac OS provides options to accommodate your needs.
Remember that not all applications may support extensive customization of the Resume feature, and their behavior may be limited to the system-wide settings. Additionally, it’s essential to stay updated with the latest version of Mac OS to ensure compatibility and access to any new customization options or improvements related to the Resume feature.
Take advantage of these customization options to optimize the Resume feature’s behavior and create a seamless and personalized experience when reopening applications on your Mac.
Troubleshooting Resume Issues
While the Resume feature in Mac OS is designed to provide a seamless experience when reopening applications, you may encounter occasional issues that prevent it from functioning as expected. If you’re experiencing problems with the Resume feature, here are some troubleshooting tips to help you resolve them.
1. Restart your Mac: Sometimes, a simple restart can fix minor glitches and restore the Resume feature’s functionality. Restart your Mac and check if the Resume feature starts working properly afterwards.
2. Check system updates: Ensure that your Mac is running the latest version of Mac OS. Apple frequently releases updates that include bug fixes and improvements. Updating your system may address any known issues with the Resume feature.
3. Reset the Resume feature: If you’re experiencing persistent problems with the Resume feature, you can try resetting it. Open “System Preferences” > “General” and uncheck and recheck the “Close windows when quitting an app” option. This action resets the Resume feature and may resolve any underlying issues.
4. Disable third-party applications: Some third-party applications or utilities may interfere with the Resume feature. If you recently installed any new software, try temporarily disabling it to see if it resolves the issue. You can do this by quitting or disabling the application or removing it from your startup items.
5. Check for application-specific settings: Certain applications may have their own settings related to resuming states or window positions. Explore the preferences or options within the specific application to see if there are any settings that may be affecting the Resume feature.
6. Clear saved state for the problematic application: If the Resume feature is only causing issues with a specific application, you can try clearing its saved state. Locate the application’s folder in the “~/Library/Saved Application State/” directory and delete it. This action removes any problematic saved state associated with the application.
It’s important to remember that not all applications fully support the Resume feature, especially older or third-party apps. In such cases, the Resume feature may not work as expected, or the application may not restore its previous state at all.
If you’ve exhausted these troubleshooting steps and are still experiencing problems with the Resume feature, it might be worth seeking further assistance. Reach out to Apple Support or visit Apple’s support forums for additional guidance and assistance specific to your situation.
By following these troubleshooting tips, you can identify and resolve issues with the Resume feature, ensuring a smoother experience when reopening applications on your Mac.
Takeaways and Final Thoughts
The Resume feature in Mac OS is a powerful tool that allows you to seamlessly pick up where you left off when reopening applications. By understanding how to enable or disable Resume, clear saved states, customize preferences, and troubleshoot issues, you can optimize this feature to enhance your productivity and streamline your workflow.
Here are some key takeaways and final thoughts to keep in mind:
- Enabling the Resume feature through the system preferences ensures that your applications automatically restore their previous states when opened.
- If you want to disable Resume for specific applications or troubleshoot issues, you can modify preferences on an individual basis or clear saved states for targeted applications.
- Resume works seamlessly across multiple displays, allowing you to effortlessly transition between tasks and maintain a consistent workspace.
- By customizing the behavior of Resume, you can tailor it to your preferences and improve your overall workflow.
- If you encounter any issues with Resume, try restarting your Mac, checking for system updates, or troubleshooting specific application settings.
Overall, the Resume feature in Mac OS is a valuable addition that streamlines your work experience and minimizes disruptions. It provides a seamless transition between sessions, saving you time and effort by preserving your progress across applications and displays.
Remember to regularly update your Mac OS and individual applications to ensure compatibility and access to the latest features and improvements related to Resume. Additionally, familiarize yourself with the specific preferences and settings of each application to optimize its behavior in alignment with your workflow.
With a clear understanding, proper customization, and troubleshooting know-how, you can make the most of the Resume feature and enjoy a productive and efficient Mac experience.