
Choosing the Right Waterproof Case
When it comes to kayaking, having a reliable waterproof case for your phone is essential. With the vast array of options available, selecting the right waterproof case can be overwhelming. Here's a guide to help you choose the perfect one for your kayaking adventures.
- Compatibility: Before purchasing a waterproof case, ensure that it is compatible with your specific phone model. Whether you have the latest smartphone or a previous model, there are waterproof cases designed to fit various devices. Be sure to check the specifications to guarantee a proper fit.
- Waterproof Rating: Look for a case with a high waterproof rating. The Ingress Protection (IP) rating system is commonly used to indicate a case’s level of water resistance. For kayaking, opt for a case with an IPX8 rating, which ensures protection against water submersion at a depth suitable for kayaking.
- Durability: Kayaking involves exposure to various elements, so durability is paramount. Choose a waterproof case constructed from high-quality materials that provide impact resistance and protection against scratches. A rugged case will safeguard your phone from accidental drops and bumps.
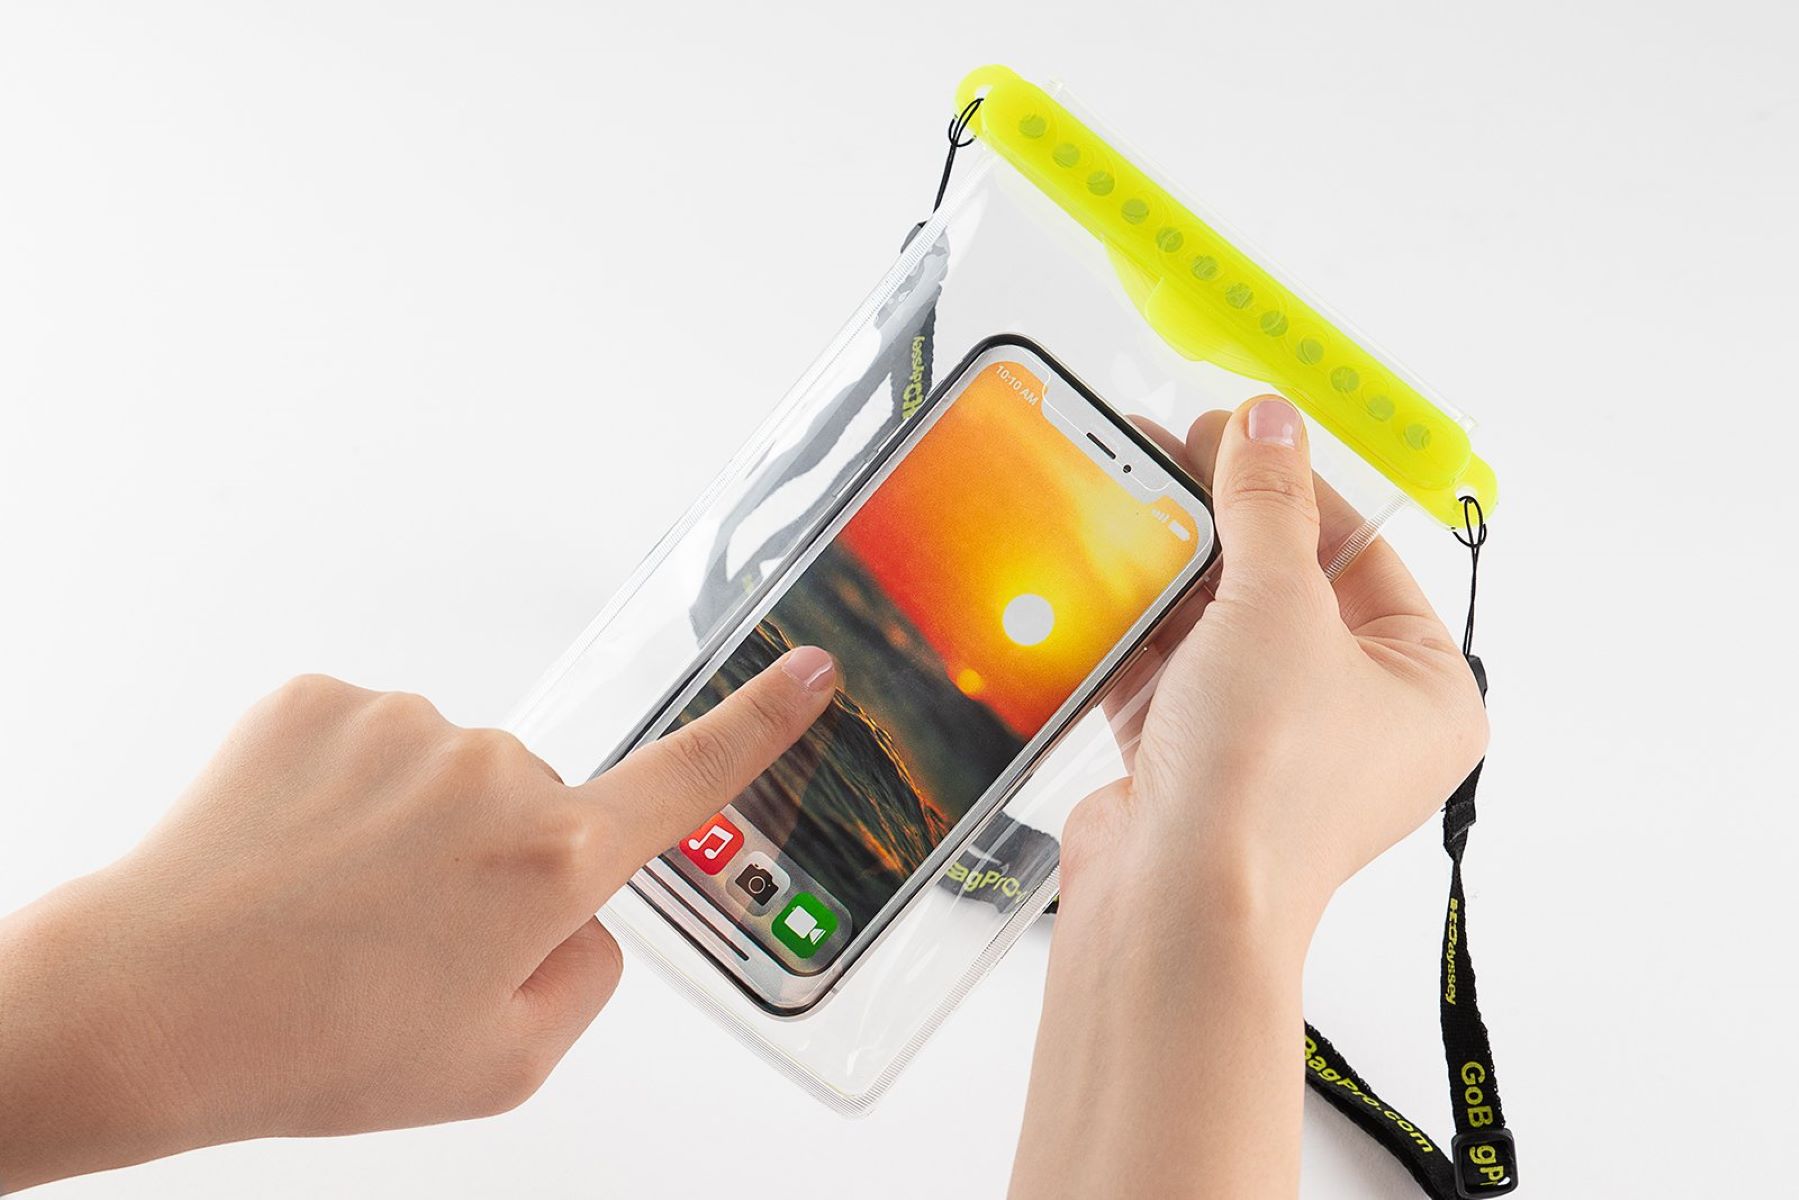
- Touchscreen Functionality: Ensure that the waterproof case allows for full touchscreen functionality. This feature is crucial as it enables you to access navigation apps, take photos, and operate your phone without compromising its protection.
- Sealing Mechanism: A reliable sealing mechanism is vital to prevent water from seeping into the case. Cases with secure locking systems, such as snap closures or screw-on seals, offer peace of mind during your kayaking excursions.
- Transparency and Clarity: Opt for a case with a clear and transparent design that does not obstruct the phone’s camera lens or impede screen visibility. Crystal-clear clarity ensures that you can capture stunning photos and videos without any distortion.
Selecting the right waterproof case for your phone is a critical decision that directly impacts the safety of your device during kayaking trips. Taking into account the aforementioned factors will guide you in making an informed choice, providing the assurance that your phone remains protected while you immerse yourself in the beauty of the waters.
Testing the Waterproof Case
Once you’ve chosen a waterproof case for your phone, it’s imperative to conduct thorough testing to ensure its reliability before venturing out on the water. Follow these steps to verify the effectiveness of your waterproof case:
- Dry Run: Before exposing the case to water, perform a "dry run" by placing a piece of paper or a tissue inside and sealing the case as directed. Submerge the case in a basin or sink for a few minutes, then carefully inspect the interior to confirm that the paper or tissue remains dry. This initial test simulates the conditions your phone will encounter while kayaking.
- Submersion Test: Fill a container with water and submerge the sealed waterproof case for the duration specified by the manufacturer. While submerged, gently maneuver the case to imitate the movements it may experience during kayaking. After the designated time, remove the case and meticulously examine it for any signs of water intrusion.
- Functional Test: With the phone enclosed in the case, verify that all essential functions, including the touchscreen, buttons, and camera, operate seamlessly. Test the responsiveness of the touchscreen by navigating through apps and menus. Additionally, capture a few test photos and videos to confirm that the case does not compromise the camera’s clarity.
- Repeat Testing: It’s beneficial to repeat the testing process periodically, especially if the case has been in use for an extended period. Over time, wear and tear can affect the waterproof seal and overall integrity of the case. Regular testing helps maintain confidence in the case’s protective capabilities.
Thoroughly testing your waterproof case instills confidence in its ability to safeguard your phone during kayaking expeditions. By meticulously following these testing procedures, you can embark on your adventures with the assurance that your phone remains secure and functional, regardless of the aquatic challenges it may encounter.
Securing Your Phone in the Case
Properly securing your phone within the waterproof case is crucial to ensure its safety and functionality while kayaking. Follow these essential steps to securely encase your phone:
- Clean and Inspect: Before placing your phone in the case, ensure that both the phone and the interior of the case are clean and free from any debris or moisture. Any foreign particles or liquid inside the case can compromise the phone’s protection and functionality.
- Positioning: Carefully position your phone within the case, ensuring that it fits snugly without excessive force. Be mindful of any protruding buttons or edges that may hinder the proper sealing of the case. Align the phone according to the case’s design to maintain its waterproof integrity.
- Sealing Mechanism: Engage the sealing mechanism as per the manufacturer’s instructions, whether it involves snapping, zipping, or locking the case. Verify that the closure is secure and airtight to prevent any potential water ingress during your kayaking endeavors.
- Air Expulsion: Before sealing the case completely, expel any trapped air by gently pressing on the case to release it. Removing excess air ensures a tighter seal and minimizes the risk of air pockets that could compromise the case’s waterproofing capabilities.
- Functional Check: After securing your phone in the case, perform a quick functional check to ensure that all buttons, ports, and the touchscreen respond as expected. Verify that the camera lens is unobstructed and that the phone’s features are fully accessible through the case.
By meticulously following these steps, you can confidently secure your phone within the waterproof case, knowing that it is shielded from water, debris, and potential damage. This meticulous approach ensures that your phone remains fully functional and well-protected throughout your kayaking escapades, allowing you to capture breathtaking moments without any concerns about your phone’s safety.
Using a Floating Lanyard
When engaging in kayaking activities, a floating lanyard serves as an indispensable accessory for ensuring the safety and accessibility of your phone. Here’s how to effectively utilize a floating lanyard to safeguard your phone during kayaking:
- Selecting the Right Lanyard: Choose a floating lanyard specifically designed for water-based activities, ensuring it is constructed from durable, water-resistant materials. Opt for a lanyard with a buoyant core that keeps your phone afloat if accidentally dropped into the water.
- Attachment: Securely attach one end of the floating lanyard to the designated anchor point on your waterproof phone case. Ensure that the attachment is firm and reliable, minimizing the risk of detachment during vigorous movements or sudden impacts.
- Adjustment and Comfort: Adjust the lanyard’s length to your preference, allowing enough slack for comfortable use without compromising security. It’s essential to find a balance between freedom of movement and preventing the phone from dragging in the water or becoming entangled with the kayak or other gear.
- Wearing the Lanyard: Wear the floating lanyard around your neck or securely fasten it to your personal flotation device (PFD). This placement ensures that your phone remains within reach at all times, providing quick access for capturing photos, using navigation apps, or making emergency calls if needed.
- Vigilance and Maintenance: Periodically inspect the floating lanyard for signs of wear, fraying, or damage. Replace the lanyard if any compromise to its integrity is detected, as its reliability is crucial for safeguarding your phone during kayaking expeditions.
By incorporating a floating lanyard into your kayaking gear, you can enhance the security and accessibility of your phone while on the water. This invaluable accessory provides peace of mind, ensuring that your phone remains within reach and afloat in the event of an accidental drop, allowing you to focus on enjoying your kayaking experience without concerns about the safety of your device.
Storing Your Phone in a Dry Bag
When embarking on kayaking adventures, safeguarding your phone from water, sand, and other elements is paramount. Utilizing a dry bag provides an additional layer of protection, ensuring your phone remains safe and dry throughout your aquatic escapades. Here’s how to effectively store your phone in a dry bag:
- Choosing the Right Dry Bag: Select a dry bag that is specifically designed for water-based activities and offers reliable waterproofing. Opt for a bag constructed from durable, waterproof materials with high-frequency welded seams to prevent water intrusion.
- Size Consideration: Ensure that the dry bag accommodates your phone, allowing extra space for additional items such as keys, identification, or small essentials. However, avoid oversized dry bags, as excess space can lead to unnecessary movement of the phone within the bag.
- Proper Sealing: Before placing your phone in the dry bag, carefully roll the top closure at least three times to create a secure and watertight seal. Utilize the bag’s integrated buckles or fasteners to maintain the rolled closure, preventing any chance of water seepage.
- Double Protection: If using a waterproof case for your phone, consider placing the encased phone inside the dry bag for an added layer of security. This dual protection strategy minimizes the risk of water damage, especially during prolonged submersion or in the event of unexpected impacts.
- Accessible Placement: Store the dry bag within easy reach, preferably secured to the kayak or your personal flotation device (PFD). This accessibility ensures that you can swiftly retrieve your phone when needed, without disrupting your kayaking experience.
By employing a dry bag to safeguard your phone, you can venture into the waters with confidence, knowing that your device is shielded from water, sand, and potential damage. This additional protective measure complements the waterproof case and floating lanyard, providing comprehensive security for your phone during kayaking excursions.
Tips for Taking Photos and Videos
While kayaking, capturing stunning photos and videos allows you to preserve the beauty of your surroundings and share your memorable experiences. Here are valuable tips to optimize your photography and videography endeavors during kayaking adventures:
- Stable Positioning: To minimize camera shake and achieve clear, stable shots, maintain a steady posture and utilize your body’s stability or the kayak’s resting points. Additionally, consider investing in a stabilizing grip or mount for your phone to enhance stability during capturing moments.
- Utilize Burst Mode: When capturing fast-moving subjects or dynamic scenes, activate the burst mode on your phone’s camera to swiftly capture multiple shots in succession. This feature increases the likelihood of obtaining the perfect photograph, especially amidst the unpredictable nature of water environments.
- Optimize Lighting: Leverage natural lighting to your advantage by adjusting the angle and position of your shots. The interplay of sunlight on the water surface and surrounding landscapes can create captivating visual effects, enhancing the overall appeal of your photos and videos.
- Protective Lens Covers: Consider using a lens cover or filter to shield your phone’s camera lens from water droplets, splashes, and potential scratches. This protective accessory ensures that your lens remains clear and free from obstructions, allowing for crisp and unobstructed imagery.
- Creative Perspectives: Experiment with diverse angles and perspectives to capture unique and compelling shots. Embrace unconventional viewpoints, such as low-angle shots from water level or aerial perspectives from elevated positions, to add depth and intrigue to your visual storytelling.
- Seamless Video Recording: When recording videos, maintain smooth and fluid movements to create immersive and visually engaging footage. Utilize panning and tracking techniques to capture the fluidity of the water and the picturesque surroundings, enhancing the cinematic quality of your videos.
By integrating these tips into your photography and videography practices, you can elevate the quality of your visual documentation during kayaking expeditions. These insights empower you to capture the essence of your adventures, preserving cherished moments and sharing the allure of the waterways through captivating imagery and videos.