
What is Perspective in Photography?
Perspective in photography refers to the way objects and elements are represented relative to each other within a frame. It plays a crucial role in creating depth, adding a sense of dimension, and guiding the viewer’s attention within an image. By understanding and utilizing perspective effectively, photographers can enhance the visual impact of their photographs and create compelling compositions.
In simple terms, perspective is all about how objects appear smaller as they recede into the distance. This phenomenon occurs because of the way our eyes perceive and interpret depth. When capturing a scene, a photographer can manipulate perspective to evoke different emotions or convey a specific message.
There are two common types of perspective in photography: linear perspective and atmospheric perspective. Linear perspective is based on the convergence of parallel lines, creating a sense of depth and distance. It is particularly noticeable in landscapes and architectural photography, where the lines of buildings or roads seem to converge towards a vanishing point.
On the other hand, atmospheric perspective deals with how the atmosphere affects the appearance of objects in terms of color, contrast, and sharpness. As objects move further away, they appear lighter in tone, less distinct, and hazier due to the scattering of light by the air molecules. This type of perspective is often utilized in landscape photography to create a sense of depth and distance.
Understanding and mastering perspective in photography allows photographers to effectively control the visual narrative of their images. By deliberately positioning objects and choosing the right angle, photographers can emphasize certain elements or create a particular mood. It also enables photographers to experiment with different focal lengths, lenses, and techniques to achieve diverse perspectives.
Now that we have a basic understanding of perspective in photography, let’s explore how to utilize it effectively in our compositions.
Understanding the Perspective in Your Frame
Before you start composing your shot, it’s essential to first understand the perspective within your frame. This involves analyzing the relationships between the various elements in your scene and how they interact with each other.
One way to grasp the perspective is by mentally dividing your frame into three sections: foreground, middle ground, and background. The foreground is the closest to the camera, while the background is the farthest. The middle ground lies in between and helps to bridge the gap between the foreground and the background.
By carefully considering each section and how they interact, you can create a sense of depth in your photographs. Placing objects or subjects in the foreground can add a three-dimensional feel and help draw the viewer’s eye into the image. It also provides a sense of scale and context, allowing viewers to understand the size and distance of objects in the frame.
Another factor to consider is the relative size of objects within the frame. Objects that are closer to the camera will appear larger, while those that are further away will appear smaller. This size difference can create a sense of perspective and depth, making your images more visually appealing. By playing with the size relationships, you can create an interesting visual dynamic and guide the viewer’s attention through the scene.
Additionally, consider the angle of view when capturing your subject. Different angles can drastically alter the perspective and visual impact of your image. Shooting from a low angle can make objects appear larger, more imposing, and emphasize their presence. On the other hand, a higher angle can create a bird’s-eye view, providing a unique perspective and showcasing the relationship between different elements from an elevated standpoint.
Understanding the perspective in your frame is crucial for creating visually compelling photographs. By carefully analyzing the relationships between the foreground, middle ground, and background, as well as considering the size and angle of view, you can create depth and dimension within your images. Take the time to study your scene and experiment with different perspectives to achieve the desired visual impact.
Utilizing Natural Lines and Shapes to Create Depth
One effective way to enhance the perspective and create a sense of depth in your photographs is by utilizing natural lines and shapes within your frame. These elements can guide the viewer’s eye, add visual interest, and create a feeling of distance.
Look out for leading lines – lines that naturally occur in your environment – and incorporate them into your composition. Leading lines can be roads, pathways, fences, rivers, or even the branches of trees. These lines draw the viewer’s attention and create a visual pathway that leads them deeper into the image. By positioning these lines strategically, you can create a strong sense of perspective and make your images more dynamic.
In addition to leading lines, pay attention to shapes within your frame. Geometric shapes such as triangles, diagonals, and curves can create depth and visual interest. For example, a row of buildings or a line of trees can form a diagonal shape, leading the viewer’s eye from the foreground to the background. Incorporating shapes with varying sizes and angles can add complexity and dimension to the image.
Another technique is to use the rule of thirds to enhance the perspective and composition. By placing your main subject or point of interest along the imaginary gridlines, you can create a more balanced and visually engaging photograph. This technique can help create a sense of depth by allowing elements in the foreground, middle ground, and background to interact harmoniously.
When utilizing natural lines and shapes, it’s important to consider the position and placement of your subject. By positioning your subject at the convergence of leading lines or in a way that complements the shapes within the frame, you can create a stronger sense of depth and draw attention to your subject.
Experiment with different angles and perspectives to find the most compelling way to use lines and shapes to create depth in your photographs. Take your time to study the scene, identify interesting lines and shapes, and consider how they can enhance your composition.
By consciously incorporating natural lines and shapes into your photographs, you can add depth and dimension to your images. These elements not only guide the viewer’s eye but also create a realistic and immersive experience, making your photographs more visually appealing.
Incorporating the Foreground to Add Depth
The foreground of an image can play a significant role in creating depth and adding a sense of dimension to your photographs. By incorporating interesting elements in the foreground, you can create a visual anchor that leads the viewer’s eye into the frame and enhances the overall composition.
One way to utilize the foreground is by finding objects or elements that can serve as a frame within a frame. For example, you could use tree branches, archways, or even natural formations like rocks or flowers to create a border around your main subject. This technique not only adds depth but also adds context and enhances the storytelling aspect of the photograph.
Another approach is to include foreground elements that provide a sense of scale. By including objects of known size in the foreground, such as people or animals, you give the viewer a point of reference to understand the size and distance of the other elements in the frame. This can create a stronger sense of depth and make your photograph more engaging.
Textures and patterns in the foreground can also add depth to your images. By focusing on details in the foreground, such as leaves, sand, or textured surfaces, you can create visual interest and a sense of depth. These elements can add a three-dimensional feel to the photograph and make it more immersive for the viewer.
Additionally, using a wide-angle lens can help emphasize the foreground and create a sense of depth. The wide-angle lens allows you to capture a broader field of view and exaggerate the perspective between the foreground and the background. However, be mindful of distortion that can occur when using extreme wide-angle lenses and ensure it complements the composition.
When incorporating the foreground, it’s important to consider its relationship with the rest of the frame. Ensure there is a visual flow and balance between the foreground, middle ground, and background elements. The foreground should not overpower the other components of the photograph but rather complement and enhance the overall composition.
Experiment with different foreground elements and angles to add depth to your photographs. Take the time to explore the scene and find interesting elements that can serve as a visual anchor. By incorporating the foreground effectively, you can create visually dynamic images that captivate viewers and draw them into your photograph.
Using Leading Lines to Guide the Viewer’s Eye
Leading lines are powerful compositional tools that can be used to guide the viewer’s eye and create a sense of depth in your photographs. These lines naturally occurring or man-made, draw the viewer’s attention and direct their gaze towards a specific point in the frame.
You can find leading lines in various forms, such as roads, fences, rivers, train tracks, or even the architectural lines of buildings or bridges. When composing your shot, position yourself in a way that allows these lines to intersect or converge towards a vanishing point, creating a strong sense of perspective.
Using leading lines helps to add depth to your images by creating a visual pathway that draws the viewer deeper into the photograph. These lines can create a sense of movement, guiding the viewer’s eye from the foreground to the background.
To maximize the impact of leading lines, consider their position and placement within the frame. Leading lines that start from the bottom corners of the image and converge towards the center can create a strong sense of depth and draw the viewer’s attention to the main subject or focal point.
It’s essential to pay attention to the direction and flow of the leading lines. Horizontal lines can provide a sense of stability and calmness, while vertical lines can convey a sense of strength and power. Diagonal lines, on the other hand, create a more dynamic and energetic feel to the image. Experiment with different types of leading lines to evoke different moods and emotions in your photographs.
Leading lines can also be used in combination with other composition techniques, such as the rule of thirds, to create a more balanced and visually appealing image. Placing your main subject or point of interest along the leading line helps to create a strong focal point and guide the viewer’s eye within the frame.
When using leading lines, it’s important to remember that they should lead the viewer to something of interest. Whether it’s a prominent subject, a vanishing point, or an element that adds depth or context to the image, the leading lines should serve a purpose and enhance the overall storytelling of the photograph.
Take the time to explore your surroundings and identify potential leading lines that can elevate the composition of your photographs. By utilizing these lines effectively, you can create visually compelling images that draw the viewer’s eye and add a sense of depth and perspective.
Using Different Lenses to Alter Perspective
One of the advantages of photography is the ability to alter perspective by using different lenses. Each lens has its own focal length, which affects the angle of view, depth of field, and the overall perspective of the image. By understanding the characteristics of different lenses, photographers can create unique and varied perspectives in their photographs.
Wide-angle lenses, often with focal lengths below 35mm, are known for their broad field of view. These lenses capture a wider perspective, allowing for more elements to be included in the frame. This wider perspective can create a sense of expansiveness and depth, making them ideal for landscape photography or capturing architectural details.
Because of their wider field of view, wide-angle lenses tend to exaggerate perspective and make objects closer to the camera appear larger, while distant objects appear smaller. This effect can be used to create a heightened sense of depth and scale in your photographs.
On the other hand, telephoto lenses, with focal lengths above 70mm, have a narrower angle of view. These lenses compress the perspective of a scene, making objects appear closer together and flattening the overall image. Telephoto lenses are often used in wildlife photography, sports photography, or when you want to isolate a subject from the background.
The compression effect of telephoto lenses can be used creatively to compress elements within the frame, creating a unique perspective and emphasizing the relationship between different elements in the scene.
Macro lenses, designed for close-up photography, offer a different perspective altogether. These lenses allow you to capture intricate details and magnify small subjects, immersing the viewer in a world that is often unseen. Macro lenses can bring a sense of wonder and reveal the beauty in the smallest of subjects, such as flowers, insects, or textures.
Experimenting with different lenses allows you to explore various perspectives and find the one that best suits your creative vision. By selecting the appropriate lens, you can manipulate the perspective and visual impact of your photographs to convey your intended message or evoke a specific mood.
Remember that each lens presents its own set of challenges and considerations, such as distortion or the need for a narrower depth of field. Understanding these characteristics and learning how to work with them will help you make the most of different focal lengths and achieve the desired perspective in your images.
By utilizing different lenses to alter perspective, you can create diverse and captivating photographs that offer unique visual experiences to the viewer.
Experimenting with Distance and Focal Length
Distance and focal length are two key factors that photographers can manipulate to create different perspectives and visual effects in their images. By experimenting with these elements, you can achieve varied results and add creativity to your photography.
One way to alter the perspective is by changing the distance between you and your subject. Getting closer to your subject can create a more intimate and immersive feeling, emphasizing its details and creating a sense of depth. On the other hand, stepping further away from your subject can provide a wider view, allowing you to capture more elements in the frame and expanding the sense of space.
Take the time to assess the scene and determine the optimal distance that will help convey your desired message or evoke a specific emotion. Experiment with different viewpoints and perspectives to see how the change in distance can transform the composition and impact of your photograph.
In addition to distance, focal length also plays a crucial role in altering perspective. Changing the focal length, either by using zoom lenses or switching to different prime lenses, allows you to adjust the angle of view and compression of elements within the frame.
Wide-angle lenses with shorter focal lengths provide a wider field of view and can create a sense of expansiveness in your photographs. They are commonly used in landscape or architectural photography to capture grand scenes and emphasize the distance between objects.
Mid-range focal lengths, such as the classic 50mm lens, provide a more natural perspective that closely resembles what the human eye sees. They can be versatile for various genres, from street photography to portraits, offering a balanced and realistic representation of the scene.
Telephoto lenses with longer focal lengths compress the perspective, making distant objects appear closer together. They are commonly used in wildlife or sports photography to bring distant subjects closer and isolate them from the background.
Experimenting with different focal lengths allows you to explore new perspectives and lend a unique visual appeal to your photographs. Consider the impact each focal length has on the composition, depth of field, and overall storytelling of your image. Keep in mind that different focal lengths may require adjustments to other settings, such as aperture or shutter speed, to achieve the best results.
By intentionally exploring different distances and focal lengths, you can unleash your creativity and tell compelling visual stories through your photographs.
Perspective in Portrait Photography
Perspective plays a crucial role in portrait photography, as it can greatly influence the overall look and feel of the image. By carefully considering and manipulating perspective, photographers can create flattering portraits that capture the essence and personality of their subjects.
One key aspect of perspective in portrait photography is the distance between the photographer and the subject. The distance affects how the subject is perceived within the frame and can emphasize certain facial features or expressions. Getting closer to the subject can create an intimate and engaging portrait, while stepping back can provide a wider view and showcase the subject’s surroundings.
When it comes to focal length, different lenses can produce different perspectives and aesthetics in portrait photography. Shorter focal lengths, such as 35mm or 50mm, can capture a wider angle of view and are ideal for environmental portraits, where the subject and their surroundings are equally important.
On the other hand, longer focal lengths, such as 85mm or 105mm, compress the perspective and can create a pleasing background separation. These lenses are often preferred for close-up portraits or when you want to isolate the subject from the background, as they help to soften facial features and produce a more flattering result.
Another aspect to consider is the height at which you capture the portrait. Shooting from eye level can create a natural and relatable perspective, while shooting from a lower angle can make the subject appear more powerful and imposing. Conversely, shooting from a higher angle can produce a more vulnerable or innocent portrayal.
Experimenting with different perspectives can also involve unique compositional choices. For example, incorporating leading lines or using unconventional framing techniques can add depth and visual interest to your portraits. Additionally, playing with different angles and viewpoints, such as shooting from above or below, can provide a fresh and unique perspective on the subject.
When it comes to perspective in portrait photography, it’s crucial to communicate and engage with your subject. Collaborate with them and discuss the desired look and feel of the portrait. Pay attention to their facial features and consider how different angles, distances, and focal lengths can flatter and enhance their unique qualities.
Playing with Angles and Viewpoints
One of the most creative aspects of photography is the ability to play with angles and viewpoints. By experimenting with different perspectives, photographers can capture unique and visually captivating images that stand out from the ordinary.
Choosing unconventional angles can add a fresh and intriguing perspective to your photographs. Instead of shooting from eye level, challenge yourself to explore different vantage points. Get down low and shoot from a worm’s-eye view, which can make your subject appear larger, more dominant, and create a sense of drama. Conversely, shooting from a bird’s-eye view, by standing on a higher platform or using a drone, can provide an expansive viewpoint and offer a unique portrayal of the scene.
Another technique is to play with extreme angles. Tilting your camera can add dynamism and a sense of movement to your image. For example, a tilted angle can create an interesting and edgy composition for street photography, architecture, or even portraits, breaking away from the traditional horizontal and vertical lines.
Changing your perspective can also involve exploring different viewpoints. Instead of always shooting straight ahead, try looking up or down to capture a different view of your subject. Looking up can produce a sense of grandeur and emphasize the height or magnitude of buildings or natural structures. Conversely, looking down can create a unique perspective on everyday objects or scenes, providing a fresh and interesting composition.
Using reflections can also add another layer of interest to your compositions. Experiment with shooting from different angles to capture reflections in water, glass, or other reflective surfaces. This can create a surreal and captivating effect, adding depth and visual intrigue to your photographs.
When playing with angles and viewpoints, it’s important to consider the story or message you want to convey. Each angle or viewpoint can evoke different emotions and perspectives from the viewer. Pay attention to the lines, shapes, and elements within your frame, and how they interact when viewed from a specific angle. Look for leading lines or foreground elements that can enhance your composition and guide the viewer’s eye through the image.
Be adventurous and curious in your approach to angles and viewpoints. Don’t be afraid to experiment and break the rules. By exploring different perspectives, you can unleash your creativity and capture photographs that are visually captivating and unique.
Using Perspective to Create a Sense of Scale
Perspective is a powerful tool that photographers can use to create a sense of scale in their images. By carefully manipulating the perspective, you can emphasize the size and proportions of objects within the frame, providing context and adding visual interest to your photographs.
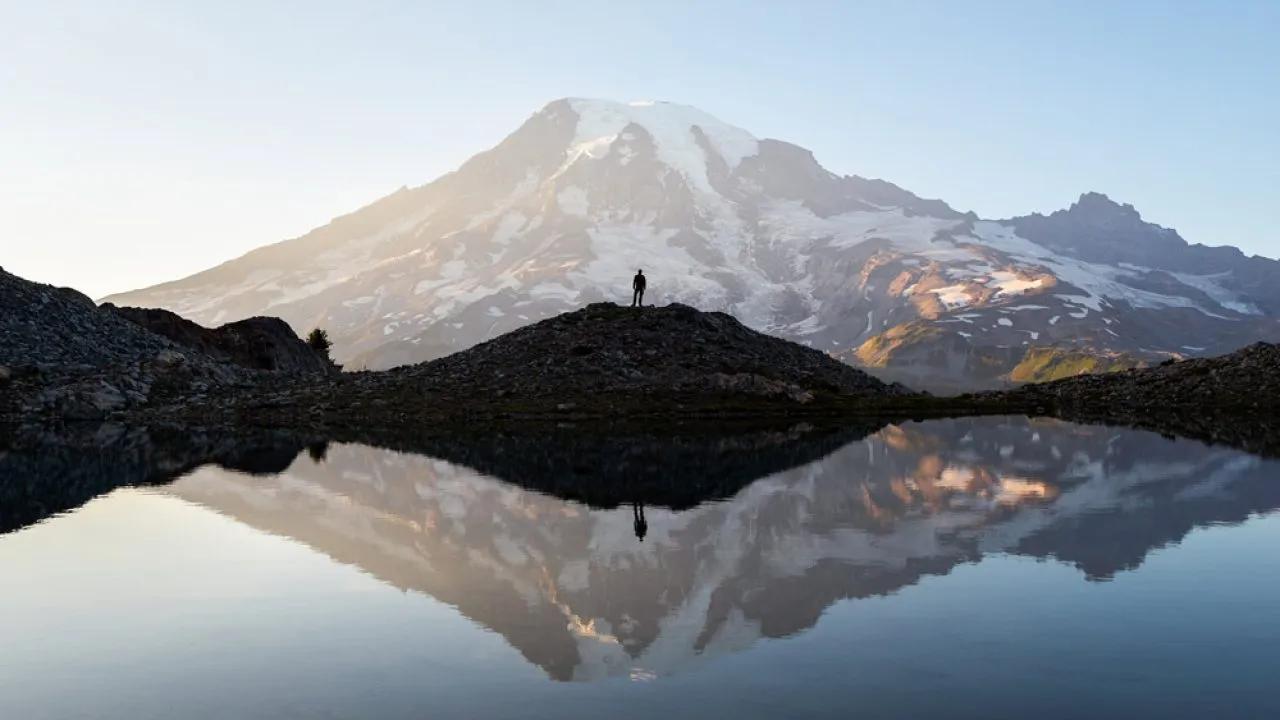
One technique is to incorporate elements of known size in the foreground to establish a sense of scale. By including people, animals, or objects with recognizable dimensions, you provide a reference point for the viewer. This allows them to understand the size and magnitude of other elements in the frame. Whether it’s a lone figure against a vast landscape or a small object juxtaposed with a larger one, this contrast can create a powerful sense of scale.
Another way to use perspective is by shooting from a low angle, especially when capturing towering structures or expansive landscapes. By shooting upwards, you can emphasize the height and grandeur of the subject, making it appear larger and more impressive. This technique is often employed in architectural photography or when photographing natural wonders such as mountains or waterfalls.
Conversely, shooting from a high vantage point can also create a sense of scale. When photographing a cityscape or a crowded event, capturing the scene from a bird’s-eye view can showcase the vastness of the location and the multitude of people or objects in the frame. This elevated perspective adds a unique perspective on the scale of the subject.
Additionally, utilizing leading lines and perspective convergence can enhance the illusion of scale. By incorporating converging lines that appear to meet at a vanishing point in the distance, you create a sense of depth and make objects appear smaller as they recede. This technique is particularly effective in landscapes or urban environments, where the lines of roads, buildings, or fences guide the viewer’s eye and provide a clear sense of scale.
Keep in mind that the use of wide-angle lenses can also influence the perception of scale. Wide-angle lenses have a broader field of view and tend to exaggerate the size difference between objects in the foreground and background. This effect can further enhance the sense of scale in your photographs.
Experiment with different techniques and perspectives to effectively utilize perspective and create a sense of scale in your images. By incorporating elements of known size, exploring different shooting angles, and utilizing leading lines, you can add depth and dimension to your photographs, captivating viewers and providing them with a unique visual experience.
Manipulating Perspective in Post-processing Techniques
Post-processing techniques offer photographers the opportunity to further manipulate and enhance the perspective of their images. With the aid of editing software, photographers can refine the perspective, correct distortions, and create unique visual effects that shape the final look of their photographs.
A common technique for manipulating perspective in post-processing is using the transform or warp tools to correct distortions caused by a wide-angle lens or shooting from certain angles. These tools allow you to straighten lines that may appear skewed or correct the perspective warp caused by shooting from a low or high viewpoint. By adjusting these distortions, you can bring balance and accuracy to the composition, ensuring that lines appear straight or that buildings and objects maintain their intended shape.
Another powerful tool in post-processing is the ability to resize or scale elements within the image selectively. This can be useful when you want to emphasize the prominence of a subject or adjust the relative size of objects to enhance the sense of scale. By resizing elements, you can create a more pronounced difference in size and manipulate the perspective to add depth or emphasize certain components of the image.
Post-processing also allows for the manipulation of depth of field and selective focus. Through techniques such as dodging and burning, you can selectively darken or lighten specific areas of the image to guide the viewer’s attention and create a sense of depth. This can be particularly effective when emphasizing the foreground or background elements to enhance the overall perspective and visual impact of the photograph.
The use of filters and overlays can also aid in manipulating perspective during post-processing. For instance, adding a vignette around the edges of the frame can draw the viewer’s eye towards the center and give a sense of tunnel-like depth. Similarly, employing graduated filters or layer masks can selectively enhance or diminish the light or color in specific parts of the image, further accentuating the perspective and guiding the viewer’s gaze.
Furthermore, techniques like panorama stitching and composite imaging can create panoramic or wide-angle images that offer a unique perspective and a broader field of view. These techniques allow photographers to combine multiple images into a seamless composition, providing a more immersive and expansive perspective that cannot be captured in a single frame.
When manipulating perspective in post-processing, it’s important to strike a balance between enhancing the desired effect and maintaining a natural and realistic look. Over-editing can lead to unnatural results that distract from the intended message or impact of the photograph. It’s always important to apply these techniques with intention and in consideration of the overall visual aesthetic you wish to convey.
Final Thoughts and Tips for Mastering Perspective in Photography
Perspective is a fundamental element in photography that has the power to transform ordinary scenes into visually captivating images. Mastering perspective opens up a world of creative possibilities and allows you to convey your vision with depth, dimension, and impact. Here are some final thoughts and tips to help you enhance your understanding and utilization of perspective in photography.
1. Continuously study and observe your surroundings: Developing a keen eye for perspective requires practice and observation. Take the time to study different environments, buildings, landscapes, and everyday scenes. Train yourself to see lines, shapes, and angles that can be used to create depth and guide the viewer’s eye.
2. Experiment with different lenses and focal lengths: Each lens offers a unique perspective. Explore the characteristics of different lenses, from wide-angle to telephoto, and see how they impact the composition, depth of field, and perception of distance. Don’t be afraid to step outside your comfort zone and try lenses outside of your usual range.
3. Pay attention to positioning and composition: The position from which you shoot greatly influences perspective. Take the time to carefully consider your composition, including foreground, middle ground, and background elements. Experiment with different angles, heights, and viewpoints to find the most compelling perspective for your subject.
4. Incorporate leading lines and shapes: Utilize natural lines or create your own leading lines that direct the viewer’s eye through the image. Look for shapes and patterns that add visual interest and depth to your compositions.
5. Think about the story you want to tell: Perspective is a powerful tool for storytelling. Consider the emotions, messages, or narratives you want to convey through your photographs. Align your perspective choices with the story you want to tell and how you want the viewer to experience your image.
6. Post-process with intention: Post-processing offers opportunities to refine and enhance perspective. Use tools like transform, cropping, resizing, and selective editing to manipulate perspective and correct distortions. However, remember to maintain a balance and keep the final result natural and in line with your artistic vision.
7. Practice, practice, practice: Like any skill, mastering perspective takes practice. Take your camera out and experiment with different perspectives in various environments. Analyze your results, learn from them, and continue to refine your understanding of perspective through experimentation.
Remember, mastering perspective is not about adhering to a set of rules, but about developing an artistic eye and a sense of creativity. Embrace the endless possibilities that perspective offers and continue to explore and push the boundaries of your photography. With time, patience, and dedication, you’ll be able to harness the power of perspective to capture mesmerizing images that leave a lasting impression.