
Why Use OneNote as a Task Manager, Notepad, and Journal
OneNote is a versatile and powerful tool that can be utilized as a task manager, notepad, and journal. Its flexible features and seamless integration with other Microsoft products make it an ideal choice for managing your tasks, taking notes, and documenting your thoughts and experiences. Here are some compelling reasons why you should consider using OneNote for these purposes.
1. Centralized Organization: With OneNote, you can have all your tasks, notes, and journal entries in one place. This eliminates the need for juggling multiple applications and simplifies your workflow. You can access everything with just a few clicks, saving you time and effort.
2. Customizable Structure: OneNote allows you to create personalized sections, pages, and tabs for different categories and projects. You have the flexibility to design your own organizational system that suits your needs. Whether you prefer a hierarchical structure, bullet-point lists, or a combination of both, OneNote can accommodate your preferences.
3. Easy Collaboration: OneNote enables seamless collaboration and sharing with others. You can invite team members or friends to view and edit your notes, making it an excellent tool for group projects and brainstorming sessions. This collaborative aspect fosters productivity and fosters a sense of teamwork.
4. Rich Media Support: OneNote allows you to insert images, audio recordings, and even drawings into your notes and journal entries. This feature is especially valuable for capturing visual inspiration, recording lectures or meetings, and adding a personal touch to your journal. You can bring your ideas to life using the different media formats available.
5. Cross-Platform Accessibility: OneNote is available across various devices and platforms, including Windows, Mac, iOS, and Android. This means that you can access your tasks, notes, and journal entries wherever you go, whether you’re using your computer, tablet, or smartphone. The synchronization feature ensures that your data is up to date across all devices.
6. Integration with Other Apps: OneNote seamlessly integrates with other Microsoft apps, such as Outlook, Teams, and SharePoint. You can create tasks directly from your notes, sync your calendar with your task list, and collaborate with colleagues in real-time. This integration enhances your productivity by streamlining your workflow.
By harnessing the power of OneNote as a task manager, notepad, and journal, you can stay organized, boost your productivity, and capture your thoughts and ideas effectively. Whether you’re a student, professional, or simply someone who wants to stay on top of their tasks and keep a record of their experiences, OneNote is the all-in-one solution for your needs.
Setting Up Your OneNote for Task Management
Before you dive into using OneNote as a task manager, it’s essential to set it up appropriately to ensure a seamless and organized workflow. Here are some steps to help you get started:
1. Create a Task Management Notebook: Start by creating a dedicated notebook in OneNote specifically for task management. This will serve as your central hub for all your tasks and related information. Consider giving it a descriptive name that reflects its purpose.
2. Set Up Sections and Pages: Divide your task management notebook into sections based on different projects, categories, or timeframes. Create pages within each section for specific tasks or subcategories. This hierarchical structure will make it easier to navigate and locate tasks later on.
3. Define Task Categories: Determine the categories or labels that you want to assign to your tasks. Examples could include “Work,” “Personal,” “Urgent,” or “Important.” These categories will help you prioritize and filter tasks, ensuring that you focus on what matters most at any given time.
4. Customize Task Templates: To streamline task creation, consider creating task templates with predefined fields such as task name, due date, priority, and notes. This will simplify the process of adding new tasks and ensure consistency across your task management system.
5. Utilize Tags: OneNote offers an extensive library of tags that can be applied to tasks to add additional information or indicate their status. Customize the tags based on your needs or create your own. Use tags like “To Do,” “In Progress,” or “Completed” to track the progress and status of your tasks visually.
6. Set Reminders and Deadlines: Take advantage of OneNote’s integration with Outlook to set reminders and deadlines for your tasks. Sync your task list with your calendar to ensure that you stay on top of your commitments and never miss an important deadline.
7. Enable Task Notifications: Keep yourself informed and updated by enabling task notifications in OneNote. You can choose to receive notifications for task assignments, updates, or approaching deadlines, ensuring that you never miss a crucial update or task modification.
8. Establish a Routine: Develop a daily or weekly routine for managing and reviewing your tasks in OneNote. Take time to assess your progress, update task statuses, and plan for the upcoming days or weeks. Regularly reviewing and prioritizing your tasks will help you stay organized and proactive.
By following these steps and customizing OneNote to suit your task management needs, you can create an efficient and effective system that helps you stay organized, focused, and productive.
Using OneNote as a Task Manager
OneNote offers a range of features that make it an excellent tool for managing your tasks effectively. Here’s how you can leverage OneNote to streamline your task management process:
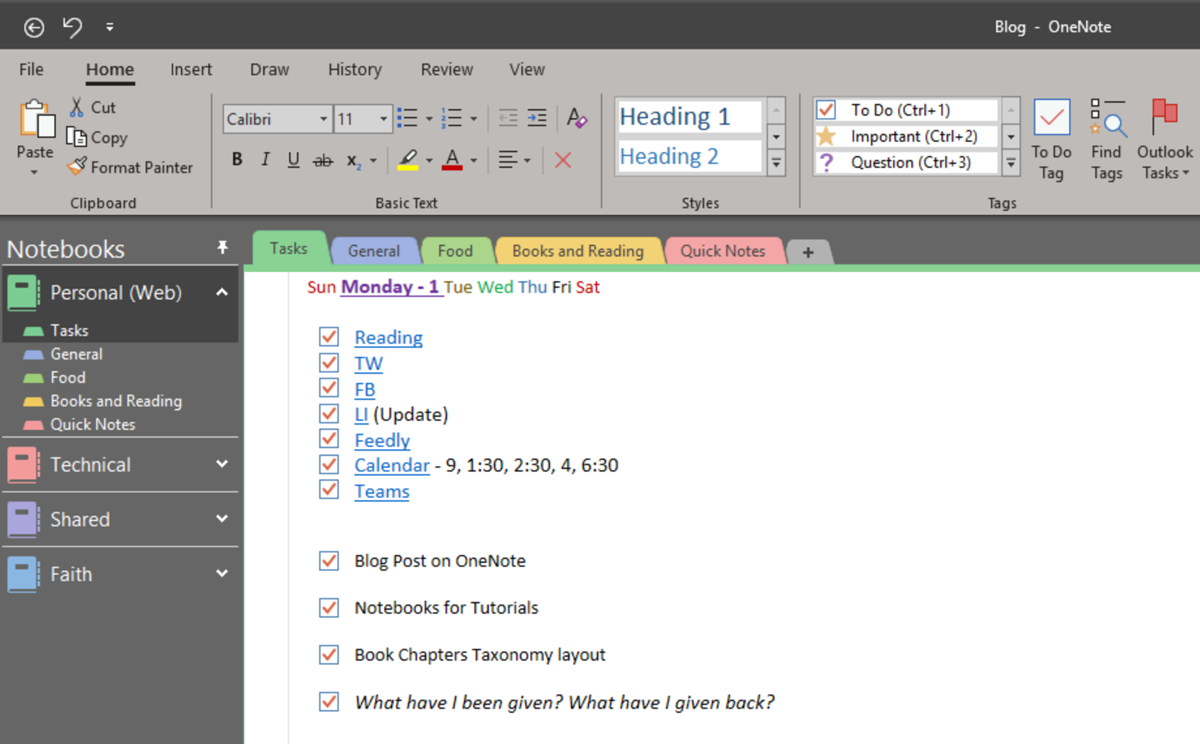
1. Creating To-Do Lists and Tasks in OneNote: Start by creating to-do lists and individual tasks within your Task Management Notebook. Use checkboxes to mark tasks as complete and track progress. You can easily add new tasks, delete or modify existing ones, and organize them in a logical order.
2. Organizing and Prioritizing Tasks in OneNote: OneNote allows you to organize your tasks based on various criteria such as due dates, priority levels, or categories. Use the hierarchy of sections and pages to group similar tasks together. By prioritizing your tasks, you can focus on what needs to be done first.
3. Using OneNote Tags for Task Management: Take advantage of OneNote’s tagging feature to add more information and context to your tasks. Utilize tags like “Important,” “Urgent,” or “Waiting for Response” to categorize and identify tasks easily. You can also create custom tags to suit your specific task management needs.
4. Syncing OneNote with Outlook for Task Management: OneNote seamlessly integrates with Outlook, allowing you to sync your tasks between the two applications. Any changes made to your tasks in OneNote will automatically update in Outlook and vice versa. This integration ensures that you have a unified view of your tasks across both platforms.
5. Collaborating on Tasks: OneNote enables collaboration on tasks, making it ideal for team projects or group assignments. You can assign tasks to team members, add notes or comments, and track progress collectively. This collaborative feature fosters effective communication and promotes teamwork.
6. Adding Task Reminders: Set reminders for your tasks in OneNote to ensure that you never miss important deadlines. OneNote’s integration with Outlook allows you to receive notifications and updates for your tasks, keeping you on track and accountable.
7. Reviewing and Updating Tasks: Regularly review and update your tasks in OneNote. Assess your progress, mark completed tasks, and modify due dates if necessary. By consistently staying on top of your task list, you can maintain organization and ensure that nothing falls through the cracks.
8. Using Search for Task Retrieval: OneNote’s powerful search functionality allows you to quickly retrieve specific tasks or information related to tasks. Use keywords or tags to search for tasks and locate them easily, saving you time and effort.
By utilizing the various task management features in OneNote, you can enhance productivity, stay organized, and effectively manage your tasks. Whether you’re working on personal projects or collaborating with a team, OneNote’s versatility makes it an invaluable tool for task management.
Creating To-Do Lists and Tasks in OneNote
One of the key features of OneNote as a task manager is its ability to create to-do lists and individual tasks. Here’s how you can efficiently create and manage your tasks in OneNote:
1. Create a To-Do List: Start by creating a new page or section within your Task Management Notebook specifically dedicated to your to-do lists. Give it a title that reflects the purpose or topic of the list.
2. Add Tasks: Begin by adding individual tasks to your to-do list. Each task can be a bullet point or line item. You can easily type or copy-paste the tasks into OneNote. Alternatively, use the “Insert” menu to create checkboxes and mark tasks as complete when necessary.
3. Specify Task Details: Provide additional details for each task such as due dates, priorities, or categories. Use the space below each task to add notes, descriptions, or instructions that may be relevant to the task.
4. Organize and Prioritize: Arrange the tasks in a logical order. You can use different indentation levels or bullet styles to create subtasks or hierarchies within your to-do list. Prioritize tasks by moving important or urgent tasks to the top of the list.
5. Format Tasks: Customize the appearance of your tasks by applying formatting options available in OneNote. This could include changing the font style, color, or size to make important tasks stand out. Utilize bold or italicized text to highlight key information within task descriptions.
6. Update Task Status: As you progress through your tasks, mark them as complete by checking off the corresponding checkboxes. For tasks that are still in progress, keep the checkboxes unchecked. This visual representation allows you to track your progress at a glance.
7. Modify and Reorder Tasks: One of the advantages of using OneNote is the flexibility it offers in modifying and reordering tasks. Easily edit task details, update due dates or priorities, or change the order of tasks as needed. OneNote allows you to adapt your task list to evolving requirements.
8. Review and Revise: Regularly review your to-do lists in OneNote to ensure that tasks are up to date and relevant. Remove completed tasks, adjust priorities if necessary, and add new tasks as they arise. By regularly revising your lists, you can maintain organization and ensure that important tasks are not overlooked.
By effectively utilizing OneNote’s features for creating to-do lists and tasks, you can stay organized, track your progress, and efficiently manage your tasks. Whether you’re working on individual projects or collaborating with others, OneNote provides a user-friendly and flexible platform for effective task management.
Organizing and Prioritizing Tasks in OneNote
OneNote’s organizational capabilities allow you to efficiently manage and prioritize your tasks. Here are some tips on how to organize and prioritize your tasks effectively within OneNote:
1. Use Sections and Pages: Divide your Task Management Notebook into sections based on different projects, categories, or timeframes. Create pages within each section to further categorize or group related tasks. This hierarchical structure provides a clear and organized framework for managing tasks.
2. Group Similar Tasks: Within each page, group similar tasks together based on shared characteristics or common themes. This helps to easily locate and manage related tasks. For example, you might group tasks related to a particular project, client, or deadline.
3. Utilize Bullet Points or Numbered Lists: OneNote provides the option to use bullet points or numbered lists for your tasks. Choose the format that suits your preference and aligns with your task management style. Bullet points are useful for unordered tasks, while numbered lists can establish a specific sequence or priority order.
4. Assign Categories or Labels: Assign categories or labels to your tasks to further organize and differentiate them. For example, you might use labels such as “Work,” “Personal,” or “High Priority.” This allows you to filter and focus on specific categories of tasks when needed.
5. Prioritize Urgent and Important Tasks: Prioritize your tasks by identifying those that are urgent and important. Urgent tasks require immediate attention, while important tasks have significant long-term impact. Focus on completing these tasks first to ensure you meet deadlines and achieve your goals.
6. Use Color Coding: Assign different colors to tasks to indicate their priority or status. For example, you could use red for urgent tasks, yellow for important tasks, and green for non-urgent or less critical tasks. Color coding adds visual cues that make it easy to identify and prioritize tasks at a glance.
7. Reorder Tasks Based on Priority: As you review and reassess your tasks, adjust their order based on their current priority level. Move important or higher-priority tasks to the top of your list to ensure they receive your immediate attention. OneNote allows you to easily drag and drop tasks to reorder them.
8. Maintain a Balanced Workload: While it’s essential to focus on urgent and important tasks, make sure you also allocate time to less critical tasks. Balancing your workload ensures that important tasks are not neglected and that you make progress on all fronts.
By implementing these strategies, you can effectively organize and prioritize your tasks within OneNote. This structured approach helps to maintain clarity, focus, and productivity, enabling you to stay on track and achieve your goals.
Using OneNote Tags for Task Management
OneNote offers a powerful feature called tags that can greatly enhance your task management process. Tags provide a visual and customizable way to categorize and track tasks. Here’s how you can leverage OneNote tags for effective task management:
1. Utilize Predefined Tags: OneNote provides a range of predefined tags that you can use to assign specific attributes to your tasks. Examples include “To Do,” “Priority,” “Important,” “Deadline,” and “Question.” These tags help to visually differentiate tasks and provide quick information at a glance.
2. Create Custom Tags: OneNote allows you to create your own custom tags to suit your specific task management needs. This flexibility enables you to design tags that are relevant to your workflow and reflect your unique priorities. You can create tags for specific projects, team members, or any other criteria relevant to your tasks.
3. Categorize and Filter Tasks: Assigning tags to your tasks allows you to easily categorize and filter them based on various criteria. For example, you can assign tags like “Work,” “Personal,” or “Client Project” to group tasks accordingly. This categorization helps you to organize and focus on specific subsets of tasks.
4. Track Task Progress: Tags can also be used to track the progress of your tasks. Create tags such as “In Progress” or “Completed” to indicate the status of each task. As you work through your tasks, update the tags to reflect their current state. This tracking feature provides a visual representation of task progress and helps you stay organized.
5. Customize Tag Styles: OneNote allows you to customize the visual style of your tags, enabling you to differentiate tasks further. You can choose different colors, font styles, or size for each tag. For example, you might use a red color for high-priority tasks and a green color for low-priority tasks. These visual cues facilitate quick identification and prioritization of tasks.
6. Search and Filter by Tags: One of the advantages of using tags is the ability to search and filter tasks based on tag criteria. You can use the search function in OneNote to find specific tags or filter tasks to view only those with certain tags. This search and filter capability helps you quickly locate tasks and focus on specific subsets of tasks as needed.
7. Adjust Tags as Needed: As your task management needs evolve, you can easily adjust and modify your tags in OneNote. You can add new tags, remove tags that are no longer relevant, or update the styles of existing tags. This flexibility ensures that your tags align with your changing workflow and priorities.
8. Use Tags Collaboratively: Tags can also be utilized in a collaborative setting, allowing team members to assign tags and track the progress of shared tasks. This collaborative use of tags fosters effective communication, accountability, and transparency within a team project or workflow.
By utilizing OneNote tags for task management, you can enhance organization, visibility, and efficiency in your workflow. They provide a visual and customizable system for categorizing, tracking, and filtering tasks, ensuring that you stay on top of your task list and effectively manage your workload.
Syncing OneNote with Outlook for Task Management
OneNote seamlessly integrates with Outlook, allowing you to sync your tasks between the two applications. This integration provides a unified platform for task management and enhances productivity. Here’s how you can leverage the syncing feature to manage your tasks effectively:
1. Syncing Tasks from OneNote to Outlook: With just a few clicks, you can sync your tasks from OneNote to Outlook. This ensures that all your tasks are centralized in one location, making it easier to track and manage them. Any changes made to tasks in OneNote will automatically update in Outlook.
2. Assigning Due Dates and Reminders: When syncing tasks from OneNote to Outlook, you can assign due dates and set reminders directly in Outlook. This feature helps you stay organized and ensures that you never miss an important task or deadline. Any changes to due dates or reminders in OneNote will be reflected in Outlook as well.
3. Creating Tasks from OneNote Notes: With OneNote’s integration with Outlook, you can easily convert notes into tasks. If you have a note that needs action, simply convert it into a task and assign it a due date or reminder. This integration streamlines the process of turning ideas or action points from your notes into actionable tasks.
4. Linking Tasks to OneNote Notes: In addition to creating tasks from your notes, you can also link tasks in Outlook to specific notes in OneNote. This linking feature allows you to provide additional context or details within your notes while keeping track of the associated task in Outlook. This connection between tasks and notes promotes better organization and easy access to relevant information.
5. Syncing Completed Tasks: When you mark a task as complete in Outlook, the completion status is synced back to OneNote. This ensures that your task lists in both applications remain up to date. By syncing completed tasks, you can maintain accurate records of your progress and easily track your accomplishments.
6. Accessing Tasks Across Devices: OneNote and Outlook are available on various devices and platforms. This means you can access your tasks from your computer, smartphone, or tablet, keeping your task management synchronized and readily accessible wherever you are. The sync feature ensures that your tasks are consistently updated across all devices.
7. Collaborating on Tasks: The seamless integration between OneNote and Outlook allows for easy collaboration on tasks. You can assign tasks to team members, track their progress, and receive updates on task status. This collaboration feature enhances teamwork and improves project management efficiency.
8. Maximizing Productivity: By syncing OneNote with Outlook, you streamline your workflow and maximize your productivity. You can leverage the rich features of both applications to effectively manage and track your tasks, ensuring you stay organized and meet your goals.
By harnessing the power of OneNote’s integration with Outlook, you can simplify your task management process, stay on top of your tasks, and enhance your productivity and efficiency.
Using OneNote as a Notepad
OneNote is not just a powerful task manager but also a versatile notepad that allows you to capture and organize your thoughts, ideas, and notes. Here are some ways you can effectively utilize OneNote as a notepad:
1. Creating and Organizing Notes: OneNote provides a blank canvas where you can create and organize your notes. You can have separate notebooks for different topics, projects, or purposes. Within each notebook, you can create sections and pages to further categorize and structure your notes.
2. Formatting and Customizing Notes: OneNote offers a wide range of formatting options to enhance the appearance and readability of your notes. You can change font styles, colors, and sizes, add headings, highlight text, and include bullets or numbered lists. Customizing your notes makes them visually appealing and easier to navigate.
3. Using OneNote Search and Quick Notes: OneNote has a powerful search function that allows you to quickly find specific notes or information within your notepad. You can search by keywords, tags, or even handwritten text. Additionally, the Quick Notes feature allows you to quickly jot down ideas or snippets of information without opening a specific notebook or page.
4. Adding Media and Annotations: OneNote supports various forms of media, including images, audio recordings, and even drawings. You can insert images to illustrate your notes, record lectures or meetings for reference, and sketch or annotate directly on your notes. These features add depth and visual context to your notepad.
5. Utilizing OneNote Templates: OneNote provides a collection of pre-designed templates that you can use as a starting point for your notes. Whether you’re taking meeting minutes, planning a trip, or organizing research, templates can save time and ensure consistency. You can also create your own custom templates based on your specific note-taking needs.
6. Syncing Notes Across Devices: OneNote synchronizes your notes across all your devices, allowing you to access and update them wherever you are. You can seamlessly switch between your computer, tablet, or smartphone while maintaining the same information and organization within your notes.
7. Sharing and Collaborating: OneNote makes it easy to share your notes with others, whether it’s coworkers, classmates, or friends. You can invite others to view, edit, or comment on your notes, facilitating collaboration and information sharing. This collaborative aspect makes OneNote a useful tool for group projects or brainstorming sessions.
8. Maintaining a Digital Archive: OneNote can serve as a digital archive for all your notes and information. You can store important documents, receipts, or articles, creating an easily searchable and accessible repository. This eliminates the need for physical notepads and allows you to declutter your workspace.
By making the most of OneNote’s features and functionalities, you can transform it into a versatile and personalized notepad. Whether you’re taking meeting minutes, organizing research, or jotting down ideas, OneNote provides a flexible and intuitive platform for capturing and organizing your notes effectively.
Creating and Organizing Notes in OneNote
OneNote offers a robust platform for creating and organizing your notes. Whether you’re taking meeting minutes, jotting down ideas, or organizing research, here are some key steps to effectively create and organize your notes in OneNote:
1. Create Notebooks for Different Topics: Start by creating separate notebooks in OneNote for different topics, projects, or purposes. This helps to keep your notes organized and easily accessible. You can create a notebook for work-related notes, personal notes, or specific subjects or courses.
2. Use Sections and Pages: Within each notebook, create sections to further categorize your notes. For example, you might have sections for different aspects of a project or categories such as “Ideas,” “Meeting Notes,” or “Research.” Within each section, create individual pages for specific topics or subcategories to keep your notes organized and easy to navigate.
3. Utilize Headings and Subheadings: Use headings and subheadings within each page to create a clear hierarchy and structure within your notes. This helps to organize and segment information, making it easier to find and review specific sections. Headings also provide a quick overview of the content of your notes.
4. Leverage Bullets and Numbered Lists: Bullets and numbered lists are useful tools for arranging and structuring information within your notes. Use bullets for unordered lists or to capture key points, and numbered lists for sequential or hierarchical information. This visual organization enhances readability and makes it easier to follow your notes.
5. Format and Customize Your Notes: OneNote offers various formatting options to make your notes visually appealing and organized. Customize the font style, color, and size to highlight important information. Utilize text formatting options such as bold, italic, or underline to draw attention to specific content within your notes.
6. Add Hyperlinks and References: OneNote allows you to add hyperlinks within your notes to reference external information or related documents. This enables you to easily access additional resources or provide context to your notes. Hyperlinks can be inserted to websites, documents, or specific sections of other notes within OneNote.
7. Attach Files and Images: In OneNote, you can attach files and images to your notes to provide visual context or reference supporting documents. This allows you to consolidate all relevant information in one place, eliminating the need to switch between different applications or folders.
8. Take Advantage of Note Tags: OneNote provides a variety of note tags that you can apply to highlight important points or mark tasks within your notes. Use tags such as “Important,” “To Do,” or “Question” to categorize and easily locate specific information. Note tags help you quickly identify key details within your notes.
9. Search Functionality: OneNote’s powerful search functionality enables you to quickly find specific notes or information within your notebooks. Use keywords, phrases, or even handwriting recognition to locate notes, saving you time and effort in searching through your notebooks manually.
10. Regularly Review and Organize: Regularly review and organize your notes in OneNote to maintain an efficient and well-structured system. Remove or archive outdated or irrelevant notes, merge similar notes, and update headings or tags as necessary. This ensures that your notes remain organized and easily accessible.
By following these guidelines, you can create and organize your notes effectively in OneNote. Whether you’re managing work-related information or capturing personal ideas and thoughts, OneNote provides a versatile and user-friendly platform for creating, organizing, and accessing your notes with ease.
Formatting and Customizing Notes in OneNote
OneNote provides a wide range of formatting options that allow you to customize and visually enhance your notes. From font styles to highlighting, here are some tips on how to format and customize your notes in OneNote:
1. Font Styles and Sizes: OneNote lets you choose from various font styles and sizes to suit your preferences and improve readability. Experiment with different fonts to find one that matches your style and makes your notes easy to scan and understand.
2. Text Formatting: Use text formatting options such as bold, italic, and underline to emphasize essential information in your notes. Apply these formatting styles to titles, headings, or key points to make them stand out and draw the reader’s attention.
3. Bullets and Numbered Lists: Organize your thoughts and ideas using bullets or numbered lists. These formatting options help create structure and hierarchy within your notes, making it easier to follow along and grasp the key points.
4. Highlighting: OneNote allows you to highlight text using different colors. This feature is particularly useful for emphasizing important passages or key information. Highlighting draws attention to specific details and makes them easily recognizable.
5. Tables and Columns: If you need to present data or organize information in a structured way, use tables or columns in OneNote. These formatting options help you create neat and organized tables, making it easier to compare and analyze information.
6. Inserting Images and Files: Enhance your notes by inserting images or attaching files. OneNote supports various image formats, allowing you to include visual aids or reference materials within your notes. Additionally, attaching files ensures that all relevant information is conveniently stored in one place.
7. Handwriting and Drawing: With touchscreen-enabled devices or stylus support, OneNote allows you to write or draw directly on your notes. This feature is particularly useful for sketching diagrams, jotting down quick ideas, or adding annotations to images.
8. Audio and Video Recording: OneNote enables you to record audio or video directly into your notes. This feature is beneficial for capturing meetings, lectures, or seminars. By integrating multimedia elements, you can supplement your notes with audio or visual content to enhance comprehension and retention.
9. Page Templates: OneNote offers a range of page templates that you can use to structure your notes. Whether it’s meeting minutes, project plans, or brainstorming sessions, these templates provide a consistent layout and formatting style that saves time and ensures consistency.
10. Custom Styles and Templates: OneNote facilitates the creation of custom styles to suit your specific note-taking needs. You can define your preferred font style, size, color scheme, and other formatting options. Utilizing custom styles ensures that your notes are formatted consistently and helps you save time when creating new notes.
By leveraging OneNote’s formatting and customization options, you can create visually appealing and organized notes. Whether you’re highlighting key points, inserting multimedia elements, or structuring your information, these features provide flexibility and enhance your note-taking experience in OneNote.
Using OneNote Search and Quick Notes for Note Taking
OneNote offers powerful search functionality and a convenient Quick Notes feature that significantly enhance the note-taking experience. Here’s how you can make the most of OneNote’s search and Quick Notes for efficient note-taking:
1. OneNote Search: OneNote’s search feature allows you to quickly find specific notes or information within your notebooks. You can search by keywords, phrases, tags, or even handwritten text. OneNote’s search capability saves you valuable time by eliminating the need to manually skim through numerous notes to locate information.
2. Search Across Notebooks: OneNote’s search is not limited to individual notebooks. It enables you to search across all your notebooks, allowing for a comprehensive and unified search experience. This can be especially useful when you need to locate information or find connections between notes from different notebooks.
3. Search by Tags: OneNote’s search function allows you to search specifically for notes or sections with certain tags. By applying tags to your notes, such as “Important,” “To Do,” or “Meeting,” you can quickly filter and find relevant information. This feature helps you prioritize and focus on specific subsets of notes based on their tags.
4. Handwriting Recognition: OneNote’s search extends to handwritten text as well. If you have handwritten notes or annotations within your notebooks, OneNote’s handwriting recognition technology can interpret and search for specific words or phrases within your handwritten notes. This capability makes handwritten notes just as searchable as typed text.
5. Quick Notes: OneNote’s Quick Notes feature allows you to jot down ideas or snippets of information without opening a specific notebook or page. You can quickly access the Quick Notes section from anywhere within OneNote or through a designated keyboard shortcut. Quick Notes provide a convenient way to capture fleeting thoughts or information without interrupting your workflow.
6. Seamless Integration: When you save a note in the Quick Notes section, it is automatically synchronized and saved within your chosen notebook. This ensures that your Quick Notes are securely stored and easily accessible alongside your other notes. The seamless integration between Quick Notes and your notebooks allows for efficient organization of spontaneous thoughts.
7. Linking Quick Notes: You can create links from Quick Notes to other relevant notes, sections, or even external sources. This linking capability allows you to connect your Quick Notes with related information and provide additional context or references. It helps create a network of interconnected notes for a more comprehensive understanding of your ideas and thoughts.
8. Reviewing and Refining Quick Notes: Periodically review your Quick Notes section to process and refine your captured ideas. As you find more time, you can expand on your Quick Notes, organize them into relevant notebooks or sections, and add more structure to your initially spontaneous ideas.
Utilizing OneNote’s search functionality and Quick Notes feature helps streamline your note-taking process and ensures that your ideas are captured, organized, and easily accessible. By making the most of these features, you can retrieve information quickly, connect related thoughts, and maintain a productive note-taking workflow.
Using OneNote as a Journal
OneNote serves as a versatile platform for journaling, allowing you to chronicle your thoughts, experiences, and reflections in a digital format. Here’s how you can effectively use OneNote as a journal:
1. Creating Journal Entries: Start by creating a dedicated notebook or section within your existing notebook for your journal. Each entry can be a separate page, capturing your thoughts and experiences on specific dates or events.
2. Organizing and Categorizing Journal Entries: Use sections or pages within your journal notebook to categorize your entries based on topics, themes, or timeframes. You can create sections for personal, professional, or specific areas of interest. This organization helps you navigate and find specific entries easily.
3. Adding Media and Annotations: OneNote allows you to enrich your journal entries by integrating images, audio recordings, or drawings. You can insert photos to visually document experiences, record audio to capture memories, or sketch directly on your entries to add a personal touch.
4. Formatting and Customizing Journal Entries: OneNote provides formatting options to customize the appearance of your entries. You can experiment with fonts, colors, and text styles to suit your personal preferences and make your journal reflect your individual style.
5. Using OneNote Search for Easy Retrieval: The search function in OneNote enables quick retrieval of specific journal entries or information within entries. You can search by keywords, phrases, or dates to locate specific memories or experiences. This feature eliminates the need to flip through pages, making your journal accessible and easily searchable.
6. Reflecting and Evaluating: OneNote’s journal feature allows you to reflect on your experiences and evaluate your personal growth over time. Explore your entries to gain insights, discover patterns, or track progress in different areas of your life. This reflective aspect helps you gain a deeper understanding of your own journey.
7. Privacy and Security: OneNote provides the option to password-protect or encrypt your journal entries. This ensures the privacy and security of your personal thoughts and experiences. You can write freely, knowing that your journal is secure and accessible only to you.
8. Syncing and Accessibility: OneNote syncs across devices, allowing for seamless access to your journal entries wherever you go. Whether you’re on your computer, tablet, or smartphone, your journal is always with you, facilitating journaling on the go and ensuring that you never miss capturing important moments.
9. Sharing and Collaboration: If desired, you can share specific journal entries or your entire journal with trusted individuals. This collaborative feature can be particularly useful for shared experiences or creating a collective journal with friends or family members.
OneNote’s versatility and features enable you to create and maintain a detailed digital journal that captures your unique experiences, thoughts, and reflections. By utilizing the various tools and capabilities of OneNote, you can create a personal chronicle that serves as a valuable resource for self-reflection and personal growth.
Creating Journal Entries in OneNote
OneNote provides a user-friendly platform for creating journal entries, allowing you to document your thoughts, experiences, and reflections in a digital format. Here’s how you can effectively create journal entries in OneNote:
1. Create a Dedicated Journal Notebook: Start by creating a separate notebook in OneNote specifically for your journal. Name it appropriately, reflecting the purpose of your journal. Having a dedicated notebook helps keep your journal entries organized and easily accessible.
2. Decide on Entry Frequency: Determine the frequency at which you want to make journal entries, whether it’s daily, weekly, or at significant milestones or events. Consistency is key, but adjust the frequency to what suits your lifestyle and preferences.
3. Date Your Entries: Begin each journal entry by dating it. This helps provide context and chronology to your journal, making it easier to navigate and review your entries later. OneNote allows you to add the date manually or automatically insert it using templates or shortcuts.
4. Capture Thoughts and Experiences: Take the time to reflect on your day, experiences, or events, and articulate your thoughts and emotions. Write freely and honestly, allowing your journal to become a personal narrative of your life.
5. Add Details: Provide specific details about the events or experiences you are writing about. Include people, places, conversations, and any noteworthy observations. The more specific and detailed your entries, the richer your journal becomes.
6. Utilize Formatting Options: OneNote offers various formatting options to enhance your journal entries. Experiment with fonts, colors, and text styles to make your entries visually appealing and reflective of your personal style. You can also use formatting to highlight key points or add emphasis to certain sections of your entries.
7. Include Media: Enhance your journal entries by incorporating media such as images, audio recordings, or sketches. OneNote allows you to insert photos to illustrate your experiences or add audio clips to capture the sounds of a specific moment. Adding multimedia elements adds depth and dimension to your journal entries.
8. Reflect and Evaluate: After writing each journal entry, take a moment to reflect on the thoughts and experiences you’ve documented. Consider the lessons learned, personal growth, and areas for improvement. Use your journal as a tool for self-reflection and evaluation.
9. Be Authentic: Your journal is a space for your authentic self. Embrace vulnerability and write openly about your emotions, challenges, and triumphs. Be true to yourself and use your journal as a safe space to express your thoughts and feelings without judgment.
10. Regularly Review and Revisit: Set aside time to review and revisit your journal entries. This practice allows you to gain insights, discover patterns, and reflect on your journey over time. It reinforces your personal growth and reminds you of past experiences and lessons learned.
By following these steps, you can create meaningful and engaging journal entries in OneNote. Cultivate the habit of regular journaling and let OneNote be a trusted companion to capture and reflect upon your life’s journey.
Organizing and Categorizing Journal Entries in OneNote
OneNote provides a range of features that allow you to effectively organize and categorize your journal entries. By structuring your journal in a logical and meaningful way, you can navigate through your entries and find specific moments with ease. Here’s how you can organize and categorize your journal entries in OneNote:
1. Create Sections: Divide your journal notebook into sections based on different themes, categories, or time periods. For example, you may have sections for personal reflections, professional growth, or specific areas of interest. This division helps maintain a clear and organized structure within your journal.
2. Use Pages for Entries: Within each section, create individual pages to represent each journal entry. Give each page a descriptive title that corresponds to the content or date of the entry. Creating separate pages allows you to easily access and review specific moments or experiences within your journal.
3. Tagging: OneNote offers a tagging feature that allows you to add tags to your journal entries. Create custom tags or use predefined tags to categorize entries based on themes, emotions, or significant events. Using tags provides a quick visual reference, making it easier to navigate and filter entries within your journal notebook.
4. Date Your Entries: Include the date in each journal entry to maintain a clear chronology. Depending on your preference, you can add the date manually or use OneNote’s date stamp feature. Dating your entries helps you track your progress, review past experiences, and easily locate specific moments within your journal.
5. Headings and Subheadings: Use headings and subheadings to further categorize and structure your journal entries. It allows you to group related entries together or highlight specific topics within a section. Headings make it easier to skim through your journal and quickly locate entries related to a specific subject.
6. Create Tables of Contents: Establish a table of contents at the beginning of each section or notebook to provide an overview of the contents within. List the titles or keywords of significant entries along with their corresponding page numbers. This organizational tool helps you quickly navigate through your journal and find specific entries.
7. Cross-Link Entries: OneNote enables you to create hyperlinks between related entries or sections within your journal. By cross-linking entries, you can establish connections or references between moments, experiences, or relevant insights. This fosters a more holistic view of your journal and allows you to follow thematic or narrative threads.
8. Revisit and Reorganize: Regularly review and assess your journal entries. As time goes on, reevaluate the organization and structure of your journal. You may find the need to reorganize or create new sections to accommodate the growth and evolution of your journal over time.
By employing these organizational techniques in OneNote, you can maintain a clear structure and easily navigate through your journal entries. The ability to categorize, tag, and cross-link entries empowers you to create a personalized and meaningful journaling experience.
Adding Media and Annotations to Journal Entries in OneNote
OneNote provides a wide array of features that allow you to personalize and enhance your journal entries with media and annotations. By incorporating multimedia elements, you can create a visually appealing and immersive journaling experience. Here’s how you can add media and annotations to your journal entries in OneNote:
1. Insert Images: OneNote allows you to insert images directly into your journal entries. You can capture photos from your device’s camera, import images from your gallery, or drag and drop images from other sources. Adding visuals can help bring your moments to life and provide a visual reference for your journaling experience.
2. Attach Files: If you have digital files related to your journal entries, such as documents, spreadsheets, or audio recordings, you can attach them to your entries within OneNote. This allows you to keep all relevant information in one place, providing a comprehensive view of your experiences.
3. Embed Videos: OneNote supports embedding videos, allowing you to add multimedia content from platforms such as YouTube or Vimeo directly into your journal entries. Whether it’s a video of a special moment or an inspirational clip, embedding videos provides an immersive element to your journaling experience.
4. Record Audio: OneNote enables you to record audio directly into your journal entries. You can capture ambient sounds, voices, or personal reflections as audio recordings. Recording audio can help capture the emotions and ambiance associated with specific memories or experiences.
5. Make Handwritten Annotations: Utilize OneNote’s digital inking capabilities to add handwritten annotations or sketches to your journal entries. If you have a stylus or touchscreen device, you can write or draw directly on your entries, providing a personal and expressive touch to your journal.
6. Highlight and Markup Text: OneNote allows you to highlight, underline, or strikethrough text within your journal entries. This feature enables you to emphasize specific words or phrases, draw attention to important details, or provide additional context to your written thoughts.
7. Add Custom Shapes and Graphs: OneNote provides a variety of shapes and drawing tools, allowing you to create custom diagrams, charts, or graphs within your journal entries. This feature is useful for visualizing data or illustrating concepts, enhancing the clarity of your journaling experience.
8. Use Tags and Note Flags: OneNote’s tagging and note flagging feature allows you to categorize and mark specific sections or elements within your journal entries. You can assign tags like “To Do,” “Important,” or “Inspiring” to specific media or annotations, providing an additional layer of organization and filtering options.
By taking advantage of these media and annotation features in OneNote, you can create dynamic and visually engaging journal entries. Whether it’s incorporating images, recording voice memos, or adding handwritten annotations, OneNote provides the tools to enhance your journaling experience and make it more personal and expressive.
Using OneNote Templates for Journaling
OneNote offers a variety of templates that can be utilized for journaling, providing structure and guidance for your journal entries. Whether you prefer a structured daily journal, a gratitude journal, or a reflective journal, OneNote templates can help jumpstart your journaling practice. Here’s how you can use OneNote templates for journaling:
1. Browse Available Templates: OneNote provides a collection of pre-designed templates that cover a range of journaling styles and themes. Browse through the available templates to find the one that best suits your journaling needs and preferences.
2. Select a Template: Once you’ve found a template that resonates with your journaling style, select it and create a new journaling notebook based on the chosen template. Give your notebook a descriptive name that reflects the purpose or focus of your journaling practice.
3. Customize the Template: OneNote templates are customizable, allowing you to tailor them to your specific preferences. Modify the sections, headers, or prompts within the template to align with your journaling goals and intentions. Make adjustments that will complement your unique writing and reflection style.
4. Personalize with Colors and Fonts: OneNote allows you to personalize templates by changing font styles, colors, and even adding images or background colors. Reflect your personality and create a visually appealing environment that resonates with your journaling experience.
5. Start Writing: Once your journaling template is customized, start writing your journal entries. Follow the prompts within the template or simply use the structure provided as a guide. Leverage the template as a starting point to express your thoughts, experiences, and reflections.
6. Experiment with Different Templates: OneNote offers a variety of journaling templates, so don’t be afraid to explore and experiment with different styles. Try different templates to see what works best for you. You may find that certain templates inspire you more or help you organize your thoughts in a way that resonates with your journaling practice.
7. Create Your Own Custom Journal Template: If the available templates don’t entirely align with your journaling style, consider creating your own custom journal template. Build a customized structure, prompts, or headers that specifically cater to your writing preferences and personal goals. This allows for a truly personalized and tailored journaling experience.
8. Regularly Review and Update: As you continue your journaling practice, regularly review and update your template as necessary. Adjust the structure, prompts, or headers to accommodate any changes or shifts in your journaling needs. Continuously refining your template ensures that it remains a relevant and valuable tool in your journaling journey.
By utilizing OneNote templates, you can jumpstart your journaling practice and benefit from the structure and guidance they provide. Experiment with different templates, personalize them to fit your preferences, and continuously adapt them as you grow and develop your journaling practice.