
Step 1: Accessing Google Reverse Image Search
Google Reverse Image Search is a powerful tool that allows you to find the original source of an image or discover similar images online. With just a few simple steps, you can access this feature and unlock a world of possibilities. Here’s how to get started:
1. Open your web browser and navigate to the Google homepage.
2. Click on the “Images” tab at the top of the page. This will take you to the Google Images search engine.
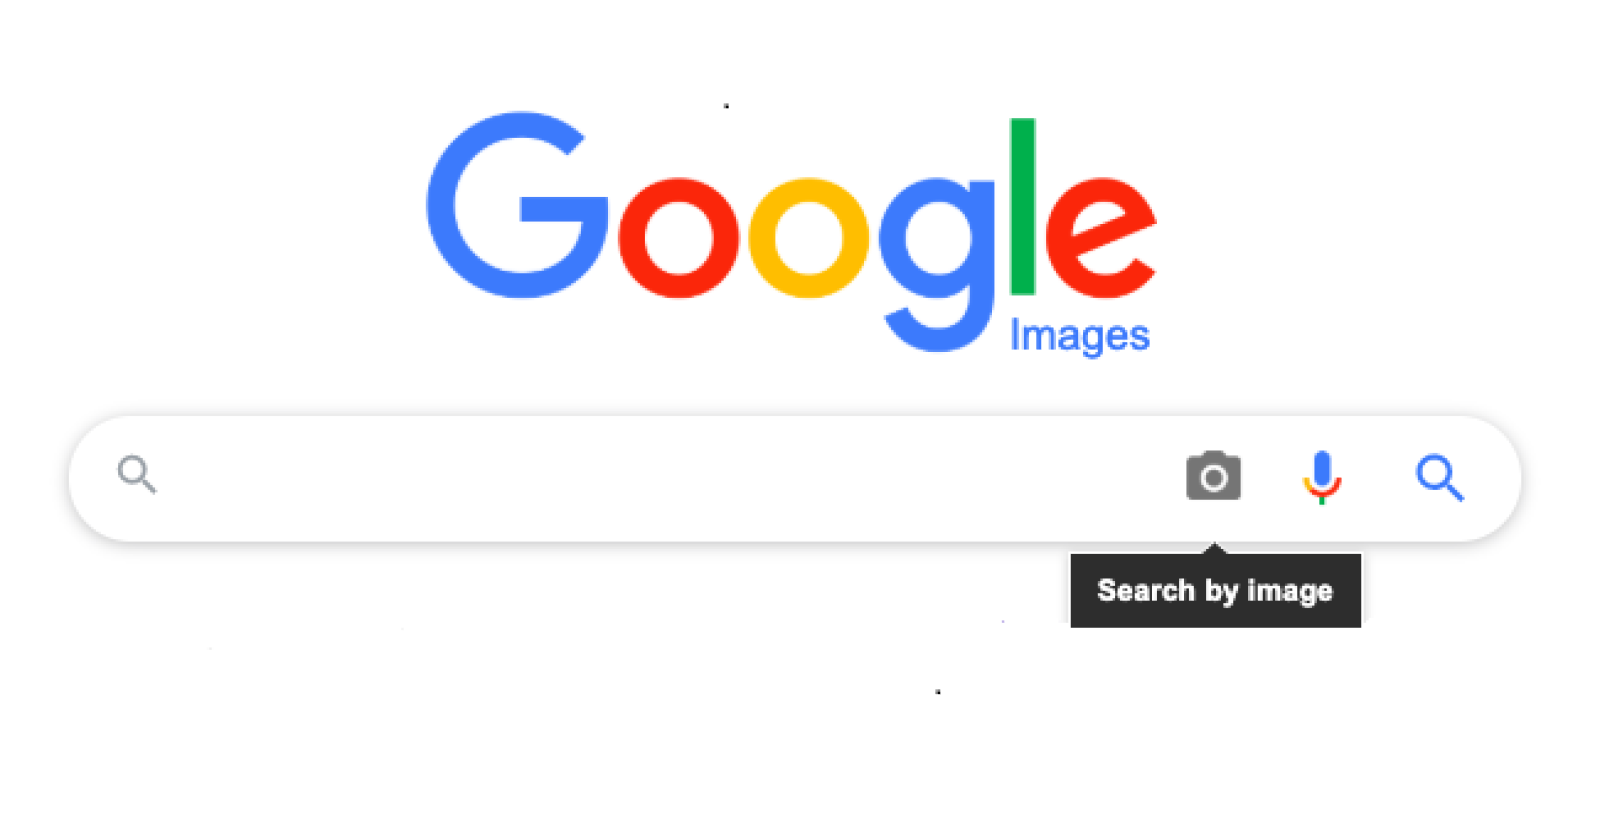
3. To access the Reverse Image Search feature, click on the camera icon located in the search bar. This will allow you to upload an image or provide a URL for an image you want to search.
4. Alternatively, you can search for an image using keywords by entering relevant search terms in the search bar and clicking the “Search by image” button.
5. Once you have clicked on the camera icon or entered your search terms, you will be directed to the Reverse Image Search page. Here, you can either upload an image from your device or paste the URL of an image.
6. To upload an image, click on the “Upload an image” tab and choose the image file from your computer. This will immediately initiate the search process.
7. If you want to search by URL, click on the “Paste image URL” tab and paste the URL of the image you want to search. Once you have entered the URL, click on the “Search by image” button to proceed.
8. After initiating the search, Google will analyze the image and provide you with results that match or are visually similar to the image you uploaded. The search results may include websites featuring the image, similar images, and other relevant information.
Now that you know how to access Google Reverse Image Search, you can leverage this tool to find the original source of an image, identify fake or altered images, discover visually similar images for design inspiration, and even track the usage of your own images online. As you explore the world of reverse image searching, you’ll be amazed at the possibilities it offers.
Step 2: Uploading an Image
Uploading an image to Google Reverse Image Search is a straightforward process that allows you to find similar images and gather information about the image you are searching for. Follow these steps to upload an image:
1. Access Google Reverse Image Search by following the instructions mentioned in Step 1.
2. Once you are on the Reverse Image Search page, click on the camera icon located in the search bar. This will open the image upload options.
3. Click on the “Upload an image” tab. You will then have the option to browse and select an image from your computer.
4. Choose the image file you want to upload by clicking the “Choose File” button or by dragging the image file into the designated area.
5. Once you have selected the image file, click on the “Open” button.
6. The image will now be uploaded to the Reverse Image Search tool. Google will analyze the image and generate search results based on the visual similarities it identifies.
7. After the analysis is complete, you will be presented with a page displaying search results related to the uploaded image.
It’s important to note that Google Reverse Image Search works best with high-quality images. Images with clear details and a high resolution tend to yield more accurate and relevant search results.
This feature can be particularly useful for a variety of purposes. For example, you can use it to search for the original source of an image you found online, locate visually similar images to find more information or inspiration, and even verify the authenticity of an image to spot potential fakes or altered versions circulating on the internet.
Whether you are conducting research, verifying the credibility of an image, or simply satisfying your curiosity, uploading an image to Google Reverse Image Search is a powerful tool that opens up a wealth of possibilities.
Step 3: Searching by URL
Searching by URL is another convenient way to use Google Reverse Image Search. This method allows you to find images related to a specific URL, whether it’s an image on a website or a social media post. Follow these steps to search by URL:
1. Access Google Reverse Image Search by following the instructions mentioned in Step 1.
2. Once you are on the Reverse Image Search page, click on the camera icon located in the search bar. This will open the image upload options.
3. Click on the “Paste image URL” tab. This will activate the URL search feature.
4. Copy the URL of the image you want to search. This could be the URL of a website or the specific image location on the internet.
5. Paste the copied URL into the designated field by either right-clicking and selecting “Paste” or using the keyboard shortcut Ctrl+V (Windows) or Command+V (Mac).
6. After you have pasted the URL, click on the “Search by image” button. Google will then process the URL and generate search results based on the image associated with that URL.
7. Once the search results are displayed, you can explore the visually similar images, related websites, and any other relevant information that shows up.
Searching by URL can be especially useful when you want to find more images from a particular website or when you come across an interesting image on social media and want to learn more about its origin. It allows you to quickly find other versions of the image or websites that feature it.
Keep in mind that not all images on the internet will have associated URLs that can be searched using this method. Some images may only appear in specific social media posts or may not be linked to a specific webpage. In such cases, alternative methods like uploading the image directly will still be necessary to initiate a search.
By utilizing the URL search feature of Google Reverse Image Search, you can save time and easily discover more images and information related to a specific URL or image location.
Step 4: Searching by Drag and Drop
Searching by drag and drop is a convenient feature of Google Reverse Image Search that allows you to find similar images without the need to upload or enter URLs manually. This method is particularly useful when you have an image saved on your computer and want to initiate a search quickly. Follow these steps to search by drag and drop:
1. Access Google Reverse Image Search by following the instructions mentioned in Step 1.
2. Once you are on the Reverse Image Search page, open the folder where the image you want to search is located.
3. Click and hold the image file you want to search.
4. Drag the image file from its saved location and drop it onto the designated area in the Reverse Image Search page.
5. After you have dropped the image, Google will start analyzing the image and generating search results based on its visual characteristics.
6. Once the analysis is complete, you will be presented with search results that include visually similar images, related websites, and additional information that may be relevant to the image.
Searching by drag and drop is a great option for those who prefer a more intuitive and effortless method of initiating a reverse image search. It eliminates the need to manually browse through the files on your computer or input URLs, making the process quick and convenient.
Additionally, searching by drag and drop allows you to easily compare an image with visually similar ones, discover more images related to a specific theme or topic, and gain insights into the context and usage of a particular image across the web.
It’s important to note that the success and accuracy of the search results may vary depending on the image and its visual distinctiveness. Images with unique features are more likely to yield more accurate and relevant search results compared to generic or heavily edited images.
By utilizing the drag and drop feature of Google Reverse Image Search, you can effortlessly find similar images and uncover valuable information related to the image you are searching, all with just a few simple actions.
Step 5: Navigating the Search Results
Once you have conducted a search using Google Reverse Image Search, it’s time to navigate the search results and explore the wealth of information and images that are presented to you. Here’s how to effectively navigate the search results:
1. After you have uploaded an image or entered a URL, Google will generate a page of search results based on the image or URL you provided.
2. The search results page will feature visually similar images, related websites, and any other relevant information associated with the image.
3. Start by closely examining the visually similar images presented at the top of the search results. These images share visual similarities with the original image and may provide alternative versions or variations of the image you are interested in.
4. Scroll down to explore the related websites that appear in the search results. These websites may feature the original source of the image, provide additional context or information about the image, or demonstrate the usage of the image across different online platforms.
5. Click on the search results that interest you to open them in a new tab or window for further exploration. This will allow you to delve deeper into the information and context surrounding the image.
6. Take note of any additional details, captions, or metadata provided alongside the search results. This information can offer valuable insights into the image’s origin, context, or usage.
7. Keep in mind that not all search results may be directly related to the image you are searching. Some results may appear due to similar elements, keywords, or contextual relevance. Evaluate the results critically to find the most accurate and informative sources.
By effectively navigating the search results, you can discover a wealth of information about the image, including its original source, related websites, and other variations or uses of the image online. This allows you to gain a deeper understanding of the image, its context, and its usage across different platforms.
Remember to evaluate the credibility and reliability of the sources as you explore the search results. This will help you ensure the accuracy and legitimacy of the information you gather.
Take your time to explore the search results thoroughly, as they can offer valuable insights and uncover hidden details about the image you are searching.
Step 6: Filtering the Search Results
When using Google Reverse Image Search, you have the option to filter and refine the search results to find more specific or relevant information. Filtering the search results can help you narrow down your search and focus on the most relevant images and websites. Here’s how you can effectively filter the search results:
1. After you have conducted a reverse image search and the search results are displayed, look for the filtering options provided by Google. These options are usually located on the left-hand side of the search results page.
2. The available filtering options may include options such as size, color, type, time, and usage rights. By selecting these options, you can customize the search results based on your specific preferences and requirements.
3. Start by filtering the search results by size. This allows you to specify the dimensions of the image you are looking for, ensuring that the search results align with your desired image specifications.
4. If you have a specific color preference in mind, you can also filter the search results by color. This is particularly useful if you are searching for images that match your branding, design, or aesthetic requirements.
5. Consider filtering the search results by type. This allows you to focus on specific image types such as photos, illustrations, clip art, line drawings, or animated GIFs, depending on your specific needs.
6. If timeliness is important to you, filter the search results by time to view the most recent images related to your search. This is particularly useful when you are looking for up-to-date and current information.
7. Lastly, pay attention to the usage rights filter. This allows you to find images that are licensed for reuse, which can be valuable if you are planning to use the image for commercial purposes or online content creation.
By filtering the search results, you can refine your search and find images that meet your specific requirements. This saves you time and ensures that you are presented with relevant images and information that align with your needs.
Experiment with different filters to explore various perspectives, styles, and visual representations of the image you searched for. This allows you to discover new insights, perspectives, and variations of the image that may be valuable for your specific project or research.
Remember that not all filtering options may be available for every search, as it depends on the metadata associated with the images in the search results. Nevertheless, by using the available filters effectively, you can enhance your search experience and find the most relevant and suitable images for your needs.
Step 7: Searching by Image on Mobile Devices
Google Reverse Image Search can also be easily accessed and utilized on mobile devices, allowing you to perform image searches on the go. Here’s how to search by image on mobile:
1. Open your preferred web browser on your mobile device and navigate to the Google homepage.
2. Tap on the menu icon (usually represented as three horizontal lines) to open the browser’s menu.
3. From the menu, select “Images” to access the Google Images search engine.
4. Look for the camera icon within the search bar at the top of the page. Tap on it to access the Reverse Image Search feature.
5. On the Reverse Image Search page, you will have the option to either upload an image or enter a URL.
6. To upload an image from your mobile device, tap on the “Upload an image” tab and choose an image from your device’s gallery or file manager. This will initiate the search process.
7. If you prefer to search by URL, tap on the “Paste image URL” tab and paste the URL of the image you want to search. Tap on the “Search by image” button to proceed.
8. After initiating the search, the search results will be displayed on your mobile device. You can navigate through them by swiping up or down on the screen.
9. Tap on any search result to view more information, visit the source website, or explore visually similar images.
Searching by image on mobile devices offers the flexibility to perform reverse image searches wherever you are. It allows you to quickly find the original source of an image, discover visually similar images, and gather more information about the image you are interested in.
While conducting the search on a smaller screen, keep in mind that the options and features may be slightly different compared to the desktop version. However, the core functionality of Reverse Image Search remains the same, providing you with valuable search results and insights.
Whether you are using a smartphone or a tablet, accessing and using Google Reverse Image Search on mobile devices is a convenient way to explore the vast world of image searching, all from the palm of your hand.
Step 8: Using Reverse Image Search for Social Media
Google Reverse Image Search can be a valuable tool for conducting searches on social media platforms, allowing you to gather more information about images and track their usage across different social media networks. Here’s how to use Reverse Image Search for social media:
1. Begin by accessing Google Reverse Image Search as explained in Step 1.
2. Once you are on the Reverse Image Search page, you will have the option to upload an image or provide a URL.
3. To search for an image on social media, you will need to download the image first. On the social media platform where the image is located, find the image you want to search and save it to your device. You can usually do this by right-clicking on the image and selecting “Save Image As.”
4. After you have downloaded the image, return to the Reverse Image Search page and click on the “Upload an image” tab. Choose the downloaded image file from your device’s storage to initiate the search.
5. Alternatively, if the image on social media has a unique URL, you can paste that URL into the “Paste image URL” tab in the Reverse Image Search page. This will enable you to search for the specific image across social media platforms.
6. After initiating the search, Google will analyze the image and generate search results based on its visual characteristics. These results may include instances where the image has been shared or used on social media.
7. Explore the search results to find various instances of the image on different social media platforms. Click on the search results to view the specific posts or pages where the image is being used.
Searching for images on social media using Reverse Image Search can be helpful in a variety of scenarios. For example, if you come across an intriguing image on social media and want to learn more about its origin or verify its authenticity, Reverse Image Search can provide you with valuable insights.
Additionally, Reverse Image Search can be a useful tool for content creators and marketers, as it allows you to track the usage and distribution of your own images across various social media platforms. This can help you identify instances where your images are being shared without proper attribution or permission.
By leveraging Google Reverse Image Search for social media, you can dive deeper into the world of social media images and gain a better understanding of their origins, uses, and impact on various platforms.
Step 9: Exploring the Options and Settings
Google Reverse Image Search offers various options and settings that you can explore and customize to enhance your search experience. These options and settings allow you to refine your searches, filter results, and access additional features. Here’s how to make the most of the options and settings:
1. Access Google Reverse Image Search as explained in Step 1.
2. Once you are on the Reverse Image Search page, you will notice several icons and options that can enhance your search.
3. Click on the gear icon or “Settings” link to access the options and settings menu.
4. Here, you can customize various aspects of your search. For example, you can adjust the SafeSearch filter to filter out explicit content from the search results or disable it altogether if desired.
5. Explore the “Region” option to customize search results based on your preferred geographical location. This feature can be especially helpful if you are interested in finding region-specific information or images.
6. You can also adjust the number of search results displayed per page using the “Number of results” option. This allows you to have more or fewer search results on a single page, depending on your preferences.
7. Experiment with the “Aspect ratio” option to filter search results based on specific image proportions. This is useful when you are looking for images with a particular aspect ratio or when you want to exclude certain ratios from the results.
8. Take advantage of the “Similarity” slider to control the level of visual similarity in the search results. By adjusting the slider, you can specify how closely the search results match the image you are searching for.
9. Other options and settings may include language preferences, date ranges, and more. Take the time to explore and familiarize yourself with all the available options and settings.
By exploring the options and settings of Google Reverse Image Search, you can tailor your searches according to your specific requirements and preferences. This allows you to find more accurate and relevant search results, saving you time and effort in the process.
Keep in mind that the availability and functionality of certain options and settings may vary based on your region and the device you are using.
By customizing your search preferences, you can optimize your experience with Google Reverse Image Search and uncover the most relevant and informative results for your needs.
Step 10: Understanding the Potential Uses of Reverse Image Search
Google Reverse Image Search is a versatile tool that offers a wide range of potential uses across various fields. Understanding the many applications of reverse image searching can help you unleash the full potential of this powerful tool. Here are some of the key uses of reverse image searching:
1. Discovering the Original Source: Reverse Image Search allows you to find the original source of an image, which can be invaluable for ensuring proper attribution, verifying authenticity, and avoiding copyright infringement.
2. Identifying Fake or Altered Images: With reverse image searching, you can detect manipulated or fake images by comparing them to verified sources or finding instances where the image has been used in different contexts.
3. Tracking Image Usage: Reverse Image Search enables you to track the usage of your own images online. By conducting searches, you can find websites, social media posts, or online articles that may be using your images without permission or proper attribution.
4. Researching Images for Content Creation: When creating content such as blog posts, articles, or social media posts, reverse image searching can help you find related images, gather information, and find inspiration for your own visual content.
5. Verifying Product Authenticity: Reverse image searching can be useful when buying or selling products online. By uploading an image of a product, you can verify its authenticity, find legitimate sellers, and avoid counterfeit or scam listings.
6. Identifying Artwork and Landmarks: When encountering artwork or landmarks that catch your attention, reverse image searching can provide information on the artist, the location, or similar works. This can enhance your cultural knowledge and appreciation of visual arts.
7. Finding Design Inspiration: Designers can benefit from reverse image searching to find inspiration for their projects. By exploring similar images, they can gather ideas, learn about popular design trends, and refine their own creative concepts.
8. Exploring Image-Based SEO: For website owners and SEO professionals, reverse image searching can be a valuable technique for optimizing image-based SEO. It allows you to assess image usage, identify potential opportunities for backlinks or collaborations, and gain insights into competitors’ visual strategies.
9. Investigating Online Harassment or Scams: Reverse image searching can aid in identifying the origin of online harassment or scams. By searching for the images or profiles associated with suspicious activity, you can uncover information that helps protect yourself or others.
10. Uncovering Image-Based Journalism: Reverse image searching can enhance investigative journalism by helping journalists find related images, verify the authenticity of visual evidence, and uncover additional sources of information for their stories.
These are just a few examples of the many potential uses of Google Reverse Image Search. As you explore and familiarize yourself with the tool, you’ll discover even more possibilities that can benefit you both personally and professionally.
Remember to use reverse image searching responsibly, respecting copyright and privacy laws, and giving proper attribution when necessary. By doing so, you can leverage this powerful tool effectively and ethically.