
Preparations
Before you start the process of updating your iPhone on your computer, it’s important to ensure that you have everything you need. Here are a few preparations you should make:
- Check your internet connection: Updating your iPhone requires a stable and fast internet connection. Make sure you are connected to a reliable Wi-Fi network to avoid any interruptions during the update process.
- Backup your iPhone: It’s always a good idea to back up your iPhone before performing any updates. This ensures that your data is safe in case anything goes wrong during the update process. You can back up your iPhone using iCloud or iTunes on your computer.
- Charge your iPhone: Updating your iPhone can take a while, and your device needs to have sufficient battery power to complete the process. Connect your iPhone to a power source or ensure that it has enough charge to last the update process.
- Clear storage space: Updating your iPhone requires some free space on your device. Delete unnecessary files, apps, and media to create enough space for the update. You can check your storage in the Settings app under “General” and “iPhone Storage”.
By completing these preparations, you can ensure a smoother and hassle-free update process for your iPhone. Now that you have everything in place, let’s move on to the steps to update your iPhone on your computer.
Step 1: Check for Updates
The first step in updating your iPhone on your computer is to check if there are any available updates. Here’s how you can do it:
- Open iTunes or Finder: Depending on the version of your macOS, you will either use iTunes or Finder to update your iPhone. Open the respective application on your computer.
- Connect your iPhone: Use a Lightning or USB-C cable to connect your iPhone to your computer. Ensure that the cable is securely connected to both your iPhone and the USB port on your computer.
- Identify your iPhone: In iTunes, you will see an iPhone icon in the top left corner of the window. In Finder, you will find your iPhone listed under the “Locations” section in the sidebar. Click on your iPhone to select it.
- Select “Check for Update”: In iTunes, click on the “Summary” tab and then click on the “Check for Update” button. In Finder, you will find the “Check for Update” button under your iPhone’s details.
Once you click on “Check for Update,” iTunes or Finder will communicate with Apple’s servers to check if there are any available updates for your iPhone. If there is an update available, you will be notified and prompted to proceed with the update process. Note that the availability of updates may vary depending on your iPhone model and region.
If there are no available updates, you can rest assured that your iPhone is already up to date. However, if there is an update available, it’s recommended to proceed with it to benefit from the latest features, bug fixes, and security enhancements.
Now that you have checked for updates, let’s move on to the next step: connecting your iPhone to the computer.
Step 2: Connect your iPhone to the Computer
Now that you have checked for updates, it’s time to connect your iPhone to your computer. Follow these steps:
- Use a Lightning or USB-C cable: Grab your iPhone’s Lightning or USB-C cable and plug one end into the charging port on your iPhone.
- Connect to a USB port on your computer: Locate an available USB port on your computer and plug the other end of the cable into it. Ensure a secure connection.
Once your iPhone is connected to your computer, it will start charging, and your computer will recognize the device. This connection is essential for the update process as it allows the necessary communication between your iPhone and computer.
If you encounter any issues with the connection, try the following troubleshooting steps:
- Try a different USB port: Sometimes, the USB port you are using may not be functioning properly. Plug the cable into a different USB port on your computer to see if it resolves the issue.
- Use a different cable: Your Lightning or USB-C cable may be damaged or faulty. Try using a different cable to establish a connection between your iPhone and computer.
- Restart your computer: Sometimes, a simple restart can fix connectivity issues. Restart your computer and try connecting your iPhone again.
- Update your computer’s software: Make sure your computer’s operating system is up to date. Updating your software may resolve any compatibility issues between your iPhone and computer.
By ensuring a proper connection between your iPhone and computer, you are ready to move on to the next step: launching iTunes or Finder.
Step 3: Launch iTunes/Finder
After connecting your iPhone to the computer, the next step is to launch iTunes or Finder, depending on your macOS version. Follow these instructions:
- Open iTunes on macOS Mojave and earlier: If you are using macOS Mojave or an earlier version, open the iTunes application on your computer. You can find it in the Applications folder or by searching for “iTunes” in Spotlight.
- Open Finder on macOS Catalina and later: If you are using macOS Catalina or a later version, open a Finder window by clicking the Finder icon in the Dock or pressing Command + Space and searching for “Finder.”
By launching iTunes or Finder, you are setting the stage for managing your iPhone and performing the necessary updates.
If you encounter any issues launching iTunes or Finder, try the following troubleshooting steps:
- Restart your computer: Sometimes, a simple restart can resolve any software glitches that may be preventing iTunes or Finder from launching properly.
- Check for software updates: Ensure that your macOS is up to date by going to the Apple menu, selecting “System Preferences,” and then choosing “Software Update.” Update your system software if any updates are available.
- Reinstall iTunes (if applicable): If you are using an older macOS version and experiencing persistent issues with iTunes, you can try uninstalling and reinstalling the application to resolve any issues.
By successfully launching iTunes or Finder, you are now ready to move on to the next step: identifying your iPhone in iTunes or Finder.
Step 4: Identify your iPhone in iTunes/Finder
Once you have launched iTunes or Finder, the next step is to identify your iPhone within the application. Here’s how you can do it:
- In iTunes: If you are using iTunes, look for the iPhone icon in the top-left corner of the iTunes window. Click on this icon to select your iPhone.
- In Finder: If you are using Finder, you will find your iPhone listed under the “Locations” section in the sidebar. Click on your iPhone to select it.
Once you have successfully identified your iPhone in iTunes or Finder, you will have access to various settings and options specific to your device.
If you are unable to locate your iPhone within iTunes or Finder, try the following troubleshooting steps:
- Ensure your iPhone is properly connected: Verify that your iPhone is securely connected to your computer using the Lightning or USB-C cable. Disconnect and reconnect the cable to establish a stable connection.
- Update iTunes/Finder: Make sure you have the latest version of iTunes or Finder installed on your computer. Outdated software may have compatibility issues with your iPhone.
- Restart your computer and iPhone: Sometimes, a simple restart can fix any temporary glitches preventing iTunes or Finder from recognizing your iPhone. Restart both your computer and iPhone and try again.
- Try a different USB port or cable: It’s possible that the USB port you are using or the cable itself is causing the issue. Switch to a different USB port on your computer or try using a different cable.
By successfully identifying your iPhone in iTunes or Finder, you are ready to proceed to the next step: checking the iPhone’s summary page.
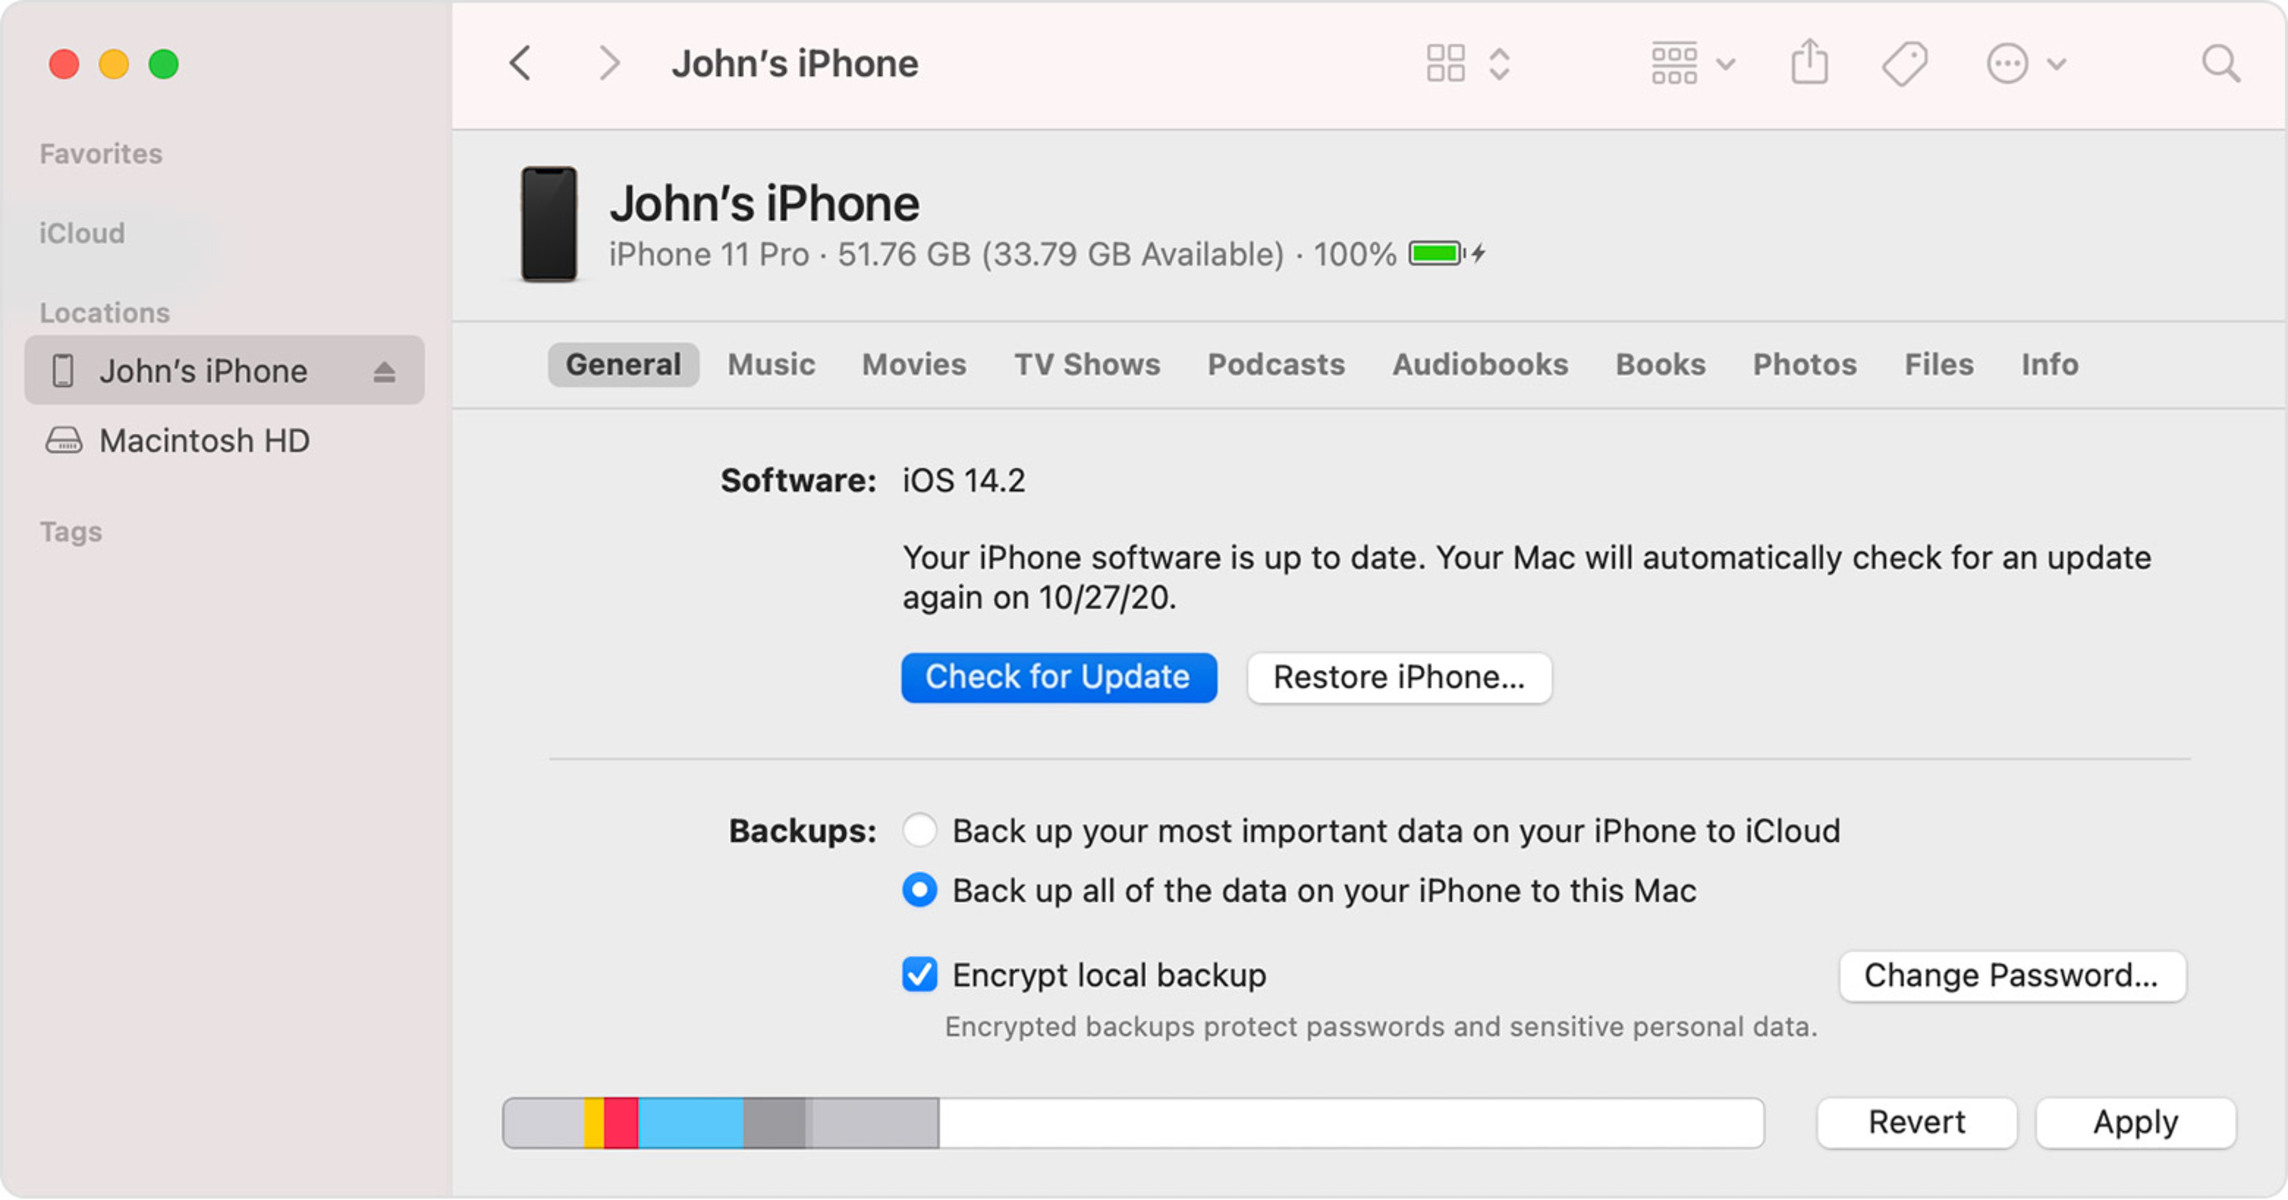
Step 5: Check iPhone’s Summary Page
After identifying your iPhone in iTunes or Finder, the next step is to check your iPhone’s summary page. This page provides essential information about your device and allows you to manage various settings. Here’s how you can access the iPhone’s summary page:
- In iTunes: If you are using iTunes, click on the “Summary” tab located in the left sidebar. This will open the summary page for your iPhone.
- In Finder: If you are using Finder, you will already be on the iPhone’s summary page once you select your device from the sidebar.
On the summary page, you will find important details about your iPhone, including its storage capacity, software version, available updates, and more. It is vital to review this information before proceeding with the update to ensure that you are well-informed about your device’s current status.
Here are a few key elements you can expect to find on the iPhone’s summary page:
- Software Update: This section will display if an update is available for your iPhone. If there is an update, you will have the option to download and install it.
- Backup Options: You can choose to back up your iPhone manually or set up automatic backups using iCloud or your computer. It’s advisable to have a recent backup before proceeding with the update.
- Storage and Capacity: This section provides an overview of your iPhone’s storage usage, including how much space is taken up by various categories such as apps, photos, and documents.
- Device Information: This section displays details about your iPhone, including the model, serial number, IMEI, and phone number.
Besides reviewing the information on the summary page, you can also make changes to certain settings, such as enabling “Sync with this iPhone over Wi-Fi” or managing your backup preferences.
If you encounter any difficulties accessing or navigating the summary page, try the following troubleshooting steps:
- Disconnect and reconnect your iPhone: Disconnect your iPhone from your computer and reconnect it to establish a fresh connection.
- Quit and reopen iTunes/Finder: Close the iTunes or Finder application and relaunch it to see if it resolves any temporary software issues.
- Update iTunes/Finder: Ensure that you have the latest version of iTunes or Finder installed on your computer, as outdated software may have compatibility issues.
By checking your iPhone’s summary page, you are well-prepared for the next step: downloading and installing the update.
Step 6: Download and Install the Update
After reviewing your iPhone’s summary page, you are now ready to download and install the update. Follow these steps to proceed:
- In iTunes: If you are using iTunes, locate the “Update” button on the right side of the iPhone’s summary page. Click on it to initiate the download and installation process.
- In Finder: If you are using Finder, you will find the “Update” button in the center of the iPhone’s summary page. Click on it to start the download and installation.
Once you click on the “Update” button, your computer will communicate with Apple’s servers to download the necessary update files specific to your iPhone. Make sure you have a stable internet connection as this process may take some time, depending on the size of the update and your internet speed.
During the download and installation process, it’s crucial to keep your iPhone connected to the computer and avoid disconnecting it until the update is complete. Interrupting the process can lead to errors and potentially harm your device.
If prompted, enter your device passcode on your iPhone to proceed with the update. Additionally, you may need to enter your Apple ID credentials to authorize the installation.
It’s important to note that depending on the size of the update and your internet speed, the download and installation time can vary. While the update is in progress, you might see a progress bar indicating the status of the installation.
If you encounter any issues during the download and installation process, try the following troubleshooting steps:
- Restart your computer and iPhone: Restarting both your computer and iPhone can resolve any temporary glitches and allow for a smoother installation process.
- Check your internet connection: Ensure that you have a stable and reliable internet connection. Switch to a different Wi-Fi network if necessary or consider using a wired connection.
- Update iTunes/Finder: It’s essential to have the latest version of iTunes or Finder installed on your computer, as outdated software may cause compatibility issues during the update process.
- Free up storage space: If you receive error messages indicating insufficient storage, you may need to clear some space on your iPhone. Delete unnecessary files or apps to create room for the update.
By successfully downloading and installing the update, you are one step closer to enjoying the latest features, bug fixes, and security enhancements on your iPhone.
Step 7: Agree to Terms and Conditions
After the download and installation of the update, the next step is to agree to the terms and conditions set by Apple. Here’s how you can proceed:
- In iTunes: If you are using iTunes, a pop-up window will appear on your computer screen, presenting the terms and conditions for the update. Read the terms carefully.
- In Finder: If you are using Finder, you will see the terms and conditions displayed directly on your iPhone’s screen. Swipe through the terms to review them.
It is important to read and understand the terms and conditions before proceeding. These terms outline the legal agreements and responsibilities between you and Apple regarding the use of the updated software on your iPhone.
Once you have reviewed the terms and conditions, you will be prompted to agree to them. Follow the on-screen instructions to indicate your consent. This ensures that you have acknowledged and accepted the terms set by Apple.
If you encounter any issues with agreeing to the terms and conditions, try the following troubleshooting steps:
- Restart your computer and iPhone: Restarting both devices can resolve any temporary software glitches that may be hindering the agreement process.
- Ensure a stable internet connection: The terms and conditions may require an internet connection for verification. Make sure you have a reliable internet connection during this step.
- Contact Apple Support: If you continue to experience difficulties, it is recommended to reach out to Apple Support for further assistance.
By agreeing to the terms and conditions, you are indicating your compliance with Apple’s guidelines and granting permission for the updated software to be installed on your iPhone. This brings you one step closer to completing the update process.
Step 8: Wait for the Update to Install
Once you have agreed to the terms and conditions, the update installation process will begin. This step requires patience as it may take some time to complete. Here’s what you need to do:
During the installation process, your iPhone will display a progress bar indicating the status of the update. It’s important to keep your iPhone connected to the computer and avoid interrupting the process until it’s fully completed.
While the update is installing, it’s not uncommon for your iPhone to restart multiple times. This is a normal part of the installation process, so there’s no need to worry if your device turns on and off during this time.
It’s essential to ensure your iPhone is connected to a power source or has sufficient battery charge. This will prevent any issues caused by your iPhone running out of power during the installation process.
During the installation, refrain from using your iPhone or disconnecting it from the computer. Any interruptions or disconnections may result in incomplete or corrupted installation, potentially causing issues with your device.
The duration of the installation process can vary depending on various factors like the size of the update, your computer’s processing power, and the stability of your internet connection. It’s best to allow ample time for the installation to complete, which may take anywhere from a few minutes to an hour or more.
If you encounter any issues during the installation process, here are some troubleshooting steps you can try:
- Check your internet connection: Ensure that you have a stable and reliable internet connection to avoid any interruptions during the installation process.
- Restart your computer and iPhone: Restarting both your computer and iPhone can resolve any temporary issues that may be affecting the installation process.
- Update iTunes or Finder: Make sure you are using the latest version of iTunes or Finder, as older versions may have compatibility issues with the update.
- Contact Apple Support: If the installation process takes an unusually long time or you encounter persistent issues, it is advisable to seek assistance from Apple Support for further guidance.
By patiently waiting for the update to install, you are allowing your iPhone to undergo the necessary steps for incorporating the latest software enhancements. Once the installation is complete, you can proceed to the final steps of setting up your iPhone.
Step 9: Set Up Your iPhone
Once the update installation is complete, it’s time to set up your iPhone with the updated software. Here’s what you need to do:
- On your iPhone, you will see a “Hello” screen welcoming you to the setup process. Slide your finger across the screen to begin.
- Choose your language: Select your preferred language for your iPhone’s display and interaction.
- Connect to Wi-Fi: Choose a Wi-Fi network and enter the password, ensuring a stable internet connection for the next steps.
- Set up Touch ID or Face ID (if applicable): Depending on your iPhone model, you will be prompted to set up Touch ID (fingerprint recognition) or Face ID (facial recognition) for added security.
- Restore from a backup (optional): If you had previously made a backup of your iPhone before the update, you can now restore your data and settings from that backup. Select the desired backup option and follow the on-screen instructions.
- Set up iCloud: You will have the option to sign in with your Apple ID or create a new one. iCloud allows you to back up your data, access iCloud Drive, and sync your content across devices.
- Enable Siri: Choose whether to enable Siri, Apple’s virtual assistant, to provide voice-activated assistance on your iPhone.
- Set up Apple Pay (if applicable): If your iPhone supports Apple Pay, you can choose to set up this convenient payment method for purchasing goods and services.
- Agree to Terms and Conditions: Read and agree to the terms and conditions that govern the use of your iPhone and associated services.
- Create a Passcode: Set up a passcode or passcode type (numeric, alphanumeric, or custom) to secure your iPhone.
- Choose a Display Appearance: Decide whether you want your iPhone to have a light or dark appearance.
Follow the on-screen instructions for each step to personalize your iPhone according to your preferences. These settings are crucial for ensuring a smooth and tailored iPhone experience with the updated software.
If you encounter any issues during the setup process, try the following troubleshooting steps:
- Restart your iPhone: Restarting your iPhone can resolve minor glitches and ensure a fresh start for the setup process.
- Ensure a stable internet connection: Make sure you have a reliable Wi-Fi connection to avoid any interruptions or delays during setup.
- Contact Apple Support: If you continue to experience difficulties or encounter errors, you can reach out to Apple Support for further assistance.
By successfully completing the setup process, you will have your iPhone ready with the updated software, personalized settings, and security measures in place. Now, you can start enjoying the benefits of the latest features and improvements on your iPhone.
Step 10: Restore iPhone Data (optional)
If you made a backup of your iPhone before the update, you have the option to restore your data and settings to your device. Follow these steps to restore your iPhone:
- On the “Apps & Data” screen, select the “Restore from iCloud Backup” or “Restore from iTunes Backup” option, depending on where you stored your backup.
- If you choose to restore from iCloud backup, sign in to your iCloud account using your Apple ID and password.
- Choose the relevant backup from the list of available backups. Consider the date and size of each backup to select the most recent and appropriate one.
- Enter any necessary passwords, such as your Apple ID password or the password for your encrypted backup, if applicable.
- Wait for the restore process to complete. This may take some time, depending on the size of your backup and your internet connection speed.
- Once the restore process finishes, continue with the setup process by following the on-screen instructions.
Restoring your iPhone from a backup will bring back your previous settings, app data, photos, messages, and other content. It essentially recreates your iPhone to match the state it was in before the update.
It’s important to note that restoring from a backup will replace any data currently on your iPhone. If you have any new data that you want to keep, make sure to back it up separately before starting the restore process.
If you encounter any issues during the restore process, try the following troubleshooting steps:
- Ensure a stable internet connection: Verify that you have a reliable Wi-Fi network that can support the data transfer required for the restore process.
- Ensure sufficient storage space: Make sure your iPhone has enough storage space to accommodate the restored data.
- Update to the latest iOS version: Update your iPhone to the latest available iOS version before attempting the restore process.
- Contact Apple Support: If you encounter persistent issues or error messages, it’s recommended to seek assistance from Apple Support for further guidance.
By restoring your iPhone from a backup, you can easily regain access to your previous data and settings, ensuring a seamless transition after the update process.
Common Issues and Troubleshooting
While updating your iPhone on your computer, you might encounter some common issues. Here are a few troubleshooting steps to help you resolve them:
- Update not appearing: If you don’t see the option to update your iPhone in iTunes or Finder, ensure that your device is compatible with the latest software version. Some older devices may not support the latest updates.
- Slow download speed: If the update is taking an unusually long time to download, check your internet connection and try connecting to a different Wi-Fi network. You can also pause and resume the download to see if it improves the speed.
- Installation failure: If the update fails to install, restart your computer and iPhone, then attempt the installation again. Ensure that you have enough storage space available on your iPhone for the update.
- Incomplete update: If your iPhone gets stuck during the update process or becomes unresponsive, force restart your device by pressing and holding the power and home (or volume down) buttons simultaneously until the Apple logo appears.
- Backup or data loss: If you didn’t back up your iPhone before the update and experience data loss, it may not be recoverable. Regularly backing up your data is essential to avoid such situations.
- Error messages: If you encounter error messages during the update process, note down the error code or message and search for it on Apple’s support website. You can also contact Apple Support for help with specific error messages.
If you are still experiencing issues or the troubleshooting steps don’t resolve the problem, it’s recommended to contact Apple Support or visit an Apple Store for further assistance. They have the expertise to help diagnose and resolve any complex or persistent issues.
Remember, it’s crucial to follow the instructions carefully and ensure a stable connection between your iPhone and the computer when updating to minimize the likelihood of encountering these issues.
By troubleshooting common problems that may arise during the update process, you can overcome any hurdles and successfully update your iPhone to enjoy the latest features and improvements.