
Checking Wi-Fi Connection
Before attempting to turn on the Wi-Fi on your Dell laptop, it is important to ensure that your laptop is equipped with Wi-Fi capability and that it is properly configured. Here are a few steps to help you check the Wi-Fi connection on your Dell laptop:
- Verify Wi-Fi capabilities: First, make sure that your Dell laptop has built-in Wi-Fi capabilities. Most modern Dell laptops come with Wi-Fi functionality pre-installed. You can usually find this information in the laptop’s user manual or by checking the product specifications on Dell’s official website.
- Turn on Wi-Fi indicator: Look for an LED light or an indicator on your Dell laptop’s keyboard or casing that signifies the Wi-Fi status. This indicator usually looks like a small antenna icon or the letters “Wi-Fi”. If the indicator is turned off or is not illuminated, it means that Wi-Fi is currently disabled.
- Check device manager: Open the Device Manager on your Dell laptop by right-clicking on the Start button and selecting “Device Manager”. Expand the “Network adapters” category and look for any entries related to Wi-Fi or WLAN. If you see a Wi-Fi adapter listed, it means that your laptop has the necessary hardware installed.
- Try connecting to a Wi-Fi network: Click on the network icon in the system tray located at the bottom-right corner of the screen. If there are available Wi-Fi networks in your vicinity, they should appear in the list. Click on the desired network to attempt a connection. If you are able to connect, it means that your Wi-Fi is functioning correctly.
- Restart your laptop: Sometimes, a simple restart can fix any temporary software or hardware issues. Restart your Dell laptop and check if the Wi-Fi connection is restored. If not, proceed to the next troubleshooting steps.
By following these steps, you can verify if your Dell laptop is equipped with Wi-Fi capabilities and diagnose any potential issues with the connection. If you encounter any persistent Wi-Fi problems, continue reading for further troubleshooting steps.
Using the Keyboard Shortcut
One convenient way to quickly turn on Wi-Fi on your Dell laptop is by using a keyboard shortcut. Dell laptops often include a dedicated key or a combination of keys that can toggle the Wi-Fi functionality. Below is a guide on how to use the keyboard shortcut to enable Wi-Fi:
- Locate the Wi-Fi key: Look for a key on your Dell laptop’s keyboard that has an icon resembling an antenna or the letters “Wi-Fi”. This key is usually one of the function keys (F1 to F12) and is often labeled with an antenna icon or the letters “WLAN”.
- Press the Wi-Fi key: Once you have identified the Wi-Fi key, press it to toggle the Wi-Fi functionality. Depending on your laptop model, you may need to hold down the Fn key while pressing the Wi-Fi key. This key combination will vary between different Dell laptop models, so consult your laptop’s user manual or Dell’s official website for the specific key combination.
- Check the Wi-Fi status: After pressing the Wi-Fi key, look for an indicator on your laptop that shows the Wi-Fi status. This could be an LED light or an on-screen notification. If the indicator turns on or shows that the Wi-Fi is enabled, it means that the keyboard shortcut was successful in turning on the Wi-Fi.
The keyboard shortcut method is a simple and efficient way to enable Wi-Fi on your Dell laptop without having to navigate through menus or settings. If the keyboard shortcut does not work or if your laptop does not have a dedicated Wi-Fi key, proceed to the next section for alternative methods.
Enabling Wi-Fi through the Windows Network Icon
If you are unable to use the keyboard shortcut to turn on Wi-Fi on your Dell laptop, another method is to enable it through the Windows network icon. Here’s how you can do it:
- Locate the network icon: Look for the network icon in the system tray at the bottom-right corner of your screen. It usually appears as a series of curved bars or as a computer monitor with signal waves.
- Right-click on the network icon: Once you have located the network icon, right-click on it to open a context menu.
- Select “Open Network & Internet settings”: From the context menu, choose the option that says “Open Network & Internet settings”. This will open the Network & Internet settings page in the Windows Settings app.
- Click on “Wi-Fi”: On the left side of the Network & Internet settings, click on the “Wi-Fi” option. This will take you to the Wi-Fi settings page.
- Toggle the Wi-Fi switch: On the Wi-Fi settings page, you will find a switch that allows you to turn on or off the Wi-Fi functionality. Click on the switch to toggle it on and enable Wi-Fi on your Dell laptop.
- Check the Wi-Fi status: After enabling Wi-Fi, check the network icon in the system tray to ensure that it shows the Wi-Fi signal bars. This indicates that the Wi-Fi is now turned on and your Dell laptop is ready to connect to Wi-Fi networks.
By following these steps, you can easily enable Wi-Fi on your Dell laptop through the Windows network icon. If this method did not work or if you are experiencing any issues with the Wi-Fi functionality, continue reading for more options to troubleshoot and resolve the problem.
Turning on Wi-Fi via the Dell Wireless Utility
If the previous methods did not successfully enable Wi-Fi on your Dell laptop, you can try using the Dell Wireless Utility. This utility, provided by Dell, allows you to manage and control various wireless settings, including Wi-Fi. Follow these steps to turn on Wi-Fi using the Dell Wireless Utility:
- Open the Dell Wireless Utility: Look for the Dell Wireless Utility icon in your system tray, typically located at the bottom-right corner of the screen. It resembles a set of curved bars or an antenna. Right-click on the Dell Wireless Utility icon to open a context menu, then select the option to open the utility.
- Navigate to the Wi-Fi settings: Once the Dell Wireless Utility is open, locate the Wi-Fi settings. These settings may be labeled differently depending on the specific version of the utility you have installed. Look for options such as “Wireless Settings”, “Wireless Controls”, or “Wi-Fi Management”.
- Enable Wi-Fi: Within the Wi-Fi settings, there should be an option to enable Wi-Fi. It may be a toggle switch, a checkbox, or a button. Click on the option to enable Wi-Fi, and wait for the utility to confirm that Wi-Fi is turned on.
- Check the Wi-Fi indicator: After enabling Wi-Fi through the Dell Wireless Utility, observe the Wi-Fi indicator on your Dell laptop. It may be an LED light or an on-screen notification. If the indicator displays that Wi-Fi is enabled, it means that the Dell Wireless Utility successfully turned on Wi-Fi.
By utilizing the Dell Wireless Utility, you can activate Wi-Fi on your Dell laptop and gain control over various wireless settings. If you encounter any difficulties or if Wi-Fi is still not functioning, continue reading for further troubleshooting steps.
Updating Wi-Fi Drivers
If your Dell laptop is experiencing Wi-Fi issues, one possible solution is to update the Wi-Fi drivers. Outdated or incompatible drivers can often cause connectivity problems. Here’s how you can update the Wi-Fi drivers on your Dell laptop:
- Identify the Wi-Fi adapter: Open the Device Manager on your Dell laptop by right-clicking on the Start button and selecting “Device Manager”. Expand the “Network adapters” category and locate the entry for your Wi-Fi adapter. It may be labeled as “Wireless LAN adapter” or something similar.
- Check for driver updates: Right-click on the Wi-Fi adapter entry and select the option to “Update driver”. Windows will search for updates online and provide you with the latest driver version if available. Follow the on-screen instructions to install the updated driver.
- Visit the Dell support website: If Windows does not find any driver updates or if the issue persists, visit the official Dell support website. Go to the “Drivers & Downloads” section and enter your Dell laptop’s model number or service tag to find the appropriate Wi-Fi driver for your specific laptop model.
- Download and install the driver: Locate the latest Wi-Fi driver for your Dell laptop on the Dell support website and download it to your computer. Once the driver is downloaded, run the installer and follow the installation prompts to update the Wi-Fi drivers.
- Restart your laptop: After the driver update is complete, restart your Dell laptop to apply the changes. This will ensure that the new Wi-Fi drivers are fully installed and functioning properly.
Updating the Wi-Fi drivers can resolve compatibility issues and improve the performance and stability of your Dell laptop’s wireless connection. If the Wi-Fi problem persists or if you need further assistance, proceed to the next section for additional troubleshooting steps.
Troubleshooting Wi-Fi Issues
If you are still facing Wi-Fi problems on your Dell laptop, you can try the following troubleshooting steps to resolve the issues:
- Restart your laptop and router: Sometimes, a simple restart of both your Dell laptop and the wireless router can help resolve connection issues. Turn off your laptop and unplug the router from the power source. Wait for a few minutes, then plug in the router and turn on your laptop.
- Check Wi-Fi signal strength: Ensure that you are within the range of the Wi-Fi network and that the signal strength is strong enough. If you are far away from the router or encountering interference, try moving closer to the router or using a Wi-Fi range extender.
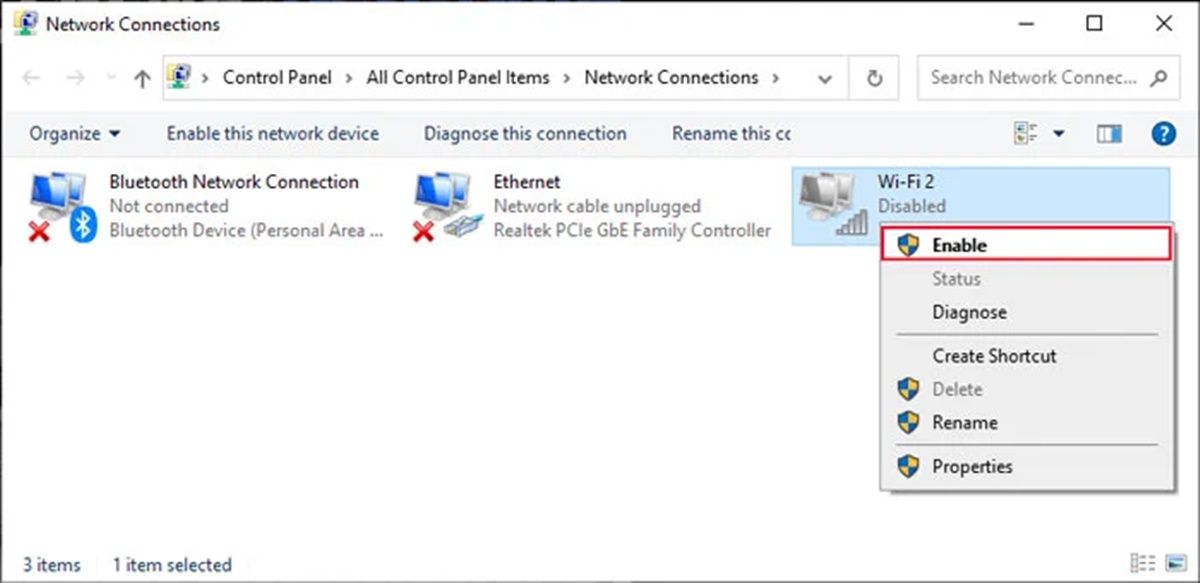
- Disable and re-enable Wi-Fi: Go to the Network Settings on your Dell laptop and disable the Wi-Fi connection. Wait for a few seconds, then re-enable it. This can refresh the connection and resolve any temporary issues.
- Reset network settings: If none of the previous solutions work, you can try resetting your network settings. Open the Network Settings on your Dell laptop, locate the option to reset network settings, and follow the on-screen instructions.
- Scan for malware or viruses: Malware or viruses on your laptop could be causing Wi-Fi issues. Run a comprehensive scan using your preferred antivirus software to detect and remove any potentially harmful files.
- Contact your internet service provider (ISP): If you have tried all the aforementioned steps and are still experiencing Wi-Fi issues, it may be worth contacting your internet service provider. They can check for any service outages or provide additional support.
By following these troubleshooting steps, you can identify and resolve common Wi-Fi issues on your Dell laptop. If the problem persists, it may be necessary to seek professional assistance or contact Dell’s customer support for further guidance.