
Choosing the Right Camera
When it comes to taking high-resolution photos, one of the most crucial factors is choosing the right camera. With so many options available in the market, it can be overwhelming to make a decision. However, by considering a few key factors, you can ensure that you select a camera that meets your needs and delivers stunning results.
The first thing to consider is the type of camera. Digital single-lens reflex (DSLR) cameras are popular among photographers due to their excellent image quality and versatility. Mirrorless cameras have also gained popularity in recent years, offering compactness and advanced features. Both types of cameras have their advantages, so it’s essential to evaluate your photography style and preferences.
Another crucial aspect to consider is the sensor size. Larger sensor size generally leads to higher image quality and better low-light performance. Cameras with full-frame sensors are highly recommended for professional photography, but they can be more expensive. APS-C and Micro Four Thirds sensors are suitable for enthusiasts and beginners.
Megapixels, while not the sole determining factor of image quality, are also significant. Higher megapixels allow for more detail and the ability to print larger photos without losing clarity. However, be cautious not to solely focus on megapixels, as other factors like sensor quality and lens choice impact image quality as well.
Finally, consider the ergonomics and user interface of the camera. A comfortable grip, intuitive controls, and a clear menu system can greatly enhance the shooting experience. Visit a camera store to physically hold and test out different models to find one that feels good in your hands and is easy to navigate.
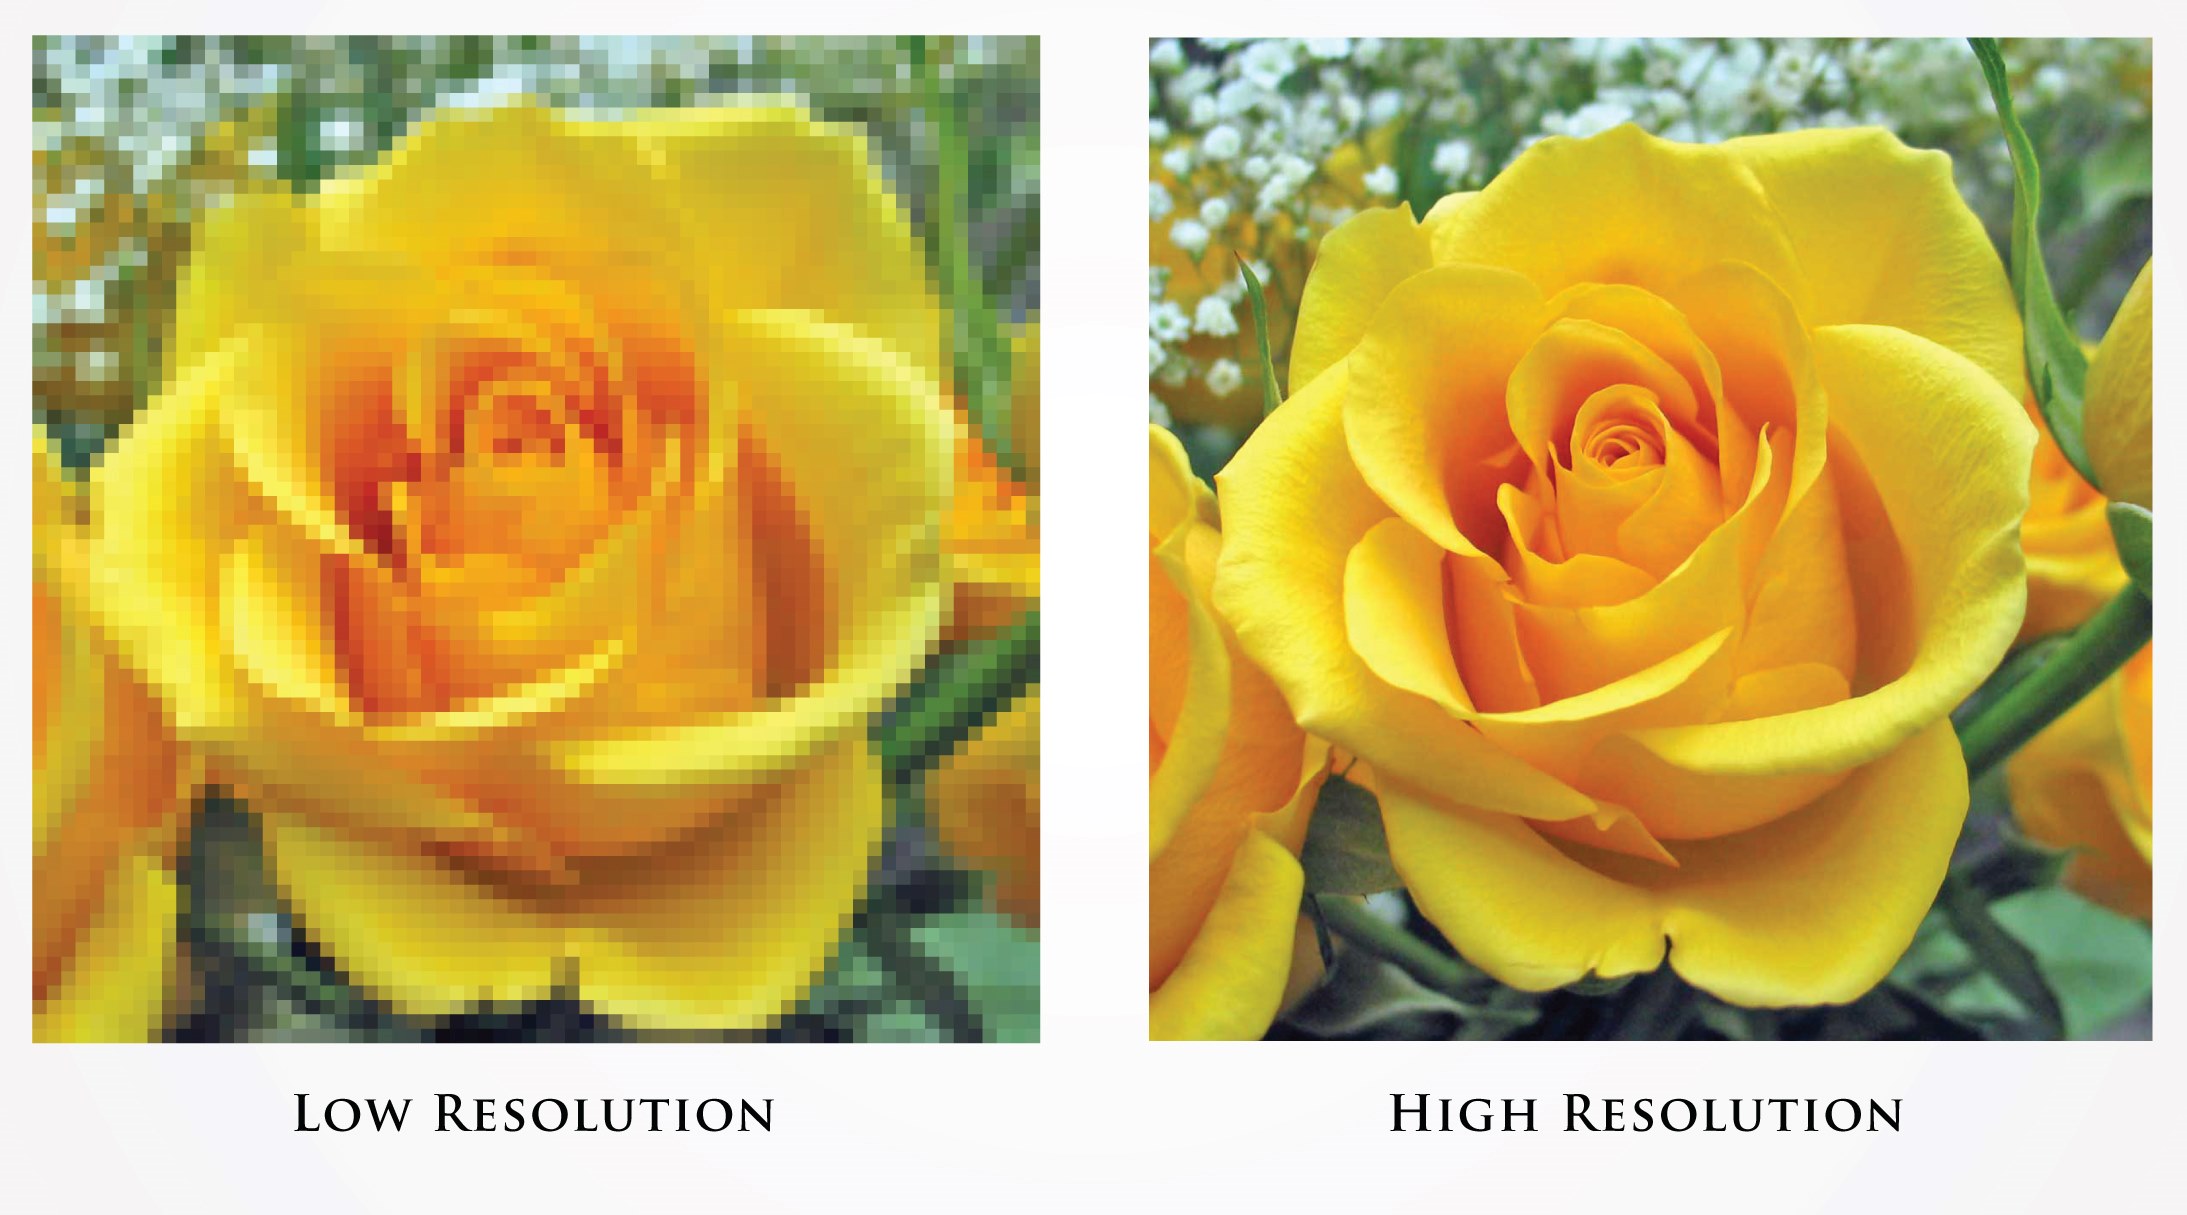
Understanding Megapixels and Sensor Size
When it comes to capturing high-resolution photos, understanding the concepts of megapixels and sensor size is essential. These two factors play a significant role in determining the quality and level of detail in your images.
Megapixels refer to the number of pixels in an image sensor. Each pixel captures a tiny portion of the overall image, and the more pixels there are, the more detail can be recorded. However, it’s crucial to note that a higher number of megapixels doesn’t necessarily mean better image quality. The overall quality is also influenced by the sensor size and other factors.
On the other hand, sensor size is the physical dimension of the image sensor within the camera. Generally, larger sensors are capable of capturing more light, resulting in better image quality, especially in low-light conditions. The size of the sensor affects the performance of the camera, including dynamic range, noise levels, and depth of field control.
Cameras with full-frame sensors offer superior image quality due to their larger size. They have a size equivalent to traditional 35mm film, providing excellent dynamic range and low noise performance. However, they tend to be more expensive and heavier. APS-C sensors, found in many entry-level and mid-range cameras, are smaller, but still produce high-quality images. They are a good option for photographers on a budget or those who prefer a more compact setup.
Micro Four Thirds sensors, found in some mirrorless cameras, are smaller than APS-C sensors. However, they still deliver impressive image quality and offer the benefit of a more lightweight and portable camera system. These sensors are a great choice for travel photographers or those who prioritize mobility.
When choosing a camera, it’s important to strike a balance between megapixels and sensor size. Consider your specific requirements, such as the type of photography you do and the desired level of detail. While having more megapixels can be advantageous for large prints and cropping, a larger sensor size often has a more significant impact on overall image quality.
Ultimately, understanding the relationship between megapixels and sensor size will help you make an informed decision when selecting a camera that suits your photography needs.
Learning about ISO, Shutter Speed, and Aperture
ISO, shutter speed, and aperture are the fundamental elements of exposure in photography. Understanding how these three settings work together is crucial for capturing high-resolution photos with proper exposure and creative control.
ISO determines the sensitivity of the camera’s image sensor to light. A lower ISO (e.g., ISO 100) is ideal for capturing images in well-lit conditions, as it produces minimal noise and preserves fine details. On the other hand, a higher ISO (e.g., ISO 800 or above) is necessary when shooting in low-light situations, but it may introduce noise into the image. It’s essential to find a balance between ISO and image quality based on the available lighting conditions.
Shutter speed refers to the length of time the camera’s shutter remains open when taking a photo. It affects the amount of light entering the camera and the motion blur in the image. A faster shutter speed (e.g., 1/1000th of a second) freezes motion and is suitable for capturing sharp images of moving subjects. Conversely, a slower shutter speed (e.g., 1/30th of a second) allows more light into the camera and can create intentional blur for artistic effects like light painting or silky waterfalls. Remember to use a tripod or stabilize the camera when using slower shutter speeds to avoid camera shake.
Aperture controls the amount of light that enters the camera through the lens. It also affects the depth of field, which determines whether the entire scene is in focus or if there is a blurred background. A wider aperture (smaller f-number) like f/2.8 or f/1.4 allows more light in but results in a shallow depth of field, ideal for portraits or isolating subjects from the background. On the other hand, a narrower aperture (larger f-number) such as f/11 or beyond allows for greater depth of field, ensuring sharpness from the foreground to the background. It’s important to note that each lens has a specific range of available apertures.
Mastering the relationship between ISO, shutter speed, and aperture is crucial for achieving proper exposure. By adjusting these settings based on the lighting conditions and desired creative effects, you can capture high-resolution photos with optimal sharpness, clarity, and artistic expression.
Shooting in Raw Format
When aiming to capture high-resolution photos, shooting in raw format is highly recommended. Unlike JPEG, which applies in-camera processing and compression, raw files contain unprocessed data straight from the camera’s sensor. This gives photographers greater control and flexibility during post-processing, resulting in higher-quality images.
One of the significant advantages of shooting in raw format is the ability to adjust the white balance after the photo is taken. White balance determines the color temperature of the image and can be a challenge to get right in-camera, especially in tricky lighting conditions. By shooting in raw, you can fine-tune the white balance during post-processing, ensuring accurate colors and eliminating unwanted color casts.
Another benefit of raw format is the preservation of all the image data captured by the sensor. JPEG compression discards some image details to reduce file size, which can result in loss of quality. With raw, you have access to the full tonal range and finer details, allowing for more precise adjustments in exposure, contrast, and shadow or highlight recovery.
Since raw files are larger and contain more data, they provide greater flexibility when it comes to making adjustments to exposure. If a photo is underexposed or overexposed, raw files can often be recovered to a greater extent compared to JPEG files. This is especially useful in challenging lighting situations or when shooting in high contrast scenes.
It’s important to note that shooting in raw format requires post-processing. Raw files are not ready to be shared directly from the camera and need editing to bring out the best in the image. However, this extra step allows for personalized adjustments and creative control over the final result.
Keep in mind that shooting in raw will take up more space on your memory card, so it’s essential to have sufficient storage capacity available. Additionally, make sure you are familiar with the raw processing software you plan to utilize and understand the workflow for importing, organizing, and editing your raw files.
Utilizing Manual Mode and Adjusting Settings
When aiming to capture high-resolution photos, utilizing manual mode and adjusting camera settings gives you full control over the exposure and allows for creative expression. While automatic modes can be convenient, manual mode offers the flexibility to customize settings according to the specific requirements of each scene.
One of the first settings to adjust in manual mode is the exposure. This is determined by the combination of ISO, shutter speed, and aperture. By manually setting these parameters, you have complete control over the amount of light entering the camera and can achieve the desired level of brightness and contrast in your photos.
When choosing the ISO, consider the lighting conditions. For well-lit scenes, a lower ISO (e.g., ISO 100) is sufficient to capture a high-quality image with minimal noise. In low-light situations, you may need to increase the ISO to maintain a properly exposed photo, keeping in mind that higher ISO values can introduce noise.
The choice of shutter speed is crucial, especially when capturing motion. A fast shutter speed (e.g., 1/1000th of a second) freezes action, ensuring sharpness for fast-moving subjects like sports or wildlife. A slower shutter speed (e.g., 1/30th of a second) allows for intentional motion blur, which can add a sense of movement or create artistic effects.
Aperture selection affects the depth of field and the amount of light entering the camera. A wider aperture (smaller f-number) like f/2.8 produces a shallow depth of field, with a sharp subject and a pleasingly blurred background. A narrower aperture (larger f-number) like f/11 or f/16 increases the depth of field, keeping more of the scene in focus.
While manual mode provides full control over the exposure settings, it’s essential to frequently check the camera’s light meter to ensure proper exposure. The light meter helps indicate whether the image is underexposed, overexposed, or correctly exposed. Make adjustments to the settings accordingly while monitoring the meter for balance.
Remember to experiment and adjust the settings based on the specific scene and your creative vision. Manual mode empowers you to capture high-resolution photos with personalized settings and artistic control, resulting in images that truly reflect your vision as a photographer.
Using the Tripod and Remote Shutter Release
When it comes to capturing high-resolution photos, using a tripod and remote shutter release can make a significant difference in the sharpness and overall quality of your images. These accessories help reduce camera shake and allow for precise control over the shutter release, ensuring optimal image sharpness and clarity.
A tripod serves as a stable platform for your camera, eliminating the possibility of unintentional movement during the exposure. It is especially useful in low-light situations or when using slower shutter speeds, where even the slightest camera shake can result in blurry images. By mounting your camera on a tripod, you can achieve tack-sharp photos, particularly in situations that require long exposures or when shooting with telephoto lenses.
When setting up your tripod, choose a stable location and secure it in place. Extend the legs to a comfortable height that aligns with your shooting position. Make sure to lock the tripod legs and center column firmly to prevent any movement. Attach your camera to the tripod’s head securely, ensuring it is level and balanced.
In addition to using a tripod, a remote shutter release or a cable release can further minimize camera shake. These devices allow you to trigger the shutter without physically touching the camera. By using a remote shutter release, you eliminate any potential vibrations caused by pressing the shutter button directly on the camera. This is especially helpful when capturing long exposures or when working with delicate compositions that require minimal disturbances.
A remote shutter release comes in various forms, including wireless options or models with cables that directly connect to your camera. Choose the option that suits your preferences and camera compatibility. Familiarize yourself with the operation and functionality of the remote shutter release before your photo session to ensure smooth and accurate control over the shutter.
By combining a tripod with a remote shutter release, you can maximize the sharpness and detail in your high-resolution photos. These accessories work hand-in-hand to eliminate camera shake, provide stability, and allow for precise shutter control. Whether you’re shooting landscapes, portraits, or any other type of photography that demands utmost sharpness, incorporating a tripod and remote shutter release into your workflow is a must.
Setting up the Perfect Composition
When striving to capture high-resolution photos, setting up the perfect composition is vital. Composition refers to the arrangement and placement of elements within the frame, creating a visually pleasing and engaging image. By carefully considering the composition, you can create impactful and visually stunning photographs.
One of the most basic yet essential composition techniques is the rule of thirds. Imagine the frame divided into a grid of nine equal parts, using two horizontal and two vertical lines. By placing your subject or key elements along these lines or at their intersections, you can create a balanced and harmonious composition that draws the viewer’s attention.
Leading lines are another powerful composition tool. Utilizing lines that guide the viewer’s eye through the scene adds depth and visual interest. These lines can be roads, paths, fences, or any other element that creates a clear direction or perspective within the frame. By incorporating leading lines, you can help guide the viewer’s gaze and create a sense of visual flow within your photograph.
Consider the foreground and background elements when composing your shots. A visually appealing foreground can add depth and dimension to the image, while a well-thought-out background can enhance the overall story or mood. Be mindful of clutter or distractions in the background and strive for simplicity and cohesion within the frame.
Another composition technique to explore is framing. Using natural elements such as arches, doorways, or foliage, you can frame your subject, drawing attention to it and creating a sense of context or enclosure. This can add layers of interest and visual impact to your photographs.
It’s also crucial to consider the balance of elements within the frame. A balanced composition can create a sense of harmony and stability. Symmetrical compositions bring a sense of order and formality, while asymmetrical compositions can add dynamism and create a more visually interesting image.
Don’t be afraid to experiment with different angles and perspectives. Get closer to your subject for a more intimate and captivating view, or try shooting from different heights or angles to add a unique perspective to your photographs. Look for interesting patterns, textures, and details that can add depth and intrigue to your composition.
Ultimately, the key to setting up the perfect composition is to carefully observe your surroundings, train your eye to see potential compositions, and experiment with different techniques. By mastering the art of composition, you can elevate your high-resolution photographs, creating visually stunning images that truly resonate with viewers.
Mastering Exposure and White Balance
When it comes to capturing high-resolution photos, mastering exposure and white balance is essential. These two factors greatly impact the overall quality and accuracy of your images. Understanding how to properly expose your photos and achieve correct white balance can make a significant difference in the final result.
Exposure refers to the brightness or darkness of an image. A well-exposed photo has a balanced distribution of tones, with details in both the highlights and shadows. To achieve proper exposure, you need to find the right combination of three key factors: ISO, aperture, and shutter speed.
First, select an appropriate ISO setting based on the available light. Lower ISO values (e.g., ISO 100) are ideal for well-lit situations, while higher ISO values (e.g., ISO 800 or above) are necessary in low-light conditions. Keep in mind that higher ISO values may introduce noise into the image, so choose the lowest ISO that allows for a well-exposed photo.
Next, determine the best aperture setting. A wider aperture (smaller f-number) like f/2.8 produces a shallow depth of field, blurring the background and isolating the subject. A narrower aperture (larger f-number) like f/8 or f/11 increases the depth of field, keeping more of the scene in focus. Choose the appropriate aperture based on the desired effect and the amount of light available.
Lastly, set the shutter speed. A fast shutter speed freezes motion and is ideal for capturing sharp images of moving subjects. A slower shutter speed allows more light into the camera and can create intentional motion blur. Adjust the shutter speed according to the specific requirements of the scene and the effect you want to achieve.
White balance refers to the color temperature of the light in a scene. Different lighting conditions can cast a warm (orange/yellow) or cool (blue) hue on your photos. It’s crucial to achieve accurate white balance to ensure colors are rendered correctly. Most cameras offer various white balance presets, such as daylight, shade, cloudy, fluorescent, and tungsten. Experiment with different presets to achieve accurate colors in different lighting situations.
For further control over white balance, consider using a custom white balance setting. This involves taking a reference photo of a neutral white or gray object in the same lighting as your scene and using it as a reference for setting the white balance. Custom white balance gives you precise control over color temperatures in challenging lighting scenarios.
In addition, shooting in raw format allows more flexibility in adjusting white balance during post-processing. This is especially helpful if you were unable to set the correct white balance in-camera or if you want to apply creative adjustments to the colors of your images.
Mastering exposure and white balance takes practice and experimentation. Continuously challenging yourself to understand and use these concepts will result in improved image quality and more accurate color representation in your high-resolution photos.
Utilizing Natural Light and Artificial Lighting
When it comes to capturing high-resolution photos, understanding how to effectively utilize both natural light and artificial lighting is crucial. The quality, direction, and intensity of light greatly influence the mood, atmosphere, and overall appearance of your images.
Natural light is a beautiful and versatile lighting source that can create stunning photographs. Different times of the day offer varying qualities of light, each with its unique characteristics. The golden hour, which occurs early in the morning or late in the afternoon, provides soft, warm light that adds a magical touch to your images. Midday sunlight, on the other hand, is harsh and can result in strong contrasts and deep shadows. Cloudy or overcast days produce diffused light, which is soft and ideal for evenly lit portraits or capturing delicate details.
When utilizing natural light, consider the direction of the light source. Front lighting, where the light is coming from behind the photographer, illuminates the subject evenly and reduces shadows. Side lighting, where the light is coming from the side, can add depth and dimension to your photographs. Backlighting, where the light is coming from behind the subject, creates a beautiful halo effect and emphasizes silhouettes or creates a dreamy atmosphere.
While natural light provides stunning opportunities for photography, there are instances where artificial lighting is necessary or desirable. Artificial lighting allows for greater control over the light source, intensity, and direction, providing consistent and tailored lighting setups.
Studio lighting, such as strobes or continuous lights, offers endless possibilities for creating professional-looking high-resolution photos. These lights can be adjusted to mimic natural light or produce unique and creative effects. They are often used in portrait, product, and still-life photography, providing full control over the lighting parameters.
On-camera flash can also be utilized to fill in shadows or provide additional light when natural light is insufficient. However, it’s important to avoid direct on-camera flash, as it can result in harsh lighting and unflattering shadows. Instead, consider using a diffuser or bouncing the flash off a nearby surface to soften the light and create a more natural-looking illumination.
Whether you’re working with natural light or artificial lighting, it’s essential to understand how to balance and manipulate these light sources to achieve the desired outcome. This involves experimenting with settings, modifying the placement of light sources, and understanding how different lighting techniques contribute to the overall look and feel of your images.
Remember, practice is key when it comes to utilizing natural light and artificial lighting effectively. Continuously explore and experiment with different lighting conditions and techniques to enhance your high-resolution photos and develop your own unique style.
Understanding the Role of Post-Processing
After capturing high-resolution photos, understanding the role of post-processing is essential to elevate the final quality and bring out the full potential of your images. Post-processing refers to the editing and enhancement of photographs using software such as Adobe Lightroom, Adobe Photoshop, or other editing tools.
Post-processing allows you to fine-tune various aspects of your images, including exposure, white balance, colors, contrast, sharpness, and more. It gives you the power to correct any technical flaws or imperfections that may have occurred during the capture, as well as the creative freedom to express your artistic vision.
One of the key advantages of post-processing is the ability to adjust exposure. You can retrieve lost details in shadows or highlights, balance tones, and enhance the overall dynamic range of your image. Through careful adjustments, you can create a more striking and visually appealing photograph.
White balance can also be refined during post-processing. You can fine-tune the color temperature and tint to accurately represent the hues and achieve the desired mood in your images. This is particularly useful if you shot in challenging lighting conditions or if you want to enhance the colors to create a particular effect.
Colors, contrast, and saturation can be modified to enhance the overall impact of your images. You can create a vibrant and eye-catching look or opt for a more muted and subdued aesthetic, depending on your vision and the subject matter. Post-processing also allows you to selectively adjust specific areas of your photo, such as brightening a subject’s face or highlighting certain elements.
Sharpening is another important aspect of post-processing. The captured image can often benefit from a slight boost in sharpness to enhance details and make the photo appear crisper. Additionally, noise reduction can be applied to reduce or eliminate any visible noise that may have resulted from higher ISO settings or low-light conditions.
Post-processing is not only about making technical adjustments but also about refining the artistic aspect of your images. You can experiment with different presets, filters, or creative effects to further enhance the mood, storytelling, or overall aesthetic of your photographs. This allows you to add your personal touch and create a unique style that sets your images apart.
However, it’s important to exercise moderation and restraint during post-processing. Avoid excessive editing that can make your images look over-processed or artificial. Strive for a natural and cohesive result that enhances the inherent qualities of your high-resolution photos without compromising their integrity.
Understanding the role of post-processing gives you the opportunity to transform your images into polished and visually stunning works of art. It allows you to bring out the full potential of your high-resolution photos and add your personal touch, resulting in images that truly reflect your unique vision as a photographer.
Storing and Backing Up High-Resolution Photos
When it comes to high-resolution photos, storing and backing up your precious images is crucial to ensure their safety, accessibility, and longevity. These files tend to be large and contain a wealth of detail, making it essential to establish a reliable storage system that protects your work from potential loss or damage.
The first step in storing high-resolution photos is to invest in ample storage space. Given the size of these files, consider using external hard drives with large capacities or cloud-based storage solutions. External hard drives provide a physical backup of your files, while cloud storage offers remote accessibility and an additional layer of protection.
It’s important to choose reputable storage devices or services from reliable brands to ensure the safety and reliability of your files. Look for drives or cloud storage options that offer encryption and password protection for an added layer of security.
Organization is key when it comes to managing high-resolution photos. Establish a clear and consistent file naming system that allows for easy retrieval and organization. Create folders and subfolders to categorize your images based on location, subject, or date. Utilize keywords and metadata to make searching and sorting more efficient.
Backing up your high-resolution photos is paramount to protect against data loss. Implement a robust backup strategy that includes both local and remote backups. This can be achieved by regularly creating copies of your files on multiple external hard drives or using backup software to automatically synchronize your files to cloud storage.
Consider adopting the 3-2-1 backup rule: have at least three copies of your data, stored on two different types of media, with one copy stored offsite. This ensures redundancy and protection against various types of potential hazards, such as hardware failure, theft, or natural disasters.
Regularly verify the integrity of your backups by performing test restores or using backup verification tools. This helps ensure that your backed-up files can be successfully accessed and recovered when needed.
Lastly, make it a habit to periodically check and update your storage devices. Hard drives can fail over time, so it’s important to monitor their health and replace them if necessary. Keep your storage devices in a cool, dry, and secure environment to minimize the risk of damage.
By implementing a solid storage and backup system for your high-resolution photos, you can have peace of mind knowing that your valuable work is protected and easily accessible. Take the necessary steps to safeguard your images and preserve them for years to come, allowing you to continue sharing and enjoying your high-resolution photography for generations.