
Getting Started with Internet on Your Nintendo Wii
The Nintendo Wii is not only a gaming console but also a device that allows you to browse the internet and explore a wide range of online content. Whether you want to stream videos, check your emails, or browse your favorite websites, setting up the internet on your Wii is a straightforward process. In this section, we will guide you through the steps to get started with internet browsing on your Nintendo Wii.
First, you need to set up your internet connection. Make sure your Wii console is connected to your home network either through a wired or wireless connection. Go to the Wii System Settings and select “Internet” to connect to your network. Follow the on-screen instructions to enter your network information and establish a connection.
Once your network is set up, it’s essential to update your Wii system to ensure it has the latest features and security patches. Go to Wii System Settings again, select “Wii System Update,” and follow the prompts to update your console.
Next, you’ll want to install the Internet Channel on your Wii. This channel provides access to the internet browser. Open the Wii Shop Channel on your console, and select “Channels” from the main menu. Find the Internet Channel and download it. Note that there may be a small fee associated with downloading this channel.
After installing the Internet Channel, you can access it from the Wii Menu or the Home Menu. Open the Internet Channel and wait for it to load. You’ll be greeted with a start page, where you can enter URLs or select bookmarks to visit your favorite websites.
Navigating the internet using the Wii Remote is simple. Use the directional pad to move the cursor and the A button to click on links or select options. You can also zoom in or out by pressing the plus or minus buttons. The Wii Remote’s motion controls allow you to scroll vertically by tilting it up or down.
Entering URLs can be done using an on-screen keyboard or by selecting letters with the Wii Remote. To make browsing more convenient, you can save bookmarks of your favorite websites for quick access in the future.
As you browse websites, you can interact with content, such as watching videos, reading articles, or playing browser-based games. However, keep in mind that the Wii’s internet browser has limited capabilities compared to desktop browsers, so some websites may not work properly or might be incompatible.
To manage your internet settings, including cookies and security preferences, navigate to the Internet Channel’s options menu. Here, you can adjust various settings to enhance your browsing experience and protect your privacy.
In addition to internet browsing, the Wii also offers features like the Wii Message Board and Forecast Channel. The Message Board allows you to send and receive messages with friends, while the Forecast Channel provides weather forecasts for your location.
If you encounter any issues with internet browsing on your Wii, you can consult the Wii’s user manual or visit Nintendo’s website for troubleshooting guides and support.
Now that you have set up the internet on your Nintendo Wii, you can start exploring the online world right from your console. Enjoy browsing the web, watching videos, and engaging with online content with the convenience of your Wii console.
Step 1: Setting up your Internet Connection
Before you can start browsing the internet on your Nintendo Wii, you need to set up a connection to your home network. This can be done either through a wired or wireless connection. Follow these steps to get your internet connection up and running on your Wii console.
1. Connect your Wii console to your home network. If you’re using a wired connection, plug one end of an Ethernet cable into the LAN port on the back of your Wii console and the other end into your router or modem. If you prefer a wireless connection, go to the Wii System Settings from the main menu and select “Internet.” Choose “Connection Settings” and then “Wireless Connection.” Select your wireless network from the list and enter the required password if prompted.
2. Test your internet connection. After setting up the connection, go back to the “Connection Settings” menu and select “Connection Test.” Your Wii console will now attempt to connect to the internet. If the test is successful, you will see a confirmation message stating that your Wii console is connected to the internet. If the test fails, double-check your network settings and make sure they are entered correctly.
3. Configure your network settings. To ensure a smooth internet browsing experience, it’s essential to configure your network settings properly. In the Internet connection settings menu, you can choose between “Automatic” or “Manual” settings. If you select “Automatic,” your Wii console will automatically obtain the IP address and DNS settings from your router. If you choose “Manual,” you will need to enter these details manually. Consult your router’s documentation or contact your internet service provider (ISP) for the correct settings.
4. Save your network settings. After configuring your network settings, make sure to save them. Select the “Save” button to save your settings and return to the main menu.
5. Test your internet connection again. Once you have saved your network settings, perform another connection test. This will verify that your Wii console can successfully connect to the internet using the configured settings. If the test is successful, you are ready to move on to the next step. If the test fails, double-check your network settings and try again.
Setting up your internet connection is the first step towards enjoying internet browsing on your Nintendo Wii. Whether you prefer a wired or wireless connection, follow these steps carefully to ensure a successful setup. Once your Wii console is connected to the internet, you can move on to updating your system and installing the Internet Channel, which will be covered in the following steps.
Step 2: Updating your Wii System
To ensure that your Nintendo Wii system is equipped with the latest features and security patches, it’s essential to regularly update your console. Updating your Wii system is a straightforward process that can be done with just a few simple steps. Follow the instructions below to keep your Wii system up to date.
1. Access the Wii System Settings. From the Wii Menu, select the round Wii button in the bottom left corner to open the System Menu. Navigate to the Wii System Settings, which is represented by a wrench icon.
2. Connect to the internet. Before you can update your Wii system, ensure that your console is connected to the internet. If you haven’t set up your internet connection yet, refer to the previous step for instructions on how to do so.
3. Start the system update. In the Wii System Settings, you will find an option called “Wii System Update.” Select this option to initiate the system update process.
4. Follow the on-screen prompts. Your Wii console will now check for available updates and guide you through the update process. Make sure your Wii console remains powered on and connected to the internet during the update.
5. Wait for the update to complete. The system update may take some time to download and install, depending on the size of the update and your internet connection speed. Be patient and do not turn off the console or disconnect from the internet until the update is complete.
6. Restart your Wii console. Once the update has been successfully installed, your Wii console will prompt you to restart. Follow the on-screen instructions to restart your console.
By regularly updating your Wii system, you not only ensure that you have access to the latest features but also protect your console against potential security vulnerabilities. It is recommended to check for system updates periodically to stay up to date with any improvements and enhancements that Nintendo may release.
It’s worth mentioning that the system update process may occasionally include firmware updates for connected accessories, such as Wii Remotes or other peripherals. If prompted, allow these updates to ensure optimal performance and compatibility.
Now that your Wii system is updated, you’re ready to move on to the next step: installing the Internet Channel. The Internet Channel is a dedicated browser that allows you to surf the web on your Nintendo Wii, offering a range of online experiences right from your console.
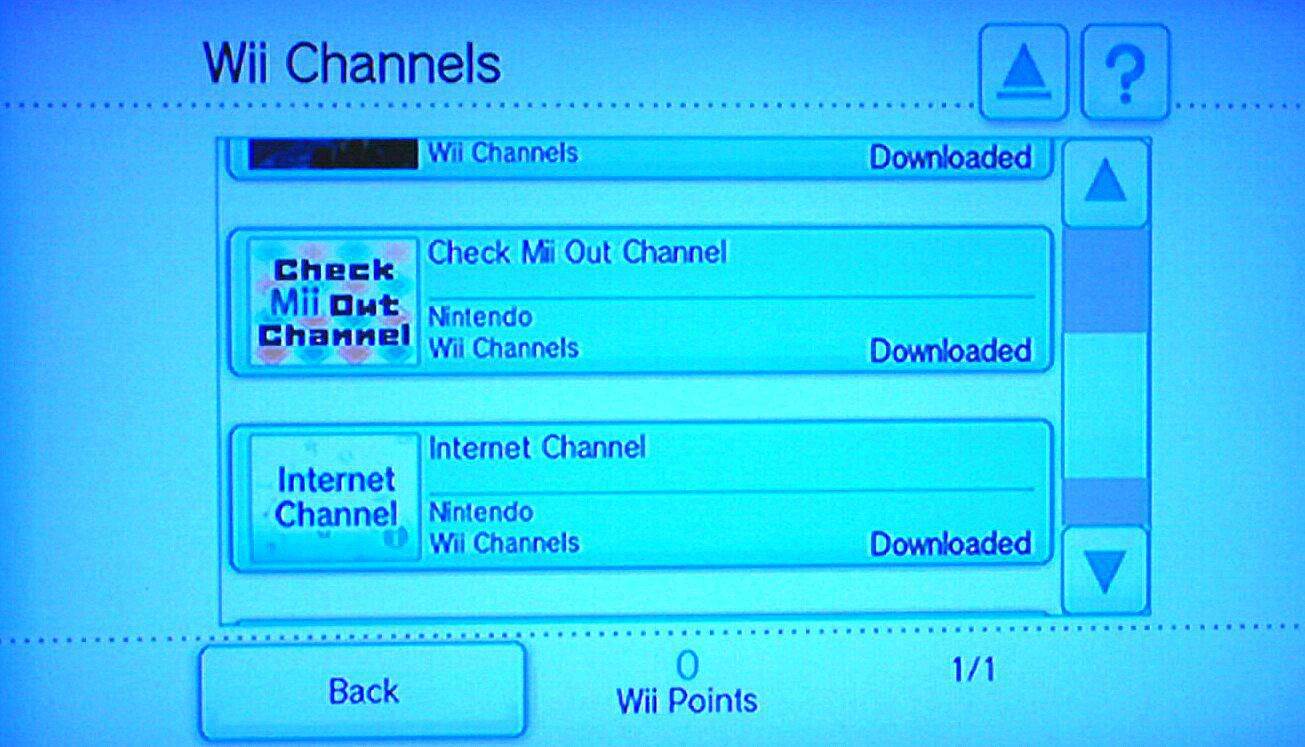
Step 3: Installing the Internet Channel
The Internet Channel is a dedicated web browser for the Nintendo Wii console, allowing you to access the internet and browse your favorite websites. In this step, we will guide you through the process of installing the Internet Channel on your Wii system.
1. Access the Wii Shop Channel. From the Wii Menu, select the round blue shopping bag icon labeled “Wii Shop Channel.” This will take you to the digital storefront where you can download various channels and games.
2. Navigate to the Internet Channel. Once in the Wii Shop Channel, select the “Start Shopping” button to browse the available channels. You can navigate through the different categories or use the search feature to find the Internet Channel.
3. Download the Internet Channel. When you find the Internet Channel, select it to open the details page. Here, you will find information about the channel, including any associated costs. If the Internet Channel is free, you can proceed to download it by selecting the “Free 0 Wii Points” button. If there is a cost associated with the Internet Channel, you will need to have enough Wii Points in your account to complete the purchase.
4. Wait for the download to complete. After initiating the download, the Internet Channel will begin to download and install on your Wii console. The speed of the download may vary depending on your internet connection. While the download is in progress, it’s important not to turn off your console or interrupt the download process.
5. Launch the Internet Channel. Once the download and installation are complete, you can access the Internet Channel from the Wii Menu or the Home Menu of your Wii console. Look for the globe icon labeled “Internet” and select it to launch the browser.
The Internet Channel will provide you with a convenient way to browse the internet using your Wii console. You can enter URLs, search for content, and interact with websites using the Wii Remote. Keep in mind that the browser may have certain limitations and may not be able to handle all types of web content, such as Flash-based websites.
Note: The Internet Channel may require periodic updates to ensure compatibility with evolving web technologies. Keep an eye out for any available updates in the Wii Shop Channel and install them to enjoy the best browsing experience on your Nintendo Wii.
Now that you have installed the Internet Channel, you are one step closer to exploring the online world using your Wii console. In the next step, we will guide you on how to access the Internet Channel and navigate the web using your Wii Remote.
Step 4: Accessing the Internet Channel
Now that you have successfully installed the Internet Channel on your Nintendo Wii, it’s time to learn how to access it and start browsing the web. In this step, we will guide you on how to launch the Internet Channel and get ready to explore the online world using your Wii console.
1. Navigate to the Wii Menu. Turn on your Wii console and wait for the Wii Menu to appear on your TV screen. The Wii Menu is the main interface where you can access various channels and settings.
2. Locate the Internet Channel. Look for the globe icon labeled “Internet” on the Wii Menu. You can scroll through the available channels by using the Wii Remote’s arrow buttons. When you find the Internet Channel, select it by pointing at it with the Wii Remote and pressing the A button.
3. Launch the Internet Channel. Once you have selected the Internet Channel, press the A button again to launch the browser. The channel will load, and you will be presented with a start page where you can enter URLs or select bookmarks to visit your favorite websites.
4. Use the Wii Remote to navigate. The Wii Remote is your tool for navigating the internet on your Wii console. Use the directional pad on the Wii Remote to move the cursor on the screen and highlight links, buttons, or text fields. To click on a link or select an option, simply press the A button on the Wii Remote. You can also scroll vertically by tilting the Wii Remote up or down.
5. Familiarize yourself with the browser interface. Take some time to explore the browser interface and its various options. You can use the “Back” button to navigate to the previous page, the “Home” button to return to the start page, and the “Forward” button to move forward to a previously visited page. Additionally, you can zoom in or out by pressing the plus or minus buttons on the Wii Remote.
6. Enter URLs or use bookmarks. To visit a specific website, use the on-screen keyboard to enter the URL in the address bar at the top of the screen. Alternatively, you can select bookmarks from the start page or add new bookmarks to easily access your favorite websites in the future.
With the Internet Channel now accessible on your Wii console, you can begin your online browsing adventure. From staying up to date on the latest news to streaming videos and exploring interactive websites, the internet opens up a whole new world of possibilities on your Nintendo Wii.
Remember to keep your Wii console connected to the internet and regularly check for browser updates to ensure the best browsing experience. In the next step, we will provide you with more information on how to navigate websites, interact with content, and manage your browsing settings on your Nintendo Wii.
Step 5: Navigating the Internet with your Wii Remote
With the Internet Channel open on your Nintendo Wii, it’s time to master the art of navigating the internet using your Wii Remote. In this step, we will guide you on how to use the Wii Remote to navigate websites, click on links, scroll through pages, and make the most out of your browsing experience.
1. Move the cursor: Use the directional pad on your Wii Remote to move the cursor on the screen. Point the remote at the TV and gently move your hand to control the cursor’s movement. The cursor will follow the motion of your hand, allowing you to navigate through different elements on the website.
2. Highlight links: When hovering over a link, the Wii Remote will automatically highlight it. Use the cursor to select a link by pointing at it and pressing the A button on the Wii Remote. This will take you to the linked page.
3. Scroll vertically: To scroll up or down on a webpage, tilt the Wii Remote up or down while holding down the B button. This motion-controlled scrolling feature allows for easy navigation through long web pages.
4. Go back and forward: If you want to go back to the previous page you visited, press the B button on the Wii Remote. To move forward to a previously visited page, press the “+” button. These buttons are located on the front side of the Wii Remote.
5. Zoom in and out: Adjusting the zoom level can improve the readability of web content. To zoom in, press the “+” button on the Wii Remote. To zoom out, press the “-” button. You can cycle through different zoom levels to find the most comfortable view for your browsing experience.
6. Enter text: When prompted to enter text, such as in search boxes or web forms, an on-screen keyboard will appear. Use the directional pad on the Wii Remote to select letters and navigate through the keyboard. Press the A button to confirm your selection and move to the next letter.
7. Interact with Flash content: The Wii’s internet browser supports some Flash-based content, allowing you to play Flash games or view multimedia elements on webpages. However, keep in mind that the Wii’s Flash capabilities are limited, and not all Flash content will work seamlessly.
By mastering the use of the Wii Remote, you can navigate websites with ease and enjoy a user-friendly browsing experience on your Nintendo Wii. Remember to take breaks and maintain good posture while using the Wii Remote to avoid any discomfort or strain.
In the next step, we will provide you with guidance on entering URLs, using bookmarks, and customizing your browsing settings on the Internet Channel of your Nintendo Wii.
Step 6: Entering URLs and Using Bookmarks
Now that you have familiarized yourself with navigating websites on your Nintendo Wii using the Wii Remote, it’s time to learn how to enter URLs manually and make use of bookmarks for quicker access to your favorite websites. In this step, we will guide you through the process of entering URLs and managing bookmarks on the Internet Channel of your Wii console.
Entering URLs:
1. From the start page of the Internet Channel, navigate to the address bar at the top of the screen.
2. Use the Wii Remote to select individual characters from the on-screen keyboard and enter the URL you want to visit. The keyboard can be navigated using the directional pad, and the A button is used to select letters.
3. After entering the URL, press the Enter button on the on-screen keyboard to load the webpage.
Using Bookmarks:
1. From the start page, scroll down to the “Bookmarks” section.
2. Use the Wii Remote to navigate through your existing bookmarks. You can use the directional pad to move the cursor and highlight a specific bookmark.
3. Press the A button to select the highlighted bookmark and load the corresponding webpage.
4. To add a new bookmark, navigate to the page you want to bookmark and press the plus (+) button on the Wii Remote. A dialog box will appear asking you to confirm the addition of the bookmark. Select “Yes” to add it to your bookmarks.
5. To manage your bookmarks, go to the options menu within the Internet Channel. From there, you can edit, delete, or rearrange your bookmarks as needed.
Using bookmarks allows you to quickly access your favorite websites without having to manually enter the URL every time. This can save you time and improve your browsing efficiency on the Nintendo Wii.
It’s worth noting that your Wii console has limited storage for bookmarks, so be mindful of the number of bookmarks you save. Consider organizing your bookmarks into folders to keep them organized and easily accessible.
Now that you know how to enter URLs and make use of bookmarks, you can efficiently navigate through various websites on your Nintendo Wii. In the next step, we will explore browsing websites, interacting with content, and managing settings on the Internet Channel of your Wii console.
Step 7: Browsing Websites and Interacting with Content
Now that you are equipped with the knowledge of entering URLs and using bookmarks on the Internet Channel of your Nintendo Wii, it’s time to dive into the exciting world of browsing websites and interacting with content. In this step, we will guide you on how to navigate webpages, interact with various types of content, and make the most out of your browsing experience on your Wii console.
1. Navigating webpages: Use the directional pad on your Wii Remote to move the cursor and highlight links, buttons, or text fields on a webpage. To click on a link or select an option, press the A button on the Wii Remote. You can scroll up or down on a webpage by tilting the Wii Remote in the respective direction.
2. Reading articles and viewing images: Once you have accessed a webpage, you can use the Wii Remote to scroll through the contents of the page. If a page contains long articles, you can use the Wii Remote’s motion controls to scroll down and continue reading. Use the plus (+) button to zoom in on text or images and the minus (-) button to zoom out.
3. Watching videos and playing audio: The Internet Channel on your Wii console supports some video and audio playback. If a webpage contains embedded videos or audio files, you can click on the respective play buttons to start watching or listening to the content.
4. Interacting with Flash-based content: Some websites may include Flash-based content such as games or interactive elements. While the Internet Channel can handle certain Flash content, keep in mind that it has its limitations. Not all Flash content will work seamlessly, and some features may be inaccessible.
5. Using online forms and submitting information: If you encounter online forms while browsing, the Wii Remote can be used to navigate through text fields and enter information. Simply point the cursor to the desired text field, press the A button on the Wii Remote, and use the on-screen keyboard to enter your information. Once the form is complete, select the submit button, if available, to send your information.
6. Saving images: If you come across an image you’d like to save, select the image on the webpage and choose the “Save Image” option, if available. This will save the image to your Wii console’s internal storage or an SD card, depending on your settings.
7. Managing cookies and privacy settings: Within the Internet Channel’s options menu, you can customize your browsing experience by managing cookies, clearing browsing history, and adjusting privacy settings. Take advantage of these features to protect your privacy and enhance your online security.
Exploring the internet and interacting with various types of content on your Nintendo Wii can offer a unique and enjoyable browsing experience. While the Internet Channel may have some limitations compared to traditional desktop browsers, it still allows you to access a wide range of websites and engage with their content.
In the next step, we will provide guidance on managing cookies and other settings on the Internet Channel of your Nintendo Wii to ensure a personalized and secure browsing experience.
Step 8: Managing Cookies and Other Settings
As you continue to explore the internet on your Nintendo Wii using the Internet Channel, it’s important to understand how to manage cookies and other settings to enhance your browsing experience and protect your privacy. In this step, we will guide you on how to manage cookies, clear browsing history, and customize other settings on the Internet Channel of your Wii console.
1. Open the options menu: To access the settings and customization options, click on the “Menu” button on the Wii Remote while browsing a webpage. This will open the Internet Channel’s options menu.
2. Managing cookies: Cookies are small text files that websites store on your computer to remember your preferences and provide a more personalized browsing experience. In the options menu, you can manage cookies by selecting “Settings” and then “Cookie Settings.” Here, you can choose to accept all cookies, block all cookies, or selectively allow certain websites to store cookies on your Wii console.
3. Clear browsing history: To clear your browsing history, navigate to the options menu and select “Settings.” Then choose “Clear History” to remove all records of the websites you have visited. This can help maintain your privacy by removing any traces of your browsing activity on the Wii console.
4. Adjust display settings: In the options menu, you can also customize the display settings to suit your preferences. Select “Settings” and then “Display Settings” to adjust the font size, screen zoom, and other visual aspects of the Internet Channel.
5. Set a homepage: If you have a favorite website that you frequently visit, you can set it as your homepage for quick and easy access. In the options menu, select “Settings” and then “Home Page.” Enter the URL of the website you want to set as your homepage and save the changes.
6. Other settings: Explore the options menu to discover additional settings and customization options offered by the Internet Channel. You may find features such as parental controls, connection settings, and security settings that allow you to fine-tune your browsing experience.
By managing cookies, clearing browsing history, and customizing other settings on the Internet Channel of your Nintendo Wii, you can ensure a more personalized and secure browsing experience. Regularly reviewing and adjusting these settings allows you to maintain control over your privacy and tailor the browser to your needs.
In the next step, we will explore how to use the Wii Message Board and Forecast Channel, two additional features that the Nintendo Wii offers for interactive and personalized experiences beyond internet browsing.
Step 9: Using the Wii Message Board and Forecast Channel
Beyond internet browsing, the Nintendo Wii offers additional features that allow you to connect with friends and access personalized information. In this step, we will explore how to use the Wii Message Board and Forecast Channel to enhance your Wii experience.
1. Wii Message Board: The Wii Message Board allows you to send and receive messages with friends who also have a Wii console. To access the Wii Message Board, return to the Wii Menu and select the envelope icon in the lower-right corner. From here, you can compose new messages, read received messages, and manage your friend list. Use the Wii Remote to navigate through your messages and reply to them.
2. Forecast Channel: The Forecast Channel provides weather forecasts and information right on your Wii console. From the Wii Menu, select the sun icon in the lower-right corner to open the Forecast Channel. The channel will display the current weather conditions, as well as a five-day forecast. You can navigate through the days using the Wii Remote and access additional weather information by selecting specific areas on the map.
3. Personalize your experience: Both the Wii Message Board and Forecast Channel allow for personalization. In the Wii Message Board, you can customize your Mii characters and create unique messages using various themes and backgrounds. In the Forecast Channel, you can save favorite locations and view weather information for different cities around the world.
These additional features of the Nintendo Wii add a social and informative aspect to your console experience. Connect with friends through messages and stay up-to-date with the latest weather forecasts, all from the comfort of your living room.
In the final step, we will address common troubleshooting steps and provide solutions to common issues you may encounter while using internet browsing and other features on your Nintendo Wii.
Step 10: Troubleshooting and Common Issues
While using the internet browsing and other features on your Nintendo Wii, you may encounter certain issues or face challenges. In this step, we will help you recognize common problems and provide troubleshooting steps to resolve them.
1. Connection Issues: If you are experiencing trouble connecting to the internet, ensure that your Wii console is properly connected to your home network. Double-check your network settings and try restarting your router or modem. If you are using a wireless connection, ensure that your Wii console is within range of your wireless router.
2. Slow Browsing Speed: If you are experiencing slow browsing speeds, ensure that there are no other devices on your network consuming a large amount of bandwidth. You can also try clearing your browsing history and cookies to improve performance. Additionally, consider optimizing your wireless signal by repositioning your Wii console and router or applying firmware updates to your router.
3. Compatibility Issues: The Internet Channel on the Nintendo Wii has limited compatibility with certain websites and technologies. Some websites may not load properly, or you may encounter issues with Flash-based content. In such cases, try visiting more mobile-friendly versions of websites or utilizing alternative web services optimized for the Wii platform.
4. Error Messages: If you receive error messages while browsing the internet, note down the error code or message and search for solutions on Nintendo’s support website. They provide a comprehensive troubleshooting guide for the Internet Channel and other Wii system features.
5. Updating the Internet Channel: Regularly check for updates in the Wii Shop Channel to ensure the Internet Channel is up to date. Updates may include performance improvements, security patches, and additional features. Keeping your browser up to date can help resolve compatibility issues and enhance your browsing experience.
6. Clearing System Cache: Occasionally, clearing the system cache can help resolve issues with the Internet Channel or other features on your Nintendo Wii. Go to the Wii System Settings, select “Internet,” and then “Console Information.” From there, choose “Clear Cache” to remove temporary files and data stored by the system.
If you’re encountering persistent issues or need more specific troubleshooting instructions, consult the Wii’s user manual or visit Nintendo’s support website. They provide comprehensive resources and assistance to help you resolve any problems you may encounter while using your Nintendo Wii.
Remember to periodically review the system requirements and recommendations for the Internet Channel to ensure compatibility with the evolving web technologies and ensure a smooth browsing experience on your Nintendo Wii.