
How to Split an Uber Fairly with Your Friends
Splitting an Uber fare with your friends can sometimes lead to confusion and awkwardness when it comes to dividing the cost. Fortunately, there are several methods you can use to ensure a fair and hassle-free split. Here are three options for splitting an Uber fare with your friends:
Option 1: Splitting the Fare within the Uber App
If you prefer to keep things simple, you can easily split the fare directly within the Uber app. When requesting the ride:
- Request an Uber as you normally would.
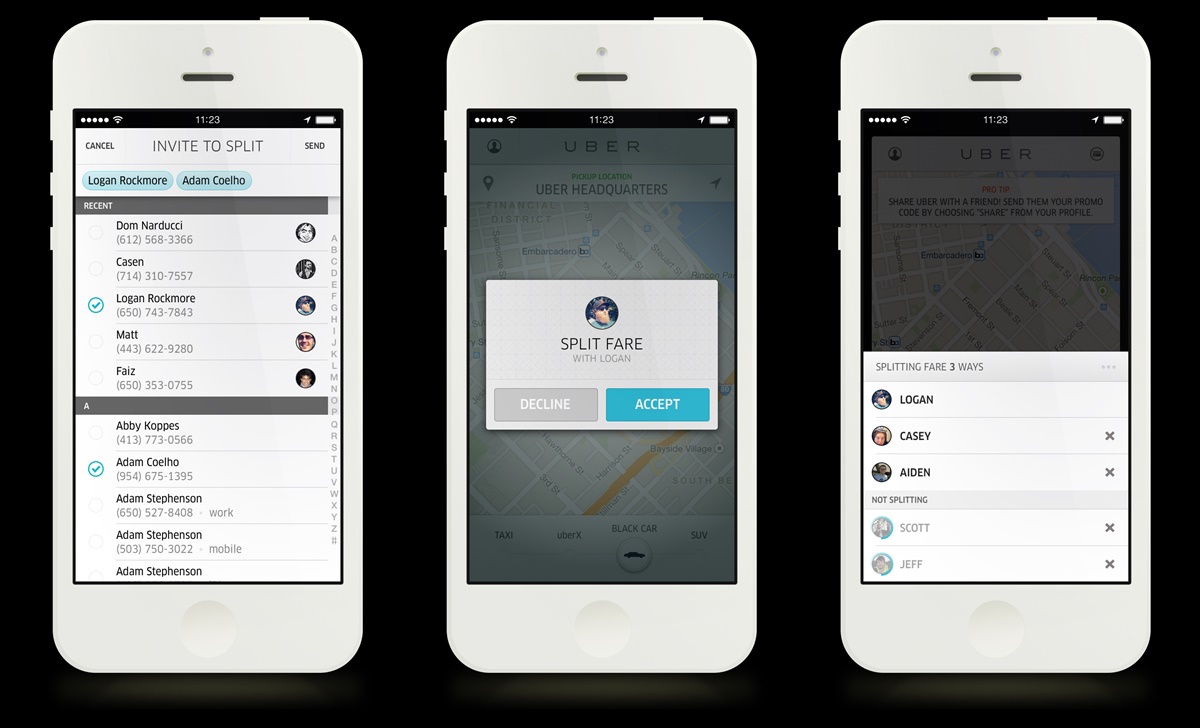
- Tap on the “Split Fare” option provided on the app.
- Select the friends with whom you want to split the fare.
- Confirm the split, and the fare will be divided equally among all the selected friends.
Option 2: Using Third-Party Apps to Split the Fare
If you want more flexibility and additional features for splitting the fare, you can use third-party apps specifically designed for this purpose. Here’s how:
- Download a reliable and trusted third-party app that supports Uber fare splitting.
- Connect the app to your Uber account.
- Request an Uber ride through the third-party app.
- Use the app to split the fare with your friends. The app will handle the calculations and payments.
Option 3: Calculating the Fare Manually
If you prefer a more hands-on approach or don’t want to rely on apps, you can manually calculate and split the fare. Here’s how:
- Determine the total fare of the Uber ride.
- Decide on a fair division method, such as splitting the fare based on distance traveled or the time spent in the ride.
- Collect the payment from each friend based on their share of the fare.
Additional Tips for Splitting an Uber
Here are a few extra tips to ensure a smooth and fair split with your friends:
- Communicate with Your Friends Before Requesting the Uber: Make sure everyone is on the same page regarding the fare split and payment method.
- Check If Everyone Is Paying with the Same Payment Method: Avoid any confusion by confirming whether everyone will be using the same payment method, such as a credit card or a digital wallet.
- Have a Backup Plan in Case Someone Doesn’t Pay: Discuss what to do in case someone forgets or is unable to pay their share. It’s always good to have a backup plan to avoid any awkward situations.
By following these methods and tips, you can split an Uber fare fairly and ensure a hassle-free experience with your friends. Happy Ubering!
The Basics of Splitting an Uber
Splitting an Uber fare with your friends doesn’t have to be complicated. By understanding the basics of how to split the cost, you can ensure a fair and convenient process. Here are some key points to keep in mind:
Option 1: Splitting the Fare within the Uber App
The easiest and most straightforward way to split an Uber fare is by using the built-in feature within the Uber app. When you request a ride, you’ll have the option to split the fare with your friends. Simply tap on the “Split Fare” button, select the friends you want to split the cost with, and confirm the split. The app will automatically calculate and divide the fare equally among the selected friends.
Option 2: Using Third-Party Apps to Split the Fare
If you’re looking for more advanced options, you can choose to use third-party apps specifically designed to help you split Uber fares. These apps provide additional features, such as customizing the split based on factors like distance or time. Download a trusted third-party app that integrates with Uber, connect it to your Uber account, and follow the app’s instructions to split the fare seamlessly.
Option 3: Calculating the Fare Manually
If you prefer a more hands-on approach or don’t want to rely on apps, you can manually calculate and split the fare. Start by determining the total fare of the Uber ride. Then, decide on a fair division method based on factors like distance traveled or time spent in the ride. Once you’ve determined the amount for each person, collect the payment from your friends accordingly.
Additional Tips for Splitting an Uber
Regardless of the method you choose, here are a few tips to make the fare-splitting process smoother:
- Communicate with Your Friends: Before requesting the Uber, discuss with your friends about the fare split and ensure everyone is on the same page.
- Confirm Payment Methods: Check if everyone is planning to pay with the same payment method, such as a credit card or digital wallet, to avoid any confusion or delays.
- Have a Backup Plan: In case someone forgets or is unable to pay their share, discuss a backup plan or alternative payment methods to avoid any uncomfortable situations.
By understanding these basics and following these tips, splitting an Uber fare with your friends can be a simple and fair process. Enjoy your ride and share the cost conveniently!
Option 1: Splitting the Fare within the Uber App
If you prefer a hassle-free and convenient method for splitting an Uber fare with your friends, using the built-in feature within the Uber app is the way to go. Here’s how you can split the fare within the app:
- Step 1: Request an Uber
- Step 2: Tap on “Split Fare”
- Step 3: Select Friends to Split the Fare With
- Step 4: Confirm the Split
Open the Uber app on your smartphone and enter your pickup location and destination. Select the type of Uber ride you want, such as UberX, Uber Black, or Uber Pool, and confirm your request for a driver.
Once your driver has been assigned and you’re on your way, locate the fare details on the bottom of the app’s screen. Tap on the “Split Fare” option.
A list of friends from your contacts or Uber app will appear. Choose the friends you want to split the fare with by tapping on their names. You can select multiple friends to divide the cost equally or adjust the split if someone is paying a different amount.
After selecting the friends, confirm the split by tapping on the “Confirm” button or similar option provided on the app. The fare will be divided equally among all the selected friends. They will receive a notification to accept the split and pay their share.
The great advantage of splitting the fare within the Uber app is that the calculations are done automatically, eliminating any potential errors or confusion. Everyone involved can easily see the amount they need to pay and can settle it directly through the app.
This feature also allows for seamless and instant payment, as the split fare is charged directly to each person’s registered payment method. This ensures a fair and fast process, without the need to collect cash or manually transfer money between friends.
Remember to communicate with your friends beforehand to confirm that they have the Uber app installed, as well as their usernames or phone numbers to easily add them to the fare split. This way, you can enjoy the journey knowing that the fare will be settled smoothly among everyone.
Step 1: Request an Uber
The first step to splitting an Uber fare within the Uber app is to request a ride. Follow these simple instructions to request an Uber:
- Open the Uber App
- Enter Your Pickup Location and Destination
- Choose Your Uber Ride Option
- Confirm Your Request
- Confirm the Split Fare
Open the Uber app on your smartphone. If you haven’t already done so, download the app from the App Store or Google Play Store and sign in to your account.
On the main screen of the app, you will see a pickup location search bar. Enter the location where you want to be picked up. You can either type the address manually or use the GPS feature to automatically detect your current location.
Next, enter your destination by either typing the address or selecting it from the suggestions provided by the app.
Once you’ve entered your pickup location and destination, the app will display the available Uber ride options in your area, such as UberX, UberPool, or Uber Black. Select the type of ride that best suits your needs by tapping on it.
Review the trip details, including the estimated fare and estimated time of arrival, displayed on the screen. If everything looks correct, tap on the “Confirm” button to request the Uber.
After you’ve requested the Uber, the app will navigate to a new screen with the details of your ride, such as the driver’s name, vehicle type, and estimated time of arrival. Below these details, you will see the option to “Split Fare.” Tap on this option to indicate your intention to split the fare with your friends.
It’s important to provide accurate and specific pickup and destination locations to ensure a smooth and efficient Uber experience. Make sure to double-check the addresses before confirming your ride request to avoid any confusion or delays.
Once you have successfully requested the Uber and selected the “Split Fare” option, you are ready to proceed to the next step of splitting the fare within the Uber app. Just remember to wait for your friends to accept the fare split invitation in order for the cost to be divided equally among everyone.
Step 2: Tap on “Split Fare”
After requesting an Uber, the next step in splitting the fare within the Uber app is to tap on the “Split Fare” option. Here’s how you can do it:
- Once the Uber is Confirmed
- Locate the “Split Fare” Option
- Confirm Your Intention to Split
- Invite Friends to Split the Fare
- Proceed to Confirm the Split
Once you have successfully requested an Uber and the driver has been assigned, the app will navigate to a screen displaying the driver’s name, vehicle details, and estimated time of arrival. Here, you will find the fare details at the bottom of the screen.
Scroll down to the fare details section and look for the “Split Fare” option. It is usually located below the fare breakdown and payment method details. Tap on this option to proceed with splitting the fare.
After tapping on “Split Fare,” a confirmation prompt will appear on the screen. This prompt is to ensure that you want to split the fare with your friends. Verify that you want to continue with the fare split by tapping on the “Confirm” button or similar option.
After confirming your intention to split the fare, the app will display a list of your friends. You can invite your friends to split the fare with you by selecting their names from the list. You may need to grant the app access to your contacts to view and select your friends.
If your friends are not already on your Uber friends list, you can manually enter their phone numbers or email addresses to invite them to split the fare. The app will send them a notification to accept the invitation.
Once you have selected the friends you want to split the fare with, tap on the button to proceed. The app will confirm the fare split, and a notification will be sent to your friends inviting them to accept the split request. Each friend will have the option to accept and pay their portion of the fare directly within the app.
By tapping on the “Split Fare” option within the Uber app, you can easily indicate your intention to divide the cost of the ride with your friends. This feature simplifies the process and ensures that the fare is distributed equally among all participants.
Remember to check that you have a stable internet connection when tapping on the “Split Fare” option, as it requires a network connection to send out the fare split invitations to your friends. Additionally, make sure that your friends have their Uber accounts set up and are available to accept the split invitation.
Step 3: Select Friends to Split the Fare With
Once you have tapped on the “Split Fare” option within the Uber app, the next step is to select the friends you want to split the fare with. Follow these steps to select your friends:
- Access the List of Friends
- Select your Friends
- Add New Friends Manually (if needed)
- Confirm Selection
After confirming your intention to split the fare, the app will provide a list of friends from your contacts or the Uber app itself. This list may include friends who are already on your Uber friends list or individuals you frequently share rides with. If necessary, grant the app access to your contacts to view and select your friends.
Browse through the list and select the friends you want to split the fare with. To do this, simply tap on their names to include them in the fare split. You can select multiple friends if you wish to divide the cost among several people.
If your desired friends are not on your Uber friends list or in your contacts, you have the option to manually add them. Tap on the “+ Add Friends” or similar button provided by the app, and enter their phone numbers or email addresses. The app will send them a fare-split invitation.
After you have selected all the friends you want to split the fare with, review your choices to ensure accuracy. Once you are satisfied, tap on the “Confirm” or similar button to proceed with the fare split.
By selecting your friends within the Uber app, you are designating them as participants in the fare split. They will receive a notification regarding the fare split request and have the option to accept and pay their portion of the fare.
Make sure to communicate with your friends beforehand to ensure that they are ready to participate in the fare split and have the Uber app installed on their devices. This will help avoid any delays or confusion during the fare-splitting process.
Remember that your friends need to accept the fare split invitation within the Uber app in order for the cost to be divided equally among everyone. Encourage them to check their notifications and accept the invite promptly for a smooth and convenient fare-splitting experience.
Step 4: Confirm the Split
After selecting your friends to split the Uber fare with, the final step is to confirm the fare split within the Uber app. Follow these steps to confirm the split:
- Review the Split Details
- Verify the Amount Due
- Confirm the Split
- Notify Your Friends
- Friends Accept the Split
Once you have selected your friends, the app will display a screen summarizing the fare split details. Take a moment to review the names of the friends included in the split and ensure that everything is accurate.
The app will also display the total fare amount and the individual share for each friend based on an equal split. Double-check these amounts to ensure that the calculations are correct.
Once you have reviewed the fare split details, tap on the “Confirm” button or a similar option provided by the app to confirm the split. By doing so, you are indicating your agreement to divide the fare among the selected friends.
After confirming the fare split, the Uber app will send a notification to each friend you have included in the split. They will receive a message indicating their share of the fare and will be prompted to accept the split request.
Your friends will need to open the Uber app and accept the split fare request to proceed with the payment. Once they accept, the app will automatically charge their registered payment method for their portion of the fare.
Confirming the fare split within the Uber app is crucial to ensure that everyone is aware of their individual share of the fare. It also allows the app to process the payments seamlessly, reducing the need for manual transactions between friends.
Because each friend needs to accept the fare split invitation within the Uber app, make sure to remind them to check their notifications and take the necessary steps to confirm their participation. This helps ensure a smooth and efficient fare-splitting process.
Once the fare split has been confirmed and your friends have accepted the split request, the Uber app will handle the payment for each individual, providing a convenient and hassle-free experience for everyone involved.
Option 2: Using Third-Party Apps to Split the Fare
If you’re looking for more advanced options and additional features for splitting an Uber fare, using third-party apps can be a great solution. These apps are specifically designed to help you split Uber fares easily and efficiently. Here’s how you can utilize third-party apps to split the fare:
- Step 1: Download a Third-Party App
- Step 2: Connect the App to Your Uber Account
- Step 3: Request an Uber through the Third-Party App
- Step 4: Split the Fare with Your Friends in the App
Start by searching for reliable and trusted third-party apps that specialize in splitting Uber fares. Examples of popular apps include Splitwise, Venmo, or FareSplit. Visit your device’s app store (App Store for iOS or Google Play Store for Android) and download the app that best suits your needs.
Once you have the app installed on your device, open it and follow the instructions to connect it to your Uber account. Most third-party apps will guide you through a simple setup process, requiring you to log in to your Uber account and grant the necessary permissions.
Instead of using the Uber app directly, use the third-party app to request an Uber ride. Open the app, select the option to request a ride, and enter your pickup location and destination. The third-party app will use Uber’s API to process your ride request. It will also provide you with additional options for fare splitting and customization.
Once your ride is complete, open the third-party app and access the ride details. Depending on the app you’re using, there will be specific features and options for splitting the fare. You can choose to divide the cost equally among all participants or customize the split based on factors like distance traveled or time spent in the ride. Follow the app’s instructions to split the fare with your friends and complete the payment process.
Using third-party apps to split an Uber fare provides you with more flexibility and control over the fare-splitting process. These apps often offer additional features such as itemizing expenses and tracking shared expenses over time. They can also help you keep a record of who has paid their share and send friendly reminders to those who haven’t.
Before using a third-party app, ensure that it is reputable and trustworthy. Read user reviews, check the app’s ratings, and confirm that it integrates seamlessly with Uber. Also, make sure your friends are familiar with the app you choose, as they will need to download and use it for the fare-splitting process.
By leveraging third-party apps dedicated to splitting Uber fares, you can simplify the logistics, minimize potential misunderstandings, and enjoy a smooth and convenient experience when dividing the costs among your friends.
Step 1: Download a Third-Party App
The first step in using a third-party app to split an Uber fare is to download a reliable and trusted app that specializes in fare splitting. These apps provide additional features and customization options to make the fare-splitting process more convenient. Here’s how you can download a third-party app:
- Identify Reputable Apps
- Access Your App Store
- Search for the App
- Download and Install the App
- Create an Account (if necessary)
Start by researching reputable third-party apps that are known for their ability to split Uber fares. Examples of popular apps include Splitwise, Venmo, and FareSplit. Read reviews, check ratings, and consider user feedback to ensure that the app you choose is reliable and well-suited for your needs.
Once you have identified a suitable app, open your device’s app store. For iOS users, this would be the App Store, and for Android users, it would be the Google Play Store.
Use the search function within the app store to search for the third-party app of your choice. Type in the app’s name or relevant keywords to find the app quickly.
Once you have located the app in the search results, select it to access the app’s page. Read the app’s description, check the ratings and reviews, and review the screenshots to ensure it meets your requirements. If you are satisfied, proceed to download and install the app on your device by tapping the “Download” or “Install” button.
After the app is installed, open it and follow the on-screen instructions to create an account if required. This usually involves providing your email address, setting up a password, and agreeing to the app’s terms and conditions.
Remember to download a reputable and trusted app from the official app store of your device. This reduces the risk of installing malicious or unreliable apps that may compromise your personal information or payment details.
By downloading a third-party app dedicated to splitting Uber fares, you gain access to additional features, customization options, and a more streamlined fare-splitting process. These apps can significantly enhance your experience when dividing the cost of an Uber ride among your friends, making it easier and more convenient for everyone involved.
Step 2: Connect the App to Your Uber Account
Once you have downloaded a third-party app that specializes in splitting Uber fares, the next step is to connect the app to your Uber account. By doing this, you enable the app to access your Uber ride details and seamlessly integrate with your Uber account. Here’s how you can connect the app to your Uber account:
- Open the Third-Party App
- Sign In or Create an Account (if required)
- Connect to Your Uber Account
- Authorize the App
- Grant Necessary Permissions
Locate the third-party app that you downloaded on your device and open it. Look for the app’s icon on your home screen or in the app drawer, and tap on it to launch the app.
If you already have an account for the third-party app, sign in using your credentials. However, if you are using the app for the first time, you might need to create a new account. Follow the app’s instructions to create your account by providing the necessary information, such as your name, email address, and password.
After signing in or creating an account, look for the option to connect your Uber account within the settings or account section of the third-party app. The location of this option can vary depending on the app you are using. Tap on the option to initiate the connection process.
The third-party app will redirect you to the Uber login page or prompt you to sign in to your Uber account within the app itself. Enter your Uber login credentials, such as your email address and password, and tap on the “Authorize” or “Connect” button to grant the app access to your Uber account.
Once you have authorized the connection, the third-party app may ask for additional permissions to access your Uber ride details. These permissions allow the app to retrieve your trip information, including the fare details and ride history, to facilitate the fare-splitting process. Grant the necessary permissions based on the app’s prompts and instructions.
By connecting the third-party app to your Uber account, you enable the app to synchronize with your ride information and streamline the fare-splitting process. This connection ensures that the app can access and analyze your ride details accurately, making it easier to split the fare with your friends.
Keep in mind that connecting the third-party app to your Uber account requires providing access to your Uber data. Ensure that you are using a trusted and reputable app from a reliable source to protect your personal information and maintain the security of your accounts.
Once you have successfully connected the third-party app to your Uber account, you are ready to move on to the next steps of requesting an Uber ride and splitting the fare using the additional features provided by the app.
Step 3: Request an Uber through the Third-Party App
Now that you have connected the third-party app to your Uber account, you can utilize its features to request an Uber ride. By using the third-party app instead of the Uber app directly, you gain access to additional options and customization for splitting the fare. Here’s how you can request an Uber through the third-party app:
- Open the Third-Party App
- Navigate to the Ride Request Section
- Enter Pickup Location and Destination
- Select Uber Ride Option
- Confirm Your Uber Ride Request
Locate the third-party app on your device and open it. Look for the app’s icon on your home screen or in the app drawer, and tap on it to launch the app.
Once you have opened the third-party app, look for the ride request section or a similar option within the app’s interface. This may be labeled as “Request a Ride,” “Book a Ride,” or something similar. Tap on this option to initiate the ride request process.
Within the ride request section of the third-party app, you will need to provide the pickup location and destination for your Uber ride. Enter the specific addresses or use the app’s integrated map feature to select the desired locations.
After entering the pickup and destination details, the third-party app will display the available Uber ride options. These options may include UberX, UberPool, Uber Black, or other vehicle types. Choose the desired ride option based on your preferences and tap on it.
Review the details of your Uber ride request, including the pickup location, destination, and selected ride option. If everything looks accurate, tap on the “Confirm” or “Request Uber” button to proceed with the ride request.
By requesting an Uber through the third-party app, you gain access to specific features and customization options provided by the app. These features may include the ability to split the fare based on different criteria, adjust the split percentages, or even schedule recurring rides for easier fare splitting over time.
Make sure to familiarize yourself with the interface and options offered by the third-party app you are using. Each app may have its unique design and functionality, so take some time to explore and understand how to maximize its features for your Uber ride requests.
Once you have completed the ride request process within the third-party app, you can move on to the next step of splitting the fare with your friends using the additional functionality and customization provided by the app.
Step 4: Split the Fare with Your Friends in the App
After requesting an Uber ride through the third-party app, the next step is to split the fare with your friends using the app’s features and functionality. Here’s how you can split the fare with your friends within the app:
- Access the Ride Details
- Select the Fare Splitting Option
- Customize the Fare Split
- Invite Friends to Split the Fare
- Complete the Payment Process
Once your Uber ride is complete, open the third-party app and navigate to the ride details section. This section will provide you with the necessary information about the ride, including the fare amount and other relevant details. Look for options or buttons related to fare splitting or expense sharing.
Within the ride details section, you will find options specific to fare splitting. These options may differ based on the third-party app you are using. Explore these options to choose the most suitable method for splitting the fare among your friends.
Depending on the app’s capabilities, you may have the flexibility to customize the fare split according to your preferences. You can divide the fare equally among all participants or create a customized split based on factors like distance traveled or time spent in the ride. Follow the app’s instructions to set the desired split parameters.
Once you have customized the fare split, use the app’s features to invite your friends to participate in the fare split. This could involve sending them notifications, invitation links, or sharing the expense directly within the app. The app will handle the process of notifying and inviting your friends to join the fare split.
After your friends accept the invitation and join the fare split within the app, they will be prompted to complete the payment process for their respective shares. The app will facilitate the payment transaction, ensuring that each friend pays their portion of the fare using their preferred payment method.
The specific steps and features for splitting the fare within the third-party app may vary depending on the app you are using. Some apps may offer additional features such as itemizing expenses, tracking shared expenses over time, or even providing payment reminders for outstanding amounts.
Take the time to explore and familiarize yourself with the fare splitting options and functionality offered by the specific third-party app you have chosen. This will allow you to tailor the fare split process to your preferences and ensure a smooth and convenient experience for yourself and your friends.
By utilizing the fare splitting features within the third-party app, you can simplify the process of dividing the Uber fare among your friends, save time on manual calculations, and streamline the payment process for a hassle-free experience.
Option 3: Calculating the Fare Manually
If you prefer a more hands-on approach or do not wish to use third-party apps, you can manually calculate and split the Uber fare among your friends. Although this method requires some effort, it allows for flexibility and customization. Here’s how you can calculate the fare manually:
- Step 1: Determine the Total Fare
- Step 2: Split the Fare Based on Distance or Time
- Distance Traveled: Divide the total fare based on the distance each person traveled. If one person traveled 60% of the total distance, they would pay 60% of the total fare, and so on.
- Time Spent: Divide the total fare based on the time each person spent in the ride. If one person spent 40% of the total ride time, they would pay 40% of the total fare, and so on.
- Step 3: Collect Payment from Each Friend
Once your Uber ride is complete, refer to the fare shown in the Uber app. This fare includes the base fare, distance traveled, time spent in the ride, and any additional fees or surcharges. Make a note of the total fare amount as you will need it for the subsequent steps.
Decide on a fair division method for splitting the fare amongst your friends. There are two common approaches:
Contact each friend and inform them of their share of the fare based on the agreed-upon division method from Step 2. You can use messaging apps or other means of communication to communicate the amount owed. Collect the payment from each friend through their preferred payment method, such as cash, bank transfer, or digital payment apps.
While calculating the fare manually offers more flexibility, it requires efficient communication and coordination among friends. Ensure everyone understands the division method and is aware of their share to avoid any misunderstandings or discrepancies.
Remember that manual fare splitting may not be as precise as using in-app or third-party features, especially for complex fare structures. Consider rounding off decimals or estimating small amounts to simplify the process and minimize discrepancies.
By calculating the fare manually, you can customize the fare split and adapt it to your preferences. However, it requires active participation and coordination among friends to ensure a fair and accurate division of the Uber fare.
Step 1: Determine the Total Fare
The first step in manually calculating and splitting an Uber fare is to determine the total fare of the ride. The total fare includes the base fare, distance traveled, time spent in the ride, and any additional fees or surcharges. Here’s how you can determine the total fare:
- Review the Fare Details in the Uber App
- Make a Note of the Total Fare
- Consider Any Discounts or Promotions
- Account for any Additional Charges
After completing your Uber ride, open the Uber app and navigate to the ride details section. This section provides a breakdown of the fare amount, which includes the base fare as well as any additional charges or surcharges applicable to the ride.
Take note of the total fare amount displayed in the Uber app. This is the amount that will be used for splitting the fare among your friends. It’s important to record this amount accurately to ensure a fair distribution of the fare.
If you or your friends have applied any discounts or promotions to the ride, be sure to account for these adjustments when determining the total fare. Discounts can reduce the overall fare amount, resulting in a lower cost to split among your friends.
In some cases, there may be additional charges, such as tolls or airport surcharges, that are included in the total fare. Take these charges into consideration when calculating the overall fare amount.
By accurately determining the total fare, you lay the foundation for a fair and transparent fare-splitting process. It ensures that everyone has a clear understanding of the initial cost to be divided among friends.
Remember, transparency is key when determining the fare amount. Communicate the total fare to your friends and provide them with any relevant details or adjustments, such as discounts or additional charges. This helps facilitate a smooth and equitable fare-splitting process and prevents any confusion or disagreements later on.
With the total fare determined, you can proceed to the next step of splitting the fare based on mutual agreement and utilizing a method that suits the preferences of you and your friends.
Step 2: Split the Fare Based on Distance or Time
Once you have determined the total fare of the Uber ride, the next step in manually calculating and splitting the fare is to decide on a fair division method. Two common approaches for splitting the fare are based on distance traveled or time spent in the ride. Here’s how you can split the fare based on distance or time:
- Distance Traveled
- Time Spent
If you choose to split the fare by distance traveled, you divide the total fare based on the distance covered by each person. For example, if one person traveled 60% of the total distance, they would be responsible for paying 60% of the total fare, while another person who traveled 40% of the distance would be responsible for 40% of the fare.
If you opt to split the fare by time spent in the ride, you divide the total fare based on the duration each person spent in the Uber ride. For instance, if one person spent 40% of the total ride time, they would be responsible for paying 40% of the total fare, while another person who spent 60% of the ride time would be responsible for 60% of the fare.
When deciding on the division method, consider the principle of fairness and the riders’ preferences. It’s important that everyone agrees to the chosen approach and feels that their share of the fare accurately reflects their contribution to the ride.
For more complex situations, you can even combine both distance and time factors to create a fair split. For example, if one person traveled 50% of the distance but only spent 30% of the time in the ride, you can consider both factors to determine their respective share of the fare.
Open and transparent communication among friends is vital to ensure everyone understands the chosen division method and agrees with the calculation. Consider discussing the reasoning behind the chosen approach to foster consensus and address any concerns or suggestions from the group.
By splitting the fare based on distance or time, you distribute the cost of the Uber ride in a manner that reflects each person’s individual contribution. This approach allows for flexibility and customization when calculating and dividing the fare, ensuring a fair and equitable distribution among friends.
Step 3: Collect Payment from Each Friend
After calculating the individual shares of the fare among your friends based on the chosen division method, it’s time to collect the payment from each person. Proper communication and coordination are essential to ensure a smooth and efficient payment collection process. Here’s how you can collect payment from each friend:
- Notify Your Friends
- Clarify Payment Deadline
- Payment Options
- Follow Up with Reminders
- Record and Track Payments
Contact each friend and inform them of their share of the fare based on the previously agreed-upon division method. Clearly communicate the amount owed and provide any necessary details regarding the preferred payment method, such as cash, bank transfer, or digital payment apps.
Establish a payment deadline to ensure timely collection from each friend. Clearly communicate the due date and any consequences for late payment, if applicable. This helps maintain accountability and ensures a smooth settlement process.
Offer various payment options to accommodate your friends’ preferences. Some may prefer cash, while others might prefer digital payment apps or bank transfers. Provide clear instructions on how they can make the payment, including relevant payment details and any necessary contact information.
If some friends have not yet made their payment by the specified deadline, gently remind them of their outstanding balance. Send friendly reminders via text message or through the preferred communication channel to prompt them to settle their share of the fare.
To maintain transparency and avoid any misunderstandings, maintain a record of the payments made by each friend. Keep track of who has paid and cross-reference it with the total fare amount. This record will also serve as proof of payment if any discrepancies arise in the future.
Effective communication during the payment collection process is vital to ensure that everyone fulfills their financial responsibility. It helps maintain trust, avoids potential misunderstandings, and strengthens the overall dynamics of the fare-splitting arrangement.
Remember, it is important to be considerate and understanding when collecting payments. Everyone has different financial circumstances, so provide flexibility when necessary and foster an open dialogue if any issues or concerns arise.
By following these steps and maintaining clear communication, you can ensure a streamlined and efficient payment collection process, allowing for a fair and convenient settlement of the fare among you and your friends.
Additional Tips for Splitting an Uber
When it comes to splitting an Uber fare with your friends, there are a few additional tips to keep in mind to ensure a smooth and hassle-free experience. Here are some helpful tips to consider:
- Communicate with Your Friends Before Requesting the Uber: It is essential to discuss the fare split and ensure everyone is on the same page before requesting the Uber ride. This prevents any confusion or disagreements later on.
- Check If Everyone Is Paying with the Same Payment Method: If possible, verify with your friends if they are all planning to pay using the same payment method, such as a credit card or digital wallet. This helps ensure a seamless financial transaction and avoids any discrepancies.
- Have a Backup Plan in Case Someone Doesn’t Pay: Unfortunately, there may be instances where a friend forgets or is unable to pay their share. In such cases, have a backup plan in place to ensure that the remaining friends are not burdened with covering the unpaid portion. Discuss this plan with your friends ahead of time to prevent any awkward situations.
- Consider Rounding Up or Down: To simplify the payment process, consider rounding up or down to the nearest whole currency unit. This makes it easier for everyone to remember and reduces the need for small, detailed payment amounts.
- Express Gratitude and Appreciation: After everyone has settled their share of the fare, take a moment to express your gratitude and appreciation to your friends for their cooperation. A simple thank you or a token of appreciation can go a long way in maintaining positive relationships.
While these tips can help enhance the fare-splitting experience, it’s important to remember that open communication, mutual respect, and understanding among friends are key to a successful and amicable arrangement. By following these tips and fostering strong communication, you can ensure a fair and enjoyable experience while splitting an Uber fare with your friends.
Tip 1: Communicate with Your Friends Before Requesting the Uber
One of the most important tips for splitting an Uber fare with your friends is to have open and clear communication before requesting the ride. This ensures that everyone is aware of the fare-splitting arrangement and avoids any misunderstandings or conflicts. Here’s how you can effectively communicate with your friends:
- Discuss the Fare Split: Before requesting the Uber, initiate a conversation with your friends about how you plan to split the fare. Share your thoughts on the division method, whether it’s based on distance, time, or another agreed-upon criteria. Make sure everyone has a clear understanding of the process.
- Establish Agreement: Seek consensus among your friends regarding the chosen division method and ensure that everyone agrees to the proposed arrangement. Encourage open dialogue, addressing any concerns or suggestions from the group to ensure a fair and transparent decision-making process.
- Confirm Everyone’s Participation: Ensure that each friend confirms their willingness to participate in the fare-splitting. This prevents any surprises or misunderstandings later on. Take note of their confirmation and make a mental or written note to include them in the fare split when requesting the Uber.
- Clarify Expectations: Communicate any specific expectations or guidelines related to the fare split. For example, let your friends know if you prefer each person to pay their share individually or if you plan to collect the money centrally and pay the fare as a group. This clarity aids in the smooth execution of the fare-splitting process.
- Settle Payment Method Preferences: Discuss payment methods with your friends and determine whether everyone prefers to pay in cash, through digital payment apps, or by any other convenient means. This helps ensure that the chosen payment methods align with everyone’s preferences and capabilities.
By communicating with your friends before requesting the Uber, you establish a foundation of understanding and agreement. This proactive approach reduces the likelihood of misunderstandings, creates a sense of transparency, and fosters a cooperative environment for splitting the fare.
Remember, open and continuous communication throughout the fare-splitting process is key to maintaining trust and harmony among friends. Be receptive to any concerns or suggestions that arise and address them promptly to ensure a successful and fair fare-splitting experience.
Tip 2: Check If Everyone Is Paying with the Same Payment Method
When splitting an Uber fare with your friends, it’s important to ensure that everyone is paying with the same payment method. This helps avoid confusion and streamlines the payment process. Here’s why checking the payment method is important and how you can go about it:
Why it’s important:
Paying with the same payment method simplifies the collection and distribution of money among friends. It ensures that everyone is on equal footing and prevents discrepancies in settling the fare. Additionally, using the same payment method can streamline the transaction process, especially if you are using a digital payment app or a single card for payment.
How to check the payment method:
- Prior communication: Before requesting the Uber, discuss the payment method with your friends. Ask them if they prefer to pay with cash, a specific digital payment app, or a particular credit card. This upfront discussion helps clarify expectations and avoids any surprises later on.
- Confirm during the fare split discussion: When discussing the fare split with your friends, reiterate the payment method that was agreed upon. Make sure to check with each friend individually if they are still planning to use the agreed-upon payment method.
- Reminder before fare collection: A friendly reminder before collecting the fare can also serve as a gentle checkpoint to confirm the payment method. Send a message or have a quick conversation emphasizing the payment method agreed upon and ensure that everyone is on board with it.
By ensuring that everyone is paying with the same payment method, you eliminate potential complications and confusion during the fare-splitting process. It creates a smoother experience for all involved and helps maintain a fair and consistent payment arrangement among friends.
Remember to be understanding if someone needs to adjust their payment method due to unforeseen circumstances. Flexibility and open communication can help navigate such situations and ensure that the fare-splitting process remains efficient and harmonious.
Tip 3: Have a Backup Plan in Case Someone Doesn’t Pay
When splitting an Uber fare with your friends, it’s always a good idea to have a backup plan in case someone forgets or is unable to pay their share. Having a contingency plan in place helps prevent any awkwardness or inconvenience and ensures a smooth resolution to the fare-splitting process. Here’s how you can create a backup plan:
- Set a Deadline: When communicating the fare split to your friends, establish a clear deadline for payment. This allows everyone ample time to settle their share and reduces the risk of delayed payments.
- Consider a Central Payment Method: Instead of relying on each person to pay individually, you can explore the option of collecting the money centrally. In this case, one person can pay the full fare and the others can reimburse their portion to that person. This ensures that the Uber fare is paid promptly, regardless of individual circumstances.
- Pool Resources: If someone is unable to make their payment on time, discuss the possibility of pooling resources. The remaining friends can temporarily cover the unpaid portion and resolve the financial imbalance later. Be sure to establish clear expectations of when the payment will be made to avoid prolonged outstanding balances.
- Seek Contribution from the Group: In cases where someone consistently fails to pay their share, consider discussing it as a group and finding a collective solution. This may involve adjusting the fare split among the remaining friends or having an open conversation with the person who hasn’t paid to address the issue directly.
- Address the Issue Promptly and Respectfully: If someone consistently does not pay their share or ignores the established payment deadline, approach the situation with understanding and open communication. Speak to them privately, express your concerns, and find a resolution that works for everyone involved.
Having a backup plan ensures that the Uber fare is settled fairly and avoids unnecessary tension or frustration between friends. It’s important to address any payment discrepancies promptly to maintain a positive and respectful dynamic within the group.
Remember, unexpected circumstances and financial constraints can arise, so approach the situation with empathy and considerate communication. By having a backup plan and addressing the issue promptly and respectfully, you can effectively manage any challenges that may arise when splitting an Uber fare.