
Why Use Flash Light Notifications?
Flash light notifications are an innovative feature that can greatly enhance your smartphone experience. By utilizing the built-in flash on your phone’s rear camera, you can receive visual notifications for incoming calls, messages, and app alerts, even when your device is silent or in your pocket. This can be particularly useful in situations where you may not be able to hear or feel your phone’s vibrations, such as in noisy environments or during important meetings.
There are several advantages to using flash light notifications. Firstly, they provide an additional layer of alertness and accessibility. Whether you are in a crowded place or have your phone on silent mode, the bright flash light can catch your attention and ensure that you never miss an important notification. This can be particularly helpful for individuals with hearing impairments or those who typically keep their phones on silent mode.
Another benefit of flash light notifications is their versatility. Unlike audio notifications, which may not be appropriate in certain situations, flash light alerts are non-intrusive and can be discreetly visible in various environments. For example, if you are in a movie theater or attending a lecture, flash light notifications can provide an unobtrusive way to stay informed without disturbing others.
Flash light notifications can also be helpful for individuals with visual impairments. By utilizing the flashing light, they can easily identify and respond to incoming calls or messages without having to rely solely on sound or tactile feedback. This can provide a greater level of independence and inclusivity for users with different accessibility needs.
Finally, customizability is another advantage of flash light notifications. Most smartphones allow users to personalize their alert settings, allowing you to assign different flash light patterns to specific contacts or apps. This means that you can easily differentiate between an important message from a loved one and a notification from a social media app. Customizing flash light notifications not only adds a personal touch to your smartphone experience but also helps you manage your notifications more efficiently.
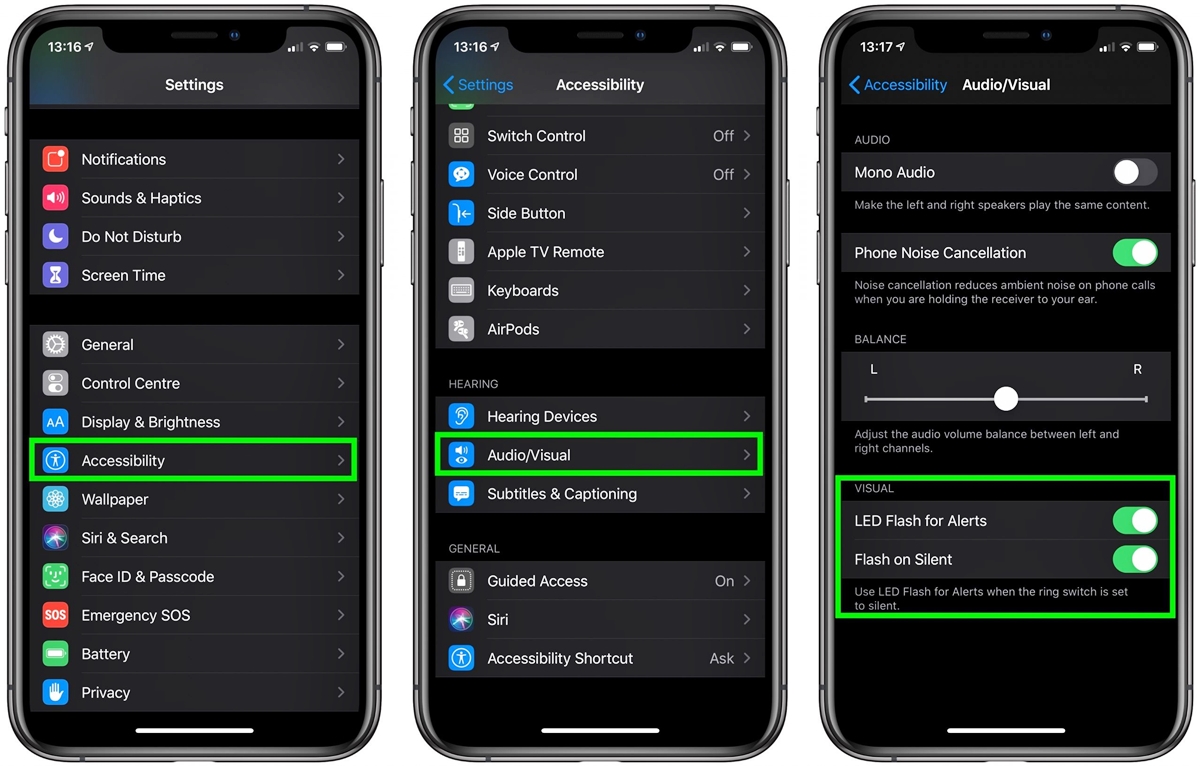
Step 1: Check if Your Phone Supports Flash Light Notifications
Before you can start using flash light notifications on your smartphone, you need to ensure that your device supports this feature. Fortunately, most modern smartphones come equipped with flash lights that can be utilized for this purpose. Here’s how you can check if your phone supports flash light notifications:
- Go to your phone’s settings menu. This can usually be accessed by swiping down from the top of the screen and tapping on the gear icon.
- Look for the “Accessibility” or “Accessibility Settings” option. On some devices, this may be located under the “System” or “General” settings.
- In the Accessibility settings menu, search for options related to “Notifications” or “Flash Light Alerts.” The specific wording may differ depending on your phone’s manufacturer and operating system.
- If you find an option for flash light notifications, your phone supports this feature. You may also see additional customization settings that allow you to adjust the flash light patterns or assign specific flash light alerts for different apps or contacts.
- If your phone does not have an option for flash light notifications in the accessibility settings, it is possible that this feature is not available on your device. However, you can still explore third-party apps that offer similar functionalities.
It’s worth mentioning that the steps outlined above serve as a general guide, and the exact location of the settings may vary depending on your phone’s make, model, and operating system version. If you’re having trouble finding the flash light notification settings, refer to your phone’s user manual or perform a quick internet search specifically tailored to your device.
Once you have confirmed that your phone supports flash light notifications, you can proceed to the next step to enable this feature and start customizing it according to your preferences.
Step 2: Enable Flash Light Notifications in Phone Settings
Now that you have determined that your phone supports flash light notifications, the next step is to enable this feature in your device’s settings. The process may vary slightly depending on your specific phone model and operating system, but the following general steps should help guide you:
- Open the Settings app on your phone. You can usually find it by tapping on the gear icon in your app drawer or swiping down from the top of the screen and tapping on the gear icon in the notification panel.
- Scroll through the settings menu and look for the “Sound & Vibration,” “Sounds & Notifications,” or a similar option. Tap on it to access the sound settings.
- Within the sound settings, search for the “Flash Light Notifications,” “LED Flash for Alerts,” or a similar setting. This is where you can enable the flash light notifications feature on your phone.
- Toggle the switch to enable flash light notifications. In some cases, there may be additional options to customize the flash light patterns or assign specific notifications for different apps or contacts. Feel free to explore these settings to personalize your flash light notifications according to your preferences.
- Once you have enabled flash light notifications, exit the settings menu, and you’re ready to start receiving visual alerts through the flash on your phone’s rear camera.
While the above steps provide a general guideline, it is important to note that the exact terminology and location of the flash light notification settings may differ based on your phone’s manufacturer and the version of the operating system. If you’re having trouble locating the settings, refer to your phone’s user manual or perform an internet search specific to your device for more detailed instructions.
Now that you have successfully enabled flash light notifications, proceed to the next step to learn how to customize these notifications for different apps on your phone.
Step 3: Customize Flash Light Notifications for Different Apps
One of the great advantages of flash light notifications is the ability to customize them according to your preferences. You can assign different flash light patterns or colors to specific apps on your phone, allowing you to easily differentiate between various notifications. Here’s how you can customize flash light notifications for different apps:
- Open the Settings app on your phone and navigate to the “Notifications” or “Notifications & Status Bar” section. This is where you can manage your app notifications.
- Scroll through the list of installed apps and find the app for which you want to customize the flash light notification. Tap on the app’s name to access its notification settings.
- Look for the “Flash Light Notifications,” “LED Flash for Alerts,” or a similar setting within the app’s notification settings. Tap on it to open the flash light customization options.
- Depending on your phone’s capabilities, you may be able to choose from a variety of flash light patterns, colors, or durations for the selected app’s notifications. Select your preferred options to customize the flash light alert.
- Some phones also allow you to set a specific flash light pattern for different types of notifications within the same app. For example, you can assign a different flash light pattern for incoming calls and messages within the messaging app.
- After customizing the flash light notifications for the app, exit the settings menu, and repeat the process for other apps that you want to customize.
Remember that not all apps may have the option to customize flash light notifications. This is dependent on the app developers’ implementation of notification features. However, most messaging, email, and social media apps offer some level of flash light notification customization.
By customizing flash light notifications for different apps, you can easily identify the source of incoming notifications without even looking at your phone’s screen or unlocking it. This feature provides a personalized and convenient way to stay informed about important notifications from your preferred apps.
With the customization of flash light notifications complete, move on to the next step to fine-tune the flash light notification settings according to your preferences.
Step 4: Adjust Flash Light Notification Settings
After enabling and customizing flash light notifications on your phone, you may want to further adjust the settings to optimize your experience. Here are some additional settings you can explore:
- Flash Light Intensity: Some smartphones allow you to adjust the intensity of the flash light notifications. This allows you to increase or decrease the brightness of the flash according to your preference.
- Flash Light Duration: You may have the option to set the duration for which the flash light will blink when a notification is received. Shorter durations could be less intrusive, while longer durations may provide more visibility.
- Schedule: If you prefer to have flash light notifications only during specific times, you can explore the scheduling options. You can set a schedule for when you want the flash light to activate, such as during your work hours or during nighttime hours.
- Silent Mode: Some phones may also offer the ability to enable flash light notifications only when your device is in silent or vibrate mode. This ensures that your flash light alerts are activated when you specifically want them to be.
- LED Flash for Calls: Along with app notifications, you may also have the option to enable flash light notifications specifically for incoming calls. This can be helpful if you want a differentiating alert for calls compared to other types of notifications.
- Custom Profiles: Depending on your phone’s capabilities, you might be able to create custom notification profiles. These profiles can include specific settings for flash light notifications, allowing you to easily switch between different setups based on your needs.
By adjusting these flash light notification settings, you can fine-tune the feature to suit your preferences and create a personalized experience. Take some time to explore these settings and experiment with different configurations until you find the setup that works best for you.
Now that you have adjusted the flash light notification settings, proceed to the final step to test and ensure that your flash light notifications are working correctly.
Step 5: Test Your Flash Light Notifications
After setting up and customizing your flash light notifications, it’s important to test them to ensure they are functioning correctly. By conducting a quick test, you can verify that you will receive visual alerts for incoming calls, messages, and app notifications. Here’s how you can test your flash light notifications:
- Request the help of a friend or family member to send you a text message or make a phone call to your device.
- Make sure your phone is not on silent or vibrate mode. This will ensure that the flash light notifications are activated.
- Observe your phone’s rear camera flash. It should blink or flash when the incoming notification is received.
- If the flash light does not activate, double-check your settings to ensure flash light notifications are enabled and properly configured. You may also need to confirm that the flash light is functioning correctly.
- Repeat the test for other apps or types of notifications that you have customized with flash light alerts. This will help ensure that flash light notifications are working consistently across various scenarios.
By conducting a thorough test of your flash light notifications, you can be confident that you will receive visual alerts for important notifications, even when your phone is not easily visible or audible. This feature can prove especially helpful in loud environments, during meetings, or when your attention is focused elsewhere.
If you encounter any issues or inconsistencies during the testing process, refer back to the earlier steps to review the settings and configurations you have made for flash light notifications. You may need to double-check if the feature is supported on your specific device or seek assistance from the manufacturer’s support resources.
With your flash light notifications successfully tested, you can now enjoy the convenience and added accessibility that this feature brings to your smartphone experience.