
What is Wake-on-LAN (WoL)?
Wake-on-LAN (WoL) is a network protocol that allows you to remotely power on or wake up a device over a local area network or the internet. It is particularly useful for managing and accessing devices that are located in different physical locations without the need for physical access.
The WoL technology works by sending a special network packet, called a Magic Packet, to the target device’s network interface card (NIC). This packet is typically sent from another device on the same network or through the internet. When the target device receives this packet, it interprets it as a command to power on or wake up from a sleep or powered-off state.
Wake-on-LAN is commonly used in various scenarios, such as:
- Home and office networks, where you can remotely power on computers, servers, and network-attached storage (NAS) devices when needed, saving energy by only keeping them powered off when not in use.
- IT departments, where administrators can remotely manage and troubleshoot devices without the need to physically be in front of them.
- Smart homes, where you can power on devices like media centers, smart TVs, or home automation systems before you even enter the house, ensuring they’re ready for use when you arrive.
- Servers and data centers, where administrators can control the power state of multiple machines without the need to physically intervene, reducing downtime and increasing efficiency.
Wake-on-LAN is a versatile and powerful tool, providing convenience and control over networked devices. It eliminates the need for manual intervention to power on devices, making it a valuable addition to any network management strategy.
In the next sections, we will delve deeper into understanding how Wake-on-LAN works, how to prepare your devices for Wake-on-LAN, and the steps to enable this feature in your device’s BIOS settings.
Understanding How Wake-on-LAN Works
Wake-on-LAN (WoL) operates by taking advantage of the network interface card (NIC) present in most modern devices. When a device is turned off or in sleep mode, the NIC still receives power from the motherboard and is capable of recognizing the Magic Packet.
The Magic Packet is a specially crafted network packet that contains specific information, including the MAC address of the target device. The MAC address is a unique identifier assigned to the network interface card. When a device receives a Magic Packet, it compares the MAC address in the packet to its own MAC address. If there is a match, it interprets the packet as a command to wake up or power on.
To successfully send a Magic Packet and wake up a device, there are a few requirements:
- The target device must have a network interface card that supports Wake-on-LAN. Most devices manufactured in the last decade possess this capability.
- The target device must be connected to a power source or have a standby power mode enabled that allows the NIC to receive power when the device is powered off or in sleep mode.
- The target device must be connected to the same local area network (LAN) as the device that sends the Magic Packet. If the target device is on a different network, additional configuration may be required.
- The device sending the Magic Packet must know the MAC address of the target device. The MAC address can be obtained through hardware documentation, network configuration settings, or by using utilities to discover the connected devices in your network.
It is important to note that Wake-on-LAN may not work in all network environments. Some factors that can interfere with its functionality include firewalls, router settings, and network infrastructure limitations. Additionally, Wake-on-LAN may not work over the internet unless the necessary port forwarding or VPN configurations are in place.
In the following sections, we will explore how to prepare your devices for Wake-on-LAN, including checking if your device supports it and enabling the feature in your device’s BIOS settings. We will also walk through the steps of configuring your network and finding your device’s MAC address.
Preparing Your Devices for Wake-on-LAN
Before you can use Wake-on-LAN (WoL) to remotely power on your devices, there are a few steps you need to take to prepare them.
1. Check if Your Device Supports Wake-on-LAN: The first thing you need to do is determine if your device has Wake-on-LAN capabilities. Most modern devices, including computers, servers, and network-attached storage (NAS) devices, support WoL. You can check the device’s specifications or manufacturer documentation to confirm its compatibility.
2. Enable Wake-on-LAN in Your Device’s BIOS Settings: Once you have confirmed that your device supports WoL, you will need to access its BIOS settings to enable Wake-on-LAN. Restart your device and press the designated key (often Del, F2, or F10) to enter the BIOS setup. Look for the Wake-on-LAN or Power Management section and enable the option. Save your settings and exit the BIOS.
3. Configure Your Network to Support Wake-on-LAN: To ensure that Wake-on-LAN works properly, you need to configure your network accordingly. Make sure that both the device sending the Magic Packet and the target device are connected to the same local area network (LAN). If your devices are on different networks, you might need to set up port forwarding or a virtual private network (VPN) to establish a secure connection.
4. Find Your Device’s MAC Address: The MAC address of your target device is required to send the Wake-on-LAN Magic Packet. You can typically find the MAC address printed on the device itself or by accessing the network settings in the operating system. Alternatively, you can use network scanning tools or command-line utilities to discover the MAC address of the device.
Once you have completed these steps, your devices will be ready for Wake-on-LAN. You can now proceed to set up a Wake-on-LAN server, install Wake-on-LAN software, and configure the necessary settings. In the following sections, we will explore these steps in detail, allowing you to harness the power of Wake-on-LAN to conveniently control your devices over the network.
Checking if Your Device Supports Wake-on-LAN
Before you can start using Wake-on-LAN (WoL) to remotely power on your device, you need to verify if it supports this feature. Most modern devices, including desktop computers, laptops, and servers, come with WoL capabilities. Here are a few methods to check if your device supports Wake-on-LAN:
1. Check the Device’s Specifications: The easiest way to determine if your device supports Wake-on-LAN is to check its specifications. You can refer to the manufacturer’s website or the product documentation to find the relevant information. Look for features related to network connectivity or power management, as Wake-on-LAN often falls under these categories.
2. Consult the Device’s User Manual or Documentation: If you have access to the device’s user manual or documentation, it’s worth reviewing it for any mention of Wake-on-LAN support. The manual may provide specific instructions or guidelines on enabling Wake-on-LAN and the compatibility of the device with this feature.
3. Search Online: If you’re unable to find information about Wake-on-LAN support in the device’s specifications or user manual, you can search online. Look for forums, community discussions, or technical documentation related to your device model. Other users or technical experts may have shared their experiences or insights about Wake-on-LAN compatibility.
4. Use Network Scanning Tools: You can use network scanning tools such as Advanced IP Scanner or Nmap to discover the capabilities of your device. These tools can provide detailed information about the device, including Wake-on-LAN support. When scanning your network, look for the device’s MAC address and check if Wake-on-LAN is mentioned in the scan results.
5. Check the Device’s BIOS Settings: Another way to determine if your device supports Wake-on-LAN is by accessing its BIOS settings. Restart your device and enter the BIOS setup by pressing the designated key during startup (typically Del, F2, or F10). Navigate to the Power Management or Network-related settings, and look for Wake-on-LAN options. If you find these options, it indicates that your device supports Wake-on-LAN.
By using these methods, you can confidently determine if your device supports Wake-on-LAN. Once you confirm its compatibility, you can proceed with enabling Wake-on-LAN in your device’s BIOS settings, configuring your network, and preparing for remote power-on capabilities.
Enabling Wake-on-LAN in Your Device’s BIOS Settings
To utilize the Wake-on-LAN (WoL) feature and remotely power on your device over a network, you need to enable it in your device’s BIOS settings. Here’s how to enable Wake-on-LAN:
1. Restart Your Device: Start by restarting your device. As soon as it powers on, press the designated key to access the BIOS setup. The key to enter the BIOS varies depending on the manufacturer and device model. Common keys include Del, F2, or F10. Refer to the device’s user manual or manufacturer’s website for the specific key.
2. Enter the BIOS Setup: Once you press the appropriate key, you will enter the BIOS setup utility. The BIOS setup screen may vary in appearance, but the Wake-on-LAN option can typically be found in the Power Management, Advanced, or Network-related settings.
3. Locate the Wake-on-LAN Option: Navigate through the BIOS settings menu and look for the Wake-on-LAN or WoL option. The naming may differ slightly depending on the device and BIOS version. Ensure that the Wake-on-LAN option is enabled or set to “On”.
4. Save and Exit the BIOS: Once you have enabled the Wake-on-LAN option, save your changes and exit the BIOS setup. The procedure to save and exit varies but is typically done by pressing the F10 key or selecting the “Save and Exit” option from the menu. Confirm your selection, and the device will reboot.
After enabling Wake-on-LAN in the BIOS settings, your device is now ready to receive the Wake-on-LAN magic packet and respond accordingly. Remember to save any changes you make in the BIOS to ensure the settings persist after a reboot.
It’s important to note that the Wake-on-LAN feature may be disabled by default in some devices. Enabling it requires proper access to the BIOS and administrative privileges. Additionally, not all devices have the same BIOS settings or options, so the exact steps may differ slightly.
Configuring Your Network to Support Wake-on-LAN
In order to successfully use Wake-on-LAN (WoL) and remotely power on your devices, you need to configure your network to support this feature. Here are the steps to follow:
1. Ensure Devices are on the Same Local Area Network (LAN): To send a Wake-on-LAN magic packet, the device from which you are sending the packet and the target device must be on the same local area network. Ensure that both devices are connected to the same router or switch.
2. Enable Wake-on-LAN on the Router: Access your router’s settings by typing its IP address into a web browser. Look for the Wake-on-LAN or WoL settings and make sure it is enabled. This allows the router to forward Wake-on-LAN packets to the appropriate devices connected to the LAN.
3. Configure Port Forwarding (If Accessing Devices Remotely): If you want to access your devices and use Wake-on-LAN remotely, you may need to set up port forwarding on your router. This involves directing incoming Wake-on-LAN packets from the internet to the specific internal IP address of the target device. Consult your router’s manual or online resources for guidance on how to configure port forwarding.
4. Establish a VPN Connection (If Accessing Devices Remotely): For added security, you can establish a virtual private network (VPN) connection when accessing devices remotely. A VPN securely connects your device to the local network where your devices are located, allowing you to send Wake-on-LAN packets as if you were on the same LAN.
5. Ensure Firewalls Allow Wake-on-LAN Traffic: Check the firewall settings on both the device sending the Wake-on-LAN packet and the target device. Ensure that the necessary ports are open and the firewall settings allow Wake-on-LAN traffic. Consult your firewall documentation or IT department for specific instructions on how to configure firewall settings for Wake-on-LAN.
6. Use a Wake-on-LAN Software or Mobile App: To simplify the Wake-on-LAN process, you can use specialized software or mobile apps that provide a user-friendly interface for sending Wake-on-LAN packets. These tools usually allow you to enter the MAC address and IP address of the target device and send the magic packet with a click of a button.
By following these steps, you can ensure that your network is properly configured to support Wake-on-LAN. This enables you to remotely power on your devices using the WoL feature, providing convenience and control over your networked devices.
Finding Your Device’s MAC Address
To successfully send a Wake-on-LAN (WoL) magic packet to wake up your device, you need to know its MAC address. The MAC address is a unique identifier assigned to the network interface card (NIC) of your device. Here are a few methods to find your device’s MAC address:
1. Check the Device Label or Documentation: Some devices, such as routers, network switches, and network-attached storage (NAS) devices, have the MAC address printed on the label or documentation that came with the device. Look for a line that mentions “MAC address,” “Ethernet address,” or “Physical address.”
2. Check the Network Settings on Your Device: You can find the MAC address of your device by checking its network settings. The method to access network settings varies based on the operating system you’re using. On Windows, navigate to the Control Panel or Settings, then select “Network and Internet” > “Network and Sharing Center” > “Change adapter settings.” Right-click on the network adapter and select “Status” > “Details” to view the MAC address. On macOS, go to “System Preferences” > “Network” > select the network adapter > click on “Advanced” > go to the “Hardware” tab to find the MAC address.
3. Use Command-Line Utilities: Command-line utilities like “ipconfig” (Windows) or “ifconfig” (macOS, Linux) can quickly display the MAC address of your device. Open the command prompt or terminal, type the appropriate command, and look for the “Physical Address” or “HWaddr” in the output. Note that you might need administrative privileges to run these commands.
4. Use Network Scanning Tools: Network scanning tools, such as Advanced IP Scanner or Angry IP Scanner, can discover devices on your network and display their MAC addresses. These tools typically provide a list of connected devices along with their corresponding MAC addresses. Simply scan your network and look for the MAC address associated with your device.
5. Check the Device’s BIOS or UEFI Settings: In some cases, the device’s BIOS or UEFI settings may display the MAC address. Restart your device and access the BIOS or UEFI setup utility. Navigate through the settings, and look for network-related information that includes the MAC address.
By using these methods, you can easily find your device’s MAC address. Once you have this information, you can use it to send a Wake-on-LAN magic packet and trigger the device to power on remotely.
Setting Up a Wake-on-LAN Server
Setting up a Wake-on-LAN (WoL) server allows you to conveniently send Wake-on-LAN magic packets to wake up devices on your network. Here are the steps to set up a WoL server:
1. Choose a WoL Server Software: First, select a Wake-on-LAN server software that suits your needs. There are various options available, both paid and free, for different operating systems. Popular choices include Depicus Wake On LAN, TeamViewer, and Advanced IP Scanner.
2. Install the WoL Server Software: Download and install the selected WoL server software onto a computer that will be running as the server. Ensure that the server is always powered on and connected to the network. Most Wake-on-LAN server software installations are straightforward and require following the on-screen instructions.
3. Configure the WoL Server Software: Once the WoL server software is installed, you need to configure it. Provide the necessary network details, such as the IP address range of your network and the MAC addresses of the devices you want to wake up. Set up any preferences or security settings required by the chosen WoL server software.
4. Add Devices to the WoL Server: In the WoL server software, add the devices you want to wake up remotely. Enter the MAC address and IP address of each device. You may also have the option to assign friendly names or labels to your devices for easier identification.
5. Test the Wake-on-LAN Functionality: After adding the devices to the WoL server, perform a test to ensure everything is set up correctly. Select a device in the WoL server software and send a Wake-on-LAN magic packet. The device should power on or wake up if the WoL server is configured correctly.
6. Fine-tune and Manage the WoL Server: Adjust any additional settings in the WoL server software as necessary. You may want to set up schedules or triggers for automatically waking up devices at specific times. Regularly update the server software and review the logs or notifications to ensure all devices are functioning properly.
By setting up a WoL server, you have a centralized control panel to manage and wake up devices on your network efficiently. This eliminates the need to manually send Wake-on-LAN packets from individual devices, offering convenience and flexibility in managing your networked devices.
Installing Wake-on-LAN Software on Your Device
In order to utilize Wake-on-LAN (WoL) functionality on your device, you need to install Wake-on-LAN software. This software enables you to easily send the Wake-on-LAN magic packet to wake up other devices on your network. Here are the steps to install Wake-on-LAN software:
1. Search for Wake-on-LAN Software: Begin by searching for Wake-on-LAN software that is compatible with your device’s operating system. There are numerous options available, both free and paid, for various platforms such as Windows, macOS, and Linux.
2. Download the Wake-on-LAN Software: Once you have found the suitable software, navigate to the official website or a trusted software repository and download the latest version of the Wake-on-LAN software that matches your device’s operating system.
3. Run the Installer: Locate the downloaded Wake-on-LAN software installer and run it to start the installation process. Follow the on-screen instructions provided by the installer. Typically, you will need to agree to the terms and conditions and select the installation location for the software.
4. Complete the Installation: After selecting the installation location, click the “Install” or “Next” button to proceed with the installation. Wait for the software to be installed on your device. Once the installation is complete, you may be prompted to launch the Wake-on-LAN software.
5. Configure the Wake-on-LAN Software: After launching the Wake-on-LAN software, you may need to configure it by providing specific details, such as the MAC addresses and IP addresses of the devices you want to wake up. Additionally, you may be able to set preferences, customize wake-up commands, and save device profiles for easy access.
6. Test the Wake-on-LAN Functionality: To ensure that the Wake-on-LAN software is working correctly, select a device from the software’s interface and send a Wake-on-LAN magic packet. The target device should power on or wake up if the software is configured properly and the network settings are appropriately set up.
By installing Wake-on-LAN software on your device, you gain the ability to conveniently wake up other devices on your network with just a few clicks. This software acts as a control center, allowing you to manage and power on devices remotely, enhancing the overall efficiency and convenience of your network management.
Configuring Wake-on-LAN Software Settings
After installing Wake-on-LAN (WoL) software on your device, it’s important to configure the settings to ensure the software functions optimally. Configuring the Wake-on-LAN software settings allows you to customize wake-up commands, manage device profiles, and tailor the software to your specific needs. Here are the steps to configure the Wake-on-LAN software settings:
1. Open the Wake-on-LAN Software: Launch the installed Wake-on-LAN software on your device. Depending on the software, you may find it in your applications folder or system tray. Double-click on the application icon to open the software’s interface.
2. Access the Settings or Preferences: Look for a menu option or toolbar button that allows you to access the settings or preferences of the Wake-on-LAN software. This is usually represented by a gear icon or the word “Settings.” Click on it to enter the configuration menu.
3. Set General Preferences: In the settings menu, you can adjust various general preferences, such as the language, theme, or notifications. These preferences can enhance your overall experience with the Wake-on-LAN software.
4. Add Device Profiles: To easily manage multiple devices, you can create device profiles within the Wake-on-LAN software. Add each device by specifying its MAC address, IP address, and any other relevant information. This allows you to quickly select and send Wake-on-LAN commands to specific devices.
5. Customize Wake-Up Commands: Some Wake-on-LAN software allows you to customize wake-up commands for specific devices. You can specify the port number or send additional commands to wake up devices that require specific configurations. These customizable options ensure compatibility with different devices or network setups.
6. Test Wake-on-LAN Functionality: After configuring the software settings, it’s crucial to test the Wake-on-LAN functionality to ensure proper operation. Select a device from the software’s interface and initiate a Wake-on-LAN command. Verify that the target device successfully powers on or wakes up.
7. Review Additional Advanced Settings: Depending on the Wake-on-LAN software, there may be advanced settings available. Explore these settings to fine-tune the software’s behavior and adapt it to your specific network environment or personal preferences.
By configuring the Wake-on-LAN software settings, you can make the most of the software’s features and customize it to suit your requirements. This ensures seamless integration with your network and simplifies the process of waking up devices remotely with just a click of a button.
Sending a Wake-on-LAN Magic Packet
Once you have set up Wake-on-LAN (WoL) software and configured the necessary settings, you can start sending Wake-on-LAN magic packets to wake up devices on your network. Here’s how to send a Wake-on-LAN magic packet:
1. Launch the Wake-on-LAN Software: Open the Wake-on-LAN software that you have installed on your device. The software’s interface will typically display a list of devices or device profiles that you have added to the software.
2. Select the Target Device: Choose the device you want to wake up from the list in the Wake-on-LAN software’s interface. This device should have its MAC address and IP address previously added to the software.
3. Send the Magic Packet: Look for a button or option in the Wake-on-LAN software to send the Wake-on-LAN magic packet. This button is usually labeled “Wake” or “Send.” Click on it to initiate the sending process of the magic packet.
4. Wait for the Device to Wake Up: After sending the magic packet, give the target device some time to receive and process it. The device should power on or wake up from sleep mode if the Wake-on-LAN configuration is correctly set up on the device and the network.
5. Verify Success: Check the target device to confirm whether it successfully powers on or wakes up. You can do this either by physically checking the device or checking its status remotely using other means, such as remote desktop software or network monitoring tools.
6. Repeat for Other Devices (If Applicable): If you have multiple devices you want to wake up, repeat the process for each device individually. Select the device from the software’s interface and send the Wake-on-LAN magic packet accordingly.
7. Troubleshoot Any Issues: In case a device fails to wake up, refer to the Wake-on-LAN software’s documentation or troubleshooting guides. Check the Wake-on-LAN settings on the target device and ensure that the network configuration is properly set up for Wake-on-LAN functionality.
By sending Wake-on-LAN magic packets, you can conveniently wake up devices on your network without physically accessing them. This feature provides flexibility and convenience, allowing you to control your networked devices with ease.
Troubleshooting Wake-on-LAN Issues
While Wake-on-LAN (WoL) is a powerful feature for remotely waking up devices on your network, it may sometimes encounter issues. Here are some common troubleshooting steps to help resolve Wake-on-LAN issues:
1. Verify Network Connectivity: Ensure that the device sending the Wake-on-LAN magic packet and the target device are connected to the same local area network (LAN). Check the network cables, wireless connections, and router settings to ensure proper connectivity.
2. Confirm Correct MAC Address: Double-check that you have entered the correct MAC address of the target device in the Wake-on-LAN software. An incorrect MAC address will result in the magic packet being sent to the wrong device, causing it to fail to wake up.
3. Check BIOS/UEFI Wake-on-LAN Settings: Access the BIOS or UEFI settings of the target device and verify that Wake-on-LAN is enabled. Some devices may have separate options for the LAN and WLAN interfaces, so ensure that the correct one is enabled.
4. Review Firewall and Security Settings: Check the firewall settings on both the device sending the Wake-on-LAN packet and the target device. Ensure that the necessary ports (usually UDP port 9) are open and that the firewall isn’t blocking Wake-on-LAN traffic.
5. Configure Router and Network Settings: Verify that your router is properly configured to forward Wake-on-LAN packets to the correct destination. Check any port forwarding or VPN settings if you’re attempting to use Wake-on-LAN over the internet.
6. Update Firmware and Drivers: Ensure that the firmware or drivers for both the sending device and the target device are up to date. Outdated firmware or drivers may cause compatibility issues with Wake-on-LAN functionality.
7. Test from Different Devices: If possible, try initiating Wake-on-LAN from different devices on your network. This will help determine if the issue lies with the sending device or if it’s a problem specific to the target device or network configuration.
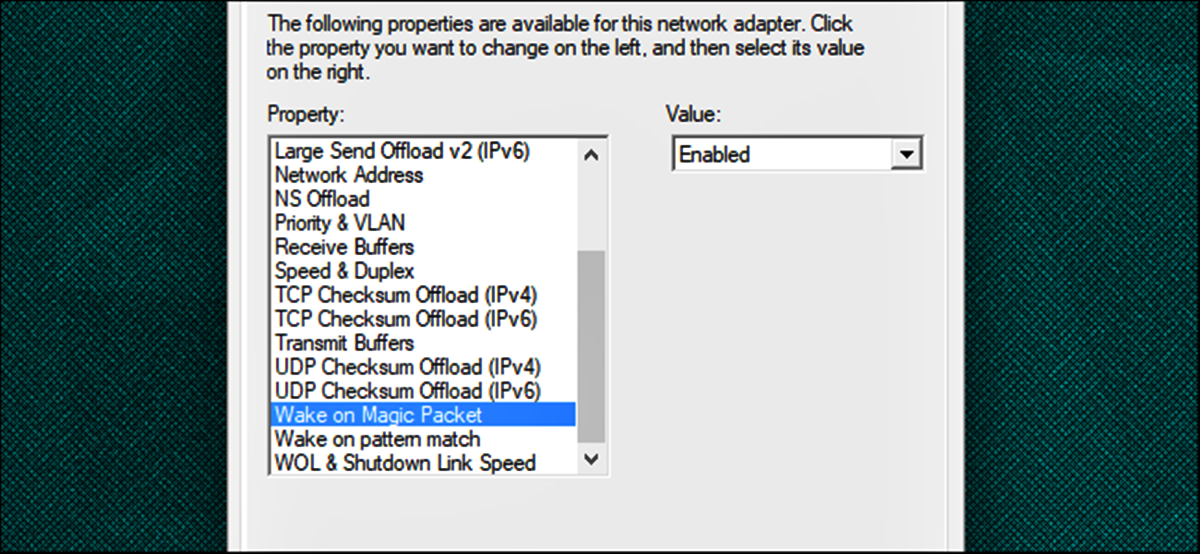
8. Enable Wake-on-LAN Power Options: Check the power settings of the target device’s network adapter. Some devices have additional power-saving options that can prevent them from responding to Wake-on-LAN magic packets.
9. Consult Manufacturer Documentation: If all else fails, consult the documentation provided by the manufacturer of your devices. They may have specific troubleshooting steps or recommendations for Wake-on-LAN issues.
By following these troubleshooting steps, you can resolve common Wake-on-LAN issues and ensure that the feature works smoothly on your network. Remember that the configuration and compatibility may vary between devices, so it’s essential to refer to specific documentation for accurate troubleshooting information.
Tips for Using Wake-on-LAN Efficiently
To make the most of the Wake-on-LAN (WoL) feature and ensure efficient usage, consider implementing the following tips and best practices:
1. Keep Devices Connected to Power: For Wake-on-LAN to work, devices need to be receiving a constant power supply. Ensure that devices are plugged in and connected to a power source, or enable power-saving settings that allow the network interface card (NIC) to receive power while the device is in sleep mode.
2. Implement Proper Network Configuration: Make sure devices are connected to the same local area network (LAN) for successful Wake-on-LAN operations. Verify your network setup, including router configurations, firewall settings, and any necessary port forwarding or virtual private network (VPN) settings for remote access.
3. Use Static IP Addresses: Assign static IP addresses to devices that you frequently wake up using Wake-on-LAN. This eliminates the need to update IP addresses each time and ensures accurate communication between the sending device and the target device.
4. Group Devices Efficiently: Consider grouping devices based on their usage patterns or locations. This allows you to send Wake-on-LAN magic packets to specific groups, reducing the need to individually wake up devices. Grouping can be done within Wake-on-LAN software by creating profiles or using IP address ranges.
5. Utilize Wake-on-LAN Schedulers: Schedule wake-up events using Wake-on-LAN schedulers. This enables you to automatically wake up devices at specific times, ensuring they are ready for use when needed. Schedulers can be integrated with Wake-on-LAN software or through other automation tools.
6. Employ Security Measures: Protect your Wake-on-LAN operations by implementing appropriate security measures. Consider using Wake-on-LAN over VPN for remote access to ensure secure communication. Additionally, ensure that only authorized devices have access to your Wake-on-LAN software.
7. Test and Monitor: Periodically test the Wake-on-LAN functionality to ensure it is working as expected. Use network monitoring tools or Wake-on-LAN software features that provide logs or notifications about the status of wake-up events. This allows you to identify and troubleshoot any potential issues promptly.
8. Update Firmware and Software: Keep your firmware and Wake-on-LAN software up to date. Manufacturers frequently release updates for devices, including enhancements to Wake-on-LAN functionality. Similarly, ensure you’re using the latest version of Wake-on-LAN software to take advantage of any bug fixes or performance improvements.
By implementing these tips, you can optimize your usage of Wake-on-LAN and efficiently wake up devices on your network. This enhances productivity, reduces downtime, and provides more control over your networked devices.
Final Thoughts on Wake-on-LAN
Wake-on-LAN (WoL) is a powerful network protocol that allows you to remotely power on or wake up devices on your network. It provides convenience, efficiency, and control over your networked devices, saving time and energy. Here are some final thoughts on Wake-on-LAN:
Enhanced Productivity: Wake-on-LAN enables you to access and control devices remotely, eliminating the need for physical presence. This is especially valuable in scenarios such as IT management, home automation, and server administration, where efficiency and productivity are critical.
Energy Efficiency: By using Wake-on-LAN, you can optimize energy consumption by powering on devices only when needed. This feature is particularly beneficial for devices in workplaces, smart homes, and data centers, where devices can be selectively turned on to conserve energy during periods of inactivity.
Seamless Device Management: Wake-on-LAN simplifies device management by providing a centralized control system. With Wake-on-LAN software or servers, you can easily wake up multiple devices simultaneously and manage them remotely, streamlining operations and reducing manual intervention.
Remote Access: Wake-on-LAN enables remote access to devices, making it valuable for troubleshooting, software updates, and file retrieval. You can access devices from anywhere, eliminating the need for physical proximity and reducing response times for critical tasks.
Considerations for Proper Configuration: While Wake-on-LAN offers many benefits, it is essential to configure devices and networks properly. Verify that devices support Wake-on-LAN, enable the feature in BIOS settings, and configure routers and firewalls to allow Wake-on-LAN traffic. This ensures reliable functionality and prevents potential issues.
Security Considerations: When implementing Wake-on-LAN, ensure that proper security measures are in place. Utilize Wake-on-LAN over VPN for secure remote access and take steps to protect Wake-on-LAN servers and software from unauthorized access. Regularly update firmware, drivers, and Wake-on-LAN software to address security vulnerabilities.
Continued Advancements: Wake-on-LAN technology continues to evolve, with improvements and new features being developed. Stay updated with the latest advancements, firmware updates, and new Wake-on-LAN software releases to leverage the full potential of this technology.
Wake-on-LAN is a valuable tool that empowers you to remotely power on devices and streamline your network management. By properly configuring and utilizing Wake-on-LAN, you can enhance productivity, save energy, and enjoy greater control over your networked devices.