
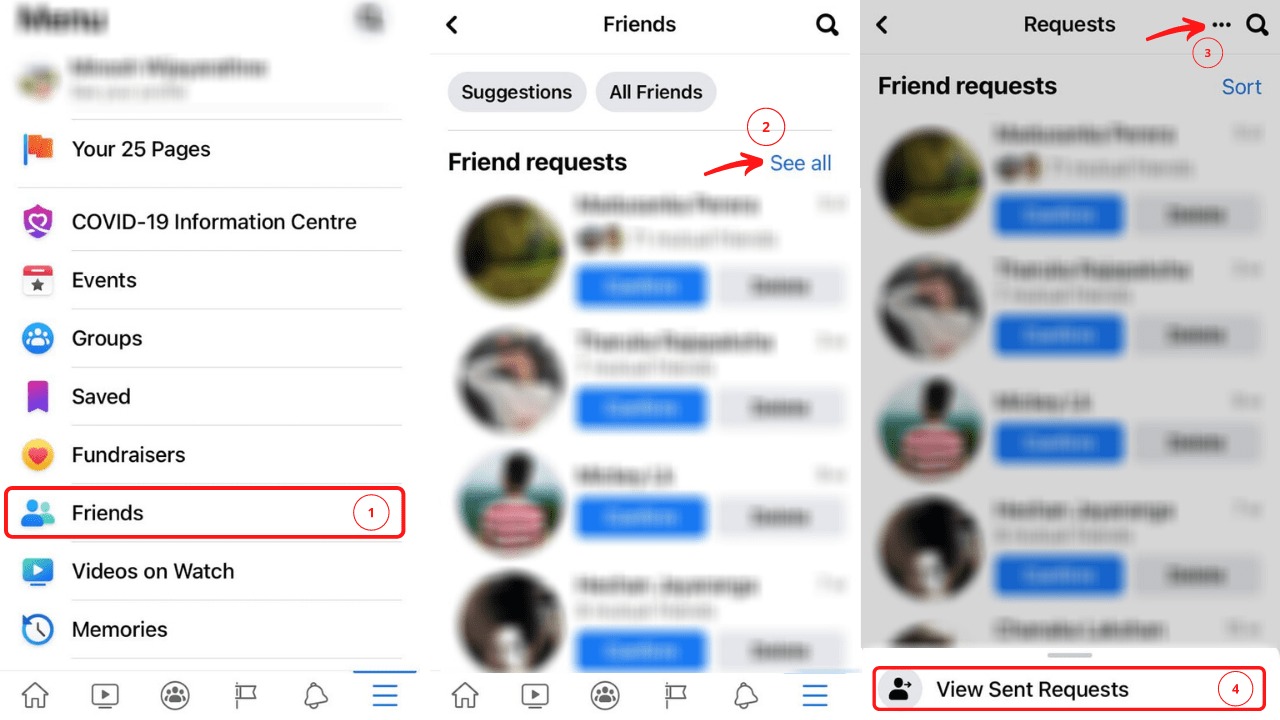
Check Your Facebook App
If you’re an avid user of the Facebook app on your mobile device, it’s easy to check for sent friend requests right from the app. Here’s a step-by-step guide on how to do it:
- Launch the Facebook app on your device. If you haven’t logged in yet, enter your credentials and log in.
- Once you’re logged in, tap on the three horizontal lines in the top-right corner of the app. This will open the Facebook menu.
- Scroll down the menu and find the “Friends” section. Tap on it to open your friends list.
- In the top-right corner of the friends list, you’ll see a button with a silhouette of two people. Tap on it to open your friend requests.
- This will take you to the “Friend Requests” screen, where you can see all the incoming and outgoing friend requests.
- By default, the screen will display the incoming requests. To view the sent friend requests, tap on the “Sent” tab at the top of the screen.
- Once you’re on the “Sent” tab, you’ll be able to see all the friend requests that you have sent in the past.
Checking for sent friend requests on the Facebook app is a quick and convenient way to keep track of your friend requests on the go.
Make sure to periodically check this section to review any pending friend requests you may have sent. You can also cancel any friend requests that are still pending or that you no longer wish to send.
Remember, if someone hasn’t accepted your friend request, it doesn’t necessarily mean they’ve declined it. They may have simply not seen your request yet or are still considering it. So, be patient and respectful when waiting for a response.
Now that you know how to check for sent friend requests on the Facebook app, managing your friend list and keeping track of your social connections will be a breeze!
Check Your Facebook Website
If you prefer using the Facebook website on your computer or mobile browser, you can easily check for sent friend requests by following these steps:
- Open your preferred web browser and visit www.facebook.com.
- Log in to your Facebook account using your credentials.
- Once you’re logged in, you’ll be directed to your Facebook news feed. On the top navigation bar, locate the search bar and click on the small downward-facing arrow on the right side.
- A drop-down menu will appear with several options. From this menu, select “Activity Log.”
- The Activity Log page will display your recent Facebook activity. On the left-hand side of the page, under your profile picture, you’ll find a list of filter options.
- In the filter options, click on “Friends” to narrow down the activity log specifically to your friend requests.
- After selecting “Friends,” the activity log will update, and you’ll see a list of all the friend requests you’ve sent.
Using the Facebook website gives you more flexibility and control over your account settings and activities. By checking your friend requests via the website, you can easily review and manage your outgoing friend requests.
It’s important to note that if someone hasn’t responded to your friend request, it may be because they either haven’t seen it yet or are still considering it. Give them some time before assuming that they’ve declined your request.
By regularly checking for sent friend requests on the Facebook website, you can stay up to date with your social connections and manage your friend list effectively.
Remember to respect others’ decisions regarding friend requests and be mindful of privacy settings. Building genuine connections and fostering positive relationships is what Facebook is all about!
Go to Your Activity Log
Your Facebook Activity Log is a useful tool that allows you to view and manage your activity on the platform. In order to check for sent friend requests, you can follow these steps:
- Log in to your Facebook account using your preferred web browser or the Facebook app.
- Once logged in, navigate to your Facebook profile page by clicking on your profile picture or name.
- On your profile page, locate and click on the “Activity Log” tab. This tab is usually located below your profile cover photo, next to the “About” section.
- Clicking on the “Activity Log” tab will open your Activity Log, where you can view all activities related to your Facebook account.
- On the left-hand side of the Activity Log page, you’ll see a list of filters. Click on the “Filter” option that says “All” by default.
- A drop-down menu will appear with various filter options. Scroll down and select “Friends” from the list.
- Once you’ve selected “Friends,” the Activity Log will refresh, and you’ll be able to see a chronological list of your Facebook friend requests.
The Activity Log not only allows you to view your sent friend requests but also provides an overview of other activities like posts, comments, likes, and more. It is a valuable tool for managing your Facebook account and maintaining control over your interactions.
By checking your Activity Log regularly, you can keep track of your sent friend requests, review any pending requests, and take action if needed. You can also use this feature to withdraw any friend requests that you no longer wish to send.
Remember, your friend request may be pending because the recipient hasn’t seen it yet or is still considering it. Stay patient and respectful while waiting for a response.
By utilizing the Activity Log, you can have a better understanding of your Facebook activity, including sent friend requests, and ensure that your social connections are up to date.
Filter Your Activity Log
Filtering your Facebook Activity Log can help you quickly find specific activities and narrow down your search for sent friend requests. Here’s how you can do it:
- Log in to your Facebook account via the Facebook app or a web browser.
- Navigate to your profile page by clicking on your profile picture or name.
- On your profile page, locate and click on the “Activity Log” tab. This tab is typically found below your profile cover photo, next to the “About” section.
- Once you’re on the Activity Log page, you’ll see a list of filters on the left-hand side. These filters allow you to narrow down your search.
- Click on the filter that says “All” by default. A drop-down menu will appear with various filter options.
- Scroll through the drop-down menu and select “Friends” to filter your activity log specifically for friend requests.
- The Activity Log will now display only the activities related to friend requests that you have sent.
Filtering your Activity Log helps you save time and find the information you need more efficiently. By selecting the “Friends” filter, you can easily access your sent friend requests and review their status.
If you’re looking for a specific friend request that you sent at a certain time or to a particular person, you can further narrow down your search by using the search bar located at the top of the Activity Log page.
Simply enter the name of the person or any other relevant details in the search bar, and the Activity Log will display the related activities, including your sent friend requests matching your search terms.
By mastering the art of filtering the Activity Log, you can effectively manage and review your sent friend requests on Facebook, ensuring that your social connections are intact and up to date.
Use the Activity Search Bar
When it comes to finding specific activities, including your sent friend requests on Facebook, the Activity Search Bar is a powerful tool that can save you time and effort. Here’s how you can use it:
- Log in to your Facebook account using the Facebook app or a web browser.
- Visit your profile page by clicking on your profile picture or name.
- On your profile page, click on the “Activity Log” tab to access your Activity Log.
- Once you’re on the Activity Log page, you’ll notice a search bar at the top of the page.
- In the search bar, enter relevant keywords related to your friend requests, such as names of people you sent requests to or specific dates.
- As you type, the Activity Log will dynamically update to display matching results.
- Review the search results to find the specific sent friend requests that you’re interested in.
The Activity Search Bar allows you to quickly locate your sent friend requests by narrowing down your search with specific keywords. This can be especially helpful if you have a long list of activities or if you’re looking for a particular friend request from the past.
Remember, the more detail you provide in your search query, the more accurate and targeted your results will be. If you know the exact name or date associated with a friend request, be sure to enter that information to increase your chances of finding the desired activity.
This feature comes in handy when you want to review the status of a particular friend request, confirm if it has been accepted or still pending, or simply refresh your memory about past interactions.
By utilizing the Activity Search Bar effectively, you can easily locate and manage your sent friend requests on Facebook, ensuring that your social connections are properly maintained and updated.
Find the Sent Friend Requests Tab
In order to check for sent friend requests on Facebook, you’ll need to locate the Sent Friend Requests tab. Here’s how you can find it:
- Log in to your Facebook account using the Facebook app or a web browser.
- Visit your profile page by clicking on your profile picture or name.
- On your profile page, locate and click on the “Friends” tab. This tab is usually found below your profile cover photo, next to the “About” section.
- On the Friends tab page, you’ll see several sub-tabs, including “All Friends,” “Recently Added,” and “Find Friends.”
- Scroll through the sub-tabs until you find the “More” tab. Click on it to reveal additional friend list options.
- Among the options that appear under the “More” tab, look for “Sent Friend Requests” and click on it.
- This will direct you to a page that shows all the friend requests you have sent in the past.
Locating the Sent Friend Requests tab allows you to easily access and review your previously sent friend requests on Facebook. It’s essential for managing your friend list and staying informed about the status of your friend requests.
By visiting this page, you can see the list of friend requests you have sent, providing you with an opportunity to assess the progress of those requests. You can also cancel any pending friend requests or gauge whether someone has accepted your request.
Remember, not everyone will respond to your friend request immediately. People may take time to review or consider your request, so it’s important to be patient and respectful throughout the process.
By finding the Sent Friend Requests tab and regularly checking for updates, you’ll have better control over your social connections on Facebook and can effectively manage your friend list.
Check Your Sent Friend Requests
Checking your sent friend requests on Facebook allows you to keep track of the requests you’ve made and monitor their status. Here’s how you can do it:
- Log in to your Facebook account using the Facebook app or a web browser.
- Visit your profile page by clicking on your profile picture or name.
- On your profile page, locate and click on the “Friends” tab. It is typically found below your profile cover photo, next to the “About” section.
- From the Friends tab, you’ll see several sub-tabs, such as “All Friends,” “Recently Added,” and “Find Friends.”
- Look for a sub-tab called “Sent Friend Requests” and click on it.
- This will take you to a page that displays all the friend requests you have sent in the past.
By checking your sent friend requests, you can keep tabs on the requests you’ve made and determine their status. This is particularly useful if you want to see whether someone has accepted your request or if the request is still pending.
On the sent friend requests page, you can view a list of the profiles you’ve sent requests to along with the date and time of each request. This information can help you track your progress and manage your friend list effectively.
If you want to cancel a pending friend request, you can do so from this page. Simply locate the request you wish to cancel and look for the “Cancel Request” button next to it. Clicking on this button will revoke the friend request.
It’s important to note that not all friend requests are accepted immediately. Some people may take time to respond or consider your request. So, don’t be discouraged if you don’t receive an immediate response.
By periodically checking your sent friend requests, you can stay informed about the progress of your requests and ensure that your social connections on Facebook are up to date.