
Determining the Type of Scanner
Before you begin the process of scanning a document on your Mac, it is important to determine the type of scanner you have. There are two main types of scanners: flatbed scanners and sheetfed scanners. Each type has its own set of capabilities and features.
A flatbed scanner consists of a flat glass surface where you place the document you want to scan. This type of scanner is ideal for scanning documents, photos, and other flat objects. You simply lay the document face down on the glass bed, close the lid, and start the scanning process.
A sheetfed scanner, on the other hand, is designed to scan multiple documents quickly. It typically includes a tray where you can load a stack of documents, and it automatically feeds them through the scanner one by one. This type of scanner is particularly useful for scanning large quantities of paper, such as business documents or receipts.
To determine the type of scanner you have, check the physical characteristics of the device. If it has a flat glass surface with a lid, it is likely a flatbed scanner. If it has a document feeder tray, it is most likely a sheetfed scanner.
It is important to note that some scanners may have both flatbed and sheetfed capabilities, allowing you to choose the appropriate scanning method based on your needs. If you are unsure about the type of scanner you have or need further assistance, refer to the user manual or contact the manufacturer for clarification.
Determining the type of scanner you have is the first step towards successfully scanning your documents on Mac. Whether you have a flatbed scanner or a sheetfed scanner, the following sections will guide you through the process of connecting the scanner to your Mac, installing the necessary software, and ultimately scanning and saving your documents with ease.
Connecting the Scanner to Your Mac
In order to effectively scan documents on your Mac, you’ll need to establish a connection between your computer and the scanner. Here are the steps to connect your scanner to your Mac:
- Check the cables: Start by checking the cables that came with your scanner. Most scanners use a USB cable for connection, so make sure you have a compatible cable and that it is in good condition.
- Power on the scanner: Before connecting the scanner to your Mac, ensure that it is powered on. Check that the power cord is securely plugged into an electrical outlet. Some scanners may have a power switch or button that you need to enable as well.
- Connect the USB cable: Take one end of the USB cable and plug it into the USB port on your Mac. Then, take the other end of the cable and connect it to the corresponding port on the scanner. Make sure both ends are firmly inserted.
- Scan for the scanner: Once the connection is established, your Mac should detect the scanner automatically. If not, you may need to open the System Preferences on your Mac, navigate to the “Printers & Scanners” or “Print & Scan” section, and click on the “+” button to add the scanner manually.
- Install necessary drivers: In some cases, your Mac may prompt you to install the necessary drivers or software required for the scanner to function properly. Follow the on-screen instructions to complete the installation process.
Once the scanner is successfully connected to your Mac, you are ready to start scanning your documents. It is important to ensure that the scanner is recognized by your Mac and that the appropriate drivers are installed to avoid any compatibility or functionality issues.
Keep in mind that the specific steps may vary depending on the model and brand of your scanner, as well as the operating system version on your Mac. Refer to the scanner’s user manual or the manufacturer’s website for detailed instructions if needed.
With your scanner connected to your Mac, you can proceed to the next steps of installing the necessary software and configuring the scanner settings to prepare for document scanning.
Installing Software for the Scanner
Once you have connected your scanner to your Mac, the next step is to install the necessary software to enable communication between the scanner and your computer. The software, often referred to as drivers or scanning utilities, allows your Mac to recognize and control the scanner efficiently. Here’s how to install the software for your scanner:
- Check for bundled software: Before downloading any additional software, check if your scanner came with a bundled installation CD or DVD. This disc may contain the drivers and scanning utility software needed for your specific scanner model.
- Download from manufacturer’s website: If your scanner did not come with bundled software or if you prefer to use the latest version, visit the manufacturer’s website. Look for the support or downloads section and locate the software for your scanner model. Download the appropriate software compatible with your Mac’s operating system.
- Run the installer: Once the software installer is downloaded, double-click on it to run the installation process. Follow the on-screen instructions to complete the installation. You may be required to agree to the software’s terms and conditions and provide administrative credentials for your Mac.
- Restart your Mac: After the software installation is complete, it is recommended to restart your Mac. This helps ensure that the scanner drivers are properly loaded and ready to be used by your scanning application.
It’s essential to install the correct software for your specific scanner model and Mac operating system to ensure compatibility and optimal performance. Using outdated or incompatible software may result in issues or limited functionality when scanning documents.
Some scanner software includes advanced features and settings that allow you to customize your scanning experience. These settings often include resolution options, color adjustments, file formats, and more. Familiarize yourself with the software’s capabilities to take full advantage of your scanner’s features.
Remember to periodically check for software updates from the manufacturer’s website to ensure that you have the latest version installed. Software updates often include bug fixes, performance improvements, and new features that can enhance your scanning experience.
With the software installed, you can now move on to setting up the scanner and adjusting the scanning settings on your Mac.
Setting Up the Scanner
After installing the necessary software for your scanner on your Mac, the next step is to properly set up the scanner to ensure smooth and efficient scanning. Here’s how to set up your scanner:
- Place the scanner in a suitable location: Find a location for your scanner where it can operate comfortably and provide easy access. Ensure that the scanner is placed on a stable surface and that there is enough space to open the scanner lid or document feeder tray fully.
- Connect to a power source: Plug the power cord of your scanner into a nearby electrical outlet. Make sure that the power source is stable and reliable to avoid any interruptions while scanning.
- Turn on the scanner: Use the power switch or button on your scanner to turn it on. Wait for the scanner to initialize and go through any startup procedures. Some scanners may have an indicator light that turns on when the scanner is powered up.
- Check scanner settings: Once the scanner is powered on, access the scanner settings either through the software installed on your Mac or directly on the scanner’s control panel, if applicable. Confirm that the settings match your scanning requirements, such as resolution, color mode, and file format.
- Calibrate the scanner (if necessary): Some scanners may require calibration to ensure accurate scanning results. Refer to the scanner’s user manual or the software’s documentation for instructions on how to perform a calibration process, if needed.
- Test the scanner: Before scanning important documents, perform a test scan to ensure that the scanner is functioning correctly. Use a sample document or photo and verify that the scanned image appears clear and without any distortions or defects.
Properly setting up your scanner is crucial for efficient and accurate document scanning. Taking the time to ensure the scanner is in a suitable location, connected to a stable power source, and configured with the correct settings helps eliminate potential issues during the scanning process.
Additionally, regularly cleaning and maintaining your scanner can prolong its lifespan and maintain scan quality. Refer to the scanner’s user manual for specific cleaning instructions and perform routine cleaning tasks as recommended by the manufacturer.
With your scanner properly set up, you are now ready to prepare the documents for scanning and adjust the scanning settings on your Mac to achieve the desired quality and format.
Preparing the Document for Scanning
Before scanning your documents on your Mac, it is important to properly prepare them to ensure optimal scan quality and accurate results. Follow these steps to prepare your documents for scanning:
- Remove any staples, paperclips, or bindings: Before placing the document on the scanner, make sure to remove any staples, paperclips, or bindings that may obstruct the scanning process. These metal objects can damage the scanner or cause paper jams.
- Straighten out any folds or creases: Smooth out any folds, creases, or wrinkles on the document as best as you can. This helps ensure that the document lies flat on the scanner bed, resulting in a clear and readable scan.
- Arrange documents in the proper orientation: Place the documents on the scanner bed in the correct orientation. For example, if the document has a specific top or bottom, make sure it is aligned accordingly. This helps prevent any scanning errors or upside-down pages in the final scan.
- Remove any dirt or debris: Check both sides of the document for any visible dirt, dust, or debris. Use a clean, lint-free cloth or a soft brush to gently remove any particles. This helps prevent smudges or specks from appearing in the scanned image.
- Consider using a document feeder (if available): If your scanner has a document feeder, consider using it for larger documents or multiple-page scans. Ensure that the pages are neatly stacked and aligned within the feeder to avoid misfeeds or skewed scans.
- Take note of scanning restrictions or limitations: Be aware of any specific size or format restrictions for your scanner. Some scanners may have limitations on the size of documents they can scan or may only support specific file formats. Refer to the scanner’s user manual or the software’s documentation for this information.
By properly preparing your documents for scanning, you can improve the accuracy and quality of the scanned results. Taking the time to remove any obstructions, straighten out folds, and ensure proper alignment helps the scanner capture clear and legible images.
Additionally, it is essential to handle the documents with care and avoid placing excessive pressure or force on the scanner bed or document feeder. Rough handling can lead to paper jams, misfeeds, or damage to both the scanner and the document.
With your documents prepared and ready, you can proceed to adjust the scanning settings on your Mac to customize the scan output according to your preferences and requirements.
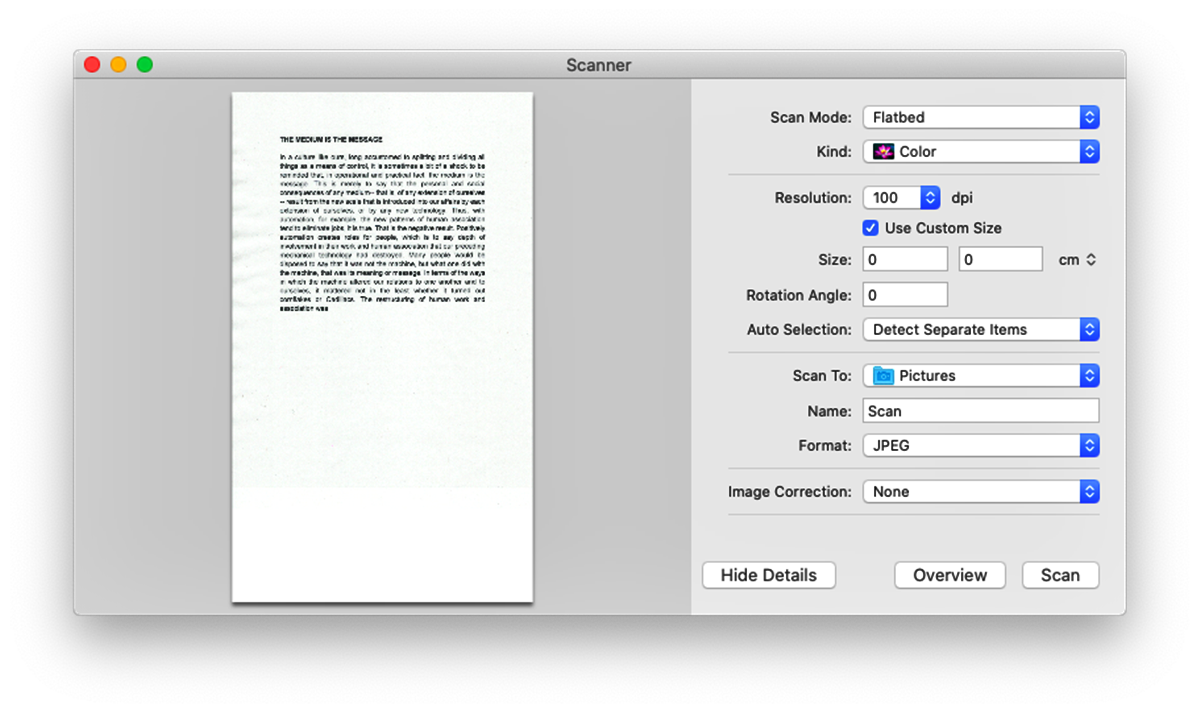
Adjusting Scanning Settings
Once your document is prepared and ready to be scanned on your Mac, you can adjust the scanning settings to customize the output according to your preferences and requirements. Here’s how to adjust the scanning settings:
- Open the scanning software: Launch the scanning software on your Mac. This software may be a standalone application or integrated into the printer and scanners section of your system preferences.
- Select the scanner: If you have multiple scanners connected to your Mac, ensure that you select the correct scanner from the available options.
- Choose the file format: Select the desired file format for your scanned documents. Common options include PDF, JPEG, TIFF, or PNG. Consider the intended use of the scanned documents when choosing the file format.
- Adjust resolution and image quality: Set the resolution and image quality based on your needs. Higher resolutions generally result in clearer and more detailed scans, but they also produce larger file sizes. Balance the resolution with your storage and printing requirements.
- Select color or grayscale: Depending on the document and your preferences, choose between color or grayscale scanning. Color scanning captures the document in full color, while grayscale scanning converts the document to black and white with varying shades of gray.
- Set brightness and contrast: Use the brightness and contrast options to enhance the quality and visibility of the scanned document. Adjust these settings as necessary to achieve the desired level of brightness and clarity.
- Optimize OCR settings (if applicable): If you intend to perform Optical Character Recognition (OCR) on the scanned document to extract text, make sure to enable OCR enhancements or select the appropriate language settings if available.
- Preview the scan: Before initiating the final scan, take advantage of the preview feature to check the positioning, quality, and settings of the scanned document. Make any necessary adjustments to ensure a satisfactory result.
By adjusting the scanning settings, you can tailor the scanned output to meet your specific needs. Whether you require high-resolution color scans or optimized grayscale documents for text extraction, customizing the settings allows you to achieve the desired results.
Keep in mind that the available settings and options may vary depending on the scanning software and scanner model you are using. Refer to the software’s documentation or the scanner’s user manual for detailed information about the available settings and their functionalities.
With the scanning settings adjusted, you are ready to proceed with previewing and scanning the document on your Mac.
Previewing the Document
Before finalizing the scan on your Mac, it is important to take advantage of the preview feature to ensure that the document is correctly positioned and the settings are adjusted to your satisfaction. Previewing the document allows you to make any necessary adjustments before initiating the final scan. Here’s how to preview the document:
- Select the scan preview option: In the scanning software on your Mac, look for the option to preview the scan. This option is typically indicated by a “Preview” or “Scan Preview” button. Click on this button to activate the preview mode.
- Position the document: Place the document on the scanner bed in the correct orientation. Align the edges of the document with the guidelines provided in the scanning software’s preview window. Take note of any cropping or scaling options available to adjust the document’s position if needed.
- Adjust settings if necessary: While in preview mode, evaluate the scanned document’s appearance and quality. Take this opportunity to make any adjustments to the scanning settings, such as resolution, color mode, brightness, or contrast, to achieve the desired output.
- Check for clarity and readability: Examine the previewed scan for clarity, readability, and any potential issues. Ensure that the text is legible, images are clear, and there are no unwanted artifacts or blemishes. Zoom in if necessary to inspect the smallest details.
- Make corrections if needed: If you notice any issues with the previewed scan, such as misalignment or poor quality, make the necessary corrections by repositioning the document or adjusting the settings accordingly. Repeat the preview process until you are satisfied with the result.
- Finalize the scanning process: Once you are satisfied with the previewed scan and have made any necessary adjustments, you can proceed to initiate the final scan. Click on the “Scan” or “Start Scan” button to begin the scanning process.
Previewing the document ensures that the final scan meets your expectations before committing to the scanning process. By carefully examining the previewed scan, you can avoid potential issues and make any necessary corrections to achieve the desired scan quality.
Remember to take your time during the preview process and make any adjustments needed to obtain the best possible result. It’s better to spend a little extra time ensuring the scan is correct rather than having to rescan the document due to errors or subpar quality.
With the document successfully previewed and adjusted, you are now ready to proceed with the final scanning process on your Mac.
Scanning the Document
After previewing and adjusting the settings for your document on your Mac, it’s time to proceed with the scanning process. Scanning the document allows you to capture a digital copy that can be saved, edited, or shared as needed. Follow these steps to scan the document:
- Ensure the document is still properly positioned on the scanner bed or in the document feeder (if applicable).
- In the scanning software, locate the “Scan” or “Start Scan” button and click on it. This initiates the scanning process.
- Depending on your scanner and software, you may have the option to scan a single page or multiple pages at once. Choose the appropriate setting based on your document.
- During the scanning process, you may see a progress bar or indicator showing the status of the scan. Be patient and allow the scanner to complete the process.
- If necessary, repeat the scanning process for any additional pages or documents you wish to scan.
- Once the scanning is complete, the scanned document will usually appear on your computer screen in a separate window or within the scanning software.
- Inspect the scanned document to ensure it matches your expectations in terms of quality, clarity, and alignment. Zoom in if necessary to check for any details.
- If you are satisfied with the scanned document, you can proceed to save it to your desired location on your Mac. Choose a meaningful file name and select the appropriate file format (such as PDF or JPEG) based on your needs.
Scanning your document allows you to create a digital version that can be easily stored, shared, or edited on your Mac. By carefully following the scanning process and double-checking the scanned document, you can ensure that the final result meets your requirements.
Keep in mind that the duration of the scanning process may vary depending on factors such as the size of the document, the resolution settings, and the performance of the scanner. Be patient and allow the scanner sufficient time to complete the scan to avoid potential issues.
With the document successfully scanned and saved on your Mac, you can proceed to the next steps of editing, sharing, or printing the scanned document as needed.
Saving the Scanned Document
Once your document has been scanned on your Mac, it’s important to save it properly to ensure easy access and future use. Saving the scanned document allows you to keep a digital copy that can be organized, edited, or shared as needed. Here’s how to save the scanned document:
- After scanning the document, review it to ensure the quality, clarity, and alignment meet your expectations. Make any necessary adjustments or re-scan if needed.
- In the scanning software or the window displaying the scanned document, navigate to the “File” or “Save” option to access the saving options.
- Choose a location on your Mac’s storage where you want to save the scanned document. You can create a dedicated folder or select an existing one that is easily accessible and well-organized.
- Select an appropriate file name that is descriptive and easy to identify. Consider adding relevant details such as the document’s title or date to help with future retrieval.
- Choose the desired file format for the scanned document, such as PDF, JPEG, or TIFF, based on your intended use and compatibility requirements. Consider factors like file size, image quality, and compatibility with other software.
- Configure any additional settings specific to the chosen file format, such as compression levels or encryption options, if applicable.
- Click on the “Save” or “OK” button to finalize the saving process. This will store the scanned document in the designated location on your Mac.
- Make a note of the saved file’s location and any relevant details for future reference. This will help you quickly locate and retrieve the scanned document when needed.
Saving the scanned document properly ensures that it is securely stored and easily accessible whenever you require it. Organizing scanned documents in designated folders and using descriptive file names can help streamline your storage and retrieval process.
Remember to regularly backup your scanned documents to external storage devices or cloud storage solutions to prevent data loss. This provides an extra layer of protection and ensures that your scanned documents are safe and accessible even in the event of a computer malfunction or data corruption.
With the scanned document successfully saved on your Mac, you can proceed to edit, share, or print it based on your specific needs.
Editing the Scanned Document
Once you have saved the scanned document on your Mac, you may want to make some edits or modifications to enhance its appearance or content. Editing the scanned document allows you to refine the text, adjust the layout, or make any necessary corrections. Follow these steps to edit the scanned document:
- Open the scanned document using appropriate software for editing. Common options include Adobe Acrobat, Microsoft Word, or image editing software like Photoshop or GIMP.
- If the scanned document is in an image format (such as JPEG or TIFF), consider converting it to a PDF format for easier editing and preservation of the document’s layout and formatting.
- Review the document and identify areas that require editing or modification. This could include correcting any misinterpretations made during the scanning process, adjusting image quality, or enhancing readability.
- Use the available tools within the editing software to perform the desired edits. This might involve adjusting text spacing, deleting or adding text, resizing or cropping images, or improving the overall document layout and formatting.
- If the document contains scanned handwritten notes or signatures, some software might offer tools for converting them into editable text or vectorized images for easier manipulation.
- Save the edited document, ensuring that you create a separate file to preserve the original scanned version. This allows you to revert to the original if needed and maintain a record of the document’s history.
- Consider saving the edited document in a widely compatible format, such as PDF or DOCX, to ensure that it can be easily viewed and accessed on different devices or by others.
Editing the scanned document gives you the opportunity to refine or correct any imperfections that might have occurred during the scanning process. It allows you to make the document more polished, professional, and aligned with your intended purpose.
Keep in mind that the editing capabilities may vary depending on the software you are using and the format of the scanned document. Some documents might be better suited for conversion into editable text using Optical Character Recognition (OCR) software before making edits.
By leveraging the editing tools available on your Mac, you can enhance the appearance, readability, and overall quality of the scanned document, making it more presentable and suitable for your specific needs.
Sharing or Printing the Scanned Document
Once you have scanned and edited your document on your Mac, you may want to share it with others or print a physical copy for various purposes. Sharing or printing the scanned document allows you to distribute it digitally or have a hard copy for reference. Here’s how you can share or print the scanned document:
- Sharing the scanned document:
- If you want to share the scanned document digitally, you can do so by attaching it in an email, uploading it to a file-sharing service, or sharing it via cloud storage platforms like Google Drive or Dropbox.
- Ensure that you choose a file format, such as PDF, that is widely compatible with different operating systems and devices to ensure seamless viewing for the recipients.
- Double-check that any sensitive or personal information is redacted or removed to protect privacy before sharing the document.
- Printing the scanned document:
- If you prefer a physical copy of the document, connect your Mac to a compatible printer using a USB cable or through a Wi-Fi network.
- Ensure that the printer is powered on and has sufficient paper and ink or toner cartridges to complete the print job.
- Open the scanned document using an appropriate software application that supports printing, such as Adobe Acrobat or a word processing program like Microsoft Word.
- Select the “Print” option from the menu or toolbar within the software application.
- Configure the print settings, such as page orientation, paper size, and print quality according to your preferences.
- Review a print preview, if available, to ensure that the document appears as desired on paper.
- Click on the “Print” button to initiate the printing process. Monitor the print job to ensure that each page is printed correctly.
Sharing or printing the scanned document allows you to distribute the information in the format that best suits your needs. Whether you choose to share it electronically or print a physical copy, consider the intended audience and purpose of the document to ensure an effective communication or preservation of information.
Remember to respect any copyright or confidentiality restrictions that may apply to the scanned document when sharing or printing it. Exercise caution to protect sensitive information and adhere to applicable privacy laws and regulations.
With the scanned document successfully shared or printed, you have completed the process of scanning documents on your Mac. Congratulations!