
Why Repost an Instagram Story
Instagram stories have become an integral part of the platform, allowing users to share their daily moments in a more temporary and casual format. While stories are meant to disappear after 24 hours, there may be times when you come across an interesting or inspiring story that you want to share with your own followers. That’s where reposting comes in.
Reposting an Instagram story provides several benefits. First and foremost, it allows you to share content that resonates with you, whether it’s a humorous clip, a beautiful photograph, or an insightful message. By reposting, you have a chance to amplify the original author’s message and reach a broader audience, potentially helping them gain recognition or support for their content.
Reposting can also be a way to engage with your own followers and start conversations. When you reshare a story, you can add your own perspective or commentary, creating an opportunity for meaningful interactions and discussions among your audience. It’s a way to spark interest, showcase your personality, or show support for causes or individuals that matter to you.
Furthermore, reposting an Instagram story can help you curate content and provide value to your followers. By sharing stories that you find interesting or useful, you become a valuable resource for your audience, bringing them fresh perspectives, entertainment, or educational content. This can enhance your credibility and authority in your niche, attracting more followers and strengthening your relationship with existing ones.
Lastly, reposting stories can foster a sense of community and collaboration among Instagram users. When you give credit to the original poster, you acknowledge their work and show appreciation for their creative efforts. It encourages a supportive environment where users uplift each other and celebrate the diverse talents and perspectives found on the platform.
While reposting an Instagram story can be a great way to engage with your audience and contribute to the community, it’s important to do so ethically and responsibly. Always give proper credit to the original poster, respect their content, and be mindful of any copyright or intellectual property rights.
Step 1: Take a Screenshot of the Instagram Story
Before you can repost an Instagram story, you’ll need to capture a screenshot of the story you want to share. Here’s how you can do it:
- Open the Instagram app: Launch the Instagram app on your mobile device and log in to your account.
- Find the story you want to repost: Scroll through your feed or navigate to the profile of the user whose story you want to capture.
- Prepare to take the screenshot: Once you’ve located the desired story, get ready to capture the screenshot. On Android devices, press the volume down button and the power button simultaneously. On iOS devices, press the home button and the power button at the same time.
- Take the screenshot: Press the buttons in step 3 firmly until you hear a shutter sound or see a flash on your screen, indicating that the screenshot has been taken. The captured image will be saved to your device’s camera roll or gallery.
It’s important to note that when taking a screenshot of someone else’s content on Instagram, you should always respect their privacy and intellectual property. Make sure to only capture public stories or seek permission from the original poster if the content is private or requires consent to share.
Once you have successfully captured the screenshot, you’re ready to move on to the next step: editing the image before reposting it as your own Instagram story. By editing the screenshot, you can add your personal touch or make any necessary adjustments to ensure the reposted story aligns with your desired presentation and style.
Step 2: Edit the Screenshot
After capturing a screenshot of the Instagram story you want to repost, you may need to make some edits to enhance the image or tailor it to better fit your own style. Here are some editing tips to consider:
- Crop the image: Use a photo editing app or the built-in editing tools on your device to crop the screenshot. This helps eliminate any unnecessary elements or unwanted borders that may have been captured in the original screenshot.
- Adjust brightness and contrast: If the screenshot appears too dark or too bright, utilize the editing tools to adjust the brightness and contrast levels. This helps to make the image more visually appealing and ensures that the details are clear and crisp.
- Add filters: Apply filters to the screenshot to give it a unique and consistent look with your own Instagram aesthetic. Experiment with different filters to find the one that best complements the content of the reposted story.
- Add text or stickers: Consider adding text or stickers to the screenshot to add context, captions, or personal flair. You can use the text feature in editing apps to write a caption, include a hashtag, or provide credit to the original poster.
- Make other adjustments: Depending on your preferences, you can make additional edits such as adjusting saturation, sharpness, or even adding special effects if desired. However, it’s important not to overdo it and maintain the integrity of the original content.
Remember, the goal of editing the screenshot is to enhance the image while staying true to the original content. Be mindful not to misrepresent or alter the message of the original post, as it’s crucial to respect the authenticity of the original story.
Once you’ve made the necessary edits and are satisfied with the final image, it’s time to proceed to the next step: opening Instagram’s story editor to upload the edited screenshot.
Step 3: Open Instagram’s Story Editor
With the edited screenshot ready, it’s time to open Instagram’s story editor to prepare the reposted story for sharing. Follow these steps to access the story editor:
- Launch Instagram: Open the Instagram app on your mobile device and ensure you are logged in to your account.
- Access the camera screen: Tap on the camera icon located at the top left corner of your home feed or swipe right from anywhere on the screen to access the camera screen.
- Choose the gallery option: At the bottom left corner of the camera screen, you will find a small square thumbnail representing your most recent photo or video. Tap on it to access your device’s gallery or camera roll.
- Select the edited screenshot: Browse through your gallery to find the edited screenshot. Tap on it to select and import the screenshot into the Instagram story editor.
Once you’ve selected the edited screenshot, it will appear on the story editor screen within a square box. At this point, you have the ability to further customize your reposted story before sharing it with your followers.
The story editor provides various features to enhance your story, including:
- Text and fonts: Use the text tool to add captions, include quotes, or provide context to your reposted story. Customize the font style, size, and color to match your desired aesthetic.
- Stickers and GIFs: The Sticker option allows you to add fun and engaging stickers, GIFs, and emojis to your story. Choose from a wide range of categories, such as location stickers, weather icons, or animated GIFs to make your reposted story visually appealing.
- Filters and effects: Apply filters or effects to the screenshot to further enhance its visual appeal. Experiment with different filters or effects to create a unique look for your reposted story.
- Draw and doodle: Use the drawing tool to add personal touches, artistic elements, or even annotations to the screenshot. Select different brush sizes and colors to create your desired effect.
Once you are satisfied with the edits and customization, you can proceed to the next step: uploading the edited screenshot as a reposted Instagram story.
Step 4: Upload the Edited Screenshot
After using Instagram’s story editor to refine and customize the reposted story, it’s time to upload the edited screenshot to your Instagram story. Here’s how you can do it:
- Access your story: On Instagram’s story editor screen, you should see a “Your Story” button at the bottom of the screen. Tap on it to add the edited screenshot to your story.
- Review your story: Before posting, take a moment to review your reposted story. Make sure all the edits, captions, stickers, and filters are in place and accurately represent the message or context you wish to convey to your followers.
- Add additional elements: If you want to include more content in your story, such as other photos, videos, or stickers, you can do so now. Simply tap on the icons on the story editor screen to access more features and elements.
- Adjust the display settings: You can customize the way the reposted story is displayed by tapping on the icons at the top of the screen. Options include hiding the story from certain followers, adding a location tag, or enabling the “Close Friends” feature.
Once you are happy with the appearance of the reposted story and have applied any desired additional elements or settings, you are ready to share it with your followers. Tap the “Send to” button, usually represented as a plus sign or a right-facing arrow, to post the story on your Instagram account.
It’s worth noting that Instagram stories have a lifespan of 24 hours, and they will automatically disappear from your profile after that timeframe. However, you can save the reposted story to your device if you wish to keep a copy for future reference or archival purposes.
Now that you’ve successfully uploaded the edited screenshot as a reposted Instagram story, it’s essential to give credit to the original poster to acknowledge and respect their work. We’ll cover this in the next step: giving credit to the original creator of the story you’re reposting.
Step 5: Add Personal Touches or Captions
When reposting an Instagram story, it’s a great opportunity to add your own personal touches or captions to make the story more engaging and meaningful to your followers. Here are some ways to add a personal touch to your reposted story:
- Write a caption: Craft a caption that provides context, expresses your thoughts, or reflects your own perspective on the story you’re reposting. You can use this space to share your reactions, insights, or even ask your followers for their opinions or experiences related to the content.
- Include emojis: Emojis can convey emotions, add emphasis, or inject some fun into your caption. Choose emojis that align with the mood or theme of the reposted story to enhance the overall message and engagement.
- Add relevant hashtags: Including hashtags in your caption can help extend the reach of the reposted story and connect it to relevant communities or conversations. Research popular hashtags related to the content and choose the ones that are most relevant and impactful.
- Tag the original poster: If the original poster has an Instagram account, consider tagging them in your caption or as an overlay sticker on the story. This gives credit to the creator and allows your followers to discover their account and engage with them directly.
- Share your thoughts in a video or audio format: Instead of using a written caption, consider recording a video or audio clip where you express your thoughts or reactions to the story. This adds a more personal touch and allows your followers to connect with you in a different way.
- Use interactive stickers: Instagram offers various interactive stickers, such as polls, questions, or quizzes. Utilize these stickers to encourage your followers to engage with the reposted story and share their opinions or experiences related to the content.
The purpose of adding personal touches or captions to your reposted story is to create a deeper connection with your audience and encourage meaningful interactions. By providing your unique perspective and inviting others to join the conversation, you make your reposted story more engaging and invite your followers to participate actively.
Once you’ve added your personal touches and crafted a captivating caption, it’s time to post the reposted story and share it with your followers. But don’t forget the important step of giving credit to the original poster, which we will explore in the next step.
Step 6: Post the Reposted Instagram Story
After adding your personal touches and captions, it’s time to post the reposted Instagram story for your followers to see. Follow these steps to share your reposted story:
- Review your story: Before posting, take a moment to review the entire reposted story, including the edited screenshot, captions, and any additional elements you’ve added. Ensure that everything appears as you intended and that there are no errors or inconsistencies.
- Make any final adjustments: If you spot any issues or want to make last-minute changes, you can still go back and edit the reposted story. Tap on the editing options within the story editor or the editing menu to make any necessary adjustments.
- Select your posting preference: When you’re ready to post, you have options for how you want to share the reposted story. You can choose to post it directly to your story so that it’s visible to all of your followers, or you can choose to share it with specific groups or individuals using the “Close Friends” feature.
- Hit the post button: Once you’ve made your choices, tap the “Post” or “Send” button to share the reposted story. Depending on your preferences, the story will be visible to your followers for the next 24 hours.
Posting the reposted Instagram story is an exciting moment, as you have successfully shared content that resonates with you and that you believe will engage your followers. Your personal touches, captions, and additions make the story uniquely yours, allowing you to connect with your audience on a deeper level.
Remember that Instagram stories are ephemeral, so your reposted story will disappear after 24 hours. However, you can access insights and view the engagement metrics of your story during its lifespan. This can include the number of views, responses to interactive stickers, or direct message conversations initiated by your followers in response to the story.
Now that you’ve posted the reposted story, it’s important to give credit to the original poster and acknowledge their creative contributions. We’ll explore this step in the next section.
Step 7: Give Credit to the Original Poster
When reposting an Instagram story, it’s crucial to give credit to the original poster to acknowledge their creative efforts and respect their work. Here’s how you can give proper credit:
- Tag the original poster: If the original poster has an Instagram account, tag them in your reposted story. Simply use the tag feature within the story editor or add their username as an overlay sticker on the story. This not only gives credit but also allows your followers to discover and engage with the original creator.
- Mention the original poster in the caption: In addition to tagging, include a mention of the original poster in the caption of your reposted story. This can be done by using their Instagram handle preceded by the @ symbol. Mentioning the creator ensures that they are properly recognized and acknowledged by your followers.
- Include a clear credit statement: Along with the tag and mention, it’s a good practice to include a clear and concise credit statement in the caption. You can write something like “Credit to @originalposter for this amazing story” or “Photo/story credit goes to @originalposter.”
- Ask for permission if needed: If the original content is not publicly available or if it requires permission to share, it’s essential to reach out to the original poster before reposting. Send them a direct message, explain why you want to repost their story, and politely ask for their permission.
Remember, giving credit to the original poster is not only a gesture of respect but also an ethical practice that demonstrates your appreciation for their work. It’s important to uphold the integrity of the Instagram community and value the creative contributions of others.
By properly crediting the original poster, you also provide a way for your followers to discover new accounts and content creators, fostering a supportive and collaborative environment on Instagram.
Now that you have given credit to the original poster, it’s worth exploring different methods and tools you can use to repost an Instagram story. We’ll cover this in the next section.
Step 8: Different Methods to Repost an Instagram Story
When it comes to reposting an Instagram story, there are various methods and tools available that can streamline the process and make it easier for you to share content with your followers. Here are a few different methods you can consider:
- Manually screenshot and edit: The most basic and straightforward method is to manually take a screenshot of the Instagram story you wish to repost. After taking the screenshot, you can use photo editing apps or the built-in editing tools on your device to customize the image before posting it as your own story.
- Use a reposting app: There are numerous third-party apps available that specialize in reposting Instagram content. These apps allow you to easily save and repost stories directly from the Instagram app. Some popular options include Repost for Instagram, Story Reposter, and Regram.
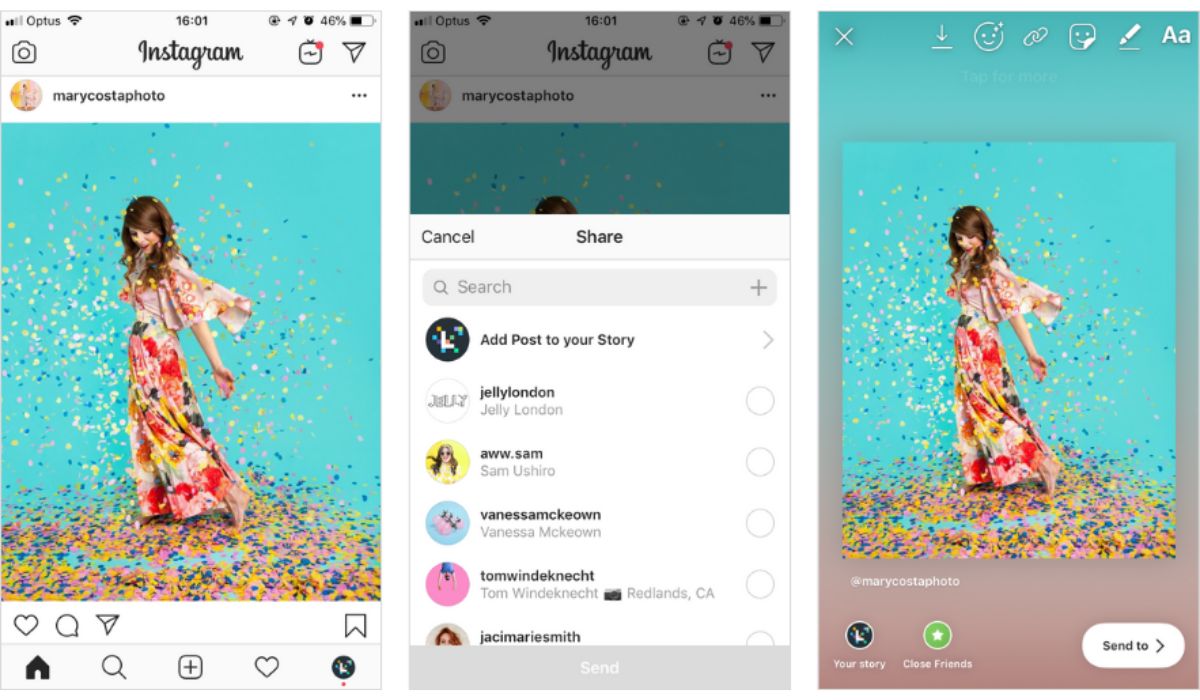
- Use Instagram’s built-in sharing options: Instagram also offers built-in sharing options that allow you to share another user’s story directly to your own story or via direct message. When viewing the story, tap the “Share” button and select the “Add post to your story” option or select specific users to send the story to via direct message.
- Tag the original poster in your story: Instead of reposting the exact content, you can create your own story and tag the original poster using the tag feature or an overlay sticker. This allows your followers to discover the original creator and engage directly with their content.
- Collaborate with the original poster: If you have a close relationship or collaboration opportunity with the original poster, you can work together to create a joint story. This way, both parties can share and benefit from the content while giving proper credit to each other.
It’s important to note that whichever method you choose, it’s essential to respect the original poster’s privacy and intellectual property rights. Only repost public stories or ensure you have obtained permission if the content is private or requires consent to be shared.
Remember to always give credit to the original poster by tagging them, mentioning them in the caption, or including a credit statement in your reposted story. This ensures that their hard work is acknowledged and appreciated.
Experiment with different methods to find the one that suits your preferences and needs. The goal is to share meaningful and engaging content with your audience while maintaining ethical practices within the Instagram community.
Now that you’re familiar with the different methods to repost an Instagram story, you can confidently share content that resonates with you and adds value to your followers’ experience on the platform.