
Things You’ll Need
Before you begin the process of replacing your MacBook Pro battery, there are a few essential items you’ll need to have on hand. These tools and supplies will ensure a smooth and successful battery replacement. Make sure you gather the following:
- A replacement battery compatible with your specific MacBook Pro model. You can purchase one online or from an authorized Apple reseller.
- A soft cloth or microfiber cloth to protect the surface of your MacBook Pro during the battery replacement process.
- A small screwdriver, usually a 5-point Pentalobe or a Phillips head, to remove the screws on the bottom case of your MacBook Pro.
- Anti-static gloves or an anti-static wrist strap to protect your MacBook Pro from static electricity while working on it.
- A clean and clutter-free workspace to ensure you have enough room to comfortably work on your MacBook Pro without any obstructions.
- A magnetic mat or container to hold and organize the screws and small parts that you’ll be removing during the battery replacement.
- A backup solution for your data, such as an external hard drive or cloud storage, to ensure that you don’t lose any important files or documents during the battery replacement process.
Having these items ready before you start the battery replacement will save you time and help make the process more efficient. Remember to read the instructions that come with your replacement battery and refer to your MacBook Pro’s user manual or online resources for specific details on your particular model.
Step 1: Check the Battery Status
Before diving into the battery replacement process, it’s important to determine if your MacBook Pro’s battery needs to be replaced. Checking the battery status will help you assess whether a replacement is necessary or if there could be other underlying issues affecting your MacBook’s performance. Follow these steps to check the battery status:
- Click on the Apple menu: Located in the top-left corner of your screen, click the Apple logo to open the drop-down menu.
- Select “About This Mac”: In the drop-down menu, click on “About This Mac” to access detailed information about your MacBook Pro.
- Go to “System Report”: In the “About This Mac” window, click on the “System Report” button. This will open a new window displaying various system details.
- Find the “Power” section: In the left sidebar of the System Report window, locate and click on the “Power” category. This will display detailed information about your MacBook Pro’s battery.
- Check the battery condition: In the Power section, look for the “Health Information” subsection. Here, you’ll find details about the battery’s current condition and its cycle count. If the condition shows “Replace Soon” or “Service Battery,” it’s a sign that your battery needs to be replaced.
By following these steps, you can accurately assess the state of your MacBook Pro’s battery. If the condition shows that the battery needs replacing or if you’re experiencing significant battery performance issues, it’s time to proceed with the battery replacement process.
Step 2: Backup Your Data
Before you proceed with replacing the battery in your MacBook Pro, it’s essential to back up all your important data. This precautionary step ensures that you won’t lose any valuable files or documents during the battery replacement process. Here’s how you can back up your data:
- Choose a backup method: Depending on your preferences, you can either use an external hard drive or utilize cloud storage solutions such as iCloud, Dropbox, or Google Drive.
- Connect your external hard drive: If you’re using an external hard drive, connect it to your MacBook Pro using a compatible cable or through a wireless connection.
- Select files and folders: Identify the files and folders you want to back up. These can include documents, photos, videos, music, and any other important files that you don’t want to lose.
- Copy files to the backup location: Drag and drop the selected files to the external hard drive or use the backup software provided by the cloud storage service to upload your files to the cloud.
- Verify the backup: After the backup process is complete, double-check that all your files have been successfully copied to the backup location. This ensures that you won’t encounter any unpleasant surprises later on.
Backing up your data before replacing the battery is crucial because it acts as a safety net in case anything goes wrong during the replacement process. It’s always better to be safe than sorry, and having a recent backup ensures that you can easily restore your data if needed.
Step 3: Power Down Your MacBook Pro and Disconnect All Cables
Before you proceed with replacing the battery in your MacBook Pro, it’s crucial to power it down and disconnect all cables. This step ensures the safety of both you and your device during the battery replacement process. Here’s what you need to do:
- Save your work and close all applications: Make sure you save any open documents or projects and close all running applications on your MacBook Pro. This prevents data loss and ensures a smooth transition to the next step.
- Shut down your MacBook Pro: Click on the Apple menu in the top-left corner of your screen and select “Shut Down” from the drop-down menu. Wait for your MacBook Pro to completely turn off before proceeding to the next step.
- Disconnect all cables and peripherals: Unplug any cables connected to your MacBook Pro, including the power adapter, USB cables, external displays, and any other peripherals. This prevents any accidental damage during the battery replacement process.
- Place your MacBook Pro on a soft, clean surface: Find a flat and stable surface to work on, preferably covered with a soft cloth or a microfiber mat. This provides a cushioning layer and prevents scratches or damage to your MacBook Pro’s surface.
By following these steps and ensuring that your MacBook Pro is completely powered down and disconnected from all cables, you’re taking necessary precautions to prevent any electrical shocks or potential damage to your device during the battery replacement process. Safety should always be a priority when working with electronic devices.
Step 4: Remove the Bottom Case
To continue with the battery replacement process, you’ll need to remove the bottom case of your MacBook Pro. Remember to handle the components with care and follow these steps:
- Flip your MacBook Pro upside down: Carefully turn your MacBook Pro upside down, so the bottom case is facing upwards.
- Locate and remove the screws: Using a small screwdriver (usually a 5-point Pentalobe or a Phillips head), unscrew the screws that secure the bottom case of your MacBook Pro. Keep the screws in a safe place, such as a magnetic mat or container, to ensure you don’t lose them.
- Gently remove the bottom case: Once the screws are removed, carefully lift the bottom case up and gently set it aside. Take caution not to apply too much force or damage any internal components.
Removing the bottom case gives you access to the inside of your MacBook Pro and allows you to proceed with the battery replacement. Remember to pay attention to the location of the screws and keep them organized for easy reassembly later in the process. With the bottom case removed, you’re ready to move on to the next step of the battery replacement process.
Step 5: Disconnect the Battery Connector
Now that you have removed the bottom case of your MacBook Pro, the next step in the battery replacement process is to disconnect the battery connector. This will ensure your safety and prevent any electrical mishaps during the replacement. Follow these steps to disconnect the battery connector:
- Locate the battery connector: Inside your MacBook Pro, look for the connector that connects the battery to the logic board. It is usually situated near the center of the device and has a white or black plastic tab.
- Release the battery connector: Gently lift the plastic tab on the battery connector to release it from its socket. Be cautious not to pull on the wires to avoid damage or disconnection.
- Confirm the disconnection: Once you have lifted the plastic tab and released the battery connector, ensure that it is no longer attached to the socket by gently pulling the connector away from the logic board. It should come off easily without any resistance.
Double-checking the battery connector’s disconnection is crucial to avoid any accidental power supply during the battery replacement process. Take your time and ensure that the connector is completely disconnected before proceeding to the next step.
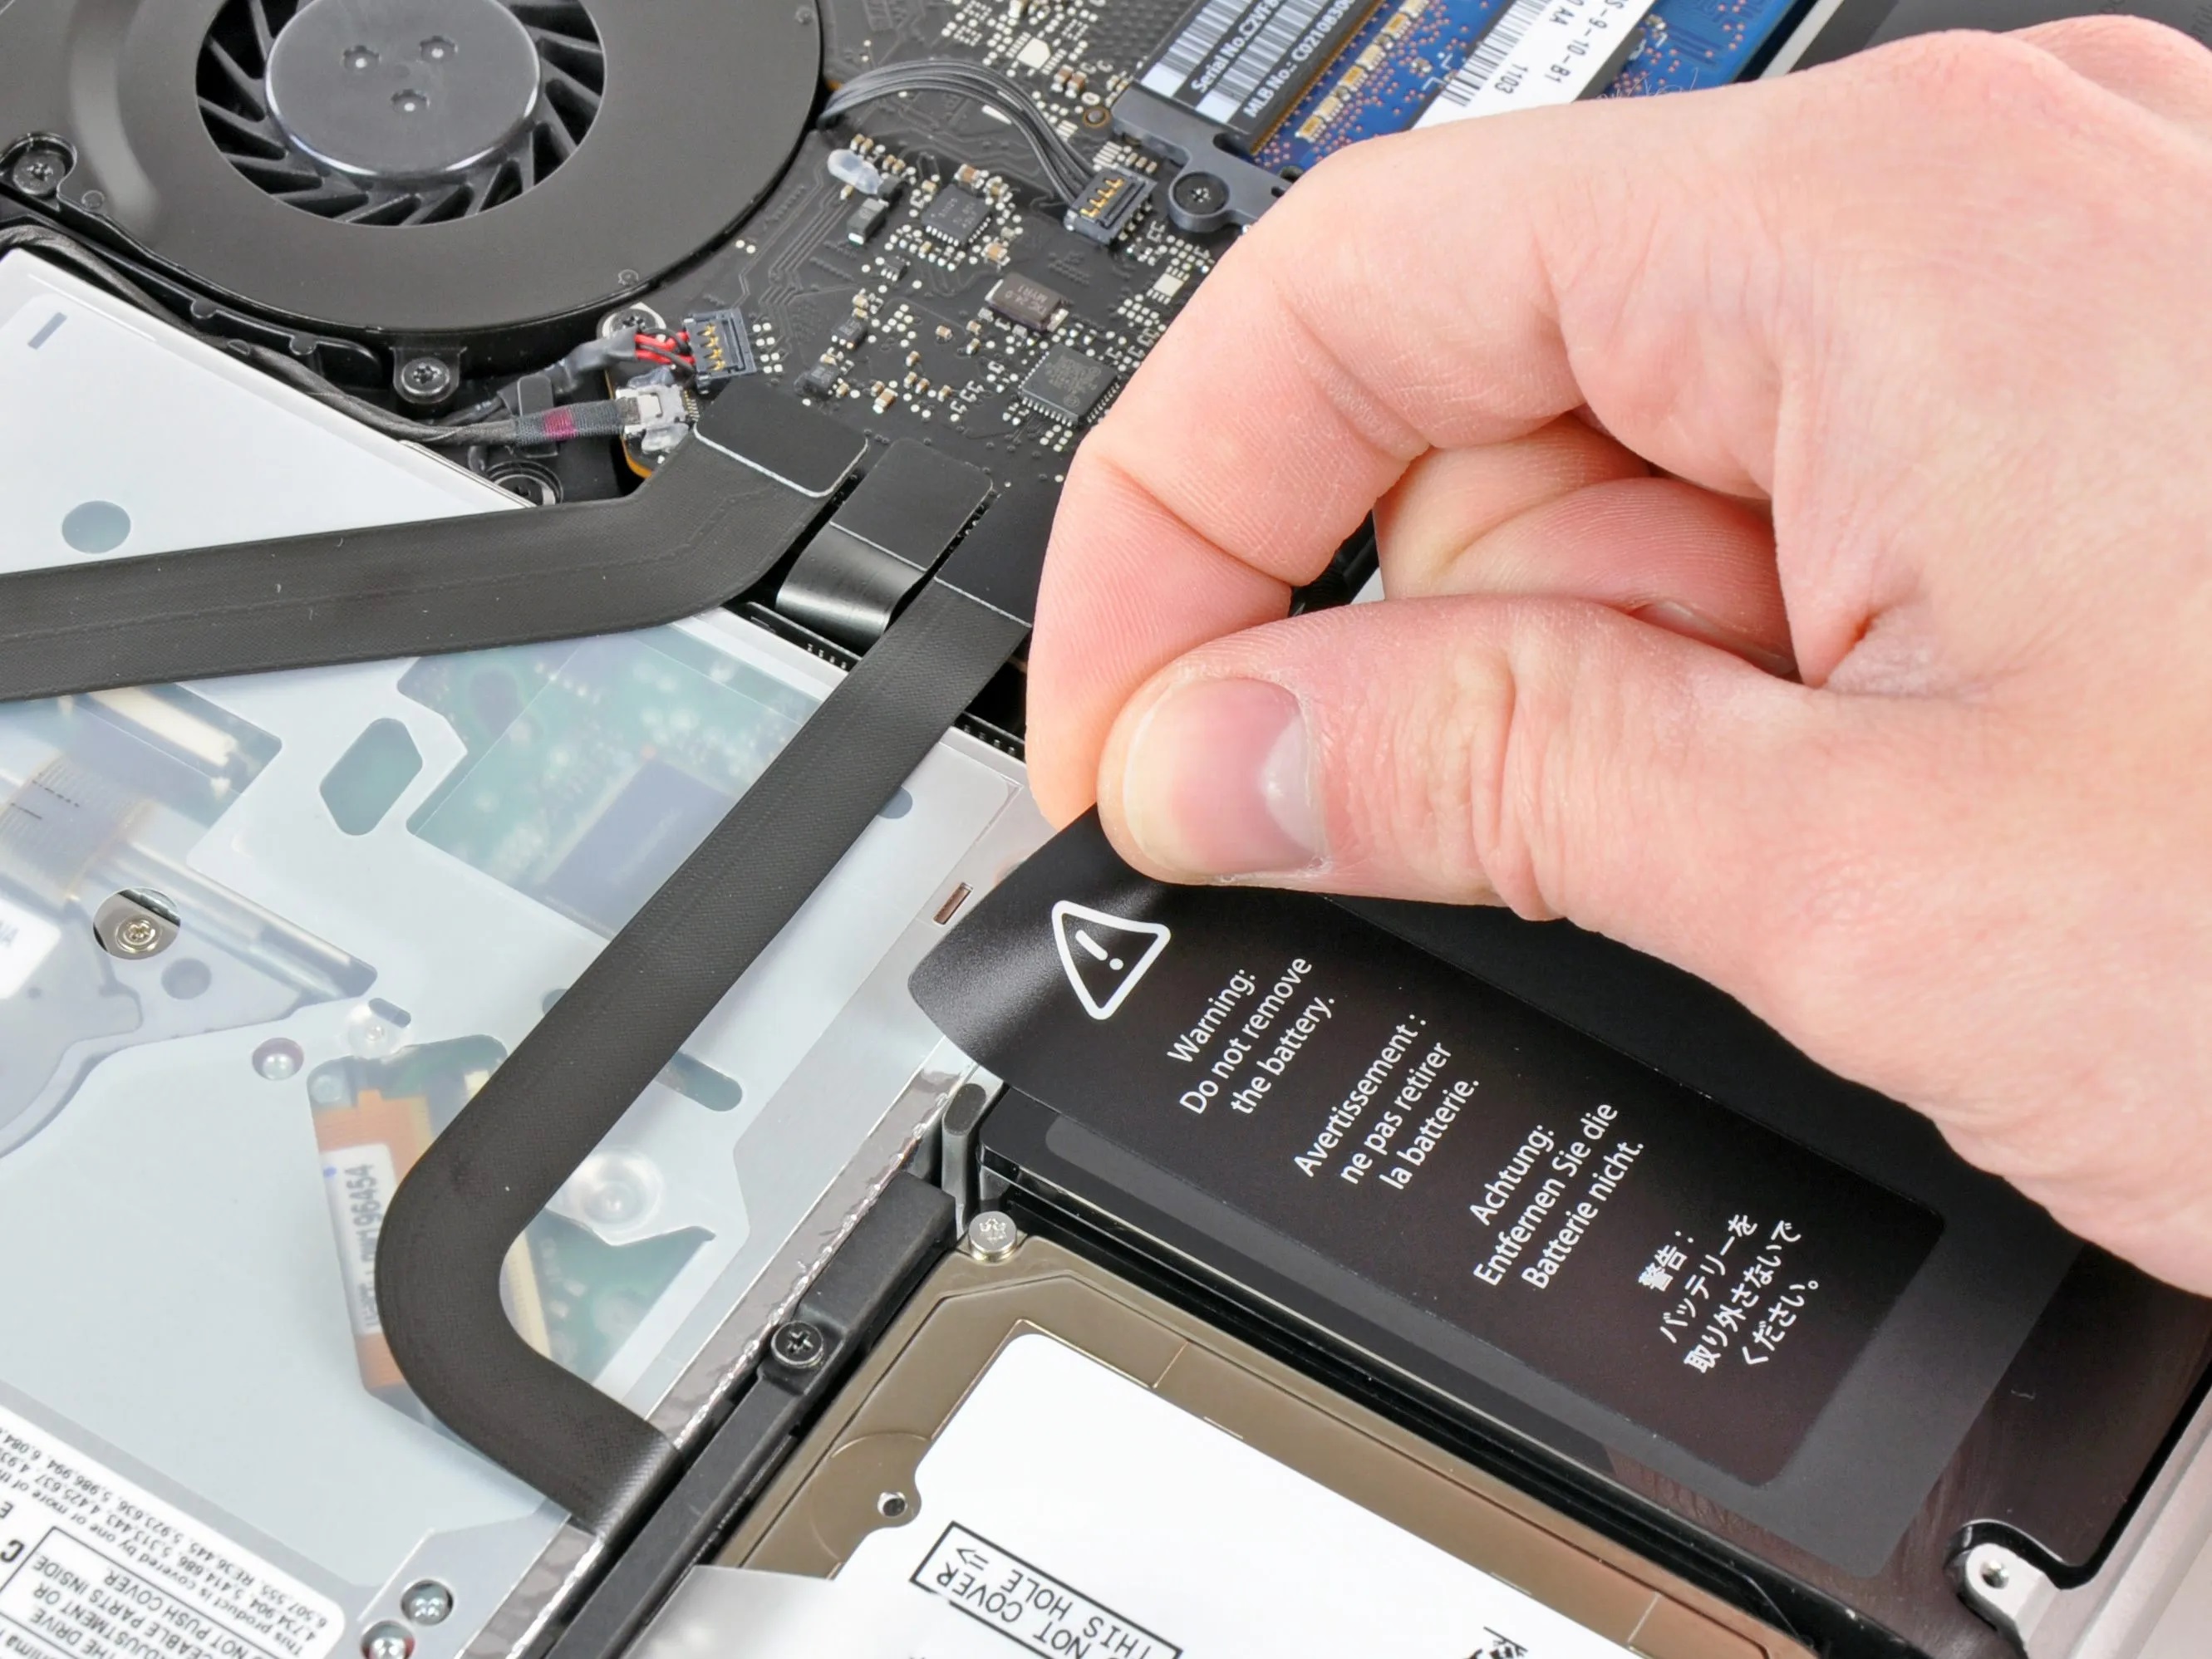
Step 6: Remove the Battery
With the battery connector disconnected, you can now safely proceed with removing the old battery from your MacBook Pro. Follow these steps carefully to ensure a successful removal:
- Identify the battery: Locate the battery inside your MacBook Pro. It is usually a rectangular-shaped component situated near the center or bottom of the device. The battery may be secured with adhesive or held in place with additional screws.
- Release any adhesive strips: If your MacBook Pro’s battery is held in place with adhesive strips, gently pull on the tab of each strip to release it. Make sure to pull straight and avoid using excessive force to prevent any damage to the battery or other internal components.
- Remove any securing screws: If there are screws securing the battery, use the appropriate screwdriver to unscrew and remove them. Set the screws aside in a secure location, such as a magnetic mat or container, to avoid misplacing them.
- Lift the battery: Once the adhesive strips are released or the securing screws are removed, carefully lift the battery from its compartment. Lift it straight up to avoid any damage to the other components surrounding the battery.
Take your time during the battery removal process to ensure that you handle the components with care. Patience and gentle movements are key to preventing any accidental damage. With the old battery removed, you’re one step closer to completing the battery replacement in your MacBook Pro.
Step 7: Replace the Battery
Now that you have successfully removed the old battery from your MacBook Pro, it’s time to replace it with a new one. Follow these steps to ensure a proper installation:
- Position the new battery: Take the new battery that is compatible with your MacBook Pro model and carefully position it in the battery compartment. Make sure it aligns correctly with the connectors and sits flush with the surrounding components.
- If required, secure the battery: Depending on your MacBook Pro model, you may need to secure the new battery in place using adhesive strips or screws. Follow the instructions provided with the replacement battery to securely fasten it in the compartment.
- Double-check the connections: Ensure that the battery’s connectors align with the socket on the logic board. Gently press down on the battery to ensure a firm connection. Take care not to apply excessive force to prevent any damage.
Replacing the old battery with a new one is a crucial step to restore your MacBook Pro’s power and prolong its lifespan. Make sure to use a high-quality replacement battery from a reputable source to ensure optimal performance and compatibility.
Step 8: Reconnect the Battery Connector
With the new battery in place, the next step in the battery replacement process for your MacBook Pro is reconnecting the battery connector. Follow these steps carefully to ensure a proper connection:
- Locate the battery connector: Identify the battery connector that was previously disconnected. It is usually situated near the center of your MacBook Pro’s logic board.
- Align the battery connector: Gently position the battery connector over its respective socket on the logic board. Make sure the connector is properly aligned for a secure connection.
- Press down on the connector: Apply gentle pressure to the battery connector until it is fully seated in the socket. Avoid using excessive force to prevent any damage.
- Secure the battery connector: Once the battery connector is properly seated, gently press down on the plastic tab to lock it in place. This will ensure a secure connection between the battery and the logic board.
Reconnecting the battery connector is a critical step to restore the power supply to your MacBook Pro. Take your time to align the connector correctly and ensure a proper connection. A secure connection will help prevent any power-related issues and ensure the smooth functioning of your device.
Step 9: Replace the Bottom Case
With the battery properly connected, it’s time to reassemble your MacBook Pro by replacing the bottom case. Follow these steps to ensure a secure and proper fit:
- Align the bottom case: Carefully position the bottom case over the bottom of your MacBook Pro, ensuring that it aligns with the screw holes and ports.
- Gently press down: Apply even pressure along the edges of the bottom case to make sure it sits flush with the rest of the device. Be cautious not to press too hard or put pressure on any internal components.
- Replace the screws: Take the screws that you had previously removed and use a small screwdriver to reinsert them into the screw holes. Start with the corner screws and then work your way around to secure the bottom case in place.
Pay attention to the screw positioning and ensure that each screw is tightened just enough to secure the bottom case without overtightening. Over-tightening the screws can potentially damage the device or strip the screw threads.
Once the bottom case is securely in place, you have successfully reassembled your MacBook Pro. The proper alignment and fitting of the bottom case help to protect the internal components and maintain the overall integrity of your device.
Step 10: Power Up Your MacBook Pro
Now that the battery replacement process is nearly complete, it’s time to power up your MacBook Pro and ensure that everything is functioning properly. Follow these steps to power up your device:
- Locate the power button: Depending on your MacBook Pro model, the power button is typically located on the top-right or top-left corner of the keyboard.
- Press the power button: Press and hold the power button until you see the Apple logo or hear the startup chime. This initiates the booting process.
- Observe the startup process: As your MacBook Pro starts up, keep an eye out for any error messages or unusual behavior. If everything appears normal, proceed to the next step.
- Check the battery status: Once your MacBook Pro has finished booting up, click on the battery icon in the menu bar to check the battery status. Ensure that the battery is recognized and charging properly.
- Test the functionality: Use your MacBook Pro as you would normally, paying attention to the battery performance and overall functionality. Verify that the battery is holding a charge and that your MacBook Pro is operating optimally.
If you encounter any issues or abnormal behavior during the startup process or while using your MacBook Pro, it may be necessary to perform additional troubleshooting or seek professional assistance. Otherwise, congratulations! Your MacBook Pro is ready to be used with its newly replaced battery.
Step 11: Calibrate the New Battery
After replacing the battery in your MacBook Pro, it’s essential to calibrate the new battery to ensure optimal performance and accuracy of the battery level indicator. Follow these steps to calibrate your new battery:
- Plug in your MacBook Pro: Connect your MacBook Pro to the power adapter, and make sure it is charging.
- Charge the battery completely: Allow your MacBook Pro to charge until the battery is full. You can confirm the battery’s charging status by checking the battery icon in the menu bar.
- Keep the power connected: Once the battery is fully charged, continue to keep your MacBook Pro connected to the power adapter. Do not unplug it.
- Allow the battery to rest: Leave your MacBook Pro connected to the power source for at least two hours without using it. This allows the battery to settle and achieve a balanced charge.
- Disconnect the power adapter: After the resting period, unplug the power adapter from your MacBook Pro.
- Use your MacBook Pro normally: Now, use your MacBook Pro on battery power until the battery level is significantly depleted. You can continue using it for tasks like web browsing, watching videos, or working on documents.
- Recharge the battery: Once the battery level reaches a low level and prompts you to recharge, connect the power adapter again and let your MacBook Pro charge to full capacity.
Calibrating the new battery helps the battery indicator provide accurate information about the remaining battery life. It also ensures optimal battery performance and longevity. It’s recommended to calibrate your battery periodically, especially after a battery replacement or if you notice any issues with the battery level accuracy.
Step 12: Dispose of the Old Battery Properly
Now that you have successfully replaced the battery in your MacBook Pro, it’s important to dispose of the old battery correctly and responsibly. Follow these steps to ensure the proper disposal of your old MacBook Pro battery:
- Check local regulations: Research the regulations in your area regarding the disposal of electronic waste and batteries. Different regions may have specific guidelines or recycling programs in place.
- Remove the battery from your work area: Safely remove the old battery from your workspace, keeping it away from any flammable or sensitive materials.
- Locate a battery recycling facility: Search for local battery recycling centers or facilities that accept old laptop batteries. These facilities specialize in the safe disposal and recycling of electronic waste.
- Prepare the battery for disposal: Tape the battery terminals with electrical tape to prevent any accidental contact or discharge during transportation. This adds an extra layer of safety.
- Visit the recycling facility: Take the prepared old battery to the designated recycling facility in your area. Follow the facility’s procedures and guidelines for battery drop-off.
- Follow any additional instructions: Some recycling facilities may have specific requirements for battery disposal. It’s important to adhere to their guidelines to ensure the safe and proper handling of the old battery.
Properly disposing of the old battery is crucial to protect the environment and prevent any harm to humans and animals. Never dispose of the battery in regular trash, as they contain hazardous materials that can be harmful if not handled correctly. By recycling the battery, its components can be responsibly extracted and reused, minimizing the impact on the environment.