
Tools Needed
When it comes to removing a metal watch band, having the right tools on hand is essential. Here is a list of the tools you will need:
- Spring Bar Tool: This tool is designed specifically for removing and replacing watch bands with spring bar attachments. It has a small forked end that fits into the gap between the watch case and the band.
- Precision Screwdriver Set: Depending on the type of watch band attachment, you may need a precision screwdriver set to remove small screws that hold the band in place.
- Watch Pin Removing Tool: For watch bands that are secured with pins, a pin removing tool is necessary. This tool has a pin pusher that safely ejects the pin from the band.
- Tweezers: Tweezers are useful for manipulating small parts and securing them during the removal process.
- Cloth or Soft Pad: Having a cloth or soft pad nearby will help protect the watch case from scratches or damage while you work on removing the band.
Remember to ensure that all the tools you use are in good working condition and are the appropriate size for your specific watch. Using the correct tools will make the process easier and reduce the risk of damaging your watch.
Step 1: Gather Necessary Tools
Before you start removing the metal watch band, it’s important to gather all the necessary tools. Having everything at hand will streamline the process and prevent any interruptions. Here’s what you need to do:
- Ensure you have a Spring Bar Tool: This tool is specifically designed for removing and replacing watch bands with spring bar attachments. It has a small forked end that fits into the gap between the watch case and the band. If you don’t have one, consider purchasing or borrowing it from a friend.
- Check for a Precision Screwdriver Set: Depending on the type of watch band attachment, you may need a precision screwdriver set to remove small screws that hold the band in place. Look for one that includes various-sized screwdrivers to accommodate different watch models.
- Verify if you have a Watch Pin Removing Tool: If your watch band is secured with pins, you’ll need a pin removing tool. This tool features a pin pusher that safely ejects the pin from the band. Ensure you have this tool to effortlessly remove the pins.
- Gather Tweezers: Tweezers can be handy for manipulating small parts and securing them during the removal process. Ensure you have a pair of tweezers available to assist with any intricate steps.
- Prepare a Cloth or Soft Pad: Having a cloth or soft pad nearby will help protect the watch case from scratches or damage as you work on removing the band. Use it as a surface to place the watch on while you work.
Double-check that all the tools you gather are in good working condition and appropriate for your specific watch. If any of these tools are missing, consider borrowing from a friend or purchasing them beforehand. Having all the necessary tools ready will make the process smoother and more efficient.
Step 2: Identify the Type of Watch Band Attachment
Before you proceed with removing the metal watch band, it’s crucial to identify the type of attachment mechanism your watch band has. Understanding the attachment type will help you select the appropriate method to remove the band without causing any damage. Follow these steps to identify the attachment type:
- Examine the watch band: Take a close look at the area where the band connects to the watch case. Look for any visible pins or screws that are holding the band in place.
- Check for spring bars: If you see small spring-loaded bars on both ends of the watch band, your watch is likely secured with spring bars. These bars fit into notches on the watch case, holding the band in place.
- Look for screw connectors: If you notice tiny screws on either side of the band, your watch band is secured with screw connectors. These screws need to be loosened to detach the band.
- Inspect for hidden pins: In some cases, the pins or screws may be hidden underneath the watch band links. Use a magnifying glass if necessary to carefully inspect the band for any discrete pins or screws that might be securing it.
Keep in mind that different watch models may have variations in attachment mechanisms. Some watches may have a combination of spring bars and screws. It’s important to identify the specific type of attachment for your watch, as it will guide you in the subsequent steps of the removal process.
If you’re unsure about the attachment type, consult the watch’s user manual or reach out to the manufacturer for guidance. Avoid attempting to remove the watch band without proper identification, as it can lead to damage and make the removal process more challenging.
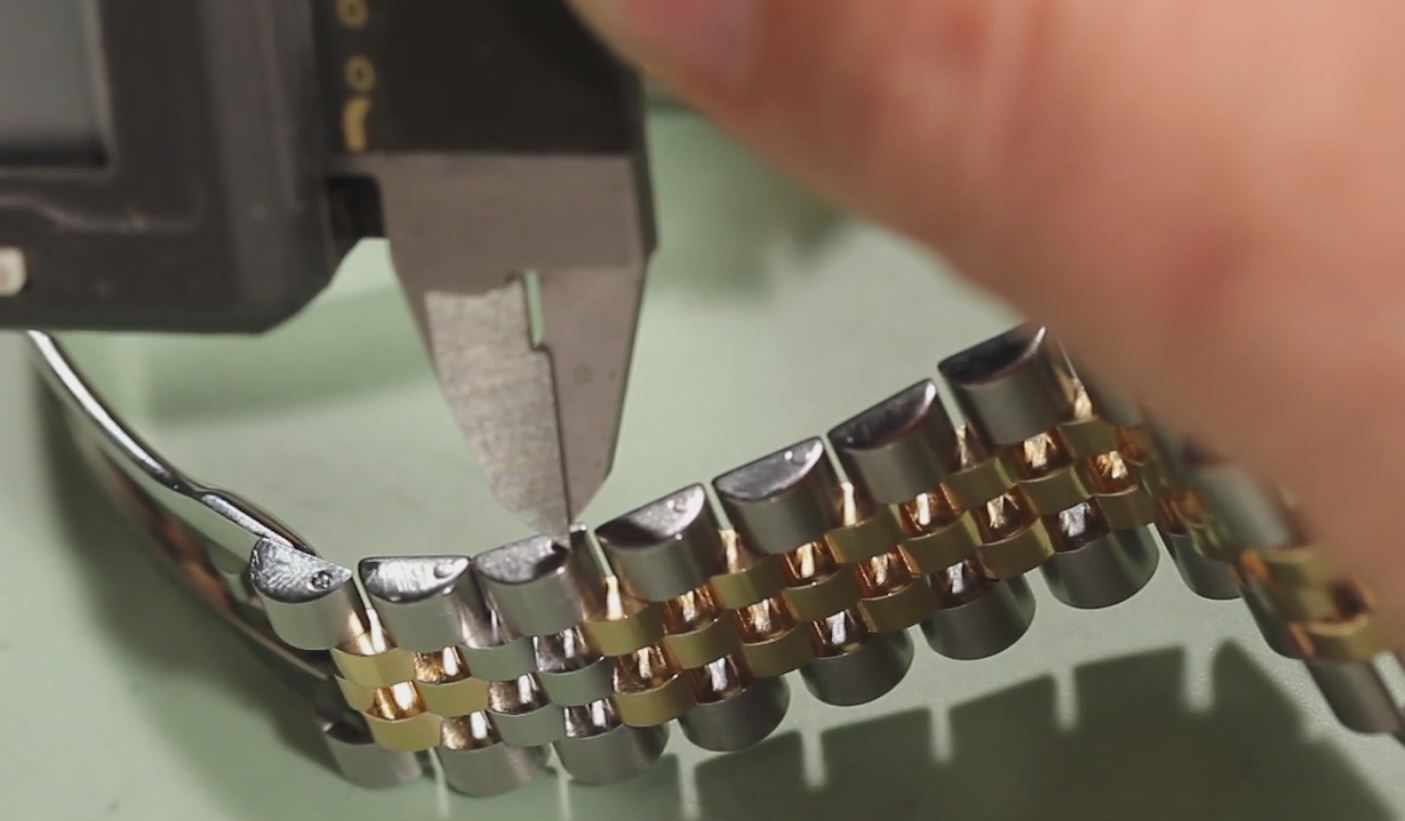
Step 3: Loosen the Pin or Screw Holding the Watch Band
Once you have identified the type of attachment mechanism your watch band has, it’s time to loosen the pin or screw that holds the band in place. Follow these steps to effectively loosen the attachment:
- For Spring Bar Attachments: If your watch band is secured with spring bars, use a spring bar tool. Insert the forked end of the tool into the gap between the watch case and the band, in line with the spring bar. Apply gentle pressure towards the center of the band to compress the spring bar. This will release it from the notch in the watch case.
- For Screw Attachments: If your watch band is secured with screws, use a precision screwdriver that matches the size of the screws. Carefully insert the screwdriver into the screw head and turn it counterclockwise to loosen the screw. Take care not to apply excessive force or allow the screwdriver to slip, as this could cause damage to the watch case or screw threads.
- For Hidden Pin Attachments: If your watch band has hidden pins, use a pin removing tool. Position the tool on the pin head and gently push inward to release the pin from its housing. Ensure that you are applying pressure directly in line with the pin to avoid bending or damaging it.
Remember to work with caution and be gentle when loosening the attachment to avoid any accidental damage. If you encounter any resistance or difficulty, pause and reassess the situation before proceeding. It’s important to ensure that the pin or screw is adequately loosened before attempting to remove the watch band.
By securely loosening the pin or screw that holds the watch band, you are now ready to move on to the next step of removing the band from your watch.
Step 4: Remove the Pin or Screw
With the pin or screw loosened, you are now ready to remove the watch band from your timepiece. Follow these steps to safely remove the pin or screw:
- For Spring Bar Attachments: Once the spring bar is released from the notch in the watch case, gently pull one end of the watch band away from the watch case. The spring bar will slide out of the corresponding hole in the band, allowing you to fully remove the band from the watch.
- For Screw Attachments: If your watch band is secured with screws, continue turning the screws counterclockwise with the precision screwdriver until they are completely free. Carefully hold onto the band while removing the screws to prevent it from falling or becoming damaged.
- For Hidden Pin Attachments: If your watch features hidden pins, use the pin removing tool to push the pin all the way out of the band. You may need to apply slight pressure to both ends of the band to separate it and allow the pin to slide out completely.
As you remove the pin or screw, be mindful of any small components that may become loose. Keep track of these parts and set them aside in a safe place. They will be needed when reattaching or replacing the watch band.
During this step, be careful not to force the pin or screw out if it’s not moving freely. Applying excessive force can lead to damage. Instead, take a moment to assess if there are any obstructions or if the pin or screw needs further loosening.
With the pin or screw successfully removed, the watch band is now detached from the watch, allowing you to proceed to the next step of either replacing or reattaching the watch band.
Step 5: Remove the Watch Band
Now that the pin or screw is removed, it’s time to take off the watch band from your timepiece. Follow these steps to safely remove the watch band:
- Gently pull the watch band: Grasp one end of the watch band and gently pull it away from the watch case. Be mindful of any resistance and avoid applying excessive force, as it could damage the watch or the band.
- Slide the band out of the lugs: As you pull on the watch band, it should slide out of the lugs on the watch case. Lugs are the small protrusions on either side of the case that hold the band in place. Continue to slowly slide the band out of the lugs until it is completely detached from the watch.
- Repeat for the other end: If your watch band is designed with two separate sections, follow the same steps to remove the other end of the band from the lugs. Ensure that both ends of the band are fully detached before proceeding.
As you remove the watch band, inspect it for any damage or wear. This is also a good opportunity to clean the band and the watch case if needed. Use a soft, lint-free cloth to gently wipe away any dirt or debris.
Remember to handle the watch band with care, as some materials are more susceptible to scratches or breakage. If you are unsure about the proper handling of your specific watch band, consult the manufacturer’s instructions or reach out to a professional for guidance.
With the watch band successfully removed, you are now ready for the next step of either replacing the band with a new one or reattaching the existing band.
Step 6: Replace or Reattach the Watch Band
After removing the watch band, your next step is to either replace it with a new one or reattach the existing band. Follow these steps to complete the process:
- Inspect the watch lugs: Before attaching the new or existing watch band, make sure the lugs on the watch case are clean and free from any debris or damage. Use a soft cloth to gently wipe the lugs and ensure a clean surface for attachment.
- Align one end of the watch band: Take one end of the new watch band or the existing band and align it with one of the lugs on the watch case. Ensure that the band is positioned correctly and fits securely into the lug.
- Slide the band into the lug: Apply gentle pressure to slide the watch band into the lug. You may need to wiggle it back and forth slightly to insert it fully. The band should fit snugly into the lug without any gaps.
- Repeat for the other end: If your watch band has two separate sections, repeat the previous steps to attach the other end of the band to the remaining lug on the watch case. Ensure both ends of the band are securely attached and aligned.
- Secure the watch band: Once both ends of the watch band are attached to the lugs, double-check that it is properly secured. Gently tug on the band to ensure it doesn’t come loose. If necessary, adjust the position of the band to ensure a comfortable fit.
If you are replacing the watch band, make sure the new band is compatible with your watch model. Check the lug width and ensure it matches the width of the new band to ensure a proper fit.
When reattaching the existing band, inspect it for any signs of wear or damage. If the band shows significant wear or is in poor condition, it might be a good opportunity to consider a replacement band for a fresh look.
With the watch band securely replaced or reattached, your timepiece is ready to be worn and enjoyed once again.