
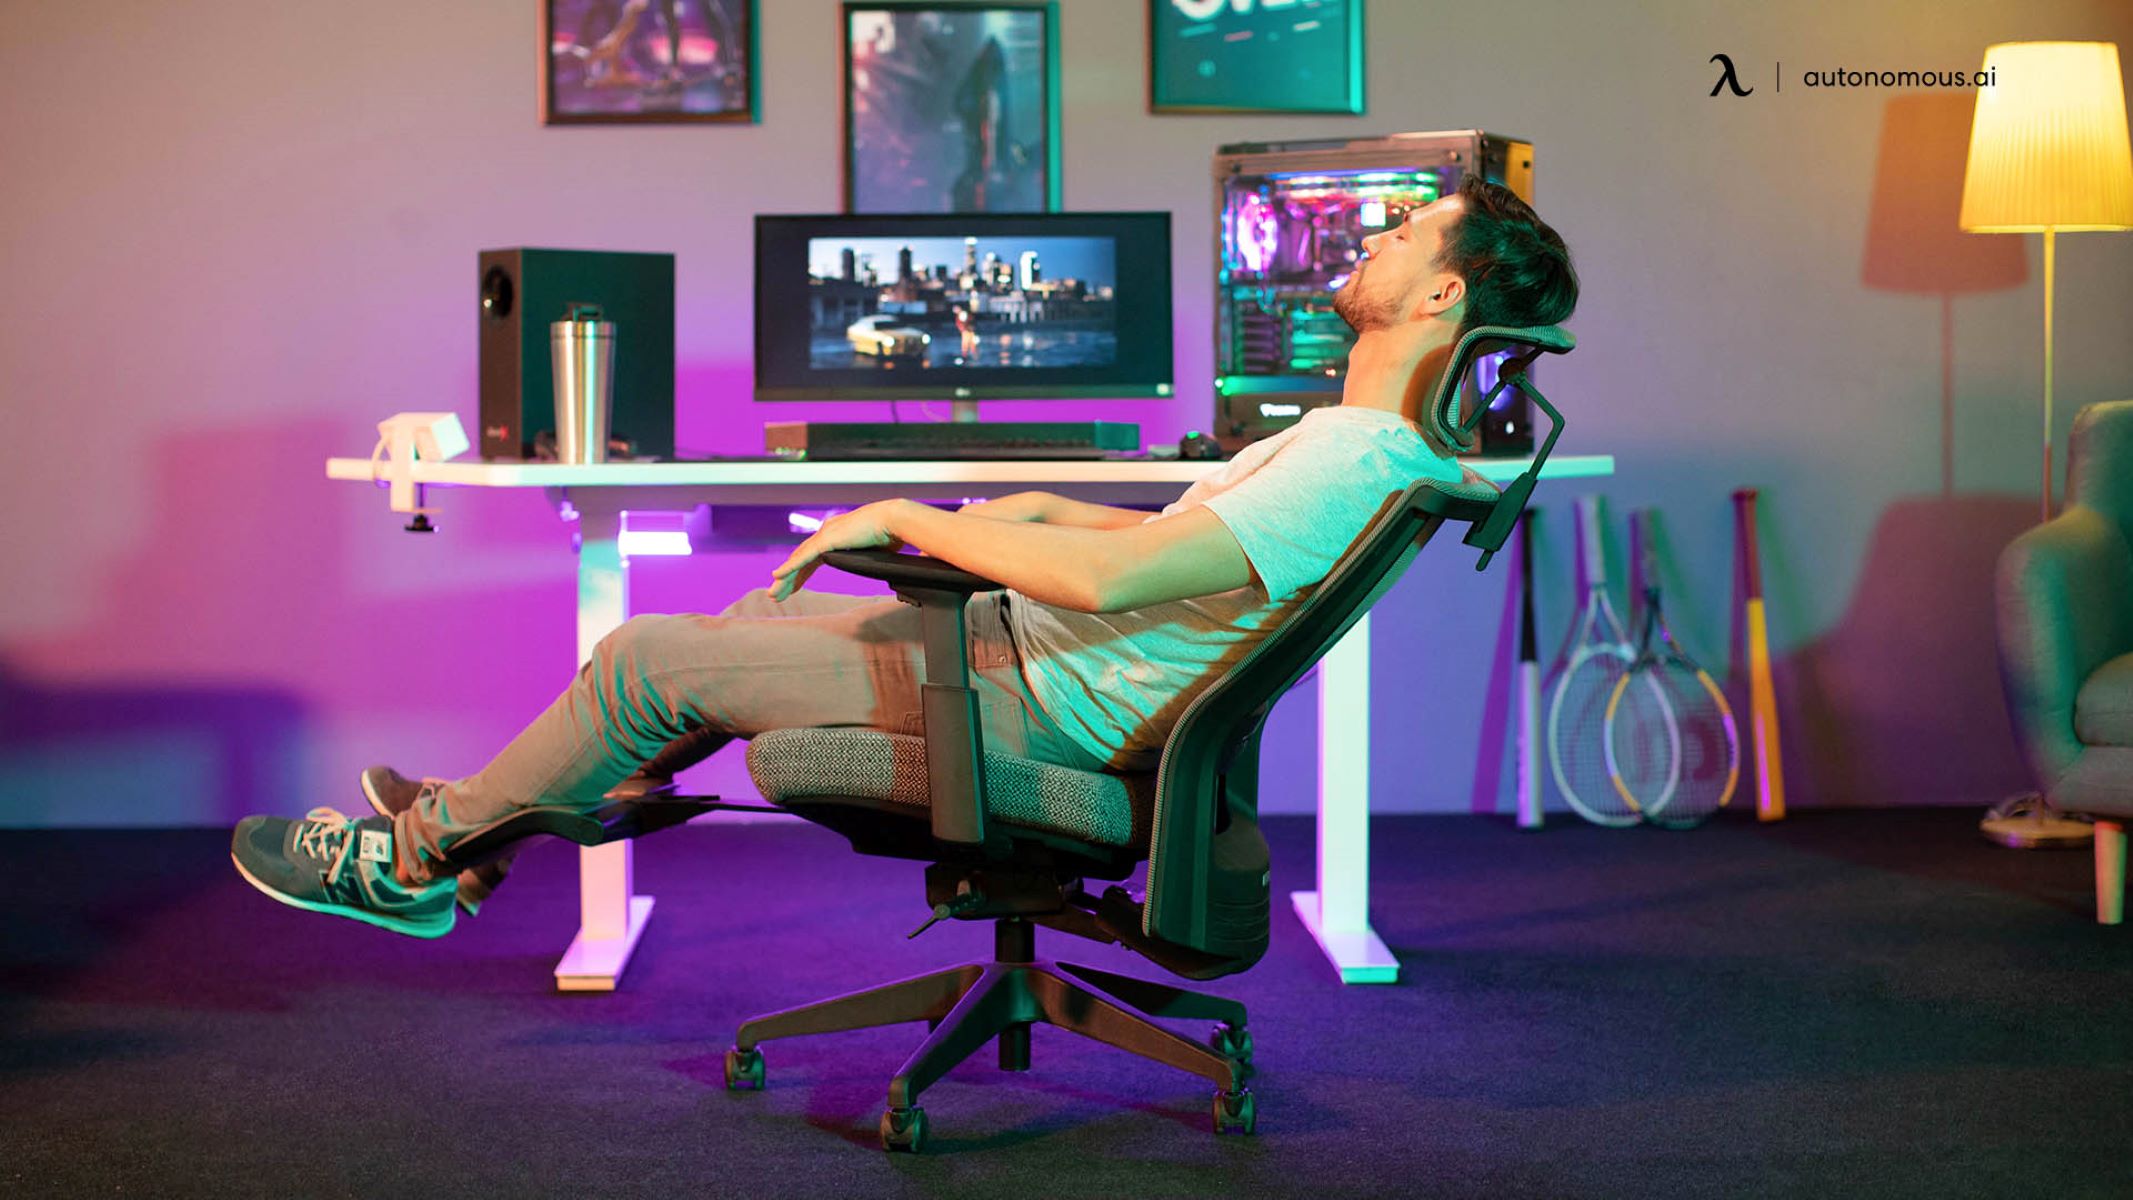
The Importance of Proper Chair Reclining
When it comes to gaming, having the right equipment is essential. While much attention is often given to the type of gaming chair you choose, it’s equally important to understand how to properly recline it for maximum comfort and support. Proper chair reclining not only enhances your gaming experience but also promotes good posture, reduces muscle strain, and prevents discomfort during long gaming sessions.
One of the key benefits of reclining a gaming chair is that it allows you to find the optimal position for your body. By adjusting the angle of the chair’s backrest, you can align your spine properly, reducing the risk of back pain and promoting better posture. This is especially important for gamers who spend hours sitting in front of a screen, as poor posture can lead to long-term health issues.
In addition to promoting better posture, reclining a gaming chair can also help alleviate muscle tension. By reclining the chair slightly, you can create a more relaxed seating position that takes the strain off your muscles. This can be particularly beneficial for gamers who experience neck and shoulder pain after extended gaming sessions.
Another advantage of proper chair reclining is that it can improve blood circulation. When you recline the chair, you allow for better distribution of blood flow throughout your body. This can prevent the numbness and tingling sensation often experienced in the legs and feet during prolonged sitting.
Furthermore, by reclining your gaming chair, you can reduce the pressure on your lower back. A slight incline gives your lower back additional support, relieving stress on the lumbar region and minimizing the risk of developing lower back pain.
Overall, understanding how to properly recline your gaming chair is crucial for maintaining your comfort and well-being during gaming sessions. By finding the right recline angle, you can promote good posture, reduce muscle strain, improve blood circulation, and prevent discomfort. So, the next time you settle in for a gaming session, take a moment to adjust your chair and recline it to the perfect position for optimum comfort and support.
Step 1: Adjusting the Chair Height
Properly adjusting the height of your gaming chair is the first step towards achieving optimal comfort and ergonomics. Here’s a step-by-step guide on how to adjust the chair height:
- Start by sitting on the gaming chair and ensuring that your feet are flat on the ground. Your knees should be at a 90-degree angle, with your thighs parallel to the ground. If your feet are dangling or if your knees are higher than your hips, the chair is too high.
- Locate the height adjustment lever beneath the chair seat. It is typically located on the right-hand side or positioned under the seat itself. Pull the lever or press the button to release the locking mechanism.
- While holding the lever or button, use your body weight to lower or raise the chair to the desired height. Release the lever or button once you have reached the desired height, and ensure that the locking mechanism engages to secure the chair in place.
- Recheck your sitting position to ensure that your feet are flat on the ground and your knees are at a 90-degree angle. Make any necessary adjustments to the height until you achieve the correct posture.
It’s important to find the right chair height to avoid strain on your legs, back, and neck. Sitting in a chair that is too low or too high can lead to discomfort and poor posture, which can have long-term effects on your health.
Remember, everyone’s body is unique, so take the time to adjust the chair height to your specific needs. Additionally, consider the height of your gaming desk or table. You should ensure that your chair height allows for proper alignment with your workstation, allowing you to comfortably reach your keyboard and mouse without straining your arms or shoulders.
By taking the time to properly adjust the chair height, you’ll create a solid foundation for a comfortable and enjoyable gaming experience. So, start by finding the right height and move on to the next steps to further optimize your gaming chair’s ergonomics.
Step 2: Locating the Recline Mechanism
Every gaming chair has a recline mechanism that allows you to adjust the angle of the backrest according to your comfort preferences. Locating this mechanism is the next step in effectively reclining your gaming chair. Here’s how to find it:
- Take a moment to familiarize yourself with your gaming chair. Look for any visible levers, knobs, or buttons on the chair’s side or underside.
- Check the chair’s user manual if you’re having difficulty locating the recline mechanism. The manual will typically provide detailed information on the various features and functions of your chair, including how to find and operate the recline mechanism.
- Some gaming chairs have a lever on the side, often close to the armrests, that allows for easy adjustment of the backrest angle. Others may have a knob or a button located underneath the seat. Experiment with these different mechanisms to determine which one controls the recline function.
- Once you have located the recline mechanism, take note of its features. It may have different positions or locking options that allow you to adjust the backrest to specific angles. Understanding these features will be helpful when it comes time to customize the recline angle.
Remember, the location and type of recline mechanism may vary depending on the gaming chair model. If you’re having trouble finding it, don’t hesitate to consult the user manual or contact the manufacturer for assistance.
Once you have successfully located the recline mechanism, you’re ready to move on to the next step and learn how to use it to recline the gaming chair to your desired position. With the recline mechanism at your fingertips, you’ll be able to find the perfect angle for both comfort and immersive gaming sessions.
Step 3: Understanding the Recline Locking Mechanism
As you explore the recline functionality of your gaming chair, it’s crucial to understand the locking mechanism that keeps the backrest securely in place. This step will guide you through the process of understanding and utilizing the recline locking mechanism:
- Take a close look at the recline mechanism and identify any additional controls or levers that are associated with the locking feature. These may be located near the recline adjustment lever or as a separate button or switch.
- Consult the user manual if there is uncertainty about the locking mechanism. The manual will provide specific instructions on how to identify and use the locking feature effectively.
- Experiment with the various controls to determine how the locking mechanism operates. Some chairs have a lever that you push or pull to engage or release the lock, while others may have a separate button or switch.
- Test the locking mechanism by adjusting the backrest angle and seeing if it holds the desired position. Engage the lock once you have found a comfortable recline angle.
The recline locking mechanism is a crucial aspect of ensuring stability and safety in your gaming chair. It prevents accidental movement of the backrest and allows you to enjoy your gaming sessions without worrying about sudden recline changes.
Understanding how the recline locking mechanism works is essential, as different chairs may have different locking mechanisms. Some locking mechanisms may have multiple positions or tension adjustments that allow you to customize the recline experience even further.
By familiarizing yourself with the recline locking mechanism, you’ll ensure that your gaming chair remains securely in your chosen recline position, providing the stability and support you need for prolonged gaming sessions.
Step 4: Activating the Recline Function
Now that you have located the recline mechanism and understood the locking mechanism, it’s time to activate the recline function of your gaming chair. Follow these steps to activate the recline function:
- Sit upright in your gaming chair, ensuring that you are in a comfortable and stable position.
- Identify the specific lever, button, or switch that controls the recline function on your chair.
- Engage the recline function by activating the designated control. This may involve pulling a lever, pressing a button, or flipping a switch.
- As you activate the recline function, lean back and gradually adjust the backrest to your desired angle. It’s essential to do this in a controlled manner to prevent sudden movements.
- Pay attention to the recline tension or resistance as you adjust the backrest. Some chairs allow you to customize the level of resistance, providing a personalized recline experience.
- Once you have achieved your desired recline position, use the recline locking mechanism to securely lock the backrest in place.
Activating the recline function allows you to find the perfect recline angle for your gaming sessions. Whether you prefer a slight recline or a deeper recline, you can customize the position to suit your comfort level and gaming needs.
Remember, it’s important to activate the recline function while sitting in an upright position to ensure a smooth and controlled transition. Avoid jerky movements or sudden recline adjustments, as this can cause discomfort or even compromise the stability of the chair.
By following these steps and activating the recline function correctly, you’ll be able to enjoy the benefits of a tailored recline position that enhances your gaming experience and provides optimal comfort.
Step 5: Finding the Optimal Recline Position
Once you have activated the recline function on your gaming chair, it’s time to find the optimal recline position that provides the perfect balance between comfort and support. Follow these steps to find your ideal recline position:
- Start by sitting in an upright position with your back against the backrest of the chair.
- Gradually lean back, adjusting the backrest angle until you feel a comfortable level of support for your back.
- Take note of how your body feels in this position. Pay attention to any areas of tension or discomfort.
- Experiment with different recline angles by adjusting the backrest, incrementally increasing or decreasing the recline until you find the position that best suits your body’s needs.
- Consider your gaming activities and preferences. For example, if you tend to lean forward when gaming, a slightly reclined position may be more appropriate to maintain good posture and prevent strain.
- Ensure that your neck and head are properly supported in the reclined position. If needed, use the adjustable headrest or add a separate pillow for additional comfort.
- Take breaks and readjust as needed. It’s important to listen to your body and make any necessary changes to the recline position to maintain comfort and reduce the risk of muscle fatigue or stiffness.
Finding the optimal recline position is a personal preference and may vary from person to person. It’s crucial to pay attention to your body’s signals and adjust the recline position accordingly to maintain proper posture and prevent discomfort.
Remember, the purpose of finding the optimal recline position is to achieve a balance between relaxation and maintaining proper support for your back and neck. By taking the time to fine-tune the recline angle, you’ll create an ergonomic and comfortable seating arrangement that enhances your gaming experience.
Step 6: Using the Adjustable Armrests to Enhance Comfort
Adjustable armrests are a valuable feature in gaming chairs that can greatly enhance your comfort and overall gaming experience. Follow these steps to utilize the adjustable armrests effectively:
- Sit in your gaming chair in a relaxed position.
- Locate the armrest adjustment mechanisms, which are usually located on the sides of the chair or underneath the armrests.
- Experiment with the different adjustment options. Some chairs offer height adjustment, width adjustment, and even angle adjustment for the armrests.
- Raise or lower the armrests to a height that allows your elbows to rest comfortably at a 90-degree angle and your forearms to rest parallel to the ground.
- Adjust the width of the armrests to align with your shoulder width, providing proper support and minimizing strain on your shoulders and neck.
- Consider the angle adjustment if available. Tilting the armrests inward slightly can provide a more natural resting position for your arms.
- Take breaks and experiment with the adjustments over time. Everyone’s body is unique, so finding the perfect armrest position may require some trial and error.
Properly adjusting the armrests on your gaming chair can help alleviate strain on your arms, shoulders, and neck. They provide support and stability, allowing you to maintain a comfortable posture throughout your gaming sessions.
Furthermore, adjustable armrests can also help prevent conditions like carpal tunnel syndrome by ensuring that your wrists are properly supported while gaming. This can reduce the risk of numbness, tingling, and pain commonly associated with prolonged mouse and keyboard use.
Remember, the goal is to find an armrest position that promotes proper alignment and reduces tension in your upper body. By taking advantage of the adjustable armrests, you can customize your gaming chair to fit your unique body shape and enhance your overall gaming comfort.
Step 7: Adding Extra Support with Lumbar and Headrest Pillows
To further enhance your comfort and support while gaming, consider adding extra support with lumbar and headrest pillows. Follow these steps to maximize your seating experience:
- Identify the areas of your body that could benefit from additional support. The lower back and neck are common areas that can experience strain during long gaming sessions.
- Choose lumbar and headrest pillows that are specifically designed for gaming chairs or ergonomic seating. Look for pillows that provide adequate support and are made of high-quality materials.
- Place the lumbar pillow in the curve of your lower back, just above the hips. Adjust its position until you feel comfortable and supported.
- Position the headrest pillow behind your head, ensuring that it supports the natural curvature of your neck. You may need to adjust its height or angle to find the most comfortable position.
- Experiment with different pillow thicknesses and firmness levels until you find the right combination that suits your needs.
- Take breaks and readjust the pillows if necessary. Over time, you may find that your comfort preferences change, and the pillows may need to be repositioned or replaced.
Lumbar and headrest pillows provide additional support to key areas of your body, helping to maintain proper alignment and reduce discomfort during long gaming sessions.
The lumbar pillow supports the natural curve of your lower back, promoting good posture and relieving pressure on your spine. This can help prevent lower back pain and improve overall comfort.
The headrest pillow, on the other hand, supports your neck and upper back, allowing for proper alignment and reducing strain. It can help prevent neck pain and stiffness, particularly during intense gaming sessions that involve a lot of head movement.
By adding lumbar and headrest pillows, you can customize your gaming chair to provide targeted support where you need it most. This extra level of support can significantly enhance your gaming experience, allowing you to focus on the game without the distraction of discomfort or pain.
Step 8: Maintaining the Chair’s Recline Functionality
Once you have learned how to recline and optimize your gaming chair for maximum comfort, it’s important to maintain the chair’s recline functionality for long-lasting performance. Follow these steps to ensure your chair remains in top condition:
- Regularly clean and dust your gaming chair. Use a soft cloth or vacuum attachment to remove any dirt, debris, or pet hair that may accumulate in the recline mechanism.
- Check for any signs of wear or damage to the recline mechanism. Inspect the levers, buttons, or switches to ensure they are functioning properly and not loose or broken.
- Apply lubrication to the recline mechanism if necessary. Consult your chair’s user manual for specific instructions on how to lubricate the moving parts to keep them operating smoothly.
- Avoid placing excessive weight or applying sudden force on the backrest to prevent damage to the recline mechanism. Treat your gaming chair with care and avoid rough handling.
- Follow the manufacturer’s guidelines for weight limits and usage recommendations. Overloading the chair or using it in a manner inconsistent with its intended purpose can affect the recline functionality and overall durability.
- If you encounter any issues or notice a significant decrease in the chair’s recline functionality, contact the manufacturer or a professional technician for assistance. Attempting to repair or adjust the recline mechanism yourself may further damage the chair.
- Finally, considering the warranty and any available extended protection plans. Understanding the coverage and duration of the warranty can provide you with peace of mind and additional support in case of any recline mechanism issues.
By following these maintenance steps, you can ensure that your gaming chair’s recline functionality remains in excellent condition. Proper care and attention will help preserve the chair’s performance and extend its lifespan, allowing you to continue enjoying a comfortable recline during your gaming sessions.