
Understanding the Whistler Scanner
The Whistler scanner is a powerful device that allows you to monitor various types of radio communications, including emergency services, amateur radio, and even weather broadcasts. Whether you’re a hobbyist or a professional, understanding the basics of how the Whistler scanner works is essential to getting the most out of this versatile tool.
At its core, the Whistler scanner is a radio receiver that can tune into different frequencies and receive the corresponding audio transmissions. It allows you to listen in on conversations and stay informed about events happening in your area. The scanner utilizes advanced technology to decode and display information about the transmitted signals, such as frequencies, channel names, and even text messages.
One of the key features of the Whistler scanner is its ability to store and organize scanned channels. This means you can easily monitor multiple frequencies without having to manually tune in to each one. The scanner can also be programmed to scan predefined lists of channels, so you can quickly switch between different sets of frequencies.
To operate the Whistler scanner, you will need to connect it to your computer and install the necessary software. This software allows you to program the scanner, set up frequencies, and customize various settings. It also provides you with the ability to update the scanner’s firmware, ensuring that you have the latest features and improvements.
It’s important to note that the Whistler scanner is legal to use for monitoring publicly available radio transmissions. However, it’s crucial to respect the privacy of individuals and not engage in any illegal activities while using the scanner. Always check your local regulations and laws regarding scanner usage to ensure you are compliant.
Now that you have a basic understanding of the Whistler scanner, you’re ready to start exploring its features and programming it to your liking. In the following sections, we will guide you through the process of setting up the scanner, programming frequencies, and troubleshooting common issues that may arise.
Gathering the Necessary Materials
Before you can begin programming your Whistler scanner, you need to gather the necessary materials. Having everything you need on hand will make the setup process smoother and more efficient. Here are the essential items you’ll need:
- Whistler Scanner: Ensure that you have a compatible Whistler scanner model. Each model may have slightly different programming steps, so it’s essential to check the specific requirements for your scanner.
- Computer: You’ll need a computer with a USB port to connect your Whistler scanner. Ensure that it meets the minimum system requirements specified by the scanner’s manufacturer.
- USB Cable: A USB cable is required to connect the scanner to your computer. Check if your scanner comes with a compatible USB cable, or purchase one separately if needed.
- Scanner Software: Download the appropriate scanner software from the Whistler website. The software allows you to program frequencies, customize settings, and update firmware. Make sure you have the latest version of the software for optimal performance.
- Scanner Antenna: While some Whistler scanner models come with an integrated antenna, others may require an external antenna for better reception. Depending on your needs and scanner model, consider investing in an external antenna to improve signal quality.
- Scanner Manual: Familiarize yourself with the scanner’s manual or user guide. This resource provides essential information about the scanner’s features, programming instructions, troubleshooting tips, and other relevant details.
- Reference Material: Depending on your interests, gather any reference material such as frequency guides, local scanner frequencies, or other relevant resources to help you program your scanner accurately.
By gathering these necessary materials upfront, you’ll have everything you need at your fingertips to start programming your Whistler scanner efficiently. Having a clear understanding of the tools required ensures a smooth setup process, allowing you to make the most of your scanner’s capabilities.
Installing the Whistler Scanner Software
Before you can start programming your Whistler scanner, you’ll need to install the appropriate scanner software on your computer. This software allows you to interface with the scanner, program frequencies, and customize various settings. Follow these steps to install the Whistler scanner software:
- Download the Software: Visit the Whistler website and navigate to the support or downloads section. Look for the software specific to your Whistler scanner model and operating system. Click on the download link to initiate the software download.
- Run the Installation File: Once the software download is complete, locate the installation file on your computer. Double click on it to run the installer. Follow the on-screen prompts to proceed with the installation process.
- Agree to Terms and Conditions: During the installation process, you may be presented with terms and conditions for the software. Read through the information and click on the “Agree” button to proceed.
- Choose Installation Location: The installer will prompt you to choose the destination folder for the software installation. You can either accept the default location or specify a different folder. Click “Next” to continue.
- Select Start Menu Folder: The installer may ask you to choose a name for the start menu folder where the software shortcuts will be placed. You can either accept the default name or provide a custom name. Click “Next” to proceed.
- Install the Software: At this stage, the installer is ready to begin installing the Whistler scanner software. Click on the “Install” button to initiate the installation process. Depending on your computer’s speed, this may take a few moments.
- Complete the Installation: Once the installation is complete, you will see a confirmation message. Make sure the option to launch the software is selected and click “Finish” to exit the installer.
- Connect the Scanner: With the software installed, connect your Whistler scanner to your computer using the provided USB cable. Ensure that the scanner is turned on and in programming mode to establish the connection.
Once the connection is established between your Whistler scanner and computer, you’re ready to start programming frequencies and customizing settings. Refer to the scanner’s user manual and the software documentation to familiarize yourself with the software’s features and capabilities.
By following these installation steps, you’ll have the Whistler scanner software installed on your computer, allowing you to seamlessly program and modify your scanner’s settings to meet your specific needs.
Connecting the Whistler Scanner to your Computer
Once you have installed the Whistler scanner software on your computer, the next step is to establish a connection between your Whistler scanner and the computer. This connection allows you to transfer data, program frequencies, and customize settings. Follow these steps to connect your Whistler scanner to your computer:
- Configure Scanner for PC Mode: Before connecting your Whistler scanner to the computer, ensure that the scanner is in PC mode. Consult your scanner’s user manual for instructions on how to set the scanner to PC mode. This step may involve navigating through the scanner’s menu system. Once in PC mode, your scanner will be ready to establish a connection with your computer.
- Find Available USB Port: Locate an available USB port on your computer. The USB port is typically rectangular in shape and may be located on the side or back of your computer tower or on the side of your laptop.
- Connect Scanner to Computer: Take the USB cable that came with your Whistler scanner and plug one end into the USB port on your computer. Then, carefully connect the other end into the USB port on your Whistler scanner. Ensure that the cable is securely connected on both ends.
- Power on the Scanner: Turn on your Whistler scanner by pressing the power button. The scanner will initialize and establish a connection with your computer. It may take a few moments for the connection to be recognized.
- Driver Installation (if needed): In some cases, when you connect your Whistler scanner to your computer for the first time, your operating system may prompt you to install the necessary drivers. Follow the on-screen instructions to complete the driver installation process. If the drivers are already installed, proceed to the next step.
- Launch Scanner Software: Open the Whistler scanner software on your computer. The software should detect the connected scanner and display its information on the screen. If the scanner is not detected, ensure that it is in PC mode and try reconnecting the USB cable.
- Establish Communication: Once the scanner software detects your Whistler scanner, it will establish communication between the scanner and the computer. You are now ready to start programming frequencies and customizing settings using the software.
By following these steps, you will successfully connect your Whistler scanner to your computer, allowing you to transfer data and program the scanner with ease. Remember to consult the scanner’s user manual and the software documentation for specific instructions and troubleshooting tips related to your scanner model.
Setting Up Scanner Frequencies
Setting up scanner frequencies is a crucial step in programming your Whistler scanner. Frequencies are the specific radio signals that you want your scanner to monitor. By programming the desired frequencies, you can listen in on various types of communications, such as police, fire, weather, and more. Follow these steps to set up scanner frequencies on your Whistler scanner:
- Research Frequencies: Before you start programming frequencies, it’s essential to research and gather the specific frequencies you want to monitor. You can find this information through online frequency databases, scanner enthusiast forums, or local radio monitoring groups. It’s important to note that some frequencies may be restricted or encrypted, so check for any legal restrictions in your area.
- Launch Scanner Software: Open the Whistler scanner software on your computer. Ensure that your scanner is connected to the computer as outlined in the previous section. The software provides a user-friendly interface for programming frequencies and customizing settings.
- Create a New Programming Session: In the scanner software, create a new programming session or select an existing one if available. This session acts as a container for the frequencies you are about to program.
- Add Frequencies to the Session: Using the software’s interface, add the frequencies you want to monitor to the programming session. You can manually enter each frequency or upload them from a pre-existing frequency list. Make sure to include relevant details such as channel names or descriptions.
- Organize Frequencies: Once you have added the frequencies to the programming session, organize them into scan lists or groups. Scan lists allow you to group frequencies together, such as police frequencies, fire frequencies, or weather frequencies. This organization helps you navigate through the frequencies more efficiently.
- Set Priority Channels: Within each scan list, designate priority channels. Priority channels are frequencies that the scanner will scan more frequently and prioritize over others. This can be useful if you have a specific frequency that you want to monitor closely.
- Customize Settings: The scanner software offers various customization options, such as setting the scan speed, modulation type, or even enabling specific alerts. Take the time to explore these settings and adjust them according to your preferences.
- Upload to the Scanner: Once you have programmed and organized the frequencies, upload the programming session to your Whistler scanner. Follow the software’s instructions to initiate the upload process. This transfers the frequencies and settings from your computer to the scanner’s memory.
- Test and Monitor: After the upload is complete, disconnect your Whistler scanner from the computer and power it on. Test the programmed frequencies by selecting the designated scan list or individual frequencies. You should now be able to listen in on the desired radio communications.
By following these steps, you can successfully set up scanner frequencies on your Whistler scanner. Remember to periodically update your frequency list and customize your scanner’s settings to enhance your monitoring experience.
Programming Channels and Frequencies
Programming channels and frequencies is an essential step in customizing your Whistler scanner to monitor specific radio communications. By organizing frequencies into channels, you can easily navigate through different sets of frequencies and quickly access the ones you want to monitor. Follow these steps to program channels and frequencies on your Whistler scanner:
- Launch Scanner Software: Open the Whistler scanner software on your computer. Ensure that your scanner is connected to the computer and the software has established communication with the scanner.
- Create a New Programming Session: In the scanner software, create a new programming session or select an existing one if available. This session will be used to store the programmed channels and frequencies.
- Add Channels: Within the programming session, add channels to organize your frequencies. Channels act as placeholders and allow you to group related frequencies together. For example, you may have channels for police, fire, emergency services, and weather.
- Assign Frequencies to Channels: Once you have created the channels, assign the desired frequencies to each channel. You can manually enter the frequencies or import them from existing frequency lists. Make sure to include relevant information such as frequency name or description.
- Set Channel Options: Customize the channel options to suit your preferences. You can specify settings such as channel type (analog or digital), scanning delay, or skip channels that you do not wish to monitor.
- Organize Channel Order: Arrange the channels in the desired order within the programming session. This allows you to prioritize the channels you often listen to or group related channels together.
- Upload to the Scanner: Once you have programmed the channels and assigned frequencies, upload the programming session to your Whistler scanner. Follow the software’s instructions to initiate the upload process. This transfers the channels, frequencies, and settings from your computer to the scanner’s memory.
- Test and Monitor: Disconnect your Whistler scanner from the computer and power it on. Navigate through the programmed channels and frequencies to test and monitor the desired radio communications. You can select specific channels or use the scanner’s scanning features to automatically cycle through the programmed channels.
- Modify and Update: As your monitoring needs change, you can modify the programmed channels and frequencies accordingly. Use the scanner software to add, remove, or modify channels and frequencies. Remember to upload the updated programming session to your scanner to apply the changes.
By following these steps, you can program channels and frequencies on your Whistler scanner, allowing you to efficiently organize and access the desired radio communications. Take the time to customize the channel options and regularly update your programming to ensure you are monitoring the frequencies that are most relevant to you.
Setting Squelch and Volume Levels
Setting the squelch and volume levels on your Whistler scanner is essential for optimal audio quality and a pleasant listening experience. The squelch level helps filter out unwanted background noise, while the volume level determines the loudness of the received audio. Follow these steps to set the squelch and volume levels on your Whistler scanner:
- Power on the Scanner: Turn on your Whistler scanner by pressing the power button. Ensure that it is disconnected from the computer and in normal operating mode.
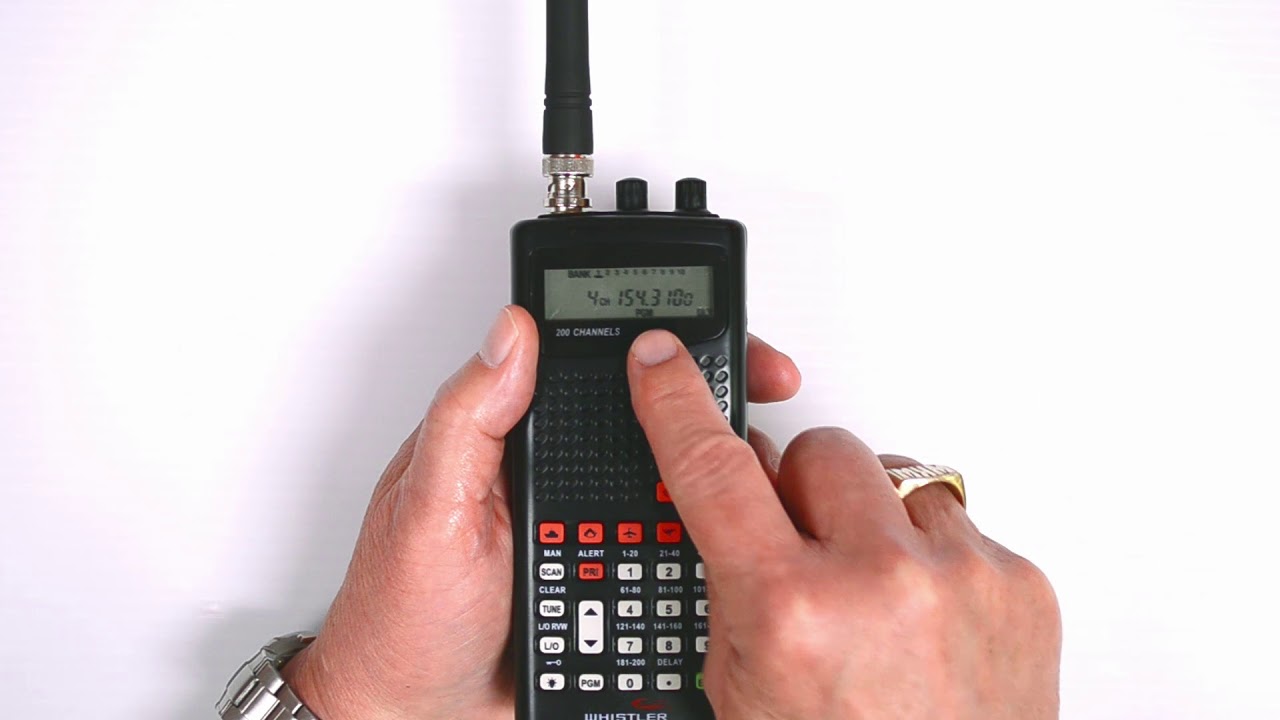
- Select a Channel: Choose a channel that you want to adjust the squelch and volume levels for. You can use the channel buttons on the scanner to navigate through the programmed channels.
- Access the Menu: On the scanner, look for a button labeled “Menu” or “Func” and press it. This will give you access to the scanner’s menu options.
- Navigate to Squelch Settings: Use the navigation buttons on the scanner to scroll through the menu options. Look for an option related to squelch settings, which may be labeled as “SQ” or “Squelch.” Select this option to access the squelch adjustment screen.
- Adjust the Squelch Level: On the squelch adjustment screen, you will typically see a numerical value representing the squelch threshold. Use the scanner’s navigation buttons to increase or decrease this value until you find the optimal setting. The squelch level should be adjusted just above the point where the background noise disappears, ensuring that only strong and clear signals are heard.
- Navigate to Volume Settings: Exit the squelch adjustment screen and return to the main menu. Look for an option related to volume settings, which may be labeled as “VOL” or “Volume.” Select this option to access the volume adjustment screen.
- Adjust the Volume Level: On the volume adjustment screen, you will typically see a numerical value representing the current volume level. Use the scanner’s navigation buttons to increase or decrease this value to achieve the desired volume. Test the audio output by listening to the received signals and adjust the volume level accordingly.
- Save the Settings: Once you are satisfied with the squelch and volume levels, save the settings by following the on-screen instructions. This ensures that the adjusted levels are applied whenever you select the respective channel.
- Repeat for Other Channels: If desired, repeat the above steps for other channels to customize the squelch and volume levels individually for each channel. This allows you to tailor the settings based on the characteristics of different frequencies.
By following these steps, you can effectively set the squelch and volume levels on your Whistler scanner, providing clear and comfortable audio while minimizing background noise. Experiment with different settings to find the optimal balance for your listening preferences.
Configuring Scan Lists
Configuring scan lists on your Whistler scanner allows you to group different frequencies together for efficient scanning. Scan lists are collections of channels or frequencies that you can enable or disable to customize your scanning experience. By organizing frequencies into scan lists, you can easily focus on specific types of communications or areas of interest. Follow these steps to configure scan lists on your Whistler scanner:
- Access the Scanner Menu: Turn on your Whistler scanner and navigate to the menu screen. The process for accessing the menu may vary depending on your scanner model.
- Enter Scan List Configuration: From the menu screen, locate the option that allows you to configure or modify scan lists. This option may be labeled as “Scan Lists” or “Channel Lists.” Select it to enter the scan list configuration menu.
- Create a New Scan List: Within the scan list configuration menu, you will have the option to create a new scan list. Select this option and assign a name or label to the scan list. This name should describe the group of frequencies you plan to include in the list, for example, “Police,” “Fire,” or “Air Traffic.”
- Add Frequencies to the Scan List: Once you have created a new scan list, you can begin adding frequencies to it. Select the option to add frequencies or channels and enter the desired frequencies manually or import them from a pre-existing frequency list.
- Organize the Scan List: Arrange the frequencies or channels within the scan list in the desired order. This ordering will determine the sequence in which the scanner scans through the frequencies. You can prioritize certain frequencies by placing them higher in the list.
- Enable or Disable the Scan List: In the scan list configuration menu, you will typically have the option to enable or disable specific scan lists. By enabling a scan list, you instruct the scanner to include those frequencies in the scanning rotation. Disable a scan list to exclude its frequencies from the scanning process.
- Save the Configuration: Once you have configured the scan list to your satisfaction, save the changes by selecting the appropriate option in the menu. This will store the scan list configuration in the scanner’s memory.
- Repeat for Additional Scan Lists: If desired, repeat the above steps to create and configure more scan lists for different types of communications or geographical areas. This allows you to switch between scan lists depending on your monitoring needs.
- Initiate Scanning: Exit the scan list configuration menu and return to the main screen. Start the scanning process by selecting the desired scan list or initiating a full scan. The scanner will cycle through the frequencies in the enabled scan lists and stop on any active signals.
By following these steps, you can effectively configure scan lists on your Whistler scanner, allowing you to tailor your scanning experience and focus on specific frequencies or areas of interest. Take the time to organize the scan lists and enable/disable them as needed, ensuring you have a personalized and efficient scanning setup.
Enabling Weather Alert and Priority Scan Modes
The Whistler scanner offers additional modes that enhance its functionality and provide convenience during monitoring. Two notable modes are the Weather Alert mode and the Priority Scan mode. Enabling these modes allows you to stay updated on weather warnings and prioritize certain channels or frequencies. Follow these steps to enable the Weather Alert and Priority Scan modes on your Whistler scanner:
- Access the Scanner Menu: Turn on your Whistler scanner and navigate to the menu screen. The process for accessing the menu may vary depending on your scanner model.
- Enter Alert Settings: From the menu screen, locate the option for alert settings. This may be labeled as “Weather Alert” or “Alert Preferences.” Select this option to enter the alert settings menu.
- Enable Weather Alert Mode: Within the alert settings menu, look for the option to enable Weather Alert mode. This mode allows your scanner to monitor weather frequencies and automatically notify you if there are any weather alerts or warnings in your area. Enable this mode to stay updated on severe weather conditions.
- Adjust Weather Alert Options: Depending on your scanner model, you may have additional options to customize the Weather Alert mode. This could include selecting specific types of weather alerts to monitor or setting the alert threshold. Follow the on-screen instructions to adjust these options according to your preferences.
- Configure Priority Scan: Return to the main menu and navigate to the scan settings or scan mode options. Look for the Priority Scan mode, which allows you to assign priority channels or frequencies. In this mode, the scanner will scan through all channels, but it will pause and stay on priority channels longer when an active signal is detected.
- Select Priority Channels: In the Priority Scan mode settings, you can select the specific channels or frequencies that you want to prioritize. Choose the channels that are most important and relevant to your monitoring needs, such as emergency services or critical communication frequencies.
- Adjust Priority Scan Delay: Some Whistler scanner models may offer the option to adjust the delay time or hold time for priority channels. This setting determines how long the scanner will pause on a priority channel before continuing the scanning process. Adjust this setting based on your monitoring preferences.
- Save the Settings: Once you have enabled the Weather Alert mode and configured the Priority Scan mode to your liking, save the changes by selecting the appropriate option in the menu. This ensures that the scanner operates according to the selected alert and priority scan settings.
- Monitor the Weather Alerts and Priority Channels: With the Weather Alert mode enabled, your scanner will automatically notify you of any weather alerts or warnings in your area. The Priority Scan mode will prioritize the selected channels, ensuring that you don’t miss any important communications on those frequencies.
By following these steps, you can enable the Weather Alert and Priority Scan modes on your Whistler scanner, enhancing its capabilities and providing convenience during monitoring. Customize the settings to suit your preferences and keep yourself informed and focused on critical communications and weather updates.
Saving and Organizing Scanner Settings
Once you have customized your Whistler scanner with desired channels, frequencies, scan lists, and other settings, it’s important to save and organize these settings. Saving scanner settings ensures that your preferences are retained even if the scanner is powered off or reset. Organizing the settings allows for easy access and management. Follow these steps to save and organize your scanner settings on the Whistler scanner:
- Access the Scanner Menu: Turn on your Whistler scanner and navigate to the menu screen. The process for accessing the menu may vary depending on your scanner model.
- Locate the Backup or Save Option: From the menu options, find the option for backing up or saving scanner settings. It may be labeled as “Save Settings” or “Backup Configuration.” Select this option to proceed.
- Choose the Backup Location: When prompted, select the location where you want to save the scanner settings. This may be an external memory card, a USB drive, or internal memory. Follow the on-screen instructions to complete the backup process. Make sure to store the backup in a safe place for future use.
- Create Multiple Backups: It’s a good practice to create multiple backups of your scanner settings, especially if you make significant changes or additions. Regularly update the backups to capture the latest modifications you’ve made to your scanner configuration.
- Organize Settings Files: If your scanner supports multiple settings files, use this feature to organize different configurations. For example, you might create separate settings files for different geographic areas, types of communications, or specific events. This allows for easy switching between configurations without manually reprogramming the scanner.
- Restore from a Backup: If you need to restore your scanner to a previous configuration, access the restore or load option in the scanner’s menu. Select the backup file from the appropriate location and follow the instructions to restore your desired settings.
- Label or Document Settings: It’s helpful to label or document your scanner settings to easily identify and refer to them in the future. This could include noting the date of the backup, specific frequencies included, or any notable changes made. Having this information readily available saves time when configuring or troubleshooting your scanner.
- Share Settings with Others: If you have fellow scanner enthusiasts or colleagues who use the same or similar Whistler scanner models, consider sharing your settings files with them. This can be done by sharing backup files, uploading them to online forums or communities, or providing instructions on recreating your configurations.
By following these steps, you can save and organize your scanner settings on your Whistler scanner, ensuring that your customized preferences are preserved, easily accessible, and shareable with others. Regularly back up your settings and keep them organized for a seamless scanning experience.
Troubleshooting Common Issues
While the Whistler scanner is a reliable device, you may encounter common issues that can be easily addressed by following troubleshooting steps. Familiarizing yourself with these solutions will help you resolve problems and ensure smooth operation of your scanner. Here are some common issues and their troubleshooting steps:
- No Power or Display: If your Whistler scanner does not power on or has no display, check the power source and make sure the batteries or power adapter are properly connected. Try replacing the batteries or using a different power source to see if that resolves the issue.
- Weak Reception: If you are experiencing weak reception or no audio output, ensure that the antenna is securely connected to the scanner. Try adjusting the antenna’s position or, for external antennas, relocating it to a better signal reception area. You can also try reducing interference by moving away from electronic devices or obstacles that may block the signals.
- Programming Errors: If you encounter errors while programming your scanner, double-check the entered frequencies for accuracy. Ensure that you have selected the correct modulation type (analog or digital) for each frequency. If copying frequencies from a list, ensure they are formatted correctly. Refer to the scanner’s user manual or software documentation for specific programming instructions.
- Scanning Not Working: If your scanner is not scanning through the programmed channels or frequencies, check that the scan lists are enabled and not locked out. Verify that the scanner is not on hold or paused mode. If using priority scan, ensure that the priority channels are assigned correctly. Resetting the scanner to factory defaults and reprogramming it may help resolve the issue.
- Interference or Noise: If you are experiencing interference or noise during scanning, adjust the squelch level to eliminate weak or undesired signals. Increase the squelch level gradually until the background noise disappears, while still allowing stronger signals to come through. Additionally, try moving away from sources of interference, such as electronics or power lines.
- Software Connection Issues: If you encounter problems connecting your scanner to the computer or software, ensure that the USB cable is properly connected and that the correct drivers are installed. Try using a different USB port or cable to rule out any hardware issues. Restarting the computer or reinstalling the scanner software may also resolve connection problems.
- Scanner Freezing or Locking Up: If your scanner freezes or becomes unresponsive, try turning it off and then back on to perform a simple reset. If the issue persists, remove batteries or disconnect the power source for a few minutes, then reconnect and power on the scanner. If the problem continues, performing a factory reset or updating the scanner’s firmware might be necessary.
- Low Battery Life: If you notice that your scanner’s battery life is shorter than expected, ensure that you are using high-quality batteries or a suitable power adapter. Reduce backlight or display brightness settings to conserve power. Consider using rechargeable batteries or an external power source for extended periods of operation.
By following these troubleshooting steps, you can quickly identify and resolve common issues that may arise with your Whistler scanner. If problems persist, consult the scanner’s user manual, online support resources, or reach out to Whistler’s customer support for further assistance.