
Setting Up Envelope Templates
When it comes to printing envelopes on a Mac, setting up envelope templates is an essential first step. Fortunately, Macs come pre-installed with several envelope templates that you can easily customize to suit your needs. Here’s a step-by-step guide on how to set up envelope templates on your Mac:
1. Open the “Pages” application on your Mac. This is where you’ll create and customize your envelope template.
2. Click on “File” in the menu bar and select “New” to create a new document. Choose the “Envelope” template option from the available templates.
3. A blank envelope template will appear on your screen. You can now customize the template by adding your desired text, logo, or any other element you want to include on your envelopes.
4. To customize the envelope size, click on “Format” in the menu bar and select “Page”. From the drop-down menu, choose “Manage Custom Sizes”. Here, you can enter the dimensions for your envelope or choose from the available presets.
5. Once you’re satisfied with the design and size of your envelope template, save the template by clicking on “File” in the menu bar and selecting “Save”. Give your template a name and choose a save location on your Mac.
Now that you’ve set up your envelope template, you’re ready to start printing envelopes using the pre-installed templates on your Mac. Alternatively, you can also customize the templates further to add a personal touch to your envelopes. In the next section, we’ll explore how to use the pre-installed templates on your Mac.
Using the Pre-installed Envelope Templates
If you’re looking for a quick and hassle-free way to print envelopes on your Mac, utilizing the pre-installed envelope templates is a great option. These templates are designed to fit standard envelope sizes and make the printing process a breeze. Here’s how you can use the pre-installed envelope templates:
1. Open the “Pages” application on your Mac and create a new document.
2. Click on “File” in the menu bar and select “New”. Choose the “Envelope” template option, and a selection of pre-installed templates will appear.
3. Select the template that matches the size of your envelope. You can preview each template to see how it will look when printed.
4. Customize the template by adding your desired text, logo, or any other elements you want to include on your envelopes. You can modify the font, color, and formatting options to make the design uniquely yours.
5. Once you’re satisfied with the customization, save the template by clicking on “File” in the menu bar and selecting “Save”. Provide a name for the template and choose a save location on your Mac.
6. To print envelopes using the pre-installed template, click on “File” in the menu bar and select “Print”. Make sure you have the correct envelope size loaded in your printer. Adjust any printing settings as needed and click “Print” to start the printing process.
By using the pre-installed envelope templates on your Mac, you can save time and effort in creating custom designs from scratch. These templates ensure that your envelopes are printed accurately and fit the standard sizes perfectly. Remember to check your printer settings before printing to ensure the best results.
Customizing Envelope Templates
To make your printed envelopes stand out and align with your branding or personal style, customizing the pre-installed envelope templates on your Mac is a great option. Here’s how you can customize the envelope templates to add a personal touch:
1. Open the “Pages” application on your Mac and create a new document using the “Envelope” template option.
2. Select the envelope template that closely matches the size of your envelope.
3. Modify the text on the template by double-clicking on the text boxes and replacing the existing text with your desired content. You can change the font, size, color, and alignment to suit your preferences.
4. To add your logo or any other image, click on “Insert” in the menu bar and select “Choose”. Navigate to the location of your image file and click “Insert”. Resize and position the image as needed.
5. Customize the color and background of the template by selecting the desired elements and adjusting the color options from the “Format” menu. You can choose from preset colors or create custom colors to match your branding.
6. If desired, add additional design elements such as shapes, borders, or decorative lines to enhance the appearance of the template. These can be found under the “Shape” or “Line” options in the “Insert” menu.
7. Once you’re satisfied with the customization, save the template by clicking on “File” in the menu bar and selecting “Save”. Provide a name for the template and choose a save location on your Mac.
By customizing the envelope templates on your Mac, you can create unique and visually appealing designs that reflect your brand or personal style. Whether it’s adding your logo, using custom colors, or incorporating additional design elements, the customization options are endless. Once you’ve customized your envelope template, you’re ready to print professional-looking envelopes that make a lasting impression.
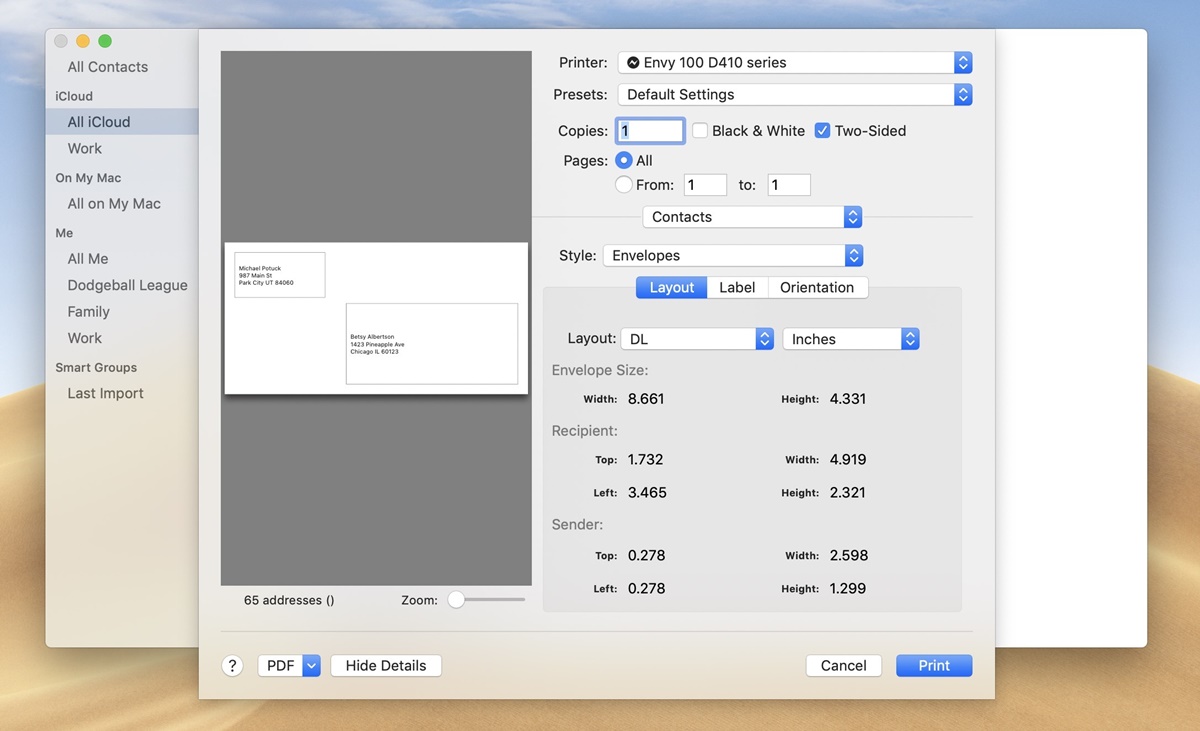
Printing Envelopes from Address Book Contacts
Printing envelopes directly from your Mac’s Address Book contacts can save you time and ensure accurate recipient information. Here’s how you can print envelopes using your Address Book contacts:
1. Open the “Contacts” application on your Mac.
2. Select the contact you want to print an envelope for. You can either search for the contact using the search bar or browse through your contacts list.
3. Once you have the contact selected, click on “File” in the menu bar and choose “Print”.
4. In the print settings window, click on the “Style” dropdown menu and select “Envelope”. This will set the print format to the standard envelope size.
5. Customize the envelope layout by clicking on the “Layout” dropdown menu. You can choose from options such as recipient address only, sender and recipient address, and more.
6. Select the desired printer and adjust any additional printing settings if needed.
7. Click on the “Print” button to start printing the envelope with the contact’s information.
Printing envelopes from your Address Book contacts is a convenient way to ensure accurate recipient information without the need for manual entry. It can save you time and reduce the chances of errors when sending out mail. Moreover, the customizable layout options allow you to tailor the appearance of the envelope to your liking.
Note: Make sure your printer is loaded with the appropriate envelope size and check your printer settings to ensure proper alignment and print quality.
Manually Entering Envelope Information
If you don’t have the contact information saved in your Address Book or prefer to manually enter the recipient details, you can still print envelopes on your Mac. Here’s how you can manually enter envelope information:
1. Open the “Pages” application on your Mac and create a new document using the “Envelope” template option.
2. Select the envelope template that matches the size of your envelope.
3. Double-click on the placeholder text boxes on the template to select and delete the existing text.
4. Begin entering the recipient’s address information, starting with the recipient’s name on the top line.
5. Continue entering the address details, such as street, city, state, and zip code, on the appropriate lines.
6. If applicable, include any additional address information, such as apartment number, suite number, or company name, on separate lines.
7. If desired, you can also include your return address or sender’s address on the envelope. Simply type in the corresponding information on the template.
8. Customize the font, size, and alignment of the entered text using the formatting options available in the “Format” menu.
9. Once you’ve entered all the necessary information and customized the envelope to your liking, save the template by clicking on “File” in the menu bar and selecting “Save”. Give your template a name and choose a save location on your Mac.
Now that you’ve manually entered the envelope information, you’re ready to print the envelopes using your printer. Make sure to load the appropriate envelope size into your printer and adjust any printing settings as needed, such as paper type and print quality. With careful attention to detail, you can create professional-looking envelopes tailored to your specific requirements.
Troubleshooting Common Printing Issues
Printing envelopes on a Mac may sometimes encounter common issues that can be easily resolved. Here are some troubleshooting steps to help address common printing problems:
1. Check printer settings: Ensure that your printer settings are correctly configured for the envelope size you are using. Verify that the paper type is set to “Envelope” and that the correct envelope size is selected.
2. Load envelopes properly: Make sure that the envelopes are loaded into the printer tray correctly. Improperly loaded envelopes can cause printing errors or feed issues. Refer to your printer’s manual for guidance on how to load envelopes correctly.
3. Verify envelope size compatibility: Ensure that the envelope size you are using is compatible with your printer. Some printers have specific limitations on the envelope sizes they can handle. Check the printer’s specifications to confirm the supported envelope sizes.
4. Clean printer rollers: Over time, printer rollers can accumulate dust and debris, leading to poor printing quality or paper feed issues. Clean the printer rollers as per the manufacturer’s instructions to maintain optimal performance.
5. Update printer drivers: Outdated printer drivers can cause printing problems. Visit the manufacturer’s website and download the latest drivers for your printer model. Install the updated drivers on your Mac and restart the computer.
6. Restart printer and Mac: Sometimes, simply restarting both the printer and your Mac can resolve minor printing issues. Turn off the printer, unplug it from the power source, wait for a few seconds, then plug it back in and power it on. Restart your Mac as well.
7. Print a test page: If the above steps don’t resolve the issue, try printing a test page to identify if it’s a problem specific to the envelopes or a general printing issue. Print a test page on plain paper to see if it prints correctly. If it does, the problem is likely related to the envelopes or settings; otherwise, it may indicate a broader printing issue.
By following these troubleshooting steps, you can often overcome common printing issues when printing envelopes on a Mac. However, if the problem persists, it may be advisable to consult the printer manufacturer’s support or seek technical assistance for further guidance.