
Overview
Posting YouTube videos on Instagram is a great way to reach a wider audience and engage with your followers. Instagram allows you to share different types of videos, including regular video posts, IGTV videos, stories, and reels. By leveraging these features, you can maximize the visibility and impact of your YouTube videos on the platform.
However, before you can post your YouTube video on Instagram, there are a few steps you need to follow. Firstly, you’ll need to prepare your video by converting it to the right format and making any necessary edits such as adding subtitles, trimming, cropping, or compressing the file size. Once your video is ready, you’ll need to set up your Instagram account if you haven’t already.
To get started, download the Instagram app on your mobile device and sign in to your account. Once you’re logged in, you’ll have different options for posting your YouTube video on Instagram. You can choose to upload it as a regular video post, an IGTV video, a story, or a reel. Each option has its own advantages and limitations, so it’s important to consider your goals and the type of content you want to share.
When uploading your YouTube video on Instagram, it’s crucial to optimize it for maximum visibility. This includes adding captions and relevant tags to make it easier for users to find your video in searches and explore pages. Additionally, you can edit the cover image to create an eye-catching thumbnail that entices viewers to click and watch your video.
Lastly, don’t forget to include a call to action in your Instagram post. This can be a simple request to like, comment, or share your video, or even a link to your YouTube channel for viewers to subscribe. By encouraging engagement and interaction, you can build a stronger connection with your audience and encourage them to take further action.
Now that you have an overview of the process, let’s dive deeper into each step to ensure you successfully post your YouTube videos on Instagram and leverage the platform’s potential to expand your reach and engagement.
Prepare Your Video
Before you can post your YouTube video on Instagram, it’s important to ensure that it is properly prepared. This includes converting the video to the right format, making any necessary edits, and optimizing it for Instagram’s requirements.
One of the first steps in preparing your video is to convert it to a format that is compatible with Instagram. Instagram supports various video formats, including MP4 and MOV, so you may need to use a video converter tool or software to change the format if your video is in a different format.
In addition to the format, you may also need to make edits to your video to make it more suitable for Instagram. This can include adding subtitles to make your video more accessible to a wider audience. Subtitles not only help viewers with hearing impairments, but they also make it easier for viewers to follow along if the video is in a different language or has poor audio quality.
Furthermore, you may want to consider trimming or cropping your video to highlight the most important parts or remove any unnecessary content. Instagram has specific video length restrictions for different types of posts, so make sure to check the guidelines and adjust your video accordingly. For longer videos, you can consider using Instagram’s IGTV feature to upload and share extended content.
Another consideration when preparing your video is the file size. Instagram has a maximum file size limit for video uploads, so if your video is too large, you may need to compress it. There are various online tools and software available that can help you compress your video while maintaining its quality.
By taking the time to prepare your video before uploading it to Instagram, you can ensure that it meets the platform’s requirements and provides a seamless viewing experience for your audience. Now that your video is ready, you can move on to the next steps in posting it on Instagram and engaging with your followers.
Convert Video to the Right Format
Before you can post your YouTube video on Instagram, it’s essential to convert it to a format that is compatible with the platform. Instagram supports specific video formats, primarily MP4 and MOV. If your video is in a different format, you’ll need to use a video converter tool or software to change it to the appropriate format.
There are several video converter tools available online that can help you convert your video quickly and easily. These tools typically allow you to upload your video file and choose the desired output format. Upon conversion, you can download the converted file to your computer and proceed with uploading it to Instagram.
When choosing a video converter tool, it’s important to consider the quality of the converted video. Some tools may compress the video and reduce its quality, resulting in a loss of clarity. Look for a converter that maintains the original quality of your video for the best viewing experience on Instagram.
Additionally, you may also need to adjust the resolution and aspect ratio of your video to meet Instagram’s requirements. Instagram recommends a resolution of 1080p (1920×1080 pixels) for regular videos and 720p (1280×720 pixels) for Stories and Reels. If your video has a different resolution, you can use the video converter tool to resize it accordingly.
During the conversion process, it’s important to note that Instagram has a time limit for different types of video posts. Regular video posts have a maximum length of 60 seconds, while IGTV videos can range from 1 minute to 15 minutes for most accounts, and up to 60 minutes for verified and larger accounts. It’s essential to ensure that your video is within the specified time limit to avoid any issues during the upload process.
Use a Video Editing App
Once you have converted your YouTube video to the correct format, you may want to consider using a video editing app before posting it on Instagram. Video editing apps provide a range of tools and features that allow you to enhance the quality and appearance of your videos.
There are many video editing apps available for both iOS and Android devices, catering to various skill levels and preferences. These apps offer a wide range of features, including trimming, cropping, adding effects, filters, transitions, text overlays, and more.
Trimming your video allows you to remove any unwanted portions or sections that may not be relevant to Instagram viewers. This can help to improve the overall pacing of your video and keep it concise and engaging. Additionally, cropping can be useful if you want to focus on a specific part of the video or adjust the aspect ratio to better fit Instagram’s requirements.
Video editing apps also give you the opportunity to add effects and filters to enhance the visual aesthetics of your video. Applying filters can help to create a cohesive look and feel, or evoke a specific mood or style. You can experiment with different filters to find the one that best suits your video content and branding.
Another useful feature offered by video editing apps is the ability to add text overlays. This can be particularly beneficial if you want to include captions, titles, or call-to-action messages in your video. Text overlays can help to convey information, engage viewers, and encourage interaction.
Before selecting a video editing app, consider your specific needs and preferences. Some popular video editing apps include iMovie, Adobe Premiere Rush, InShot, and FilmoraGo. Explore the features and user reviews of different apps to find one that aligns with your requirements and provides the necessary tools to enhance your YouTube videos before sharing them on Instagram.
Using a video editing app allows you to add that extra touch to your YouTube videos and make them stand out on Instagram. By utilizing the various editing tools and features, you can create visually appealing, professional-looking videos that engage and captivate your audience.
Use a Video Converter
If you need to convert your YouTube video to the right format for Instagram, using a video converter tool can simplify the process and ensure that your video meets the platform’s requirements. A video converter allows you to change the file format, adjust the resolution, and compress the file size of your video, if needed.
There are various video converter tools available online, many of which are free and easy to use. These tools typically allow you to upload your YouTube video file and select the desired output format. Instagram supports MP4 and MOV formats, so ensure that you choose one of these options when converting your video.
When selecting a video converter, consider the quality of the converted video. Some converter tools may diminish the video quality during the conversion process, resulting in a loss of clarity. Look for a converter that maintains the original quality of your video, so your Instagram audience can enjoy a high-quality viewing experience.
In addition to converting the file format, you may also want to adjust the resolution of your video to meet Instagram’s recommended specifications. For regular videos, Instagram suggests a resolution of 1080p (1920×1080 pixels). For Stories and Reels, the recommended resolution is 720p (1280×720 pixels). If your video has a different resolution, use the video converter tool to resize it accordingly.
Another factor to consider when using a video converter is the duration of your video. Instagram has specific time limits for different types of posts. Regular video posts have a maximum length of 60 seconds, while IGTV videos can range from 1 minute to 15 minutes for most accounts. For verified and larger accounts, the maximum duration for IGTV videos is 60 minutes. Ensure that your video respects these time constraints before uploading it to Instagram.
If your video file is too large, you may need to compress it to meet Instagram’s maximum file size limit. Many video converter tools offer options to reduce the file size while maintaining the video quality, or you can use a separate video compression tool before converting it.
By using a video converter, you can easily ensure that your YouTube video is in the appropriate format and meets Instagram’s specifications. This ensures seamless uploading and optimal viewing on the platform.
Add Subtitles
Adding subtitles to your YouTube video before posting it on Instagram can significantly enhance the accessibility and engagement of your content. Subtitles, also known as captions, provide text that displays along with the video, allowing viewers to read the dialogue or narration as they watch.
There are several reasons why adding subtitles to your videos is beneficial. Firstly, subtitles make your video more accessible to viewers with hearing impairments. By including captions, you ensure that everyone can engage with and understand your content, regardless of their hearing abilities.
Moreover, subtitles can be helpful for viewers who don’t have sound available or are watching your video in a noisy environment. They can follow along with the text even if they can’t listen to the audio. This expands your potential reach and allows your content to be consumed in various situations.
Additionally, subtitles are valuable for viewers who speak a different language or are not fluent in the language used in your video. By providing captions, you make your content accessible to a global audience and increase the chances of engagement and shares.
To add subtitles to your YouTube video, you can use video editing software or online tools that offer subtitle functionality. These tools allow you to upload your video and synchronize the subtitles with the audio track. You can either manually enter the captions or upload a pre-made subtitle file, such as an SRT or VTT file.
While adding subtitles, ensure that the captions are accurately synchronized with the audio and easy to read. Consider using clear and concise wording, and make sure that the font size, color, and style are legible against the video background. This will enhance the overall viewing experience and ensure that your message is effectively conveyed to your audience.
By adding subtitles to your YouTube video before posting it on Instagram, you make your content more inclusive, accessible, and engaging. The extra effort shows your commitment to reaching a wider audience and providing a positive viewing experience for all.
Trim or Crop the Video
Before posting your YouTube video on Instagram, it’s crucial to ensure that it is properly trimmed or cropped. Trimming or cropping your video allows you to highlight the most important parts, remove unnecessary content, and ensure that your video fits within Instagram’s specific video length requirements for different types of posts.
Trimming your video involves removing unwanted sections from the beginning, end, or middle of the footage. This can help improve the pacing and overall flow of your video, making it more engaging and concise. By trimming unnecessary footage, you can ensure that viewers are captivated from the start and not distracted by irrelevant content.
When trimming your video, consider the specific time limits set by Instagram for different types of posts. Regular video posts on Instagram have a maximum duration of 60 seconds, which means you need to ensure that your video fits within this time constraint. Trimming allows you to select and showcase the most captivating and impactful moments of your video within the given time frame.
Cropping your video, on the other hand, involves adjusting the dimensions or aspect ratio of the video frame. This can be useful if you want to eliminate distractions or focus on a specific area of the frame. Instagram allows videos in both landscape and portrait orientations, but the platform recommends a resolution of 1080p (1920×1080 pixels) for regular videos. Cropping your video can help ensure that it fits within these guidelines and looks visually appealing on Instagram.
When trimming or cropping your video, it’s important to use video editing software or apps that offer these features. There are numerous options available, ranging from professional editing software like Adobe Premiere Pro to user-friendly mobile apps like iMovie or InShot. These tools provide a user-friendly interface where you can easily trim or crop your video with precision.
Before finalizing the trimmed or cropped version of your video, make sure to preview it to ensure that it conveys your intended message and maintains seamless transitions. Pay attention to the overall coherence and pacing of the edited video, as well as the visual composition within the frame.
By trimming or cropping your YouTube video before posting it on Instagram, you can make sure that it grabs viewers’ attention and fits within the platform’s specific video length requirements. This helps deliver a more focused and engaging user experience, increasing the chances of your video resonating with your Instagram audience.
Compress the Video File Size
When preparing your YouTube video to be posted on Instagram, it’s important to consider the file size of your video. Instagram has a maximum file size limit for video uploads, so compressing your video can help ensure that it meets the platform’s requirements and uploads smoothly.
Compressing the video file size involves reducing the amount of data in the video file without significantly sacrificing its quality. By compressing the file, you can decrease the overall size of the video, making it easier and faster to upload on Instagram while minimizing any potential buffering issues for viewers.
There are various methods and tools available to compress video file sizes. One commonly used method is adjusting the video’s bitrate, which controls the amount of data used to represent each second of the video. Lowering the bitrate can significantly reduce the file size, but be careful not to reduce it too much as it may result in a loss of quality.
Using video compression software or online tools can simplify the process of reducing the file size. These tools allow you to choose the desired compression settings and output format, ensuring that the video maintains an acceptable balance between quality and size.
When compressing your video, it’s important to find the right balance between reducing the file size and maintaining a satisfactory level of video quality. Be sure to preview the compressed video to ensure that it still meets your standards and remains visually appealing to your audience.
Another aspect to consider when compressing the video file size is the duration of the video. Longer videos tend to have larger file sizes, so if you find that your video is too large, you may need to shorten it or consider using Instagram’s IGTV feature if your video exceeds the regular time limits.
Lastly, keep in mind that the file size limit on Instagram may vary based on factors such as your account’s status and network connection. It’s always a good idea to check Instagram’s guidelines and recommendations or reach out to their support for the most up-to-date information on file size limits.
By compressing your YouTube video to a smaller file size, you can ensure that it meets Instagram’s requirements for upload and prevents any issues that could hinder the viewing experience for your audience. Compressing your video is a crucial step in optimizing its upload and ensuring a smooth playback on the platform.
Prepare Your Instagram Account
Before you can post your YouTube video on Instagram, it’s important to ensure that your Instagram account is properly prepared. This involves downloading the Instagram app, signing in to your account, and making any necessary adjustments to optimize your profile for video sharing.
The first step is to download the Instagram app on your mobile device if you haven’t already. You can find the app in the App Store for iOS devices or the Google Play Store for Android devices. Downloading the app will give you access to all the features and functionalities of Instagram.
Once you have the app installed, it’s time to sign in to your Instagram account. If you already have an account, simply enter your username and password to log in. If you don’t have an account yet, you can create one by following the prompts and providing the necessary information.
When preparing your Instagram account for video sharing, there are a few key areas to focus on. Firstly, review your profile bio and make sure it accurately reflects your brand or personal identity. Consider including a brief description, relevant hashtags, and a link to your YouTube channel or website.
Next, take some time to curate your Instagram feed. Determine the aesthetic and visual style you want to maintain and choose a consistent theme for your posts. Consistency in your content and visual presentation can help attract and retain followers who resonate with your brand or content.
In addition, it’s important to consider the privacy settings of your Instagram account. If you have a public account, anyone can view and interact with your posts. If you prefer more control over who sees your content, you can opt for a private account where you manually approve follower requests.
Furthermore, explore the different video features offered by Instagram, such as regular video posts, IGTV, Stories, and Reels. Familiarize yourself with these options and think about how each can be used to effectively share and engage your audience with your YouTube video content.
Lastly, take some time to engage with the Instagram community. Explore relevant hashtags, follow accounts that align with your interests or industry, and engage with their content by liking and commenting. Building a presence and network on Instagram can help increase your visibility and reach.
By preparing your Instagram account before posting your YouTube video, you can ensure that your profile is appealing, aligned with your brand, and ready to showcase your content. Taking the time to optimize your account will set the stage for successful video sharing and engagement on Instagram.
Download the Instagram App
Downloading the Instagram app is the first crucial step in preparing to post your YouTube video on Instagram. The app is available for both iOS and Android devices, and it provides access to all the features and functionalities of the platform.
If you have an iOS device, you can find the Instagram app in the App Store. Open the App Store on your device and search for “Instagram” in the search bar. Once you find the app, tap the “Get” button to download and install it on your device. If you already have the app installed, make sure it is updated to the latest version for the best experience.
For Android users, the Instagram app is available on the Google Play Store. Open the Play Store and search for “Instagram” in the search bar. Tap on the app listing, then select the “Install” button. The app will start downloading and will be installed on your device shortly.
Once the Instagram app is downloaded and installed on your device, you can open it and proceed with signing in to your account or creating a new one if you don’t have an account yet.
It’s worth mentioning that Instagram also offers a web version, which allows you to view and engage with content on your desktop or laptop. However, posting videos and accessing certain features may be limited on the web version, so it’s recommended to primarily use the mobile app for the best experience.
Downloading the Instagram app ensures that you have a dedicated platform to post and engage with your audience. With the app installed on your device, you can easily access and utilize the various video-sharing features that Instagram offers, making it convenient to share your YouTube videos with your Instagram followers.
Before proceeding, ensure that you have sufficient storage space on your device for the Instagram app and any potential video content you plan to upload. Clear out unnecessary data or apps to free up space and ensure a smooth experience on Instagram.
By downloading the Instagram app, you’re taking the first step toward expanding your reach and engagement on the platform. With the app installed on your mobile device, you’ll have access to all the necessary tools and features to successfully post and share your YouTube videos with your Instagram audience.
Sign in to Your Instagram Account
Once you have downloaded the Instagram app, the next step is to sign in to your Instagram account. If you already have an account, signing in will give you access to your profile, followers, and the ability to post content. If you don’t have an account yet, you can create one directly through the app.
To sign in to your existing Instagram account, open the Instagram app on your device. You will be prompted with a login screen where you can enter your username and password. If you don’t remember your login credentials, you can use the “Forgot Password” option to reset your password using the email address or phone number associated with your account.
If you prefer a more convenient and seamless log-in process, you can also use your Facebook account to log in to Instagram. If your Instagram account is linked to your Facebook account, simply select the “Log in with Facebook” option on the login screen. This allows you to log in to Instagram with your existing Facebook credentials.
If you don’t have an Instagram account yet, you can create one directly through the app. Tap on the “Sign Up” option on the login screen, and you will be guided through the process of creating a new account. You will need to provide a valid email address or phone number, create a username and password, and then you can set up your profile and start posting content.
Signing in to your Instagram account is essential for access to the full range of features and capabilities that the platform offers. Once you’re logged in, you can customize your profile, add a profile picture and bio, and start interacting with other Instagram users.
Keep in mind that it’s important to keep your login credentials secure and use a strong, unique password for your Instagram account. This will help protect your account from unauthorized access and ensure the privacy and security of your content and personal information.
By signing in to your Instagram account, you gain the ability to post and interact with your audience on the platform. It’s an important step in establishing your online presence and leveraging Instagram’s features to share your YouTube videos and connect with your followers.
Decide on the Placement
When it comes to posting your YouTube video on Instagram, you have several placement options to consider. Instagram offers various features and formats for sharing videos, including regular video posts, IGTV, Stories, and Reels. Each placement option has its own unique advantages and limitations, so it’s important to choose the one that aligns best with your goals and the type of content you want to share.
Regular video posts on Instagram allow you to share your YouTube video on your feed, alongside your other photos and videos. This placement ensures that your video remains accessible to your followers and can easily be discovered by new viewers exploring your profile. However, regular video posts are limited to a maximum duration of 60 seconds, so longer videos may need to be edited or split into shorter segments.
IGTV (Instagram TV) is a feature specifically designed for sharing longer videos on the platform. With IGTV, you can upload videos that are up to 15 minutes long for most accounts, and up to 60 minutes for verified and larger accounts. This placement is ideal for YouTube videos that exceed the regular video post duration limit and allows you to maintain the full-length content without compromising its quality.
Instagram Stories, on the other hand, offer a more ephemeral and temporary placement for your YouTube video. Stories are displayed at the top of the Instagram app and disappear after 24 hours. This placement is perfect for sharing behind-the-scenes footage, teasers, or shorter snippets of your YouTube videos to keep your audience engaged and create a sense of exclusivity.
Reels, Instagram’s most recent addition, allows you to create short, engaging videos with added effects, music, and text overlays. With Reels, you can leverage trending challenges and viral content to reach a wider audience and gain exposure on the Explore page. This placement is suitable for creating catchy and shareable snippets from your YouTube videos that can quickly capture viewers’ attention.
When deciding on the placement for your YouTube video on Instagram, consider your goals, content type, and target audience. Are you looking to showcase the entire video, or do you want to highlight specific moments? Are you aiming to increase engagement and reach a wider audience, or focus on your existing followers? Answering these questions will help you determine which placement option is most suitable for your needs.
Remember, it’s not strictly limited to just one placement option. You can experiment and repurpose your YouTube video across different features and formats on Instagram to maximize its visibility and impact.
By carefully considering the placement of your YouTube video on Instagram, you can effectively share your content with your Instagram audience and leverage the platform’s diverse features and formats to increase engagement and reach.
Use IGTV
IGTV (Instagram TV) is a powerful feature on Instagram that allows you to share longer videos with your audience. This placement option is ideal for YouTube videos that exceed the regular video post duration limit and enables you to maintain the full-length content without compromising its quality.
IGTV offers a platform within Instagram dedicated to longer-form video content. Most accounts can upload videos that are up to 15 minutes long, while verified and larger accounts have the option to upload videos up to 60 minutes in length. This extended time limit makes IGTV perfect for sharing in-depth tutorials, vlogs, interviews, and other content that requires more time to convey your message.
To use IGTV, start by tapping on the IGTV icon on the Instagram app’s home screen or accessing it through the explore page. You can upload videos to IGTV directly from the app or through the IGTV section on your profile. The upload process includes adding a title, description, and cover image to optimize the discoverability and visual appeal of your video.
IGTV videos have their separate tab on your Instagram profile, making it easy for your followers to browse and watch your long-form content. They can also discover your videos through the IGTV explore page, where Instagram suggests videos based on the user’s interests and activity. This exposure can help you reach a broader audience and attract new followers who may be interested in your niche or content.
One of the advantages of using IGTV is the ability to share a preview of your video on your Instagram feed. This means that a short preview of your IGTV video will be visible in your followers’ feeds, along with a “Watch IGTV” call-to-action button. This preview format piques your followers’ curiosity and encourages them to tap and watch your full IGTV video, increasing engagement and views.
When using IGTV, it’s important to consider the visual and audio quality of your videos. Although IGTV allows for longer videos, it’s crucial to maintain a high standard of production value to captivate your audience. Invest in good lighting, clear audio, and visually appealing aesthetics to make your videos stand out.
Additionally, optimize your video’s title, description, and cover image to make it more appealing and clickable. The title should give a clear idea of the content, while the description can provide additional context, keywords, or call-to-action messages. The cover image should be visually striking and representative of the video’s content to entice viewers to click and watch.
By using IGTV, you can leverage Instagram’s long-form video feature to share your YouTube content seamlessly with your Instagram audience. The extended duration and dedicated platform for IGTV allow you to showcase your expertise, entertain your followers, and build a stronger connection with your audience on Instagram.
Use Stories
Instagram Stories offer a dynamic and interactive way to share your YouTube video content with your audience. This placement option provides a more ephemeral and temporary format, allowing you to engage with your followers through short video snippets that disappear after 24 hours.
Stories have become a popular feature on Instagram, with millions of users actively viewing and engaging with them daily. Leveraging Stories to promote your YouTube videos can help increase visibility, drive engagement, and create a sense of exclusivity among your followers.
To use Stories, open the Instagram app and tap on your profile picture or swipe right from the Instagram feed. This will open the Stories camera where you can capture and share videos directly from your device’s camera or choose a video from your camera roll.
You can customize your Stories by adding text, stickers, emojis, music, and various interactive features such as polls, quizzes, and questions. Utilizing these features can make your Stories more engaging and encourage your followers to interact with your content.
When sharing YouTube videos on Stories, consider creating teaser or highlight snippets to spark curiosity and entice your audience to watch the full video. You can add text captions or call-to-action messages to provide additional context and encourage viewers to swipe up or visit your YouTube channel to watch the complete video.
One advantage of using Stories is the “Swipe Up” feature. If you have a verified or business account with at least 10,000 followers, you can include a swipe-up link in your Stories. This can be a direct link to your YouTube video, allowing viewers to easily navigate to your content with a simple swipe up gesture.
Using Stories also offers the opportunity to enhance your storytelling skills and creativity. Experiment with different video editing techniques, filters, and effects to make your Stories visually appealing and engaging. You can create multi-part Stories to build anticipation or use the “Highlights” feature to save your Stories as permanent collections on your profile for viewers to revisit even after 24 hours.
Another benefit of Stories is the ability to tag other Instagram accounts or add location tags. Tagging relevant accounts or locations can help increase discoverability and reach as your Stories may appear in their tagged sections or associated locations.
Lastly, actively engage with your audience by responding to direct messages, replying to Story mentions, or reposting your followers’ stories that mention or share your YouTube videos. This helps foster a sense of community and encourages further interaction with your content.
By utilizing Stories, you can effectively promote your YouTube videos in a fun and interactive manner. Stories provide a creative platform to engage your followers, drive traffic to your YouTube channel, and facilitate meaningful connections with your audience on Instagram.
Use Reels
Reels is a feature on Instagram that allows you to create and share short, engaging videos set to music. This placement option provides an excellent opportunity to repurpose your YouTube videos into catchy and shareable snippets that can quickly capture viewers’ attention.
Reels are displayed in a dedicated section on the Explore page of Instagram, making them highly discoverable by users who may not follow you yet. Leveraging Reels can help increase your visibility, reach a wider audience, and gain exposure on the platform.
To use Reels, open the Instagram app and swipe right or tap the camera icon at the top left corner of the home screen. Select the “Reels” option at the bottom of the screen to access the recording interface. From there, you can record short video clips, add special effects, adjust the speed, and overlay music from the Instagram music library or your own audio files.
When using Reels to promote your YouTube videos, consider taking the most attention-grabbing moments or highlights from your videos and condensing them into a short, engaging format. Add captions, text overlays, or effects to enhance the visual appeal and communicate your message effectively.
One important aspect of Reels is the use of trending audio tracks and challenges. Explore the trending music and effects on Instagram to incorporate them into your Reels, making your content more relatable and shareable. Participating in popular challenges can help you tap into existing trends and attract a wider audience.
Reels also offers interactive features such as stickers, countdown timers, and polls that you can use to engage your audience. These features can encourage viewer interaction, comments, and sharing, which further amplifies the reach and engagement of your Reels.
Additionally, use relevant hashtags in your Reels to increase discoverability. Research and add hashtags that are popular in your niche or related to the content of your YouTube videos. This will help your Reels appear in hashtag searches and potentially be featured in the Explore page.
Once you’ve created your Reel, you can share it to your main feed, where it will be permanently visible to your followers, or simply keep it in the Reels tab on your profile. Sharing your Reel allows your followers to engage with it, comment, and share it with their own followers, ultimately increasing the reach and potential impact of your content.
Through Reels, you can showcase your creativity, repurpose your YouTube videos, and reach a broader audience on Instagram. It’s a powerful feature that offers immense potential for grabbing attention and driving engagement, making it an essential tool for growing your presence and promoting your YouTube content on Instagram.
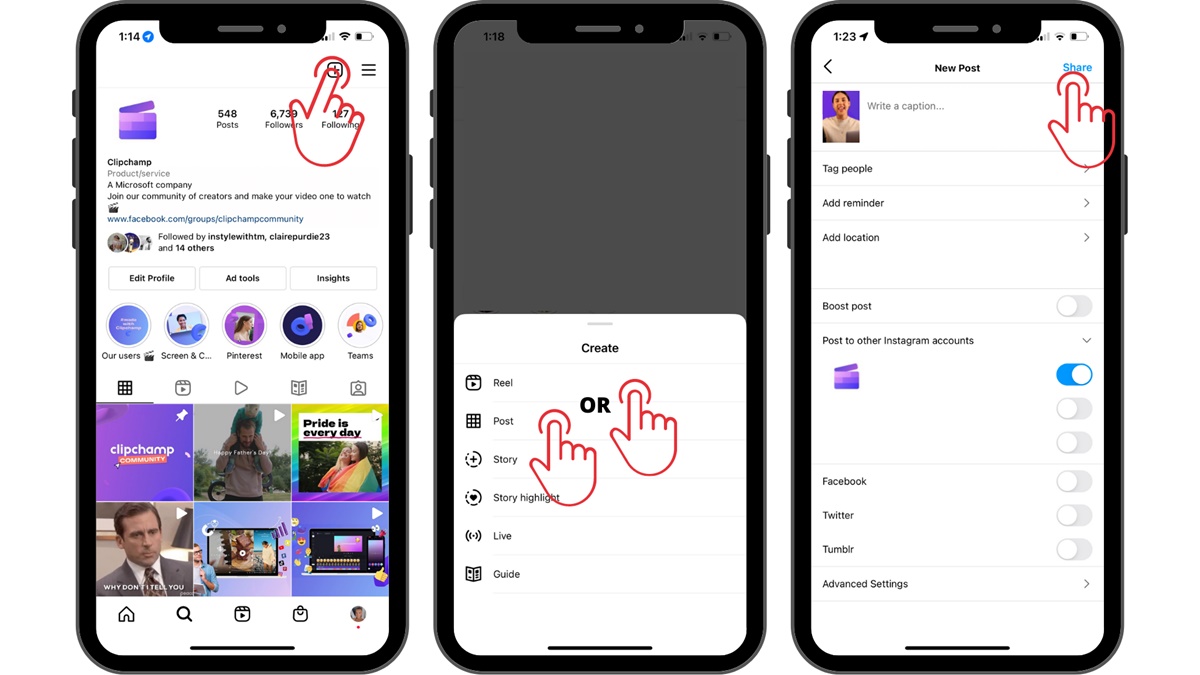
Upload Your YouTube Video
Once you have prepared your YouTube video and decided on the placement, it’s time to upload it to Instagram. Uploading your YouTube video to Instagram enables you to reach a wider audience and engage with your followers on another platform.
Start by opening the Instagram app on your mobile device. Depending on the placement you have chosen, you can navigate to the relevant section, such as the regular video post, IGTV, Stories, or Reels.
If you are uploading your YouTube video as a regular video post, tap the “+” icon at the bottom center of the screen. Choose the video from your camera roll or gallery, and edit it by trimming, cropping, or adding filters if desired. Add a caption, relevant hashtags, and location tags to make your video more discoverable. Optionally, you can also tag relevant accounts or add a call-to-action in the caption to engage your audience.
For uploading your YouTube video as an IGTV video, tap the “IGTV” icon on the home screen or via your profile. Then, tap the “+” button and select the video you want to upload. Fill in the title, description, and cover image, ensuring they accurately represent your video’s content. Add hashtags and choose whether to post a preview of the video on your profile and in your followers’ feeds.
If you wish to share your YouTube video as a Story, swipe right from the Instagram home screen or tap your profile picture to access the Stories camera. There, select the video from your camera roll, make any necessary edits, and add text, stickers, or interactive features to enhance your Story. Share it with your followers and make sure to include a swipe-up link if you have the “Swipe Up” feature enabled on your account.
When choosing to upload your YouTube video as a Reel, open the Instagram Stories camera and select the “Reels” option at the bottom. Record or add the desired clips from your YouTube video, and use the available editing tools to add effects, captions, and music. Publish the Reel to your profile and engage with viewers through comments and sharing.
Before finalizing the upload, ensure that your video meets Instagram’s guidelines regarding video dimensions, aspect ratios, and file sizes. This will prevent any issues during the uploading process and optimize the video’s appearance on the platform.
Once your YouTube video is uploaded to Instagram, it’s essential to engage with your followers by responding to comments, encouraging interaction, and promoting your video through other channels. Share it on other social media platforms, embed it in blog posts, or inform your email subscribers, driving more traffic and views to your YouTube channel through Instagram.
By uploading your YouTube video to Instagram, you can amplify your video’s reach and engagement. Utilize the specific features of each placement option to tailor your content and optimize its performance on the platform.
Add Captions and Tags
When posting your YouTube video on Instagram, adding captions and relevant tags is crucial for optimizing its discoverability, accessibility, and viewer engagement. Captions provide text that appears alongside the video, while tags help categorize and associate your video with relevant topics or keywords.
Adding captions to your video allows viewers to follow along with the content even when the audio is muted or inaccessible. Captions also make your video accessible to individuals with hearing impairments, ensuring that everyone can engage with your content. Instagram provides a built-in captioning feature where you can manually enter the captions or use automatic captioning if available for your account.
When creating captions, aim for accuracy and clarity. Make sure the captions accurately reflect the spoken content, and avoid any spelling or grammatical errors. You can also use captions creatively to enhance the viewing experience, such as adding text overlays for emphasis or providing additional context for the video’s content.
Tags, commonly known as hashtags, play a vital role in expanding the reach of your Instagram video. They help categorize your content and make it more discoverable by users searching for specific topics or keywords. Research relevant hashtags in your niche or industry and add them to your video’s caption. Use a mix of popular and niche-specific hashtags to maximize exposure without getting lost in a sea of posts.
When selecting tags, consider the content, theme, and target audience of your video. Use broad hashtags to reach a larger audience, but also incorporate specific hashtags relevant to your video’s topic to target a more engaged and interested audience. For example, if you are sharing a cooking tutorial, include hashtags like #recipes, #foodie, or #cookingtips.
It’s beneficial to create a branded hashtag unique to your YouTube channel or content. This can help build brand recognition and encourage your viewers to engage with your video by using the hashtag when sharing or commenting. Promote your branded hashtag in the video’s caption or within the video itself to encourage participation.
While adding captions and tags, ensure that they enhance the viewer’s experience and align with your video’s content. Avoid overusing hashtags or using unrelated tags solely for gaining visibility, as it can come across as spammy or misleading. Focus on using relevant tags that genuinely connect your video with your target audience.
Regularly monitoring the performance of your captions and tags can help refine your strategy. Pay attention to which hashtags generate the most engagement and incorporate them into future posts. Similarly, analyze the reach and engagement of videos with and without captions to gauge their impact on audience retention and accessibility.
By adding captions and relevant tags to your YouTube video on Instagram, you enhance its discoverability, accessibility, and overall engagement. Captions allow viewers to fully comprehend your video’s content, while appropriate tags amplify its reach, attracting a wider audience interested in your niche or industry.
Edit the Cover Image
An eye-catching cover image is essential for grabbing viewers’ attention and enticing them to watch your YouTube video on Instagram. The cover image serves as a visual representation of your video, acting as a thumbnail that viewers will see before deciding to click and watch.
By default, Instagram generates a cover image by selecting a frame from your video. However, you have the option to edit and customize the cover image to better represent your video’s content and make it more visually appealing.
To edit the cover image, start by uploading your YouTube video to Instagram in the desired placement, such as a regular video post, IGTV, Stories, or Reels. Once uploaded, you can navigate to the settings or editing options for that specific placement to access the cover image editing feature.
Within the editing options, you can scrub through the video to find the perfect frame for the cover image. Look for a frame that captures the essence of your video, showcases the main point or visually intriguing moment, and sparks curiosity in viewers. It should be enticing enough to make people want to click and watch your video.
If you can’t find a suitable frame, or if you want to create a more customized and polished cover image, you can use external tools or editing software to create a high-quality image specifically tailored to your video. This can include overlaying text, adding graphical elements, or enhancing the colors and contrast to make it visually striking.
Keep in mind that the cover image’s aspect ratio should match Instagram’s requirements for the specific placement. For regular video posts, the recommended aspect ratio is 1:1 (square). IGTV cover images typically have a 9:16 (vertical) aspect ratio, while Stories and Reels have a 9:16 or 4:5 (vertical) aspect ratio.
While editing the cover image, ensure that it accurately represents the content of your video and is in alignment with your brand or message. Consistency in visual branding can help viewers identify your content more easily and build recognition over time.
It’s also important to remember that the cover image should comply with Instagram’s guidelines and policies. Avoid using misleading or deceptive imagery, as it may violate the platform’s rules and lead to your content being flagged or removed.
Take the time to experiment with different cover images and compare their performance in terms of click-through rates and engagement. Analyzing the data can provide insights into which cover images are most effective in driving viewer interest and click-throughs.
By editing the cover image of your YouTube video on Instagram, you can increase its visual appeal and entice viewers to click and watch. A compelling and well-crafted cover image can significantly impact the success of your video on the platform.
Include a Call to Action
When posting your YouTube video on Instagram, it’s essential to include a call to action (CTA) in the caption or within the video itself. A well-crafted CTA prompts viewers to take further action, whether it’s engaging with your content, visiting your YouTube channel, subscribing, sharing, or leaving a comment.
The CTA should be clear, concise, and specific. It should create a sense of urgency or provide value to the viewer, enticing them to act immediately. Consider using action verbs and persuasive language to encourage viewers to take the desired action.
There are various types of CTAs you can include in your Instagram post. For example, you can ask your viewers to like, comment, or share the post if they found the video helpful or entertaining. This helps to increase engagement and extend the reach of your video to a wider audience.
If your goal is to drive traffic to your YouTube channel, you can encourage viewers to click the link in your bio to watch the full video. Mention the benefits or unique aspects of your YouTube channel to entice viewers and emphasize why they should visit and subscribe.
Utilizing Instagram’s features, such as the “Swipe Up” feature in Stories or the “Link in Bio” option in the caption, can make it easier for viewers to take the desired action. Adding a “Swipe Up to Watch” or “Link in Bio” call-to-action message can increase click-through rates and drive traffic directly to your YouTube video.
Another effective CTA is asking viewers to leave comments or share their thoughts on the topic of the video. Encourage them to share their experiences, ask questions, or provide feedback in the comments section. Engaging with your audience in the comments not only fosters a sense of community, but also boosts visibility and encourages others to join the conversation.
It’s important to note that the CTA should be aligned with your overall marketing goals and fit naturally within the context of your video and post. Aim for a seamless integration that feels genuine and relevant to your content, rather than coming across as overly promotional.
Remember to monitor the responses and engagement metrics associated with your CTA. This can provide valuable insights into the effectiveness of your call to action and help refine your future content and messaging strategies.
Ultimately, including a clear and compelling call to action in your Instagram post helps guide viewers towards the desired action, whether it’s increased engagement, channel subscriptions, or driving traffic to your YouTube videos. Crafting a strong CTA can significantly impact the level of interaction and response you receive from your Instagram audience.
Share Your Instagram Post
Once you’ve successfully posted your YouTube video on Instagram, it’s important to share your Instagram post with your broader network to maximize its reach and engagement. Sharing your Instagram post helps increase visibility, attract new followers, and drive traffic to your YouTube channel.
One effective way to share your Instagram post is by cross-promoting it on other social media platforms. Leverage your existing presence on platforms such as Facebook, Twitter, LinkedIn, or Pinterest to share a link or screenshot of your Instagram post. This allows your followers on those platforms to discover and engage with your Instagram video.
In addition to social media platforms, you can also promote your Instagram post through other digital channels. Embed the Instagram post or video on your website or blog, encouraging website visitors to watch the video directly on Instagram. This strategy can help direct traffic from your website to your Instagram profile, boosting followers and engagement.
To tap into your existing email subscriber base, include a link to your Instagram post or video in your email newsletter. This keeps your subscribers in the loop about your latest content and encourages them to engage with your video and follow you on Instagram.
Don’t forget about offline promotion opportunities as well. If you have physical business cards, posters, or signage, consider adding your Instagram handle or QR code to encourage offline audiences to connect with you on Instagram and view your YouTube video.
Engaging with influencers or running collaborations with like-minded accounts in your niche can also drive more visibility to your Instagram post. Reach out to influencers or complementary brands to share or repost your content with their followers. This can introduce your YouTube video to a wider audience and attract new followers who may be interested in your content.
Encourage your current Instagram followers to share your post on their own profiles by including a call to action in your caption. Ask them to tag friends or share the video in their own Instagram stories, which helps to expand the reach of your post to their network. Consider running giveaways or contests where participants can share your post on their profiles for a chance to win prizes, creating a viral effect.
Regularly engage with your followers and respond to comments on your Instagram post. Building a strong relationship with your audience helps foster a sense of community and encourages them to continue engaging with your content. Foster a two-way conversation, and don’t be afraid to ask for feedback or suggestions for future videos.
By sharing your Instagram post across various platforms and engaging with your audience, you can maximize the visibility and impact of your YouTube video on Instagram. Broadening the exposure of your content increases the likelihood of attracting new followers, boosting engagement, and driving traffic back to your YouTube channel.