
Choosing a Design
When creating a Roblox shirt, one of the most important steps is choosing a design that will captivate and impress other players. Whether you want to showcase your artistic talent, promote your brand, or simply express your personal style, having a visually appealing design is crucial. Here are some tips to help you choose the perfect design for your Roblox shirt:
- Consider your interests: Start by brainstorming ideas that reflect your interests or hobbies. Do you love animals, gaming, or music? Think about incorporating elements that resonate with your passion.
- Research popular trends: Take some time to explore popular Roblox shirt designs. Follow Roblox fashion trends, browse the Roblox marketplace, or even check out social media platforms for inspiration. While it’s important to stay true to your own style, being aware of what’s trending can give you ideas for unique twists on popular themes.
- Think about the audience: Who will be wearing or buying your Roblox shirt? Consider the preferences and tastes of the target audience. For example, if you’re creating a shirt for gamers, incorporating gaming-related symbols or references can be a great way to appeal to that specific community.
- Play with colors and patterns: Colors and patterns can greatly impact the visual appeal of your design. Experiment with different color combinations and patterns to create a unique and eye-catching shirt. Consider using elements like gradients or texture overlays to add depth to your design.
- Stay original: While it’s important to gather inspiration from existing designs, make sure your final creation is unique and original. Avoid simply copying someone else’s work and strive to add your own creative touch.
Remember, the design of your Roblox shirt is a reflection of your personality and style. Take your time to brainstorm ideas, gather inspiration, and create something that you are truly proud of. In the next section, we will explore the necessary tools and materials needed to bring your design to life.
Gathering the Necessary Tools and Materials
Before you can start creating your Roblox shirt, it’s essential to gather the necessary tools and materials. Having the right resources at hand will make the design process smoother and more efficient. Here are the key items you’ll need:
- Graphics program: To create your design, you’ll require a graphics program such as Adobe Photoshop, GIMP, or any other software that allows you to manipulate images and create graphics. Choose a program that you’re comfortable with and that provides the necessary features for designing.
- Roblox shirt template: The Roblox shirt template is a specially formatted image that serves as a guide for creating your shirt design. You can download the template from the Roblox website. It’s crucial to use the correct template to ensure proper sizing and placement of your design on the shirt.
- Image editing tools: Alongside your graphics program, having tools specifically designed for image editing can be helpful. These may include features like cropping, resizing, and adjusting color levels. While many graphics programs have built-in editing tools, you may also consider using standalone editing software for more precise adjustments.
- High-resolution images: If your design incorporates images, make sure you have access to high-resolution versions to preserve the quality and sharpness. Low-resolution images may appear blurry or pixelated when printed on a Roblox shirt.
- Inspiration and reference materials: Having a collection of inspiring designs, color palettes, or reference images can be beneficial for generating ideas and making creative choices. Create a folder or bookmark websites that provide design inspiration to refer to during the creation process.
Once you’ve gathered these essential tools and materials, you’ll be well-prepared to start crafting your Roblox shirt design. In the next section, we’ll delve into the intricacies of the Roblox shirt template and the technical aspects you need to understand. So, let’s move forward and unravel the secrets behind the template and its functionalities.
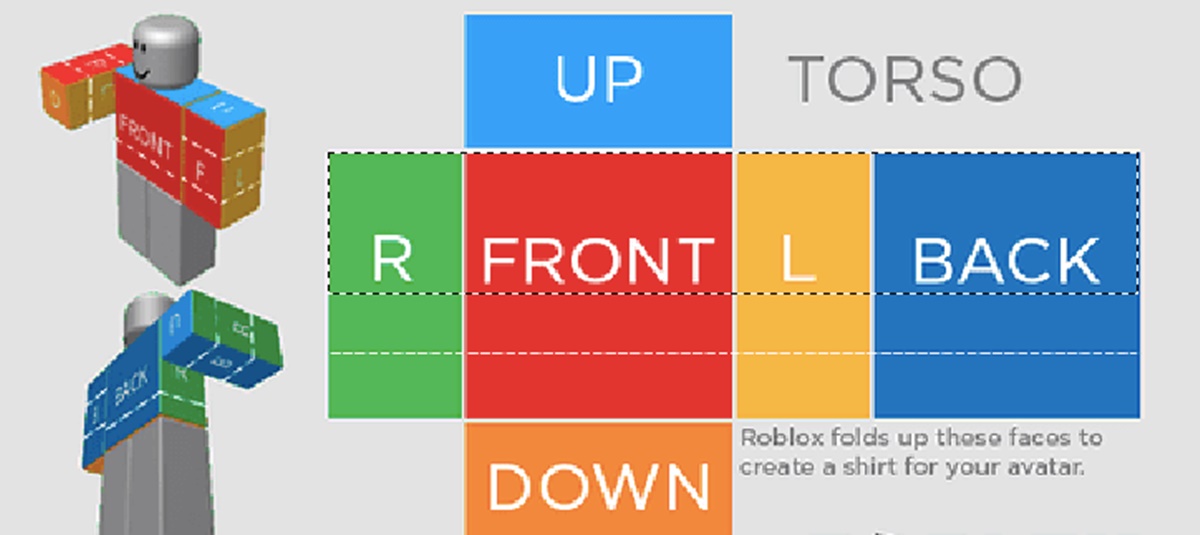
Understanding the Roblox Shirt Template
The Roblox shirt template is a crucial component of creating your own custom shirt design. Understanding the template and its specifications will ensure that your design fits properly and looks great when applied to a Roblox avatar. Here are the key aspects to understand:
- Resolution and dimensions: The Roblox shirt template has specific resolution and dimension requirements. It is typically a 585×559-pixel image and should be saved as a PNG file. Make sure to adhere to these dimensions to avoid distortion or cropping of your design when applied to a shirt.
- Front and back design areas: The template is divided into two main sections: the front and back design areas. The front area corresponds to the front of the shirt, while the back area corresponds to the back. Keep in mind that both areas can contain distinct designs or form a cohesive pattern when designing.
- Transparency: Transparency plays a crucial role in creating your design on the Roblox shirt. The transparent areas of the template will allow the Roblox avatar’s skin or other clothing items to show through. Therefore, when designing, use transparency strategically to ensure the desired effect while avoiding any unintended visual overlap.
- Layering: The layering of your design is essential when using the Roblox shirt template. The elements you place on the template will maintain the same hierarchy as they would in an image-editing program. It’s important to carefully consider the order of layers to achieve the desired look and prevent any overlapping or misplaced elements.
- Previewing and testing: To ensure that your design looks seamless when worn on a Roblox avatar, it’s recommended to preview and test your design. Utilize the preview features provided by Roblox or try out the shirt design on your own avatar or a test account. This will help you identify any issues or adjustments needed before finalizing and saving the design.
Taking the time to understand the intricacies of the Roblox shirt template will greatly enhance the quality of your design and ensure a smooth implementation process. In the next section, we’ll dive into the process of creating the design itself using a graphics program. So, let’s get our creative juices flowing and bring our vision to life!
Creating the Design in a Graphics Program
Once you have chosen a design concept and familiarized yourself with the Roblox shirt template, it’s time to bring your vision to life using a graphics program. Whether you are using Adobe Photoshop, GIMP, or any other graphic design software, the following steps will guide you through the process of creating your Roblox shirt design:
- Set up the canvas: Open your graphics program and create a new document with the dimensions of the Roblox shirt template (585×559 pixels). This will serve as your canvas for the design.
- Import resources: If your design includes images, logos, or other resources, import them into your graphics program. Then, arrange and position them on the canvas as desired. Remember to consider transparency and layering to ensure the template’s functionality.
- Add colors and patterns: Use the tools in your graphics program to apply colors, gradients, or patterns to different elements of your design. Experiment with different combinations to achieve the visual effect you desire.
- Incorporate text: If your design includes text, use the text tool to add it to the canvas. Choose appropriate fonts, sizes, and colors that complement the overall design. Consider legibility and readability of the text when placed on the Roblox shirt.
- Edit and refine: Take the time to review your design, making any necessary adjustments or refinements. Pay attention to details such as alignment, spacing, and overall balance. This step is crucial for achieving a polished and professional-looking design.
- Save your design: Once you are satisfied with the final result, save your design as a separate image file. Ensure that it meets the specifications required for Roblox shirts (PNG format, 585×559 pixels).
Remember to save your work periodically as you progress to avoid losing any changes. Building your design in layers can also help you make edits or tweaks easily if needed. In the next section, we will explore the process of uploading your design to the Roblox platform. So, let’s move forward and get ready to showcase your creativity to the Roblox community!
Uploading the Design to Roblox
Now that you have created your custom Roblox shirt design in a graphics program, it’s time to upload it to the Roblox platform. This process allows you to apply your design to your avatar and even offer it to other players. Follow these steps to upload your design to Roblox:
- Login to the Roblox website: Visit the Roblox website and log in to your account using your credentials.
- Go to the ‘Create’ section: Once logged in, navigate to the ‘Create’ section of the website. This is where you can manage and upload your creations.
- Select ‘Shirts’ from the menu: In the ‘Create’ section, select ‘Shirts’ from the available options. This will take you to the shirt creation page.
- Click on ‘Choose File’ or ‘Browse’: On the shirt creation page, you will find an option to upload the image file of your design. Click on ‘Choose File’ or ‘Browse’ to locate and select your design file from your computer’s storage.
- Adjust the design settings: Once you have selected the file, you may need to adjust certain settings related to the design. These may include options for transparency, scaling, or tiling. Modify the settings according to your preferences and the desired appearance of your shirt.
- Preview and save your design: After adjusting the settings, you will have the opportunity to preview how your design will look on the Roblox avatar. Take this chance to ensure everything is as expected. If you are satisfied, save your design.
- Name your shirt and set its price (optional): To make your shirt available for purchase by other players, you can provide a name for your design and set a price. This step is optional, and you can always come back later to make these changes if desired.
- Submit your design: Finally, click on ‘Upload’ or ‘Submit’ to complete the process of uploading your shirt design to Roblox. Once submitted, it will undergo a review to ensure compliance with Roblox’s guidelines and standards.
After your design passes the review process, it will be available in your inventory for you to wear or sell. Congratulations on successfully uploading your custom Roblox shirt design! In the next section, we will discuss how to adjust and position your design on the shirt template using Roblox’s editing tools. So, let’s move forward and fine-tune the appearance of your shirt!
Adjusting and Positioning the Design on the Shirt Template
After uploading your design to Roblox, it’s time to fine-tune its appearance by adjusting and positioning it on the shirt template. Roblox provides editing tools that allow you to make precise adjustments to ensure your design fits and looks as intended. Follow these steps to adjust and position your design:
- Select the shirt design: Go to your Roblox inventory and locate the shirt design you want to adjust. Click on it to open the editing menu.
- Access the editing tools: Within the editing menu, you will find several tools to modify your shirt design. These may include options for resizing, rotating, and repositioning the design on the shirt template.
- Resize the design: If your design appears too small or large on the shirt template, use the resizing tool to adjust its dimensions. Be careful not to distort the design while resizing, as it may affect its overall appearance.
- Rotate the design: If you want to change the orientation of your design on the shirt template, use the rotation tool to achieve the desired angle. This can add a unique visual element or help align your design with specific areas of the template, such as the collar or sleeve.
- Reposition the design: To adjust the placement of your design on the shirt template, use the repositioning tool. This allows you to move the design horizontally or vertically, ensuring it aligns properly with certain areas or elements of the template.
- Preview and make adjustments: As you make changes to the design, it’s important to preview the shirt on a Roblox avatar to ensure everything looks as intended. Don’t hesitate to make additional adjustments if needed to achieve the desired appearance.
- Save your changes: Once you are satisfied with the adjustments and positioning of your design, save the changes in the editing menu. This will update your shirt design in your inventory and reflect the modifications you have made.
Take your time to experiment with different adjustments and positioning options to achieve the best visual outcome for your Roblox shirt design. Remember, these tools help you optimize the placement and alignment on the shirt template, ensuring a seamless and appealing final product. With the design now perfectly positioned, we can move on to the next section and explore how to preview and test your shirt design before finalizing it. So, let’s proceed and put your design to the test!
Previewing and Testing the Shirt Design
Before finalizing your Roblox shirt design, it’s crucial to preview and test it to ensure it looks seamless and appealing on a Roblox avatar. Roblox provides tools that allow you to see how your design appears in different contexts and make any necessary adjustments. Follow these steps to preview and test your shirt design:
- Open the shirt design menu: Go to your Roblox inventory and access the menu for the shirt design you want to preview and test.
- Choose a testing option: Within the shirt design menu, you will find options for previewing and testing your design. These may include options to view the shirt on a customizable mannequin or to apply it directly to your own avatar.
- Preview on a customizable mannequin: If you select the mannequin option, Roblox will provide a virtual mannequin that you can customize with different body types, poses, and animations. Use this feature to see how your design looks on various avatars to ensure it maintains its quality and integrity.
- Apply the design on your own avatar: Opting to apply the design directly to your own avatar allows you to see firsthand how it looks and fits. This is especially important if your design incorporates specific elements or takes into account the avatar’s body proportions and movements.
- Make necessary adjustments: While previewing and testing, pay attention to any visual issues, misalignments, or pixelation. If you encounter any problems, go back to the editing tools and make the necessary adjustments to improve the appearance of your design.
- Repeat the process if needed: If you make any changes to your design during the preview and testing stage, it’s essential to repeat the process to ensure the modifications have the desired effect and have not introduced new issues.
By previewing and testing your Roblox shirt design, you can identify and address any potential problems before making it available to others. Taking the time to thoroughly examine your design ensures that it meets your expectations and creates a positive experience for those who choose to wear it. With the previewing and testing phase complete, we can proceed to the next section and discuss the final steps involved in finalizing and saving your Roblox shirt. So, let’s continue and put the finishing touches on your design!
Finalizing and Saving the Roblox Shirt
After you have previewed, tested, and made any necessary adjustments to your Roblox shirt design, it’s time to finalize and save your creation. Follow these steps to ensure your design is ready to be worn, shared, or sold:
- Review your design: Take a final look at your design to ensure that all elements are in place, aligned correctly, and visually appealing. Check for any potential issues or mistakes that might have been missed during the previous stages.
- Make any last-minute adjustments: If you notice any minor issues during the review, go back to the editing tools and make the necessary adjustments. Pay attention to details like color accuracy, text legibility, and overall balance.
- Name your Roblox shirt: Provide a unique and descriptive name for your shirt design. This name should represent your design concept and help potential users understand what your shirt is about.
- Consider setting a price: If you wish to sell your shirt design to other players, you have the option to set a price for it. Consider the value, uniqueness, and demand of your design when deciding on a price point.
- Save your Roblox shirt: Once you are satisfied with the final version of your design and any accompanying settings, save your Roblox shirt. This action will finalize your creation and make it available in your inventory.
- Promote your design: If you’re proud of your Roblox shirt design and want others to know about it, consider promoting it through social media or within Roblox communities. Generate interest by showcasing the design concept and encouraging interactions from other players.
By finalizing and saving your Roblox shirt design, you are ready to share your creative work with the Roblox community. Whether you choose to wear it yourself, offer it for sale, or simply showcase it as a testament to your artistic abilities, your creation is now complete. Congratulations on successfully creating and saving your Roblox shirt design! In the next section, we will address common issues that may arise during the design process and provide troubleshooting tips. So, let’s move forward and equip ourselves with the knowledge to overcome obstacles along the way!
Troubleshooting Common Issues
While creating a Roblox shirt design, it’s not uncommon to encounter certain issues or challenges along the way. Understanding common problems and how to troubleshoot them will help you overcome these hurdles and ensure a successful design process. Here are some common issues you may come across and their corresponding troubleshooting tips:
- Blurriness or pixelation: If your design appears blurry or pixelated when applied to a Roblox shirt, it may be due to using a low-resolution image. To resolve this, ensure that your design resources are high-resolution and properly scaled for the Roblox shirt template. Avoid enlarging small images, as it can lead to loss of quality.
- Misaligned or overlapping elements: If the elements of your design are not properly aligned or are overlapping, it may be a result of incorrect positioning on the shirt template. Use the editing tools in Roblox to adjust and align the elements carefully. Pay attention to the placement of your design, ensuring that it fits within the designated areas and does not interfere with other design elements.
- Transparency issues: Transparency is a key aspect of designing a Roblox shirt. If you encounter transparency issues, such as unexpected colors showing through or elements appearing solid, review your design file. Ensure that the transparent areas in your design are set to be fully transparent when saving the file. Adjust the transparency settings in Roblox if necessary.
- Color inconsistencies: Sometimes, the colors in your design may appear different when applied to a Roblox shirt. This can occur due to color settings or variations across different devices and monitors. To minimize color inconsistencies, use a color profile that is widely accepted and ensure proper calibration of your device when creating your design.
- Text legibility: If the text in your design is difficult to read or appears blurry, consider adjusting the font, size, or color. Use clear and legible typefaces that are easy to read even at smaller sizes. Make sure there is sufficient contrast between the text and the background to enhance legibility.
Remember, troubleshooting is an integral part of the design process. Whenever you encounter an issue, take a step back, analyze the problem, and refer to these troubleshooting tips to find a solution. With these strategies in mind, you’ll be better equipped to overcome obstacles and achieve the desired results with your Roblox shirt designs. Now that we’ve covered common troubleshooting scenarios, let’s move on to the next section, which offers some additional tips and tricks to make your Roblox shirt design stand out. So, let’s continue and explore some creative techniques!
Tips and Tricks for Making an Eye-catching Shirt Design
Creating an eye-catching Roblox shirt design not only requires artistic skills but also strategic thinking. To help your design stand out and capture attention, consider incorporating the following tips and tricks:
- Be unique: Strive for originality. Avoid creating designs that are too similar to existing ones to make your shirt stand out from the crowd.
- Use color effectively: Experiment with color combinations to create visually appealing contrasts and harmonies. Consider the emotions and associations different colors convey and use them intentionally to enhance your design’s impact.
- Focus on composition: Design your shirt with strong composition principles in mind, such as balance, proportion, and visual flow. A well-composed design will attract and hold the viewer’s attention.
- Incorporate texture and depth: Add depth and dimension to your design by using texture effects or playing with light and shadows. These techniques can make your design visually interesting and realistic.
- Simplicity is key: While it’s important to be creative, don’t overload your design with unnecessary elements. Keep it clean, uncluttered, and easily understandable to ensure it has a strong impact.
- Analyze trends: Stay updated with Roblox fashion trends and incorporate elements or themes that are currently popular. However, don’t be afraid to put your unique twist on trends to make your design stand out.
- Consider the shirt’s form: Keep in mind how the design will look when worn on an avatar. Consider both the front and back of the shirt and ensure that the design flows seamlessly across both areas.
- Think about target audience: If you’re designing for a specific group of people, understand their interests and preferences. Create a design that resonates with them and speaks to their unique style.
- Seek feedback: Don’t be afraid to share your work in progress with others and seek constructive feedback. Other perspectives can help you refine your design and make it even more impactful.
- Practice and iterate: Designing is a skill that improves with practice. Keep experimenting, trying new techniques, and learning from each design you create. Iterate on your ideas to continually improve your skills and produce better designs.
By following these tips and tricks, you’ll elevate your Roblox shirt designs and create captivating designs that catch the eye and leave a lasting impression. Remember, design is an ever-evolving process, so keep learning and refining your skills to continually enhance the quality of your creations. Now that you are equipped with these creative techniques, you’re ready to take your Roblox shirt designs to the next level. In the final section, we’ll wrap everything up and summarize the key points covered in this article. So let’s proceed and conclude our journey through the world of Roblox shirt design!