
Why does the screen turn off?
Have you ever found yourself in a situation where you’re reading an article or watching a video on your Android device, only to have the screen abruptly turn off? It can be quite frustrating, especially if you’re in the middle of something important. But why does the screen turn off in the first place?
The screen timeout feature is designed to conserve battery life and prevent accidental screen taps when your device is not in use. By default, most Android devices have a set time limit for the screen to automatically turn off after a period of inactivity. This helps to extend your battery life and ensure that your device is not unnecessarily consuming power.
However, there are times when you may want to keep the screen of your Android device active for longer periods without it turning off. Whether you’re reading a lengthy document, following a recipe, or presenting a slideshow, there are various reasons why you may need the screen to remain on.
Luckily, there are several methods you can employ to prevent your Android device’s screen from turning off. Let’s explore some of these options.
Changing the screen timeout settings
One of the simplest ways to keep your Android screen active for longer is by adjusting the screen timeout settings. By customizing the screen timeout duration, you can extend the time it takes for the screen to turn off after inactivity.
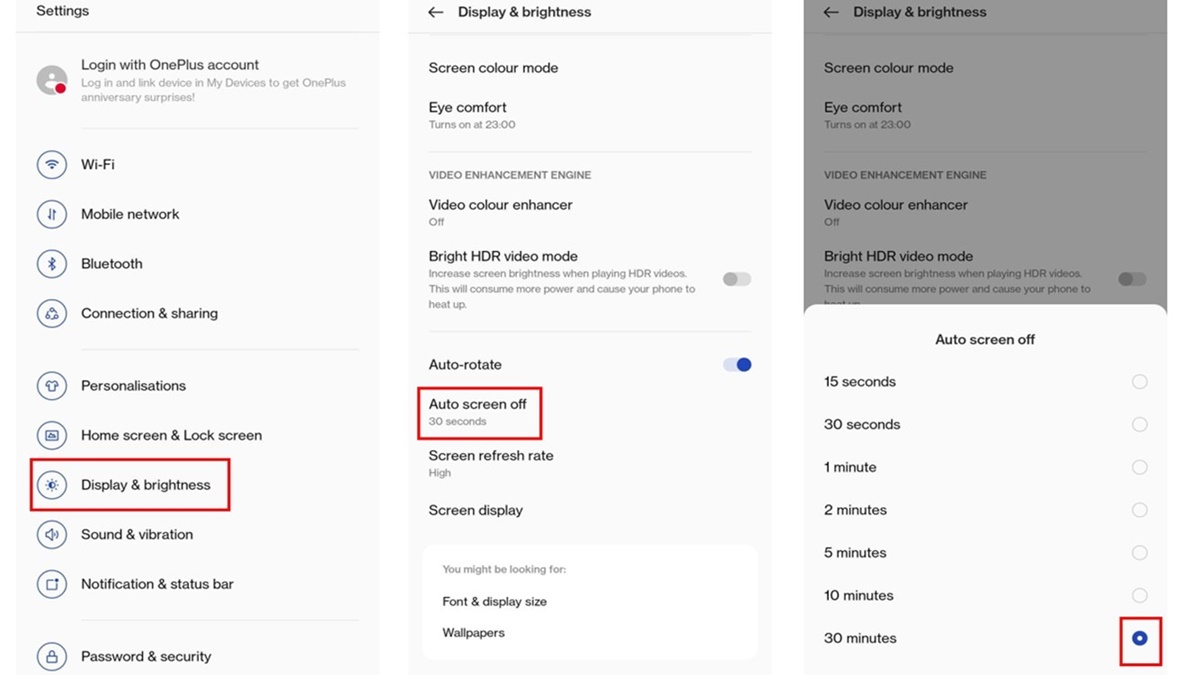
To change the screen timeout settings, follow these steps:
- Open the ‘Settings’ app on your Android device.
- Scroll down and select the ‘Display’ or ‘Display & Brightness’ option.
- Look for the ‘Screen timeout’ or ‘Sleep’ option. The name may vary depending on your device.
- Select the desired screen timeout duration. The available options typically range from 15 seconds to 30 minutes or ‘Never’.
- Once you’ve chosen your preferred screen timeout duration, exit the settings.
By increasing the screen timeout duration, you can ensure that your screen stays active for longer periods, giving you ample time to read, watch videos, or complete tasks without interruption. However, keep in mind that setting the duration to ‘Never’ may significantly drain your device’s battery life if left unattended.
While adjusting the screen timeout settings can be a quick and temporary solution, it may not be the ideal approach if you frequently need to keep the screen active for extended periods. In such cases, you may want to explore other options.
Using Developer options to keep the screen awake
For advanced users or those who have enabled Developer options on their Android device, an additional option exists to keep the screen awake. Developer options offer various settings and features that are not available in the standard settings menu.
To enable the ‘Stay Awake’ feature via Developer options, follow these steps:
- Open the ‘Settings’ app on your Android device.
- Scroll down and select the ‘About phone’ or ‘About device’ option.
- Look for the ‘Build number’ and tap on it multiple times (usually around seven times) until you see a message confirming that you are now a developer.
- Go back to the main settings menu and scroll down to find the newly unlocked ‘Developer options.’
- Tap on ‘Developer options’ and scroll through the list of settings until you find ‘Stay Awake’ or ‘Keep screen on while charging.’
- Toggle the switch to enable the feature. This will ensure that the screen stays on as long as the device remains connected to a power source.
Enabling the ‘Stay Awake’ feature in Developer options can be useful when you’re using your device while it’s charging or when you need to keep the screen active for an extended period. However, please note that this feature specifically keeps the screen on while charging, so it may not be suitable if you require the screen to stay awake while not charging.
Using Developer options to keep the screen awake provides more flexibility and control to advanced users. However, if you’re not comfortable with accessing Developer options or are looking for a more convenient solution, there are apps available specifically designed to keep your screen active. Let’s explore that next.
Using apps to keep the screen active
If you’re looking for a more convenient way to keep your Android screen active for extended periods, you can turn to specialized apps designed to prevent the screen from turning off. These apps offer additional features and customization options to suit your specific needs.
Here are a few popular apps that can help you keep the screen active:
- Keep Screen On: This simple yet powerful app allows you to easily toggle the screen timeout, keeping it on for as long as you need. You can enable the app’s functionality with just a single tap, and it provides a persistent notification that you can use to quickly disable or enable the screen timeout.
- Stay Alive!: Stay Alive! is another reliable app that can prevent your Android screen from turning off. It offers various methods to keep the screen active, including motion detection, touch detection, and proximity sensor. You can customize the app’s settings to suit your preferences and even set up specific applications where the screen should stay on.
- Screen On : With Screen On, you can easily configure your Android device to keep the screen awake when certain conditions are met, such as when charging, when a specific app is open, or when the device is in a specific position. The app offers a user-friendly interface and allows you to enable the screen on feature with just a few taps.
These apps provide a convenient way to keep your Android screen active without changing the system settings manually. They offer flexibility and customization options, allowing you to tailor the screen timeout to your specific requirements. Just be mindful of any potential impact on battery life, as keeping the screen active for too long can drain your device’s battery faster.
While using apps can be a handy solution, you may also consider setting up a Daydream screen saver or even creating a custom app to prevent screen lock. Let’s explore these options in the following sections.
Setting up a Daydream screen saver
If you want to keep your Android screen active in a visually pleasing way, setting up a Daydream screen saver can be a great option. Daydream is a feature available in Android that displays interactive animations or slideshows when your device is idle or charging.
To set up a Daydream screen saver, follow these steps:
- Open the ‘Settings’ app on your Android device.
- Scroll down and select the ‘Display’ or ‘Display & Brightness’ option.
- Look for the ‘Advanced’ or ‘Daydream’ option. The name may vary depending on your device.
- Select ‘Daydream’ from the list of options.
- Choose the Daydream mode you prefer, such as ‘Colors’ or ‘Photos.’
- Customize the settings for your chosen Daydream mode, such as selecting specific photos or setting the transition duration.
- Toggle the switch to enable Daydream.
Once you have set up the Daydream screen saver, your Android device will display the chosen animation or slideshow when it is idle or charging, preventing the screen from turning off while providing a visually engaging experience.
Keep in mind that using a Daydream screen saver may consume more battery power compared to regular screen timeout settings. You can adjust the Daydream settings to suit your preferences and balance the visual appeal with battery usage.
If setting up a Daydream screen saver doesn’t meet your requirements, you can explore creating a custom app to prevent screen lock. This option allows for more flexibility and control over screen behavior, as we’ll discuss next.
Creating a custom app to prevent screen lock
If you’re comfortable with a more advanced approach, you can create a custom app to prevent your Android device’s screen from locking. This option gives you complete control over the behavior of the screen and allows for more customization options.
Here’s a general overview of how you can create a custom app:
- Set up a development environment: Install Android Studio or any other preferred integrated development environment (IDE) for Android app development.
- Create a new project: Open your chosen IDE and create a new Android project.
- Add the necessary permissions: In the AndroidManifest.xml file, include the necessary permission to keep the screen on, such as the ‘WAKE_LOCK’ permission.
- Implement code logic: Write the code to keep the screen on throughout the app. This can be achieved by using the WindowManager.LayoutParams.FLAG_KEEP_SCREEN_ON flag or the PowerManager.WakeLock class.
- Customize additional functionality: Depending on your requirements, you can add additional features to your app, such as detecting user interaction to keep the screen on or implementing a timer to control screen lock behavior.
- Build and test the app: Build the app and test it on your Android device or emulator to ensure that the screen remains active as desired.
- Distribute the app (optional): If you want to share your custom app with others, you can distribute it through the Google Play Store or other app distribution channels.
Creating a custom app to prevent screen lock gives you the freedom to tailor the behavior of the screen to your specific needs. It requires some development skills and knowledge of the Android platform, but it provides the utmost control over screen timeout settings.
If you prefer a more user-friendly and customizable solution without delving into app development, you can explore the use of Tasker, a popular automation app for Android.
With Tasker, you can create custom profiles to control various aspects of your Android device, including screen timeout settings. Let’s explore how you can use Tasker to keep the screen on in the next section.
Using Tasker to keep the screen on
If you’re looking for a more user-friendly approach to keeping your Android screen on, Tasker is a powerful app that allows you to automate various tasks on your device, including controlling screen timeout settings.
Here’s how you can use Tasker to keep the screen on:
- Install and open the Tasker app from the Google Play Store.
- Create a new profile: Tap on the ‘+’ button to create a new profile.
- Select the desired trigger: Choose a trigger that indicates when you want the screen to stay on, such as when a specific app is open or when your device is connected to a power source.
- Add a task: Tap on the ‘+’ button to add a new task to the profile.
- Select ‘Display’ from the list of available categories.
- Choose the ‘Display Timeout’ action.
- Set the screen timeout duration: Enter the desired duration, or select ‘Never’ to prevent the screen from timing out.
- Save and activate the profile: Tap on the checkmark icon to save the profile, then activate it by toggling the switch next to the profile name.
With Tasker, you can create multiple profiles with different triggers and conditions to control when the screen should stay on. Additionally, you can customize other actions within tasks to create complex automation sequences based on your specific needs.
Tasker offers a wide range of possibilities for automating various tasks on your Android device, making it a versatile and convenient solution to keep the screen active without manual intervention.
Whether you choose to create a custom app, use Tasker, or explore other options discussed earlier, you now have several methods at your disposal to prevent your Android device’s screen from turning off. Choose the option that best suits your preferences and needs, and enjoy uninterrupted usage of your Android device.