
Checking the SIM Card Slot
Before you can insert a SIM card into your smartphone, it’s important to check the availability of a SIM card slot. Most smartphones today come with a dedicated SIM card slot, but some models may have a hybrid slot that can accommodate both a SIM card and a memory card. To begin, follow these steps to ensure your smartphone has a SIM card slot:
- Refer to the user manual: The user manual is a valuable resource that provides detailed information about your smartphone’s features and specifications. Look for a section dedicated to the SIM card slot and its location. If you don’t have the manual, you can often find downloadable versions on the manufacturer’s website.
- Visually inspect the smartphone: Examine the sides and edges of your smartphone to locate the SIM card slot. It is typically found on the top or side of the device, but the exact location may vary depending on the model.
- Check for a SIM card icon: On some smartphones, there may be a small icon or label near the SIM card slot indicating its location. Look for a symbol that resembles a SIM card or the letters “SIM.”
- Consult the manufacturer’s website or support: If you’re still unsure about the location of the SIM card slot, visit the manufacturer’s website or contact their support for assistance. They can provide specific instructions or even visual diagrams to help you find it.
Once you have confirmed the presence of a SIM card slot on your smartphone, you can proceed to the next steps to prepare the SIM card for insertion.
Preparing the SIM Card
Before inserting the SIM card into your smartphone, it’s essential to prepare the card properly. Follow these steps to ensure the SIM card is ready for insertion:
- Turn off the smartphone: Power off your smartphone completely to avoid any potential damage to the device or the SIM card during the preparation process.
- Gather necessary tools: To handle the SIM card, you may need a SIM eject tool or a small paperclip. These tools are often provided with the smartphone or can be obtained separately.
- Inspect the SIM card: Take a close look at the SIM card to check for any visible damage, such as scratches or bends. If you notice any issues, it’s advisable to get a replacement SIM card from your mobile service provider.
- Unlock the SIM card: Some SIM cards are locked with a PIN or PUK (Personal Unblocking Key) code to protect user data. Make sure you know the PIN or PUK code for your SIM card. If you have forgotten it, contact your mobile service provider for assistance.
- Remove the protective casing: If your SIM card is covered by a protective casing or sticker, gently remove it before inserting it into the smartphone. This will prevent any interference with the proper insertion and functioning of the SIM card.
By following these steps, you will ensure that your SIM card is in optimal condition and ready to be inserted into your smartphone. Once the SIM card has been prepared, you can move on to the next steps of the insertion process.
Powering Off the Smartphone
Before inserting or removing a SIM card from your smartphone, it’s crucial to power off the device to avoid any potential damage or data loss. Follow these steps to power off your smartphone safely:
- Save and close any open apps: Make sure to save any important work or data and close all open applications before powering off your smartphone. This will prevent any unsaved changes or data loss.
- Press and hold the power button: Locate the power button on your smartphone, typically located on the side of the device or along the top edge. Press and hold the power button until the power options menu appears on the screen.
- Select “Power off” or “Shut down”: On the power options menu, you should see an option to power off or shut down your smartphone. Tap on this option to initiate the shutdown process.
- Confirm the power off: Some smartphones may require you to confirm the power off action. If prompted, select “OK” or a similar confirmation button to proceed.
- Wait for the device to power off: Your smartphone will now begin the shut down process. Wait for a few seconds for the device to completely power off before proceeding further.
It’s essential to ensure that your smartphone is powered off before proceeding with the SIM card insertion or removal process. Failure to do so may result in damage to your device or the SIM card itself. Once you have powered off your smartphone, you can proceed to locate the SIM card slot on your device.
Locating the SIM Card Slot
Once you have powered off your smartphone, the next step is to locate the SIM card slot. Follow these steps to find the SIM card slot on your device:
- Refer to the user manual: If you are unsure about the exact location of the SIM card slot, refer to the user manual that came with your smartphone. The manual will provide detailed instructions on where to find the SIM card slot.
- Inspect the exterior: Take a close look at the sides and edges of your smartphone. Look for a small tray or slot with a slot-shaped opening or a removable cover.
- Check for labels or icons: Some smartphones have labels or icons near the SIM card slot to indicate its location. Look for symbols such as “SIM” or a picture of a SIM card.
- Search online: If you are unable to locate the SIM card slot using the above steps, you can search online for your specific smartphone model. Many manufacturers provide visual guides and videos to help users find the SIM card slot.
It’s important to locate the SIM card slot before proceeding with the insertion process. Different smartphone models may have the SIM card slot located in different places, so be sure to follow the specific instructions for your device. Once you have found the SIM card slot, you can proceed to the next steps of removing the SIM card tray.
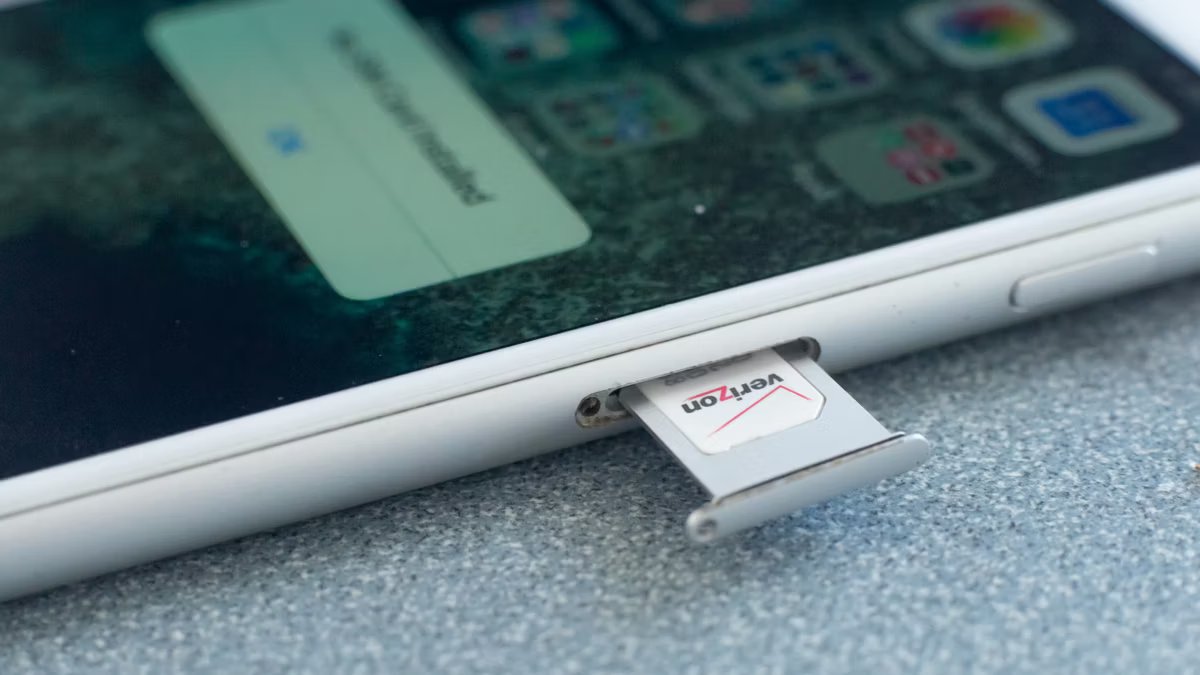
Removing the SIM Card Tray
Once you have located the SIM card slot on your smartphone, the next step is to remove the SIM card tray. Follow these steps to successfully remove the SIM card tray:
- Locate the SIM card eject tool: Most smartphones come with a SIM card eject tool included in the packaging. If you don’t have the eject tool, you can use a small paperclip or a thin, pointed object.
- Identify the SIM card tray: The SIM card tray is a small tray located next to or near the SIM card slot. It is usually made of plastic or metal and has a small hole on one side.
- Insert the eject tool: Insert the SIM card eject tool or the end of a paperclip into the small hole on the SIM card tray. Apply gentle pressure until the tray pops out slightly.
- Remove the SIM card tray: Once the tray has popped out, gently pull it out of the smartphone. Be careful not to force it or apply excessive pressure to avoid damaging the tray or the device.
- Set the SIM card tray aside: Place the SIM card tray in a safe location to prevent it from getting lost or damaged. Remember to keep it within reach for when you need to reinsert the SIM card.
By following these steps, you will be able to successfully remove the SIM card tray from your smartphone. The SIM card tray holds the SIM card securely, and removing it will allow you to insert or replace the SIM card. With the SIM card tray removed, you can now proceed to the next steps of orienting and inserting the SIM card.
Orienting the SIM Card
Before inserting the SIM card into your smartphone, it’s important to orient it correctly to ensure proper compatibility and functioning. Follow these steps to orient your SIM card correctly:
- Inspect the SIM card: Take a moment to examine the SIM card. Notice that one corner of the SIM card is usually cut off diagonally or has a notch. This corner is called the “chamfered corner.” It helps you determine the correct orientation of the SIM card.
- Align the chamfered corner: Hold the SIM card between your thumb and index finger, making sure the chamfered corner is in the top-left or bottom-right corner, depending on the specific orientation required by your smartphone.
- Check for a notch or guide on the SIM card tray: Sometimes, the SIM card tray may have a small notch or guide that matches the chamfered corner of the SIM card. Align the chamfered corner of the SIM card with the corresponding notch or guide on the tray.
- Ensure the connection pins are facing down: Take a careful look at the underside of the SIM card. You will see a set of small metal contact pins that connect with the SIM card slot. Make sure these pins are facing downward when you insert the SIM card.
By orienting the SIM card correctly, you ensure that it fits securely into the SIM card tray and aligns with the corresponding contacts in the SIM card slot. This proper orientation is crucial for the smartphone to recognize the SIM card and establish a connection with the network. Once you have oriented the SIM card correctly, you can proceed to the next step of inserting the SIM card into the smartphone.
Inserting the SIM Card
Now that you have prepared and oriented the SIM card correctly, it’s time to insert it into your smartphone. Follow these steps to insert the SIM card:
- Locate the SIM card slot: Using the information from the previous steps, locate the SIM card slot on your smartphone. It is usually located on the side, top, or bottom of the device.
- Gently insert the SIM card tray: Take the SIM card tray that you removed earlier and align it with the SIM card slot. Insert the tray back into the slot, ensuring that it fits securely and there are no obstructions.
- Push the tray all the way in: Use your finger to gently push the SIM card tray back into the smartphone until it is fully inserted. Make sure it goes in smoothly and sits flush with the device’s frame.
- Power on the smartphone: Now that the SIM card is inserted, you can power on your smartphone. Press and hold the power button until the device turns on and the screen comes to life.
By following these steps, you have successfully inserted the SIM card into your smartphone. The SIM card tray securely holds the SIM card in place, allowing the device to establish a connection with the mobile network. Once your smartphone is powered on, proceed to check for SIM card recognition and ensure everything is working properly.
Returning the SIM Card Tray
Once you have checked the SIM card recognition and ensured that everything is working properly, it’s time to return the SIM card tray to its original position. Follow these steps to safely return the SIM card tray:
- Power off the smartphone: Before returning the SIM card tray, power off your smartphone. This precaution will prevent any accidental damage to the device or the SIM card.
- Remove the SIM card tray again: Gently eject the SIM card tray from the smartphone using the SIM card eject tool or a paperclip. Take care not to force it and avoid bending or damaging the tray.
- Inspect the SIM card: While the SIM card tray is removed, take a moment to inspect the SIM card to ensure it is still in good condition. Look for any signs of damage, such as scratches or dents.
- Align the SIM card tray: Hold the SIM card tray between your fingers and align it with the correct orientation. The chamfered corner of the tray, which matches the chamfered corner of the SIM card, should be in the same position as before.
- Insert the SIM card tray: Carefully slide the SIM card tray back into the designated slot on the smartphone. Make sure it goes in smoothly and sits flush with the device’s frame.
Returning the SIM card tray properly ensures that the SIM card remains securely in place and maintains a stable connection with the mobile network. Once the tray is inserted, power on your smartphone and check for SIM card recognition again to confirm that everything is back to normal.
Powering On the Smartphone
After you have successfully returned the SIM card tray to its original position, it’s time to power on your smartphone. Follow these steps to power on your device:
- Ensure the SIM card tray is securely inserted: Double-check that the SIM card tray is properly inserted into the smartphone. Give it a gentle push to ensure it is fully seated and sits flush with the device’s frame.
- Press and hold the power button: Locate the power button on your smartphone, usually located on the side or top of the device. Press and hold the power button until you see the device powering on.
- Wait for the startup process: After powering on your smartphone, you will see the manufacturer’s logo appearing on the screen. Wait patiently as your device goes through the startup process.
- Enter your lock screen credentials: Once the startup process is complete, you will be prompted to enter your lock screen credentials, such as a PIN code, password, or fingerprint. Follow the on-screen instructions to unlock your device.
By following these steps, you will be able to power on your smartphone smoothly and securely. After successfully powering on, your device should recognize the SIM card and establish a connection with the mobile network. Proceed to check for SIM card recognition and ensure that you have a stable connection for making calls, sending messages, and accessing mobile data.
Checking for SIM Card Recognition
After powering on your smartphone and inserting the SIM card, it’s important to check if your device recognizes the SIM card. Follow these steps to verify SIM card recognition:
- Unlock your smartphone: Enter your lock screen credentials, such as a PIN code, password, or fingerprint, to access your device’s home screen.
- Look for network signal bars: On the top or bottom of your smartphone’s screen, you should see network signal bars indicating the strength of the mobile network connection. If you see signal bars, it means your device has successfully recognized the SIM card and established a network connection.
- Make a test call: Dial a test number or contact from your smartphone to check if you can make a call successfully. If the call goes through, it confirms that your SIM card is recognized, and the voice calling feature is functioning correctly.
- Test mobile data connectivity: Open a web browser or any app that requires an internet connection to test the mobile data connectivity of your smartphone. If you can access the internet or use data-based apps, it indicates that your SIM card is recognized, and the mobile data feature is working as expected.
- Check for text messages: Send a test text message to another device or receive a text message from someone. If you can send and receive text messages, it indicates that your SIM card is recognized, and the messaging functionality is operational.
By following these steps, you can ensure that your smartphone properly recognizes the SIM card. If you encounter any issues with SIM card recognition or any of the mentioned functionalities, double-check the SIM card orientation, try reinserting the SIM card, or contact your mobile service provider for further assistance.
Troubleshooting SIM Card Issues
If you are experiencing difficulties with your SIM card, there are several troubleshooting steps you can take to resolve the issue. Follow these steps to troubleshoot SIM card problems:
- Check for SIM card damage: Inspect the SIM card for any signs of physical damage, such as scratches, dents, or bent pins. If you notice any damage, it may be necessary to obtain a replacement SIM card from your mobile service provider.
- Reinsert the SIM card: Remove the SIM card from your smartphone and reinsert it, ensuring that it is securely inserted in the SIM card slot. Sometimes, a loose connection can result in SIM card recognition issues.
- Restart your smartphone: Power off your device, remove the SIM card, wait for a few seconds, and then reinsert the SIM card and power on your smartphone again. Restarting your device can help refresh the system and resolve temporary software glitches.
- Try a different device: If you have access to another unlocked device, try inserting your SIM card into that device to see if it recognizes the SIM card. This will help determine if the issue lies with the SIM card or your smartphone.
- Check SIM card compatibility: Ensure that your smartphone is compatible with your SIM card’s network technology (e.g., GSM, CDMA, LTE). Incompatible network technologies can lead to SIM card recognition problems.
- Contact your mobile service provider: If none of the above steps resolve the issue, reach out to your mobile service provider for further assistance. They will have the necessary tools and knowledge to help troubleshoot and resolve SIM card-related problems.
By following these troubleshooting steps, you can effectively identify and address SIM card issues. Remember to always handle the SIM card with care and ensure that it is properly inserted in the SIM card slot. If the problem persists, seek professional assistance from your mobile service provider or a qualified technician.