
What is Trezor and why is it important for Ethereum?
When it comes to securely storing and managing cryptocurrencies like Ethereum, the importance of having a reliable hardware wallet cannot be overstated. Enter Trezor – a leading provider of hardware wallets that offers advanced security features to protect your digital assets.
Trezor is a small, handheld device that connects to your computer or smartphone via a USB or Bluetooth connection. It is specifically designed to store your private keys offline, away from potentially vulnerable online environments. With its robust security measures, Trezor ensures that your Ethereum funds are protected against theft or unauthorized access.
One of the main reasons why Trezor is crucial for Ethereum enthusiasts and investors is its ability to safeguard your private keys. Your private key is a complex alphanumeric code that is required to access and manage your Ethereum funds. If this key falls into the wrong hands, your funds can be easily stolen or compromised.
Unlike software wallets or online exchanges, which are susceptible to hacking and phishing attacks, Trezor keeps your private keys offline and securely stored within the device. This offline storage, commonly known as “cold storage,” provides an additional layer of protection against potential security breaches.
Furthermore, Trezor employs a variety of security features to ensure the integrity and authenticity of your transactions. It uses a secure element chip to encrypt and store your private keys, making it nearly impossible for hackers to gain unauthorized access. Additionally, Trezor incorporates a PIN code system and employs a passphrase feature to further enhance the security of your funds.
By utilizing a Trezor hardware wallet for Ethereum, you can confidently manage your digital assets without worrying about the risks associated with online wallets or exchanges. Whether you are a long-term Ethereum holder or an active trader, Trezor provides a safe and convenient solution for storing and accessing your funds.
With the ever-increasing popularity of Ethereum and the rise in cyber threats, it is crucial to prioritize the security of your digital assets. Trezor offers a reliable and user-friendly solution that ensures your Ethereum funds remain protected and accessible only to you.
Setting up your Trezor device for Ethereum
Setting up your Trezor device for Ethereum is a straightforward process that allows you to securely manage your Ethereum funds. Follow these simple steps to get started:
- Connect your Trezor device to your computer or smartphone using the provided USB cable.
- Visit the official Trezor website and download the Trezor Bridge software, if necessary. This software allows your device to communicate with the Ethereum wallet interface.
- Install the Trezor Bridge software on your computer and follow the on-screen instructions to complete the installation.
- Once the software installation is complete, open your preferred web browser and navigate to the Trezor Wallet website.
- Click on the “Get Started” button and select the option to set up a new device.
- Choose a suitable PIN code for your Trezor device. Make sure to select a PIN code that is unique and not easily guessable.
- Follow the instructions displayed on the device’s screen to confirm and verify your PIN code.
- Next, you will be presented with a recovery seed. This seed is a randomly generated series of words that serve as a backup of your device’s private keys. It is crucial to write down this seed and keep it in a safe and secret location.
- Enter the words of the recovery seed in the correct order to verify that you have correctly noted them down. This step ensures that you have a valid backup in case your device is lost or damaged.
- After verifying the recovery seed, you will be prompted to install the Trezor Ethereum wallet firmware. Follow the on-screen instructions to complete this process.
- Once the firmware installation is complete, you can access your Ethereum wallet on your Trezor device.
With your Trezor device successfully set up for Ethereum, you can now securely store, send, and receive your Ethereum funds. Remember to always use your Trezor device when accessing your Ethereum wallet to ensure maximum security and protection against potential threats.
Accessing your Ethereum wallet on Trezor
Once you have successfully set up your Trezor device for Ethereum, you can easily access your Ethereum wallet and manage your funds securely. Follow these steps to access your Ethereum wallet on Trezor:
- Connect your Trezor device to your computer or smartphone using the provided USB cable.
- Open your preferred web browser and navigate to the Trezor Wallet website.
- Click on the “Connect Trezor” button to establish a connection between your device and the wallet interface.
- Enter your PIN code on the Trezor device when prompted, ensuring that it matches the one you set during the initial setup.
- After successfully entering your PIN code, you will see a list of supported cryptocurrencies. Select Ethereum from the list.
- On the Trezor device, confirm the action by pressing the corresponding button.
- The Trezor wallet interface will now display your Ethereum wallet balance and transaction history.
- You can now send and receive Ethereum by following the respective options provided in the wallet interface.
It’s important to note that whenever you want to access your Ethereum wallet on Trezor, you must connect the device and verify your PIN code. This ensures that your funds are protected by the highest security standards.
The Trezor wallet interface also provides additional options for managing your Ethereum funds. You can view your transaction history, check the status of pending transactions, and configure various settings to customize your wallet experience.
If you need to access your Ethereum wallet from another device, simply connect your Trezor and follow the same steps outlined above. Your wallet is not tied to a specific device, allowing you to securely manage your funds from any compatible device with internet access.
By accessing your Ethereum wallet on Trezor, you can have peace of mind knowing that your funds are safe from potential security threats and unauthorized access. Use this secure platform to effectively manage your Ethereum holdings and carry out transactions with confidence.
How to generate a private key for Ethereum on Trezor
Generating a private key for Ethereum on your Trezor device is a crucial step in securing your Ethereum funds. Follow these steps to generate a private key for Ethereum on Trezor:
- Connect your Trezor device to your computer or smartphone using the provided USB cable.
- Open your preferred web browser and navigate to the Trezor Wallet website.
- Click on the “Connect Trezor” button to establish a connection between your device and the wallet interface.
- Enter your PIN code on the Trezor device when prompted, ensuring that it matches the one you set during the initial setup.
- After successfully entering your PIN code, select Ethereum from the list of supported cryptocurrencies.
- On the Trezor device, navigate to the Ethereum wallet option and confirm the action.
- Next, click on the “Receive” tab in the Ethereum wallet interface to generate a new Ethereum address.
- On the Trezor device, verify and confirm the address displayed on the screen.
- The Trezor device will generate a new private key corresponding to the Ethereum address you just created.
- Make sure to keep your private key secure and never share it with anyone. Trezor stores your private keys offline, providing an extra layer of protection.
By following these steps, you have successfully generated a private key for your Ethereum on your Trezor device. Your private key is a critical piece of information that allows you to access and manage your Ethereum funds securely.
It is important to note that, in addition to the generated private key, your Trezor device also generates a recovery seed during the initial setup process. This seed serves as a backup of your private keys and is essential for recovering your funds in case your device is lost, stolen, or damaged.
Remember to always double-check the address generated by your Trezor device before sharing it with others for receiving funds. This ensures that the address matches the one displayed on your Trezor device, preventing any potential errors or security breaches.
Generating a private key for Ethereum on your Trezor device offers peace of mind, knowing that your funds are secure and protected from unauthorized access. Take advantage of this advanced security feature to safeguard your Ethereum holdings in the ever-evolving world of digital assets.
Ensuring the security of your private key on Trezor
When it comes to the security of your Ethereum private key, your Trezor device plays a crucial role in keeping your funds safe. Here are some important tips to ensure the security of your private key on Trezor:
1. Keep your Trezor firmware up to date: Regularly check for firmware updates for your Trezor device and install them promptly. Firmware updates often include security enhancements and bug fixes, ensuring the ongoing protection of your private keys.
2. Set a strong PIN code: Choose a PIN code for your Trezor device that is unique and difficult to guess. Avoid using easily guessable combinations like birth dates or sequential numbers. A strong PIN code adds an extra layer of protection against unauthorized access to your private keys.
3. Enable the passphrase feature: Trezor offers an additional security feature called the passphrase feature. By enabling this feature, you can create an extra layer of protection for your funds. Make sure to choose a strong and memorable passphrase, and never share it with anyone.
4. Enable the lock feature: The lock feature allows your Trezor device to automatically lock itself after a specific period of inactivity. This prevents unauthorized access to your private keys in case your device is left unattended or misplaced.
5. Use the official Trezor wallet interface: When accessing and managing your Ethereum funds, always use the official Trezor wallet interface. Avoid using third-party wallet providers or unofficial applications, as they may compromise the security of your private keys.
6. Keep your recovery seed offline: The recovery seed generated by your Trezor device is a crucial backup of your private keys. Write down the recovery seed and keep it offline in a safe and secure location. Protect it from potential physical damage or unauthorized access.
7. Be cautious of phishing attempts: Be vigilant of phishing attempts that may try to trick you into revealing your private key or recovery seed. Always double-check the URL of the website you are visiting and never enter your private key or recovery seed in any untrusted source.
8. Verify addresses on your Trezor device: When sending or receiving Ethereum funds, always verify the address displayed on your Trezor device. This ensures that you are sending or receiving funds to the correct address and minimizes the risk of fraudulent transactions.
Following these security measures will help ensure the safety of your Ethereum private key stored on your Trezor device. By taking proactive steps to protect your private keys, you can have peace of mind knowing that your funds are secure and inaccessible to unauthorized individuals.
Backing up and restoring your Ethereum private key on Trezor
Backing up and restoring your Ethereum private key is a critical step to ensure the safety and accessibility of your funds. Trezor provides a reliable backup and recovery process, allowing you to protect your Ethereum private key. Follow these steps to back up and restore your Ethereum private key on Trezor:
Backing up your Ethereum private key:
- Connect your Trezor device to your computer or smartphone using the provided USB cable.
- Open the Trezor Wallet website and enter your PIN code when prompted.
- In the wallet interface, click on the “Settings” tab and select the “Backup” option.
- Follow the on-screen instructions to enter your PIN code and display the recovery seed on your Trezor device.
- Write down the recovery seed on a piece of paper or other physical medium. Make sure to write it down in the exact order and keep it in a secure location.
- Confirm the recovery seed on your Trezor device to ensure that it has been correctly noted down.
Restoring your Ethereum private key:
- If you need to restore your Ethereum private key, connect your Trezor device to your computer or smartphone.
- Open the Trezor Wallet website and enter your PIN code when prompted.
- Click on the “Recover Wallet” option and enter the recovery seed in the correct order.
- Follow the on-screen instructions to complete the recovery process.
- Once the recovery is complete, your Ethereum private key will be restored on your Trezor device, allowing you to access your funds.
Backing up and restoring your Ethereum private key is crucial to ensure that you can recover your funds in the event of a lost, stolen, or damaged device. The recovery seed serves as a backup of your private keys, and it should be kept offline in a secure location that is accessible only to you.
It is important to note that once your private key is restored on a new Trezor device, the old device will no longer have access to your funds. This ensures that even if your old device falls into the wrong hands, your funds remain secure on the new device.
By regularly backing up and securely storing your recovery seed, you can have peace of mind knowing that you have a failsafe solution to recover your Ethereum private key and access your funds when needed.
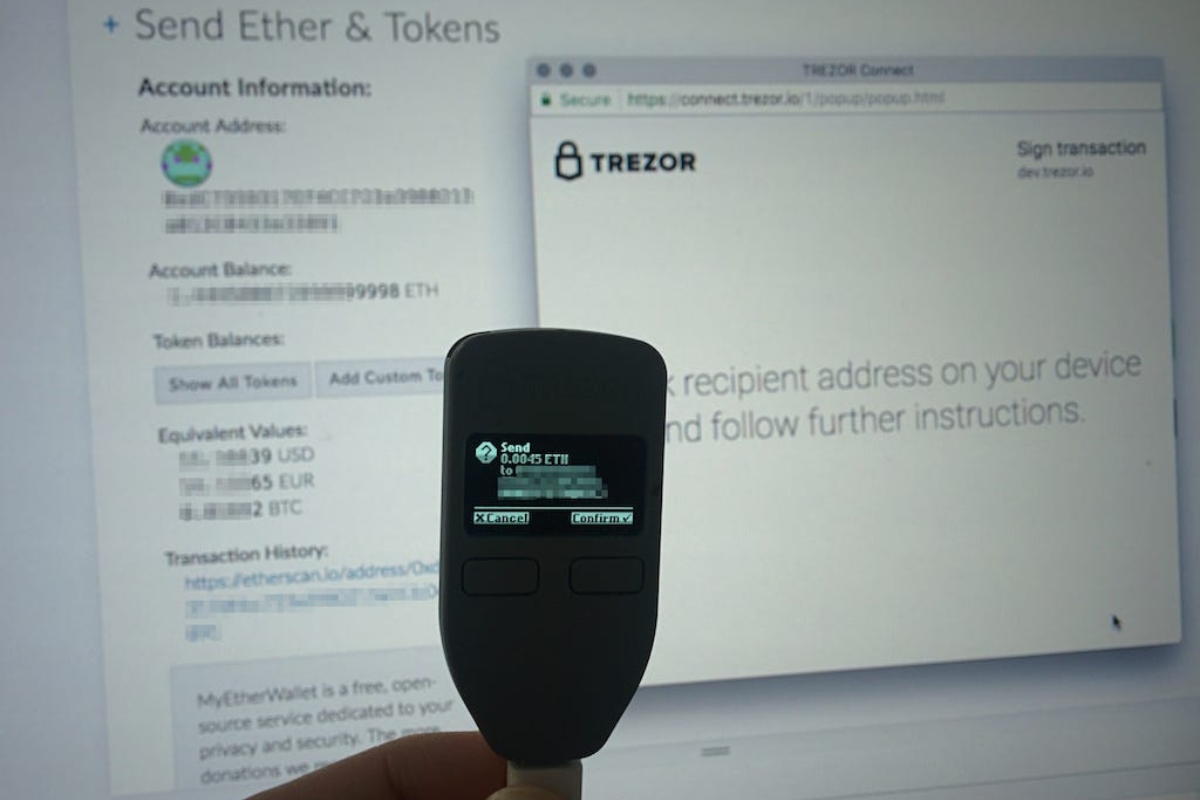
Transferring funds using your private key on Trezor
When it comes to managing your Ethereum funds, Trezor provides a secure and convenient way to transfer funds using your private key. Follow these steps to transfer funds using your private key on Trezor:
- Connect your Trezor device to your computer or smartphone using the provided USB cable.
- Open the Trezor Wallet website and enter your PIN code when prompted.
- In the wallet interface, navigate to the Ethereum wallet section.
- Click on the “Send” tab to initiate a new transaction.
- Enter the recipient’s Ethereum address in the designated field. Make sure to double-check the address to avoid any errors.
- Specify the amount of Ethereum you want to transfer.
- Review the details of the transaction and ensure that everything is accurate.
- On your Trezor device, confirm the transaction by verifying the details displayed on the screen.
- Once the transaction is confirmed, Trezor will sign the transaction using your private key, ensuring its authenticity and security.
- Wait for the transaction to be confirmed on the Ethereum network. This process may take a few minutes, depending on network congestion.
- Once the transaction is confirmed, the recipient will receive the transferred Ethereum funds.
Transferring funds using your private key on Trezor ensures a high level of security and protection for your Ethereum funds. By keeping your private key offline and stored within your Trezor device, you minimize the risk of unauthorized access or potential security breaches.
It’s important to review the transaction details carefully before confirming. This includes double-checking the recipient’s address, the amount you wish to transfer, and any transaction fees involved. Taking these precautions helps to prevent any errors that may result in the loss of your funds.
During periods of high network congestion, it’s worth noting that transaction processing times may be longer than usual. Be patient and allow sufficient time for the transaction to be confirmed on the Ethereum network.
By utilizing your private key and Trezor’s secure environment, you can confidently transfer your Ethereum funds while maintaining the highest level of security for your digital assets.