
What Does ‘iPhone Is Disabled’ Mean?
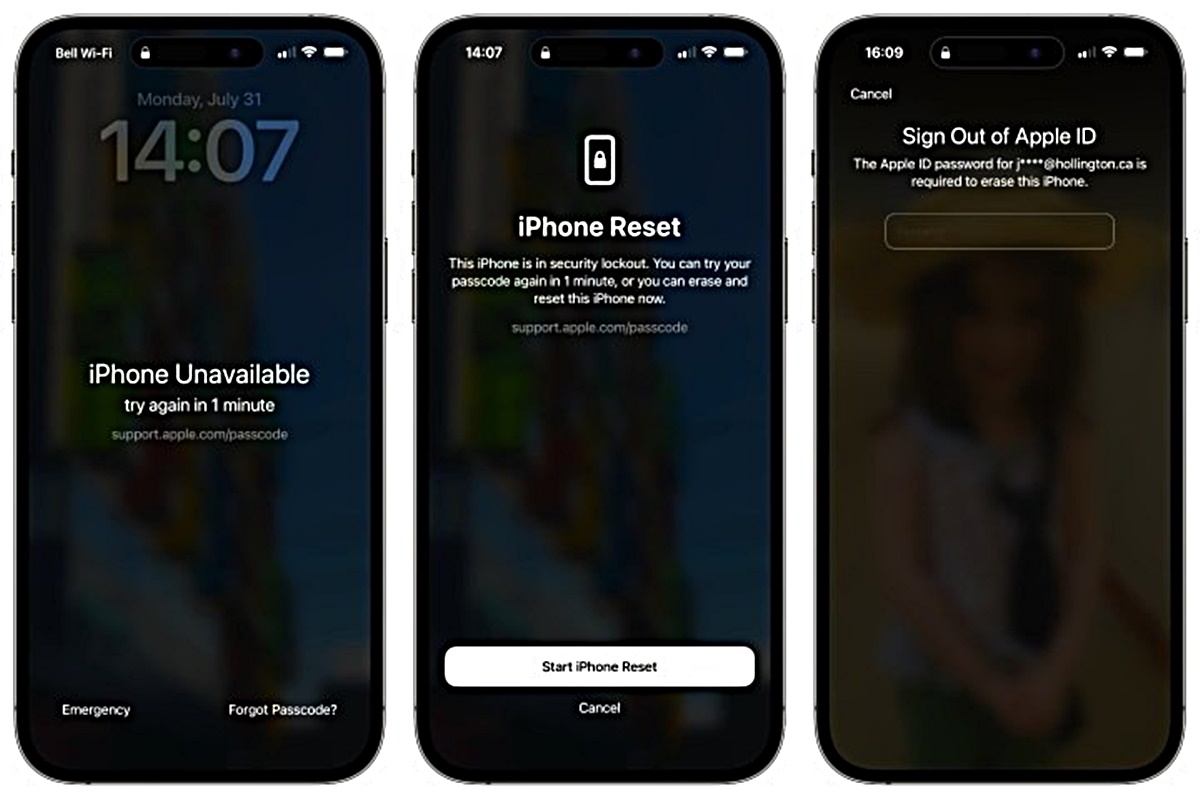
Have you ever encountered the dreaded message on your iPhone that says, “iPhone is disabled”? This error usually occurs when you enter the wrong passcode multiple times, rendering your iPhone temporarily unusable. When your iPhone is disabled, you will see a message on the screen informing you that you need to connect to iTunes to fix the issue.
The ‘iPhone is disabled’ error is a security feature designed to protect your device and data from unauthorized access. It acts as a safeguard against brute-force attacks where someone tries to guess your passcode repeatedly to gain access to your iPhone. When too many incorrect passcode attempts are made, your iPhone automatically disables itself to prevent further unauthorized access.
The message stating that your iPhone is disabled also includes a timeframe for how long the device will be disabled. It could be anywhere from a few minutes to several hours, depending on the number of unsuccessful passcode attempts and your device’s specific settings.
It’s important to note that if you see the message “iPhone is disabled, connect to iTunes,” it means that the only way to resolve this issue is to connect your iPhone to a computer and use iTunes to restore it. This process will erase all of your data, so it’s crucial to have a recent backup before attempting to fix the ‘iPhone is disabled’ error.
In the next sections, we will explore different methods to fix the ‘iPhone is disabled’ error using iTunes, iCloud, recovery mode, and a third-party tool called 4uKey. Depending on your situation and preferences, you can choose the method that works best for you.
Why Did My iPhone Get Disabled?
There are several reasons why your iPhone may become disabled. Understanding these reasons can help you avoid this frustrating situation in the future.
The most common reason for an iPhone to become disabled is entering the wrong passcode multiple times. When you repeatedly enter an incorrect passcode, your iPhone interprets it as an attempt to gain unauthorized access, triggering the disabled state. This serves as a security measure to protect your personal information and data.
Children or other individuals who are unfamiliar with your iPhone’s passcode may unknowingly enter incorrect codes, leading to the device becoming disabled. It’s essential to educate those who have access to your device about the importance of entering the correct passcode to prevent this issue.
Another reason for an iPhone to be disabled is if it has been stolen or lost. In such cases, it’s vital to promptly report the situation to the authorities and your mobile carrier. By doing so, they can help track the device or take necessary steps to ensure the safety of your information.
In some instances, an iPhone might get disabled due to a software glitch or malfunction. This can occur if there is a problem with the iOS system or if an update or installation goes wrong. In such cases, a hard reset or restoring the device using iTunes may be necessary to resolve the issue.
It’s worth noting that enabling the “Erase Data” feature on your iPhone can also contribute to the device being disabled. This feature is designed to erase all data on your iPhone after ten incorrect passcode attempts. If you accidentally trigger this feature, your iPhone will become disabled, and you’ll need to restore it using iTunes.
To avoid your iPhone getting disabled, it’s essential to use a passcode that is easy to remember but difficult for others to guess. Additionally, be cautious when allowing others to access your device or when handing it over to children, ensuring they understand the importance of entering the correct passcode.
By being proactive and diligent with passcode security and device usage, you can minimize the risk of your iPhone becoming disabled and the inconvenience that comes with it.
How to Fix ‘iPhone Is Disabled’ Error Using iTunes
If you see the message “iPhone is disabled, connect to iTunes,” you can use iTunes to fix the issue. This method requires a computer with the latest version of iTunes installed and a USB cable to connect your iPhone.
Here’s how you can fix the ‘iPhone is disabled’ error using iTunes:
- Connect your iPhone to the computer using the USB cable.
- Launch iTunes on your computer. If prompted, enter your iPhone passcode or choose to Trust This Computer on your iPhone if you haven’t connected it to this computer before.
- Once your iPhone is recognized by iTunes, select your device from the list of available devices.
- In the Summary panel, you will find the option to Restore iPhone. Click on this option.
- Follow the on-screen instructions to confirm the restoration process. This will erase all data on your iPhone and install the latest version of iOS.
- Wait for the restoration process to complete. Your iPhone will restart and display the setup screen.
- Set up your iPhone as a new device or restore it from a previous backup if you have one available.
By using iTunes to restore your iPhone, you can fix the ‘iPhone is disabled’ error and regain access to your device. However, keep in mind that this method erases all data, so it’s crucial to have a recent backup to restore your data after the process is complete.
If you don’t have access to a computer or prefer a different method, you can also try fixing the ‘iPhone is disabled’ error using iCloud or recovery mode. These methods offer alternative solutions that might be more suitable for your situation.
How to Fix ‘iPhone Is Disabled’ Error Using iCloud
If you have enabled the Find My iPhone feature and have access to another Apple device with iCloud, you can use iCloud to fix the ‘iPhone is disabled’ error. This method allows you to erase your iPhone remotely and restore it from a previous backup.
Here’s how you can fix the ‘iPhone is disabled’ error using iCloud:
- Open a web browser on any device and visit the iCloud website (www.icloud.com).
- Sign in to your iCloud account using your Apple ID and password.
- Once you are logged in, click on the Find iPhone icon.
- On the Find My iPhone page, click on All Devices at the top and select your disabled iPhone from the list.
- In the device’s summary, click on the Erase iPhone option.
- Confirm the erasure by following the on-screen prompts. This will erase all data on your iPhone and restore it to factory settings.
- Once the erasure is complete, you can set up your iPhone as a new device or restore it from a previous backup.
Using iCloud to fix the ‘iPhone is disabled’ error requires an active internet connection and the Find My iPhone feature enabled on your device. The Erase iPhone option remotely deletes the data and settings on your iPhone, allowing you to start fresh.
Remember, this method will erase all data on your iPhone, so it’s important to have a recent backup available to restore your information after the process is complete. If you don’t have access to another Apple device or prefer an alternative method, you can also try fixing the ‘iPhone is disabled’ error using iTunes or recovery mode.
How to Fix ‘iPhone Is Disabled’ Error Using Recovery Mode
If you are unable to fix the ‘iPhone is disabled’ error using iTunes or iCloud, you can try using recovery mode. Recovery mode allows you to restore your iPhone to factory settings and resolve the issue.
Here’s how you can fix the ‘iPhone is disabled’ error using recovery mode:
- Connect your iPhone to the computer using a USB cable.
- Launch iTunes on your computer. If it’s already open, close and reopen it to ensure it recognizes your iPhone.
- Put your iPhone into recovery mode by following the specific steps depending on your iPhone model:
– For iPhone 8 or later: Quickly press and release the Volume Up button. Then quickly press and release the Volume Down button. Finally, press and hold the Side button until the recovery mode screen appears.
– For iPhone 7 and 7 Plus: Press and hold the Side (or Top) button and Volume Down button simultaneously until the recovery mode screen appears.
– For iPhone 6s and earlier, including iPhone SE (1st generation): Press and hold the Home button and the Side (or Top) button simultaneously until the recovery mode screen appears. - Once your iPhone is in recovery mode, a prompt will appear in iTunes, asking if you want to Restore or Update your device. Click on the Restore button.
- Follow the on-screen instructions to complete the restoration process. This will erase all data on your iPhone and install the latest version of iOS.
- Wait for the restoration process to complete. Your iPhone will restart and display the setup screen.
- Set up your iPhone as a new device or restore it from a previous backup if you have one available.
By using recovery mode, you can fix the ‘iPhone is disabled’ error and regain access to your device. However, keep in mind that this method erases all data, so it’s crucial to have a recent backup to restore your data after the process is complete.
If none of the previous methods work or if you prefer a different approach, you can also try using a third-party tool called 4uKey to fix the ‘iPhone is disabled’ error.
How to Fix ‘iPhone Is Disabled’ Error with 4uKey
If you’re unable to fix the ‘iPhone is disabled’ error using iTunes, iCloud, or recovery mode, you can try using a third-party tool called 4uKey. 4uKey is a powerful software that can help you bypass the disabled screen on your iPhone and regain access without the need to erase your data.
Here’s how you can fix the ‘iPhone is disabled’ error with 4uKey:
- Download and install 4uKey on your computer.
- Launch 4uKey and connect your disabled iPhone to the computer using a USB cable.
- Once your iPhone is detected by 4uKey, click on the ‘Start’ button to begin the unlocking process.
- Follow the on-screen instructions provided by 4uKey to enter recovery mode or DFU mode.
- 4uKey will verify and download the latest firmware package for your iPhone.
- After the firmware package is downloaded, click on the ‘Unlock Now’ button to start removing the disabled screen.
- Wait for 4uKey to complete the unlocking process. Your iPhone will restart, and the ‘iPhone is disabled’ error will be resolved.
By using 4uKey, you can quickly and effectively fix the ‘iPhone is disabled’ error without losing your data. However, it’s important to note that using third-party software carries some risks, so it’s best to proceed with caution and ensure you download 4uKey from a trusted source.
It’s worth mentioning that 4uKey works well for most iPhone models and iOS versions, but there might be some exceptions or limitations depending on your specific device and situation. Therefore, it’s a good practice to consult the official website or support resources of 4uKey for any additional guidance or troubleshooting tips.
Tips to Avoid Getting Your iPhone Disabled in the Future
Dealing with a disabled iPhone can be frustrating and inconvenient. To ensure that you don’t encounter this issue again, it’s important to implement some preventive measures and follow these tips:
- Use a strong passcode: Set a passcode that is both easy for you to remember and difficult for others to guess. Avoid using predictable combinations such as 1234 or your birthdate. Opt for a longer passcode with a mix of numbers, letters, and special characters.
- Enable Touch ID or Face ID: Take advantage of the biometric authentication features on your iPhone, such as Touch ID or Face ID. These technologies provide an extra layer of security and make it faster and more convenient to unlock your device.
- Keep your iPhone updated: Regularly update your iPhone’s software to ensure you have the latest security patches and bug fixes. New updates often address vulnerabilities and enhance the overall performance and security of your device.
- Be cautious with third-party apps: Only download apps from trusted sources, such as the App Store, and read user reviews before installing them. Some third-party apps may pose security risks or contain malicious code that can compromise your iPhone’s security.
- Limit incorrect passcode attempts: Educate those who have access to your iPhone, especially children or others who may be unfamiliar with the device, on the importance of entering the correct passcode. This will help avoid triggering the disabled state due to multiple incorrect attempts.
- Back up your iPhone regularly: Make it a habit to back up your iPhone regularly using iCloud or iTunes. If you ever need to restore your device or if it becomes disabled, having a recent backup will ensure you don’t lose valuable data.
- Enable ‘Erase Data’ with caution: The ‘Erase Data’ feature on your iPhone automatically erases all data after ten incorrect passcode attempts. Only enable this feature if you understand the consequences and are confident in your ability to remember the correct passcode.
- Keep your iPhone secure: Take precautions to protect your iPhone from theft or loss. Use features like Find My iPhone, which allows you to remotely locate, lock, or erase your device if it goes missing. Additionally, avoid leaving your iPhone unattended in public places.
Implementing these tips will help safeguard your iPhone and minimize the risk of it becoming disabled. By taking proactive measures to protect your device and using secure practices, you can enjoy a hassle-free iPhone experience.