
Symptoms of Dried Out Printer Ink
Dried out printer ink can be a frustrating issue that affects the quality of your printed documents and images. It can result in faded or streaky prints, and sometimes even render your printer completely unusable. It’s important to be able to identify the symptoms of dried out printer ink so that you can take appropriate measures to fix the problem. Here are some common signs to look out for:
- Faded prints: One of the most noticeable symptoms of dried out printer ink is faded prints. If your documents or images are coming out lighter than usual or with a noticeable lack of color intensity, it may be an indication that your ink has dried out.
- Streaky prints: Another telltale sign of dried out ink is streaks on your prints. These streaks can appear as lines or smudges across the page and can significantly degrade the quality of your prints.
- Poor print quality: Dried out ink can also result in overall poor print quality. You may notice blurred or distorted text, uneven colors, or a lack of sharpness in the printed output.
- Inconsistent ink flow: When ink dries out, it can cause blockages in the printhead or ink nozzles, leading to an inconsistent ink flow. This can result in uneven distribution of ink on the page and contribute to the aforementioned issues.
- Error messages: Some printers are equipped with error detection systems that can detect dried out ink. In such cases, you may receive error messages or alerts indicating that your ink needs attention.
If you experience any of these symptoms, it’s highly likely that your printer ink has dried out. However, it’s important to note that other factors, such as low ink levels or faulty cartridges, can also contribute to these issues. To confirm the exact cause and address the problem, it’s essential to carry out a thorough inspection of your printer and ink cartridges.
In the following sections, we will explore the reasons behind ink drying out, as well as step-by-step instructions on how to fix it and prevent it from happening again.
Reasons Behind Ink Drying Out
Printer ink can dry out for several reasons, and understanding these factors can help you prevent future occurrences. Here are some common causes of ink drying out:
- Inactive printer: If your printer has been sitting idle for an extended period, the ink can dry out. When the printer is not in use, the ink can evaporate or clog the printhead, leading to drying out.
- Exposure to air: Ink cartridges that are not properly sealed or stored can be exposed to air, causing the ink to dry out quickly. Once the ink contacts the air, it starts to dry out, leading to poor print quality.
- High temperature and humidity: Extreme temperature and humidity conditions can accelerate the drying out process of ink. Exposure to heat and excessive moisture can cause the ink to evaporate more rapidly, resulting in dried out ink.
- Incorrect storage: Storing ink cartridges improperly can also contribute to ink drying out. Ink should be stored in a cool and dark place, away from direct sunlight and extreme temperature fluctuations.
- Expired ink: Over time, ink cartridges can reach their expiration date. Expired ink is more likely to dry out and can result in poor print quality. Always check the expiration date before using ink cartridges.
- Low ink levels: Printing with low ink levels can lead to ink drying out faster. When the ink levels are low, there is a higher chance of air entering the cartridges, which can cause the ink to dry out quicker.
By being aware of these reasons, you can take necessary precautions to prevent ink from drying out in the future. Storing ink cartridges properly, using the printer regularly, and replacing cartridges when they are low on ink can help maintain optimal ink performance.
In the next sections, we will discuss how to check ink levels, inspect and clean ink cartridges, and implement effective techniques to fix dried out printer ink.
Checking Ink Levels
Before jumping into fixing dried out printer ink, it’s important to check the ink levels in your cartridges. This will give you an indication of whether the ink is indeed dried out or if the issue lies elsewhere. Here’s how you can check the ink levels:
- Printer software: Many printers come with software that allows you to monitor ink levels. Open the printer software on your computer, navigate to the ink or cartridge settings, and check the ink levels displayed.
- Printer display panel: Some printers have a built-in display panel that shows the ink levels for each cartridge. Check the printer’s control panel to see if it provides this information.
- Visual inspection: If your printer doesn’t have software or a display panel, you can visually inspect the cartridges. Most ink cartridges are translucent, allowing you to see the ink levels through the cartridge walls. Carefully remove the cartridges from the printer and observe the ink levels.
Keep in mind that ink level indicators are not always 100% accurate and may vary depending on the printer model. However, they can still provide a rough estimate of the ink levels.
If the ink levels are low or empty, it’s possible that the ink has dried out. On the other hand, if the ink levels appear sufficient, the issue might be something other than dried out ink. In such cases, you can proceed to inspect the ink cartridges more closely to identify any potential issues.
In the following sections, we will explore how to remove and inspect the ink cartridges, clean the cartridge contacts, and implement techniques to fix dried out printer ink.
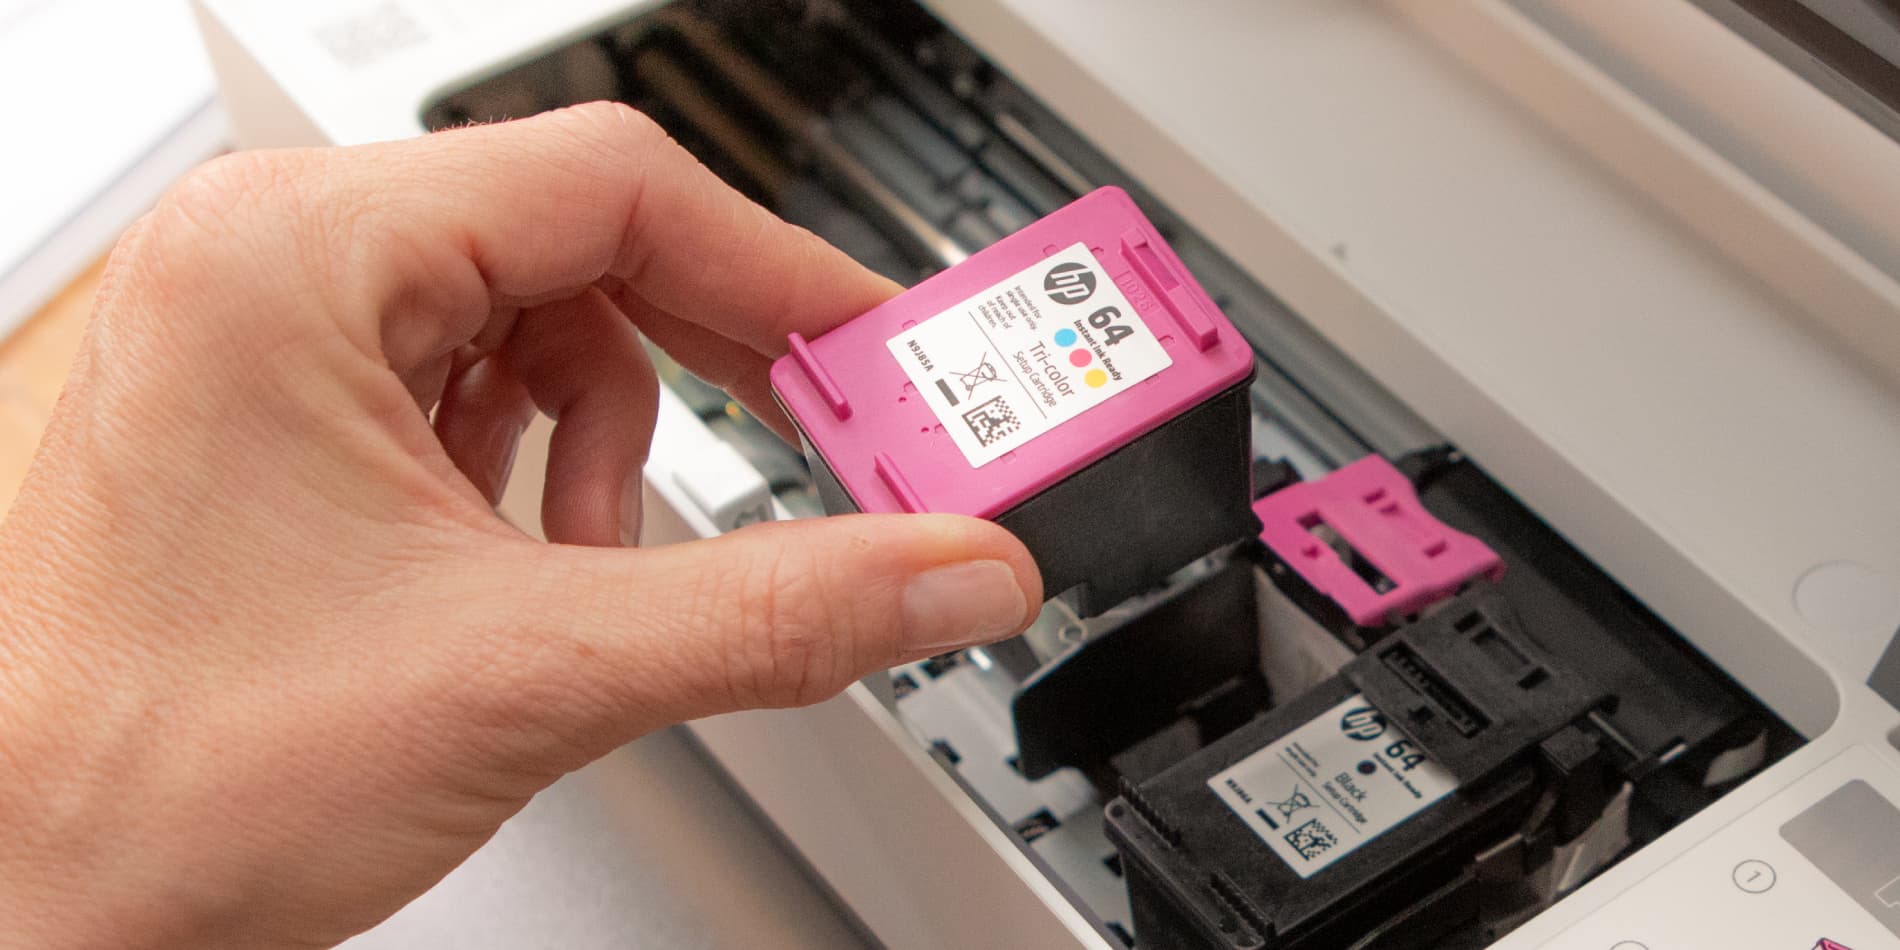
Removing and Inspecting the Ink Cartridge
If you’ve determined that the ink levels are low or suspect that your printer ink may be dried out, the next step is to remove and inspect the ink cartridge. This will allow you to closely examine the cartridge for any signs of dried ink or clogs. Here’s how you can remove and inspect the ink cartridge:
- Turn off the printer: Before handling the ink cartridges, it’s important to turn off the printer and unplug it from the power source. This ensures your safety and prevents any potential damage to the printer.
- Open the printer cover: Locate the printer cover or access panel and open it. This will give you access to the ink cartridges.
- Identify the ink cartridges: Depending on your printer model, you may have one or multiple ink cartridges. Take note of their positions and colors.
- Remove the ink cartridges: Gently press down on the ink cartridge and pull it out of its slot. Be careful not to force or touch the sensitive parts of the cartridge.
- Inspect the cartridges: Take a close look at each ink cartridge. Check for any visible signs of dried ink, such as crusty or caked residue. Also, look for any clogs or blockages in the ink nozzles or the metal contacts on the cartridges.
If you notice any dried ink or clogs, this is likely causing the issue. In the next sections, we will discuss how to clean the cartridge contacts, soak the cartridge in warm water, and unclog the ink nozzles to fix dried out printer ink.
Cleaning the Cartridge Contacts
One of the common causes of dried out printer ink is dirty or contaminated cartridge contacts. Over time, dust, ink residue, and debris can accumulate on the metal contacts of the ink cartridge, affecting its performance. Cleaning the cartridge contacts can help restore proper communication between the cartridge and the printer, potentially fixing issues related to dried out ink. Here’s how you can clean the cartridge contacts:
- Gather cleaning supplies: Prepare a lint-free cloth or coffee filter and isopropyl alcohol or distilled water. Avoid using regular tap water, as it may contain impurities that can further damage the cartridge.
- Disconnect the cartridge: Remove the ink cartridge from the printer following the steps outlined in the previous section.
- Dampen the cloth or filter: Moisten the lint-free cloth or coffee filter with a small amount of isopropyl alcohol or distilled water. Make sure it is slightly damp, not soaking wet.
- Clean the contacts: Gently wipe the metal contacts on the ink cartridge with the damp cloth or filter. Be careful not to apply too much pressure or scrub vigorously, as this can damage the contacts. Ensure that you clean both the contacts on the cartridge and the corresponding contacts inside the printer.
- Dry the contacts: Allow the cartridge contacts to air dry completely before reinstalling the cartridge back into the printer. It’s important to ensure that there is no moisture left on the contacts, as it can interfere with the ink flow.
Once you have cleaned the cartridge contacts thoroughly, you can proceed to the next steps, such as soaking the cartridge in warm water or unclogging the ink nozzles, to further address the issue of dried out printer ink.
Soaking in Warm Water
If cleaning the cartridge contacts didn’t fully resolve the issue of dried out printer ink, another method you can try is soaking the ink cartridge in warm water. Soaking can help soften and dissolve any dried ink that may be clogging the nozzles, allowing for better ink flow. Here’s how you can soak the ink cartridge:
- Prepare warm water: Fill a shallow bowl or container with warm water. Make sure the water is not too hot, as excessive heat can damage the cartridge.
- Remove the cartridge: Take out the ink cartridge from the printer following the steps mentioned earlier.
- Submerge the cartridge: Place the ink cartridge, nozzle side down, into the warm water. Ensure that the nozzles are fully submerged.
- Let it soak: Allow the cartridge to soak in the warm water for about 10-15 minutes. This duration should be sufficient to dissolve any dried ink deposits that may be obstructing the ink flow.
- Remove and dry the cartridge: After the soaking time, carefully remove the ink cartridge from the water and pat it dry using a clean, lint-free cloth or paper towel. Ensure that the nozzles are completely dry before reinstalling the cartridge.
Once you have soaked and dried the cartridge, you can proceed to the next steps of unclogging the ink nozzles and reinstalling the cartridge into the printer. These steps will help in resolving the issue of dried out printer ink and improve the overall print quality.
Unclogging Ink Nozzles
If your printer ink is still dried out even after cleaning the cartridge contacts and soaking the ink cartridge in warm water, there may be clogged ink nozzles preventing proper ink flow. Clogged nozzles can result in inconsistent printing and poor print quality. Here’s how you can unclog the ink nozzles:
- Remove the cartridge: Take out the ink cartridge from the printer as described earlier.
- Inspect the nozzles: Examine the cartridge closely for any visible clogs or blockages in the ink nozzles. You can use a magnifying glass if needed.
- Clean with a soft cloth or cotton swab: Gently wipe the ink nozzles using a soft, lint-free cloth or a cotton swab slightly moistened with distilled water. Be careful not to apply excessive pressure, as this can damage the nozzles.
- Use an unclogging solution: If the clogs are stubborn, you can try using an unclogging solution specifically designed for this purpose. Follow the instructions provided with the solution and apply it to the nozzles as directed. Allow the solution to work for the recommended period.
- Rinse with distilled water: After using the unclogging solution, rinse the nozzles with distilled water to remove any residue. Ensure that the nozzles are completely clean and clear.
- Dry the cartridge: Once the nozzles are cleaned and rinsed, let the cartridge air dry completely before reinstalling it into the printer. Make sure there is no residual moisture that could affect the ink flow.
After unclogging the ink nozzles and ensuring the cartridge is dry, you can proceed to reinstall the cartridge into the printer and perform a test print. This should help resolve the issue of dried out ink and improve the overall print quality.
Reinstalling and Testing the Cartridge
Once you have cleaned and addressed any issues with the ink cartridge, it’s time to reinstall it into the printer and perform a test print. Proper installation is crucial for optimal performance and to ensure that the printer recognizes the cartridge correctly. Follow these steps to reinstall and test the cartridge:
- Turn off the printer: Before reinstalling the cartridge, make sure the printer is turned off and unplugged from the power source. This will prevent any accidental damage and ensure your safety.
- Open the printer cover: Locate the printer cover or access panel and open it to gain access to the cartridge slots.
- Insert the cartridge: Take the cleaned and dried ink cartridge and align it with the corresponding slot in the printer. Gently insert the cartridge into the slot, ensuring it is securely seated.
- Lock the cartridge: Depending on your printer model, there may be a locking mechanism to secure the cartridge in place. Follow the instructions provided by the manufacturer to lock the cartridge properly.
- Close the printer cover: Once the cartridge is installed, close the printer cover or access panel securely.
- Power on the printer: Plug the printer back into the power source and turn it on. Wait for the printer to go through its initialization process.
- Perform a test print: Once the printer is ready, send a test print job to check if the dried out ink issue has been resolved. Print a document or image with multiple colors to ensure that all ink colors are properly working.
- Evaluate the printout: Examine the test printout carefully. Check for any signs of faded prints, streaks, or uneven colors. If the print quality is still not satisfactory, you may need to repeat the previous steps or consider replacing the ink cartridge.
If the test print shows improved print quality and the ink is no longer dried out, you can continue using your printer for your printing needs. However, if the issue persists or if there are other problems with the printer, it may be beneficial to seek assistance from a professional or the manufacturer’s support.
Now that the ink cartridge has been reinstalled and tested, we will conclude with the final section on storing ink correctly to avoid drying out.
Storing Ink Correctly to Avoid Drying Out
To prevent printer ink from drying out, it’s essential to store it correctly when it’s not in use. Proper storage can prolong the life of the ink and maintain its quality. Here are some tips on how to store ink correctly:
- Seal the ink cartridges: When not in use, make sure to tightly seal the ink cartridges. This will prevent air from entering and evaporating the ink, helping to keep it fresh for longer.
- Store in a cool and dark place: Ink cartridges should be stored in a cool and dark location, away from direct sunlight and excessive heat. Exposure to heat and light can accelerate the drying out process, significantly reducing the ink’s lifespan.
- Avoid extreme temperature fluctuations: Fluctuations in temperature can also impact the ink’s consistency. Try to store the ink cartridges in an area with stable temperatures, avoiding places that experience rapid temperature changes.
- Keep away from moisture: While it’s important to store ink in a cool environment, it’s equally crucial to keep it away from excessive moisture. Moisture can cause damage to the cartridge and compromise ink quality.
- Follow manufacturer’s guidelines: Different ink cartridges may have specific storage recommendations from the manufacturer. Read the instructions provided by the manufacturer to ensure you follow their guidelines for optimal storage conditions.
- Use before expiration date: Ink cartridges have an expiration date printed on the packaging. It’s important to use the ink cartridges before they expire, as expired ink is more likely to dry out and result in poor print quality.
By following these storage practices, you can minimize the risk of printer ink drying out and maintain its performance over time. Regularly check the ink levels and use the ink cartridges in a timely manner to ensure optimal print quality.
With these steps, you now have the knowledge to fix dried out printer ink and prevent it from occurring in the future. By properly inspecting, cleaning, and storing your ink cartridges, you can ensure a smooth printing experience with vibrant and high-quality prints.