
What is Supersampling?
Supersampling, also known as SSAA (Super Sampling Anti-Aliasing), is a graphics rendering technique that improves image quality in virtual reality (VR) and gaming experiences. It works by rendering the image at a higher resolution than the display device’s native resolution and then downsampling it to fit on the screen.
The primary purpose of supersampling is to reduce aliasing artifacts, such as jagged edges and shimmering textures, by increasing the level of detail in the image. By oversampling the image and then downsampling it, the resulting image appears smoother and more refined, contributing to a more immersive and realistic visual experience. Supersampling can significantly enhance the clarity and sharpness of virtual reality content, making it particularly effective for high-resolution VR headsets like the HTC Vive.
When supersampling is enabled, the GPU (Graphics Processing Unit) renders the game or VR application at a higher resolution, typically at a factor of 1.5x or 2x the native resolution. This increased resolution comes at the cost of higher GPU processing power and can put a strain on the system resources. However, the improved visual quality is well worth the trade-off for many users.
Supersampling is especially useful for reducing the visibility of screen-door effects (the visible gaps between pixels) in VR, improving the clarity of small details, and producing smoother edges on objects in the virtual environment. It’s a technique widely used by VR enthusiasts and gamers who prioritize visual fidelity and want to maximize the potential of their hardware setup.
It’s important to note that the level of supersampling the system can handle depends on the GPU and overall system specifications. A more powerful GPU can handle higher levels of supersampling, resulting in crisper images, while a less capable GPU may struggle to maintain optimal performance with higher supersampling values.
Why Enable Supersampling?
Enabling supersampling can greatly enhance your VR and gaming experiences, providing several key benefits:
- Improved Visual Quality: By rendering the image at a higher resolution and downsampling it, supersampling reduces jagged edges, aliasing, and other visual artifacts. This results in sharper and more detailed graphics, enhancing the realism and immersion of the virtual world.
- Reduced Screen-Door Effect: Supersampling effectively diminishes the visible gaps between pixels on VR displays, known as the screen-door effect. This makes the image appear smoother and more continuous, leading to a more seamless and enjoyable VR experience.
- Enhanced Clarity: Supersampling increases the level of detail in the image, making small objects and fine textures appear crisper and more defined. This can greatly improve the visual fidelity of games and VR applications, allowing you to appreciate intricate details that would otherwise be less noticeable.
- Smoothing of Edges: When supersampling is enabled, the edges of objects in the virtual environment become smoother and more natural-looking. This reduces the appearance of jagged lines and improves the overall visual aesthetics, creating a more polished and visually pleasing experience.
- Optimal Performance on High-Resolution Displays: Supersampling is particularly beneficial for high-resolution displays, such as those found in the HTC Vive. It maximizes the potential of these displays by delivering images that match or exceed their native resolution, resulting in a more immersive and visually stunning VR experience.
While enabling supersampling provides numerous advantages, it’s important to keep in mind the impact it can have on system performance. Higher supersampling levels require more GPU processing power, which can lead to decreased frame rates and potential performance issues. Therefore, finding the right balance between visual quality and system performance is crucial.
Overall, enabling supersampling is a worthwhile endeavor for those seeking to enhance their VR and gaming experiences. It offers substantial improvements in visual quality, reducing visual artifacts and enhancing clarity and detail. However, it’s important to consider the capabilities of your hardware and find the optimal supersampling setting that maintains a balance between visual fidelity and performance.
Check Your System Requirements
Before enabling supersampling on your HTC Vive, it’s crucial to ensure that your system meets the necessary requirements to handle the increased GPU processing demands. Here are some key factors to consider:
- GPU Capability: Supersampling requires a powerful GPU to handle the increased resolution rendering. Check if your GPU meets the recommended specifications for supersampling and if it has enough VRAM (Video Random Access Memory) to handle the higher demands.
- System RAM: Make sure that your computer has adequate system RAM to support the additional load imposed by supersampling. Insufficient RAM can lead to performance issues and potentially impact the smooth running of VR applications or games.
- Processor: Your CPU (Central Processing Unit) should be capable enough to handle the increased demands of supersampling. A faster processor will help in maintaining optimal performance while rendering at higher resolutions.
- Available Storage Space: Check if you have enough free storage space on your hard drive or SSD (Solid State Drive). Supersampling may require additional disk space for storing the larger render files, particularly if you plan on capturing or recording your gameplay.
- VR Headset Compatibility: Ensure that your VR headset, in this case, the HTC Vive, is compatible with supersampling. Most modern VR headsets support supersampling settings, but it’s still worth verifying in the specific documentation for your device.
To confirm if your system meets the requirements, consult the manufacturer’s documentation, visit their official website, or refer to the software or device manuals. Additionally, you can also use online benchmarking tools or consult forums and communities of VR enthusiasts to get insights from others who have similar hardware setups.
It’s crucial to understand that enabling supersampling on a system that does not meet the necessary requirements can result in performance issues, including frame rate drops, stuttering, or even crashes. Therefore, taking the time to evaluate your system’s capabilities ensures a smoother and more enjoyable VR experience without compromising performance and stability.
Update Your GPU Drivers
Before enabling supersampling on your HTC Vive, it’s essential to ensure that your GPU drivers are up to date. GPU driver updates often include optimizations for performance, bug fixes, and improved compatibility with the latest software and games, making them crucial for a smooth VR experience.
Here are the steps to update your GPU drivers:
- Identify Your GPU: Determine the make and model of your GPU. You can usually find this information in your computer’s System Information or by checking the manufacturer’s website or documentation.
- Visit the Manufacturer’s Website: Go to the website of your GPU manufacturer, such as NVIDIA or AMD, and navigate to the support or driver download section.
- Download the Latest Driver: Locate the latest driver for your GPU model and download it. Ensure that you download the appropriate driver for your operating system.
- Install the Driver: Run the downloaded driver installer and follow the on-screen instructions to install the latest driver. It may require you to agree to the terms and conditions and restart your computer.
- Verify Installation: Once the installation is complete, verify that the driver has been successfully updated. You can typically check this in the GPU control panel or by using third-party software that provides system information.
Regularly updating your GPU drivers is important as new driver releases often include optimizations for VR applications and games, improving their performance and stability. However, keep in mind that not all driver updates may offer significant performance improvements specifically related to supersampling, so it’s essential to check the release notes or driver documentation for any specific mentions of supersampling-related enhancements.
Updating your GPU drivers should be a routine maintenance task to ensure that your system is running optimally and can handle the demands of supersampling. It’s also recommended to enable automatic driver updates if your GPU manufacturer provides such a feature, as it can simplify the process of keeping your drivers up to date.
Install SteamVR
In order to enable supersampling on your HTC Vive, you need to have SteamVR installed on your computer. SteamVR is a virtual reality platform developed by Valve Corporation that provides the necessary software framework and tools to run VR applications and games on different VR devices, including the HTC Vive.
Here are the steps to install SteamVR:
- Launch Steam: Start by opening the Steam application on your computer. If you don’t have Steam installed, you can download it from the official website and install it.
- Navigate to the SteamVR Page: Once in Steam, go to the “Library” section and click on “Tools” at the top of the window.
- Find and Install SteamVR: Scroll through the list of tools until you find “SteamVR.” Click on it to open the SteamVR page, and then click on the “Install” button to begin the installation process.
- Follow the On-Screen Instructions: The SteamVR installer will guide you through the installation process. Follow the on-screen instructions to complete the installation. This process may take some time, depending on your internet connection speed.
- Launch SteamVR: Once the installation is complete, you can launch SteamVR by clicking on the “VR” icon located at the top-right corner of the Steam application. This will open the SteamVR dashboard and activate your HTC Vive headset.
After successfully installing SteamVR, make sure that your HTC Vive is correctly connected to your computer, including the headset, tracking devices, and controllers. Refer to the HTC Vive setup guide or consult the manufacturer’s documentation for detailed instructions on setting up and connecting your VR device.
By installing SteamVR, you gain access to a wide range of VR content, including games, applications, and experiences, all of which can now take advantage of supersampling for improved visual quality and immersion on your HTC Vive.
Enable Supersampling Through SteamVR
Now that you have SteamVR installed on your computer and your HTC Vive headset connected, it’s time to enable supersampling through the SteamVR settings. Here’s how you can do it:
- Launch SteamVR: Open the Steam application and click on the “VR” icon at the top-right corner to launch SteamVR.
- Access the SteamVR Settings: Once SteamVR is running, look for the small dropdown menu located in the top-left corner of the SteamVR dashboard. Click on it and select “Settings.”
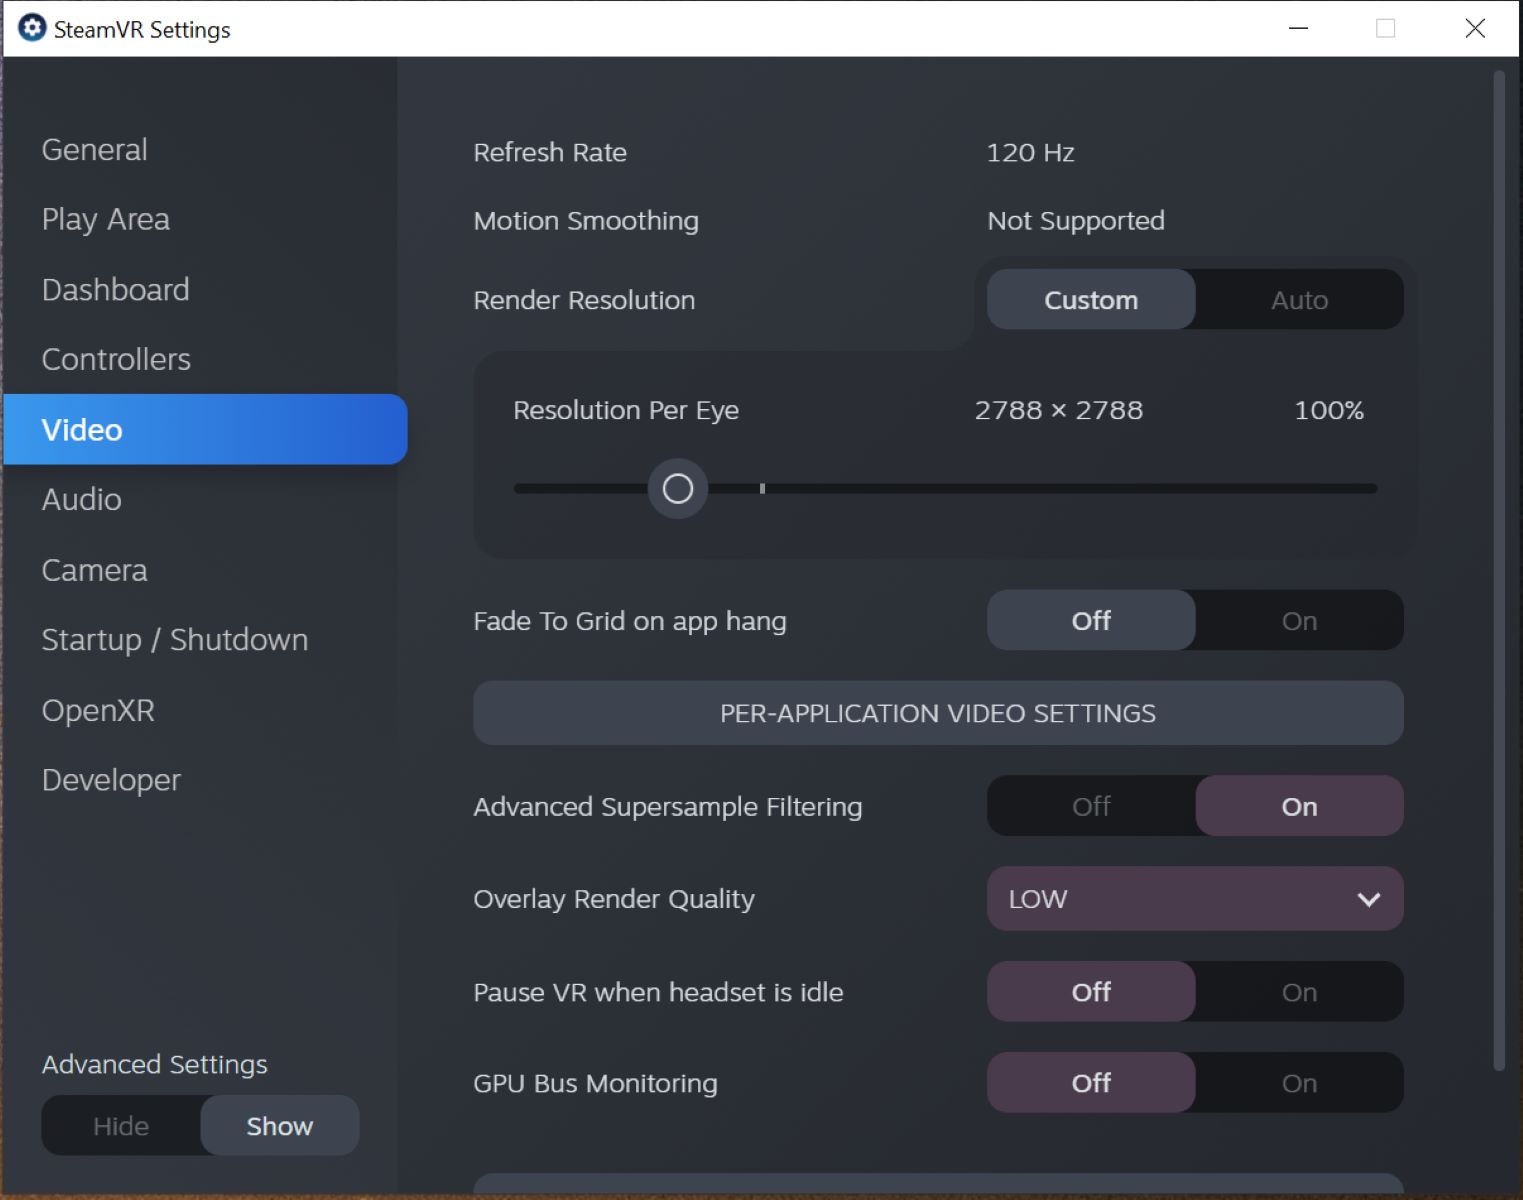
- Navigate to the Video Tab: In the Settings window, navigate to the “Video” tab. This is where you can access the supersampling settings.
- Adjust the Supersampling Slider: In the Video tab, you’ll find a slider labeled “Render Resolution.” This slider determines the supersampling level for your HTC Vive. Moving the slider to the right increases the supersampling factor, while moving it to the left decreases it. Adjust the slider according to your preference and hardware capabilities.
- Apply the Changes: After adjusting the supersampling level, click on the “Apply” button to save the changes.
- Exit the Settings: Close the Settings window and return to the SteamVR dashboard. The changes you made to the supersampling settings will now be in effect.
Keep in mind that the ideal supersampling level may vary depending on the capabilities of your GPU and the specific VR application or game you’re running. Higher supersampling levels result in better visual quality, but they also require more GPU processing power. It’s recommended to experiment with different supersampling values to find the optimal balance between visual fidelity and performance.
Enabling supersampling through SteamVR allows you to take full advantage of your HTC Vive headset’s capabilities, enhancing the overall visual experience and reducing aliasing artifacts. The improved image quality and increased level of detail provided by supersampling contribute to a more immersive and realistic virtual reality experience.
Configure Supersampling Settings
Once you have enabled supersampling through SteamVR, you can further configure the supersampling settings to ensure optimal visual quality and performance for your HTC Vive headset. Here are some key configurations to consider:
- Supersampling Level: As mentioned earlier, adjust the supersampling slider in the SteamVR settings to set the desired supersampling level. Higher values, such as 1.5x or 2x, offer better image quality but require more GPU processing power. Find the balance that provides a visually pleasing experience without causing performance issues.
- Application-Specific Settings: SteamVR allows you to configure supersampling settings on an application-by-application basis. This means you can set different supersampling levels for each VR application or game. To access these settings, go to the “Applications” tab in the SteamVR settings and adjust the supersampling level for each application individually.
- Supersampling Profiles: SteamVR also allows you to create and save different supersampling profiles for easy switching between settings. This can be useful if you have different preferences or if you want to quickly switch between different supersampling levels for performance testing purposes. To create and manage profiles, go to the “Applications” tab and click on the “Manage Profiles” button.
- Real-Time Performance Monitoring: While testing different supersampling levels, monitor your system’s performance in real-time to ensure optimal performance. Keep an eye on the GPU usage, CPU utilization, and frame rates to identify any performance bottlenecks or issues and adjust your supersampling settings accordingly. You can use software monitoring tools or built-in SteamVR performance monitoring features to track these metrics.
- Testing with Different Applications: Different VR applications and games may have varying levels of performance demands and visual requirements. It’s important to test and adjust your supersampling settings with different applications to find the best trade-off between image quality and performance for each specific scenario.
Remember, the goal is to achieve the best possible visual quality without sacrificing performance. Take your time to experiment with different supersampling levels and configurations to find the optimal settings that work for you and your specific hardware setup.
Configuring supersampling settings allows you to fine-tune the visuals in your VR experience, enhancing the clarity, detail, and overall immersion. By finding the right balance, you can enjoy stunning visuals and a smooth VR experience that maximizes the potential of your HTC Vive headset.
Test Your Supersampling Settings
After configuring the supersampling settings for your HTC Vive, it’s important to test the new settings and evaluate their impact on visual quality and performance. Here are some steps to follow for testing your supersampling settings:
- Launch a VR Application or Game: Start by launching a VR application or game that you frequently use and are familiar with. This will allow you to assess any changes in visual quality and performance more easily.
- Observe Visual Enhancements: Pay close attention to the visual quality while in the VR environment. Look for improvements in sharpness, clarity, and the reduction of jagged edges. Note any difference in the overall immersion and realism compared to the previous settings.
- Check Performance Indicators: Monitor the performance indicators such as GPU usage, CPU utilization, and frame rates while running the application. If you notice a significant drop in frame rates or performance issues, it may be an indication that your supersampling level is too high for your hardware. Consider adjusting the supersampling settings to find a better balance between visual quality and performance.
- Test Multiple Applications: It’s recommended to test your supersampling settings with different VR applications and games. Each application may have varying demands on your hardware, and what works well for one application may not work as effectively for another. By testing multiple applications, you can better evaluate the overall impact of your supersampling settings.
- Make Iterative Adjustments: If you find that the visual quality is not up to your expectations or the performance is not satisfactory, iterate on your supersampling settings. Try different supersampling levels, adjust application-specific settings, or create new profiles to find the optimal balance that suits your individual preferences.
Feedback from other users who have tested supersampling settings for specific applications or games can also be valuable. Participating in VR forums or communities can provide valuable insights and recommendations for achieving the best results.
Remember that finding the ideal supersampling settings is a subjective process that depends on your hardware capabilities, personal preference, and the specific applications or games you use. The goal is to strike a balance between enhanced visual quality and smooth performance to ensure an immersive and enjoyable VR experience.
Adjust Supersampling Based on Performance
One of the key aspects of enabling supersampling on your HTC Vive is finding the right balance between visual quality and performance. If you’re experiencing performance issues or your system struggles to maintain smooth gameplay, it may be necessary to adjust your supersampling settings. Here’s how you can do it:
- Lower Supersampling Level: Decrease the supersampling level in the SteamVR settings or application-specific settings to a lower value. This reduces the GPU processing load and can help improve performance, especially if your hardware is struggling to handle the higher supersampling levels.
- Monitor Frame Rates: Keep an eye on the frame rates while using the higher supersampling settings. If you consistently experience low frame rates or stuttering, it’s an indicator that your GPU is being pushed to its limits. Lower the supersampling level until you achieve a smoother and more playable experience.
- Experiment with Incremental Changes: Instead of making drastic adjustments to the supersampling level, try making incremental changes. Gradually increase or decrease the supersampling value, testing each setting along the way. This allows you to find the optimal balance between visual quality and performance without making sudden and extreme changes.
- Consider Adaptive Supersampling: Some VR applications and games offer adaptive supersampling options. With adaptive supersampling, the system automatically adjusts the resolution based on the GPU’s performance. This can help maintain a stable frame rate by dynamically scaling the supersampling level in real-time.
- Utilize Performance Monitoring Tools: Take advantage of performance monitoring tools, both built-in and third-party, to track the impact of supersampling on your system’s performance. Keep an eye on GPU usage, CPU utilization, and frame times to identify any bottlenecks or performance issues. This information can guide you in making informed adjustments to your supersampling settings.
It’s essential to find the sweet spot where you achieve a visually appealing experience while maintaining smooth and playable performance. Every system is different, and what works for one may not work for another, so it may take some trial and error to find the optimal settings for your specific hardware configuration.
Keep in mind that as technology advances and new GPU generations are released, you may be able to gradually increase your supersampling settings as you upgrade to more powerful hardware. Regularly monitoring the latest advancements in hardware and new driver updates can help maximize the potential of your system and push the supersampling boundaries.
Other Methods for Enabling Supersampling
In addition to enabling supersampling through SteamVR, there are alternative methods that you can explore to enable supersampling on your HTC Vive. Here are a few options to consider:
- VR Game/Software Settings: Some VR games and software applications have supersampling settings built into their options menu. Check the settings menu of the specific application you’re using to see if it offers its own supersampling controls. Adjusting the supersampling settings within the application can provide more fine-tuned control over the image quality.
- Third-Party Software: There are third-party software applications available that allow you to enable supersampling for your HTC Vive. These tools often offer additional customization options and flexibility beyond what is provided by SteamVR. Examples of popular third-party supersampling tools include OpenVR Advanced Settings and Oculus Tray Tool.
- CrossVRC: CrossVRC is an open-source VR compositor that includes supersampling features. It allows you to leverage supersampling without relying on SteamVR or specific game settings. CrossVRC provides control over rendering resolution and offers a range of supersampling options to enhance the visual quality of your VR experience.
- VRSS (Virtual Reality Supersampling): Some GPU manufacturers, such as NVIDIA, offer their own VRSS technology. VRSS utilizes the GPU’s hardware to selectively apply supersampling to specific parts of the image, focusing on areas where it is most needed. VRSS settings can usually be found in the GPU driver control panel, allowing you to enable supersampling specifically for VR applications.
When exploring alternative methods for enabling supersampling, it’s important to research and understand the specific tools or software being used. Be sure to follow any instructions or documentation provided by the developers to ensure compatibility and proper usage with your HTC Vive.
Remember that when using alternative methods for enabling supersampling, it’s crucial to monitor performance and adjust settings accordingly. Each method may have its own performance impact, and finding the right balance between visual quality and performance is key to achieving an enjoyable and immersive VR experience.
Experimentation and testing are often necessary to find the most suitable method for enabling supersampling that aligns with your preferences and hardware capabilities.