
Why Delete Pre-installed Android Apps?
Pre-installed apps on Android devices, also known as bloatware, are applications that come pre-loaded by manufacturers and carriers. While some of these apps are useful, many of them are unnecessary and take up valuable storage space on your device. There are several reasons why you might want to delete pre-installed Android apps:
1. Storage space: Pre-installed apps consume storage space on your device, which can be an issue, especially if you have a device with limited internal storage. Removing unwanted apps can free up space for apps and files that are important to you.
2. Performance: Bloatware apps running in the background can slow down your device and affect its performance. By deleting these apps, you can improve the overall speed and responsiveness of your Android device.
3. Customization: Removing pre-installed apps gives you more control over the appearance and functionality of your device. You can personalize your device by installing only the apps that you need and use regularly.
4. Privacy and security: Some pre-installed apps may collect user data or have unnecessary permissions that can compromise your privacy. Deleting these apps reduces the potential risks associated with them.
5. Battery life: Unwanted apps running in the background can drain your device’s battery. By removing these apps, you can extend your device’s battery life and reduce the need for frequent charging.
6. Reducing clutter: Many pre-installed apps are rarely used and only add clutter to your app drawer. By removing these unused apps, you can declutter your device and make it easier to find the apps you actually use.
While it’s not possible to remove every pre-installed app on Android devices, many can be disabled or even completely removed with the right steps. In the following sections, we’ll explore various methods to disable or delete pre-installed Android apps, giving you more control over your device’s storage, performance, and functionality.
Step 1: Check for Uninstallable Apps
Before you start deleting pre-installed Android apps, it’s important to identify which apps can be uninstalled and which ones can only be disabled. Here’s how to check for uninstallable apps:
1. Go to Settings: Open the Settings app on your Android device. The location of the Settings app may vary depending on your device’s manufacturer and Android version. It is usually represented by a gear icon.
2. Look for “Apps” or “Applications”: Scroll down and find either “Apps” or “Applications” in the Settings menu. Tap on it to open the app management screen.
3. Select “All Apps”: Once inside the app management screen, locate and tap on the option that says “All Apps”. This will display a list of all the apps installed on your device, including both system apps and user-installed apps.
4. Check for “Uninstall” option: Scroll through the list of apps and look for apps that have an “Uninstall” button next to them. These are the apps that can be easily uninstalled from your device.
5. Note down the apps: Make a note of the apps that can be uninstalled. This will help you keep track of the apps you want to remove later in the process.
It’s important to understand that not all pre-installed apps can be uninstalled. Some system apps are considered integral parts of the operating system and cannot be removed without rooting your device, which can void your warranty and may have other risks. However, even if you can’t uninstall these apps, you can still disable them to prevent them from running in the background and taking up valuable resources.
By identifying the uninstallable apps on your device, you can prioritize which ones to disable or remove based on your personal preferences and the amount of storage space you want to reclaim. In the next step, we will learn how to disable unwanted apps on Android devices.
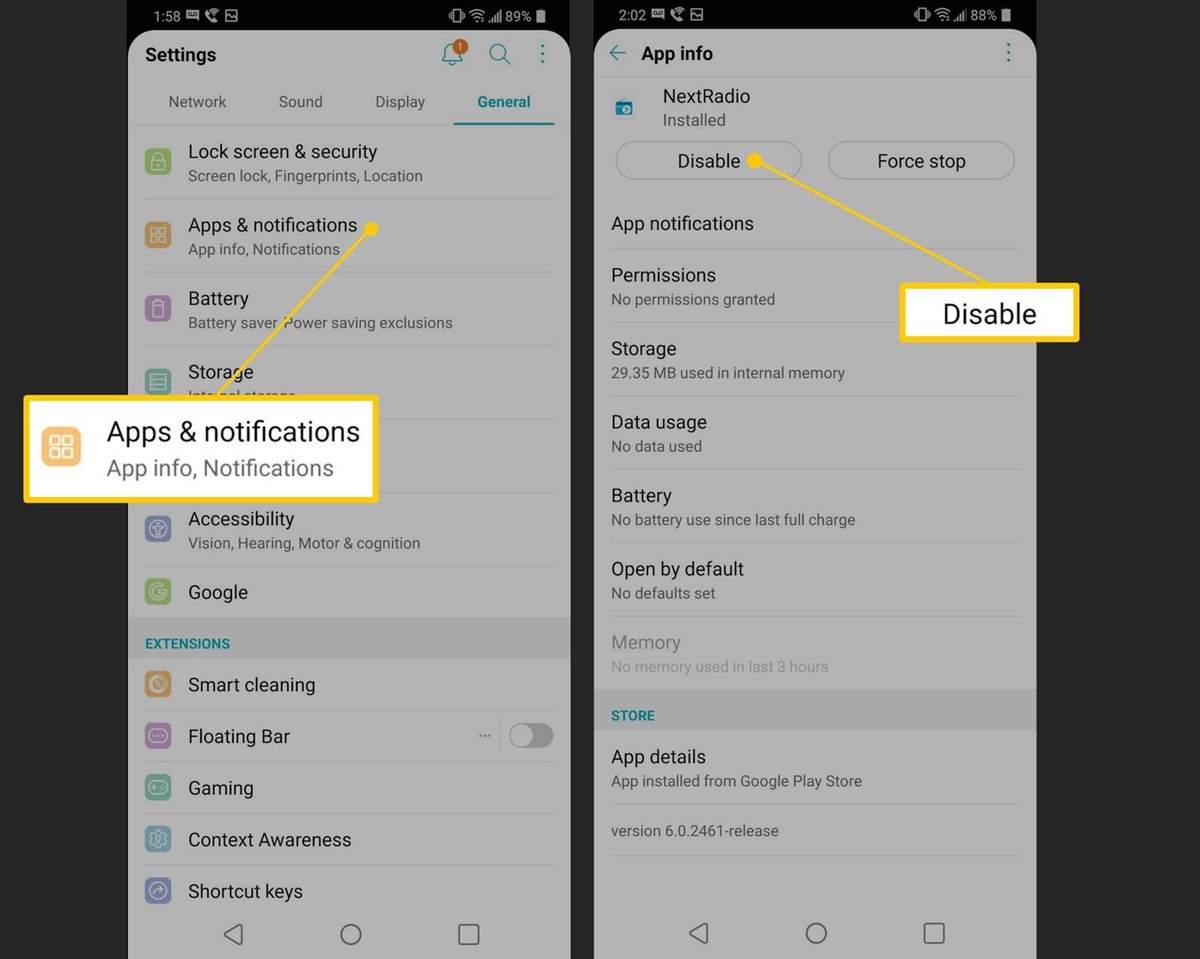
Step 2: Disable Unwanted Apps
If you have pre-installed apps on your Android device that cannot be uninstalled, the next best option is to disable these apps. Disabling apps will prevent them from running in the background and consuming system resources. Here’s how to disable unwanted apps:
1. Go to Settings: Open the Settings app on your Android device. Look for the gear icon, which represents the Settings app, and tap on it to access the settings menu.
2. Navigate to “Apps”: Scroll through the settings menu and find the option that says “Apps” or “Applications”. This may be located under the “Device” or “Device Management” category. Tap on it to open the app management screen.
3. Choose the app to disable: On the app management screen, you will see a list of all the apps installed on your device. Locate the app you want to disable and tap on it to open the app information page.
4. Disable the app: On the app information page, you will see buttons with different options. Look for the “Disable” or “Turn off” button and tap on it. A confirmation prompt may appear asking if you want to disable the app. Confirm your action by tapping “Disable” or “Confirm”.
5. Repeat for other unwanted apps: Repeat steps 3 and 4 for other pre-installed apps that you want to disable on your Android device.
By disabling unwanted apps, you effectively stop them from running and consuming system resources. However, keep in mind that disabling system apps can sometimes affect the functionality of certain features or services on your device. If you encounter any issues after disabling an app, you can easily enable it again through the app management screen.
Disabling pre-installed apps is a great way to declutter your device and gain better control over its performance and resource usage. In the next step, we will learn how to enable developer options on your device, which will allow us to use ADB commands to remove apps that cannot be uninstalled or disabled through the regular settings.
Step 3: Enable Developer Options
To remove pre-installed apps using ADB commands, we need to enable Developer Options on your Android device. Here’s how to enable Developer Options:
1. Open Settings: Go to the Settings app on your Android device. Look for the gear icon, which represents the Settings app, and tap on it to access the settings menu.
2. Find “About phone” or “About device”: Scroll through the settings menu and find the option that says “About phone” or “About device”. This option is usually located towards the bottom of the settings menu.
3. Locate “Build number”: On the “About phone” or “About device” screen, look for the “Build number” or “Build version” entry. This option may be hidden under a sub-menu or require you to tap on “Software information”.
4. Tap on “Build number”: Tap on the “Build number” entry repeatedly, usually around seven times, until you see a message indicating that you are now a developer. This will enable Developer Options on your device.
5. Go back to Settings: After enabling Developer Options, go back to the main settings menu. You should now see a new option called “Developer Options” or “Developer settings”.
6. Open Developer Options: Tap on “Developer Options” to access the advanced settings for developers.
7. Enable USB debugging: In the Developer Options menu, look for the “USB debugging” setting and enable it. This will allow your device to communicate with your computer when executing ADB commands.
By enabling Developer Options and USB debugging, you gain access to advanced settings and debugging tools that are not available in the regular settings menu. However, it’s important to exercise caution when making changes in the Developer Options menu, as improper settings can potentially harm your device.
In the next step, we will learn how to use ADB commands to remove pre-installed apps from your Android device.
Step 4: Use ADB Commands to Remove Apps
If you have pre-installed apps on your Android device that cannot be uninstalled or disabled through the regular settings, you can use ADB (Android Debug Bridge) commands to remove them. Here’s how to remove apps using ADB commands:
1. Connect your device to your computer: Make sure your Android device is connected to your computer using a USB cable. Ensure that USB debugging is enabled in Developer Options on your device (as explained in the previous step).
2. Install ADB on your computer: Download and install the Android SDK Platform Tools package on your computer. You can find this package on the official Android developer website. The package includes ADB, which is required for executing commands on your device.
3. Open a command prompt or terminal: On your computer, open a command prompt on Windows or a terminal on macOS or Linux.
4. Verify ADB connection: In the command prompt or terminal, enter the command “adb devices” and press Enter. This will verify that your device is properly connected and recognized by ADB. You should see your device’s unique identifier along with the word “device” in the command prompt or terminal.
5. List installed packages: Enter the command “adb shell pm list packages” and press Enter. This command will list all the installed packages (apps) on your Android device.
6. Identify the package name: Scroll through the list of installed packages and locate the package name of the app you want to remove. The package name is usually in the format “com.example.appname”.
7. Remove the app: Enter the command “adb shell pm uninstall -k –user 0
8. Repeat for other apps: Repeat steps 6 and 7 for any other pre-installed apps you want to remove from your Android device.
Using ADB commands to remove pre-installed apps gives you more control over your device’s software and allows you to remove apps that would otherwise be difficult to uninstall or disable. However, be cautious when using ADB commands, as removing system apps or critical components can potentially cause issues with your Android device.
In the next step, we will explore using third-party apps to remove pre-installed Android apps on your device.
Step 5: Use Third-Party Apps to Remove Apps
In addition to using ADB commands, you can also utilize third-party apps to remove pre-installed apps on your Android device. These apps offer a user-friendly interface and simplify the process of uninstalling unwanted system apps. Here’s how to use third-party apps to remove apps:
1. Choose a reliable app: Browse the Google Play Store or reputable third-party app stores to find an app that specializes in removing system apps. Some popular options include “Package Disabler Pro” and “System App Remover”. Choose an app with positive reviews and a good reputation.
2. Install and open the app: Download and install the selected app on your Android device. Once the installation is complete, open the app to get started.
3. Grant necessary permissions: The third-party app will require various permissions to function properly. Grant the necessary permissions to the app when prompted. These permissions are usually related to device administration and uninstalling system apps.
4. Choose the apps to remove: In the app’s interface, you will see a list of installed apps on your device. Look for the pre-installed apps you want to remove and mark or select them for removal. Some third-party apps also offer features to disable or freeze apps, depending on your preference.
5. Confirm and remove the apps: Once you have selected the apps you want to remove, review the selection, and then proceed to uninstall them. The third-party app will handle the uninstallation process, and you may be asked to confirm your action before the removal begins.
6. Follow any additional instructions: Depending on the third-party app you are using, there may be additional instructions or steps to follow during the process. Pay attention to any prompts or notifications that appear and follow the app’s guidance accordingly.
Using third-party apps can provide a more user-friendly and intuitive approach to removing pre-installed Android apps. These apps often offer additional features such as app management, disabling unused apps, and clearing app data and cache. However, it’s important to research and choose reliable and trusted third-party apps to ensure the security and stability of your device.
In the next step, we will explore how to clear the cache and data for disabled apps on your Android device.
Step 6: Clear Cache and Data for Disabled Apps
After disabling pre-installed apps on your Android device, it’s a good practice to clear the cache and data associated with those apps. Clearing the cache and data can free up additional storage space and help improve the performance of your device. Here’s how to clear cache and data for disabled apps:
1. Go to Settings: Open the Settings app on your Android device. Look for the gear icon, which represents the Settings app, and tap on it to access the settings menu.
2. Navigate to “Apps”: Scroll through the settings menu and find the option that says “Apps” or “Applications”. Tap on it to open the app management screen.
3. Switch to “Disabled” apps: On the app management screen, look for the option that allows you to switch between “All apps” and “Disabled apps”. Tap on “Disabled apps” to view the list of apps that are currently disabled on your device.
4. Select the app to clear cache and data: Scroll through the list of disabled apps and choose the app for which you want to clear cache and data. Tap on it to open the app information page.
5. Clear the cache: On the app information page, you will see buttons with different options. Look for the “Clear cache” button and tap on it. This will remove any temporary files and data stored in the cache for that particular app.
6. Clear the data: If you want to remove all the app’s data and settings, look for the “Clear data” or “Clear storage” button. Tap on it to confirm and proceed with clearing the app’s data. Keep in mind that clearing data will reset the app to its default state, and you may lose any personalized settings or saved data.
7. Repeat for other disabled apps: Repeat steps 4 to 6 for other disabled apps that you want to clear cache and data for on your Android device.
Clearing cache and data for disabled apps not only frees up storage space, but it can also resolve issues and improve the overall performance of those apps. It is important to note that clearing the data for certain apps may require you to sign in again or reconfigure settings once you open the app.
In the next step, we will explore factory resetting your device as a last resort for removing pre-installed apps.
Step 7: Factory Reset as a Last Resort
If all else fails and you still have pre-installed apps on your Android device that you want to remove, you can resort to performing a factory reset. However, it’s important to note that a factory reset will erase all data and settings on your device, so make sure to back up any important files before proceeding. Here’s how to perform a factory reset:
1. Backup your data: Before proceeding with a factory reset, it’s crucial to back up your data. This includes photos, videos, contacts, messages, and any other important files or information stored on your device. You can use cloud storage services, external storage devices, or backup apps to securely store your data.
2. Go to Settings: Open the Settings app on your Android device. Look for the gear icon, which represents the Settings app, and tap on it to access the settings menu.
3. Find “System” or “System and Reset”: Scroll through the settings menu and find the option that says “System” or “System and Reset”. This option may be located under the “General management” or “Advanced” category. Tap on it to open the system settings.
4. Locate “Reset” or “Factory Reset”: On the system settings screen, look for the option that says “Reset” or “Factory Reset”. This option may be labeled differently based on your Android device. Tap on it to access the factory reset settings.
5. Confirm and proceed with the factory reset: Read through the information presented on the factory reset page and make sure you understand the consequences of this action. Tap on the “Reset” or “Factory Reset” button to initiate the process.
6. Enter your credentials: During the factory reset process, you may be asked to enter your device’s PIN, pattern, or password to verify your action. Follow the prompts and enter the required information as prompted.
7. Wait for the reset to complete: The factory reset process may take some time to complete. Your device will restart and return to its original factory state. All data, settings, and pre-installed apps will be erased.
Performing a factory reset should only be considered as a last resort for removing pre-installed apps that cannot be uninstalled or disabled by other methods. It wipes your device clean and restores it to its original state, allowing you to start fresh. Make sure to backup your data and be aware of the implications before proceeding with a factory reset.
With these steps, you now have various methods at your disposal to remove or disable pre-installed apps on your Android device. Choose the method that suits your needs and preferences, and enjoy a more personalized and streamlined experience with your Android device.