
Creating Users in MySQL
One of the fundamental tasks in MySQL administration is creating users. Users in MySQL are separate entities that can be granted specific permissions on databases and tables. These users can be used to manage access and control the level of interaction with the database for different individuals or applications.
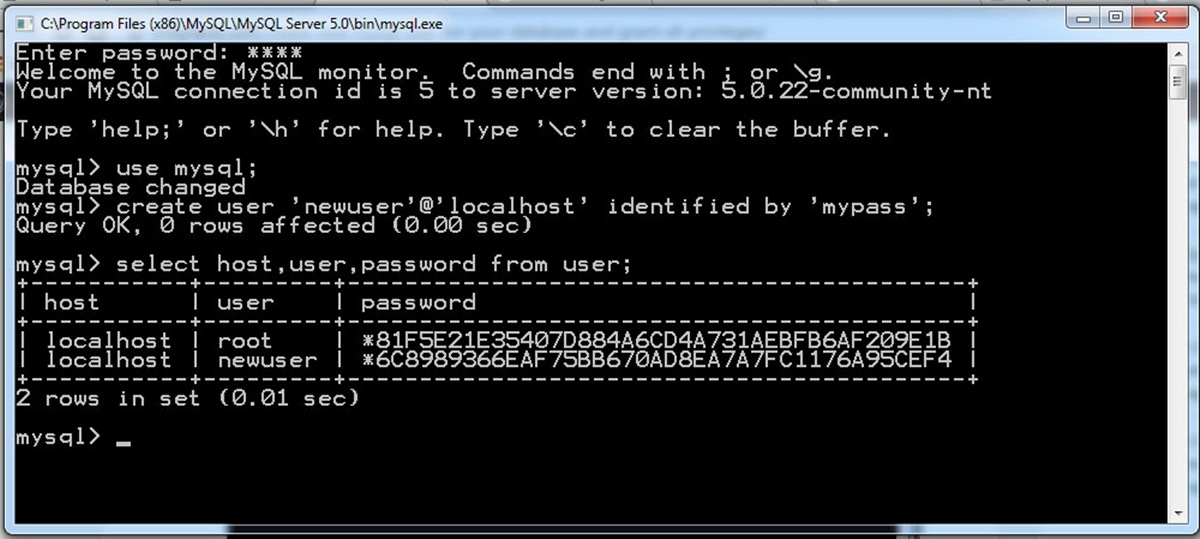
To create a user in MySQL, you need to have administrative privileges. Once you have the necessary privileges, you can use the following syntax:
CREATE USER 'username'@'hostname' IDENTIFIED BY 'password';
Let’s break down the syntax:
'username': The desired username for the new user.'hostname': The hostname or IP address from which the user will connect. Use'%'to allow connections from any host.'password': The password for the user. Make sure to use a strong password to enhance security.
For example, to create a user named “john” with the password “mypassword” and allow connections from any host, the command would look like this:
CREATE USER 'john'@'%' IDENTIFIED BY 'mypassword';
It’s important to note that creating a user does not grant any privileges to that user. After creating the user, you need to grant specific permissions to control what the user can do in the database.
Once you have created a user, they can log in to the MySQL server, but they won’t have permission to access any databases or tables. To grant them the necessary permissions, you need to use the GRANT statement, which we will explore in the next section.
Granting Permissions to Users
After creating users in MySQL, the next step is to grant them specific permissions to access databases and perform various operations. MySQL offers a flexible and granular permission system that allows you to control the level of access each user has.
To grant permissions to a user, you can use the GRANT statement. The syntax for granting permissions is as follows:
GRANT privileges ON database.table TO 'username'@'hostname';
Let’s break down the syntax:
privileges: The specific permissions you want to grant. This can include a combination of privileges like SELECT, INSERT, UPDATE, DELETE, CREATE, etc.database.table: The name of the database and table where the permissions will be granted. Use*to grant permissions on all databases or tables.'username': The username you want to grant permissions to.'hostname': The hostname or IP address from which the user will connect.
For example, to grant SELECT and INSERT permissions on the “orders” table in the “ecommerce” database to the user “john” from any host, the command would look like this:
GRANT SELECT, INSERT ON ecommerce.orders TO 'john'@'%';
It’s important to note that granting permissions at the table level allows you to control access to specific tables, whereas granting permissions at the database level grants access to all tables within that database.
If you want to grant all permissions to a user, you can use the ALL keyword:
GRANT ALL PRIVILEGES ON database.* TO 'username'@'hostname';
With the GRANT statement, you have the flexibility to grant different levels of access to different users, ensuring the security and integrity of your databases.
Syntax for Creating Users
Creating users in MySQL requires the use of specific syntax to ensure the user is correctly set up with the desired credentials. The syntax for creating users consists of the CREATE USER statement, followed by the username, hostname, and password.
Here’s the syntax for creating users in MySQL:
CREATE USER 'username'@'hostname' IDENTIFIED BY 'password';
Let’s break down the syntax:
'username': This refers to the desired username for the new user. It can be any alphanumeric combination or a specific name.'hostname': This represents the hostname or IP address from which the user will connect to the MySQL server. Specify'%'to allow connections from any host.'password': This is the password associated with the user. It’s important to set a strong password to enhance security.
For example, suppose we want to create a user named “john” with the password “mypassword” and allow connections from any host. The CREATE USER statement would look like this:
CREATE USER 'john'@'%' IDENTIFIED BY 'mypassword';
Once you execute this statement, the user “john” will be created, and they will be able to connect to the MySQL server using the specified credentials.
Remember that creating a user simply sets up their login credentials, but it does not grant them any permissions to access databases or perform operations. You will need to use the GRANT statement to grant specific permissions to the user.
Mastering the syntax for creating users in MySQL is essential for managing access and control within your database system. By properly setting up users, you can ensure the security and integrity of your data.
Syntax for Granting Permissions
Granting permissions in MySQL allows you to control the access and privileges that users have on databases and tables. To grant permissions, you need to use the GRANT statement with the appropriate syntax.
Here’s the syntax for granting permissions in MySQL:
GRANT privileges ON database.table TO 'username'@'hostname';
Let’s break down the syntax:
privileges: This represents the specific permissions you want to grant to the user. It can include privileges like SELECT, INSERT, UPDATE, DELETE, CREATE, and more. You can grant multiple privileges by separating them with commas.database.table: This refers to the name of the database and table on which you want to grant the permissions. Use*to grant permissions on all databases or tables.'username': This is the username for which you want to grant the permissions.'hostname': This specifies the hostname or IP address from which the user will connect. Use'%'to allow connections from any host.
For example, let’s say we want to grant SELECT and INSERT permissions on the “orders” table in the “ecommerce” database to the user named “john” from any host. The GRANT statement would look like this:
GRANT SELECT, INSERT ON ecommerce.orders TO 'john'@'%';
By executing this statement, you give the user “john” the ability to select and insert data into the “orders” table in the “ecommerce” database.
It’s important to note that you can also grant permissions at the database level if you want to grant access to all tables within a specific database.
Granting permissions using the appropriate syntax allows you to control the level of access each user has in your MySQL database. By granting specific privileges, you ensure the security and integrity of your data.
Granting All Permissions to a User
In MySQL, you have the ability to grant all permissions to a user, giving them complete access to the databases and tables within the system. Granting all permissions is particularly useful when you want to provide a user with the highest level of access and privileges.
To grant all permissions to a user in MySQL, you can use the GRANT statement with the ALL PRIVILEGES keyword.
Here’s the syntax for granting all permissions to a user:
GRANT ALL PRIVILEGES ON database.* TO 'username'@'hostname';
Breaking down the syntax:
ALL PRIVILEGES: This grants all possible permissions to the user.database.*: This specifies the database on which you want to grant the permissions. The*wildcard allows access to all tables within that database.'username': This is the username for which you want to grant all permissions.'hostname': This represents the hostname or IP address from which the user will connect. Specify'%'to allow connections from any host.
For example, to grant all permissions on the “ecommerce” database to the user “john” from any host, the GRANT statement would look like this:
GRANT ALL PRIVILEGES ON ecommerce.* TO 'john'@'%';
With this command, the user “john” will have full access to all tables within the “ecommerce” database, including the ability to SELECT, INSERT, UPDATE, DELETE, and perform other operations.
Granting all permissions should be approached with caution, as it grants extensive privileges to the user. It is recommended to only grant all permissions to trusted individuals or when explicitly required.
By using the GRANT statement with the ALL PRIVILEGES keyword, you can easily grant a user complete access to a specific database, giving them extensive control over the data and operations within that database.
Granting Specific Permissions to a User
In MySQL, it is common to grant specific permissions to users based on their intended use and level of access required. This allows you to maintain granular control over the user’s interactions with the database and tables.
To grant specific permissions to a user in MySQL, you can use the GRANT statement with the desired privileges.
Here’s the syntax for granting specific permissions:
GRANT privileges ON database.table TO 'username'@'hostname';
Breaking down the syntax:
privileges: This represents the specific permissions you want to grant to the user. You can grant multiple privileges by separating them with commas. Some common privileges include SELECT, INSERT, UPDATE, DELETE, CREATE, and DROP.database.table: This specifies the database and table on which you want to grant the permissions. Use*to grant permissions on all tables ordatabase.*to grant permissions on all tables within a specific database.'username': This is the username for which you want to grant the specific permissions.'hostname': This refers to the hostname or IP address from which the user will connect. Specify'%'to allow connections from any host.
For example, let’s say you want to grant SELECT and INSERT permissions on the “orders” table in the “ecommerce” database to the user named “john” from any host. The GRANT statement would look like this:
GRANT SELECT, INSERT ON ecommerce.orders TO 'john'@'%';
With this command, the user “john” will have the ability to select data from and insert data into the “orders” table within the “ecommerce” database.
By granting specific permissions, you have fine-grained control over the user’s actions within the database. You can tailor their access to only what is necessary for their intended tasks, ensuring the security and integrity of your data.
Remember to carefully consider the permissions you grant to users, providing them with the necessary access while limiting unnecessary privileges to maintain data protection.
Revoking Permissions from a User
In MySQL, revoking permissions from a user allows you to remove specific privileges that were previously granted. This can be necessary when you want to modify the level of access a user has or when removing access altogether.
To revoke permissions from a user in MySQL, you can use the REVOKE statement along with the appropriate syntax.
Here’s the syntax for revoking permissions:
REVOKE privileges ON database.table FROM 'username'@'hostname';
Breaking down the syntax:
privileges: This represents the specific permissions you want to revoke from the user. Just like granting permissions, you can revoke multiple privileges by separating them with commas.database.table: This specifies the database and table from which you want to revoke the permissions. Use*to revoke permissions from all tables ordatabase.*to revoke permissions from all tables within a specific database.'username': This is the username from which you want to revoke the permissions.'hostname': This refers to the hostname or IP address associated with the user. Specify'%'to revoke permissions from any host.
For example, let’s say you want to revoke the SELECT and INSERT permissions on the “orders” table in the “ecommerce” database from the user named “john” from any host. The REVOKE statement would look like this:
REVOKE SELECT, INSERT ON ecommerce.orders FROM 'john'@'%';
By executing this command, you remove the ability of the user “john” to select data from and insert data into the “orders” table within the “ecommerce” database.
Revoking permissions is an essential aspect of database administration. It allows you to fine-tune and modify user access as needed, ensuring the appropriate levels of security and control over your data.
Remember to revoke permissions carefully, considering the impact on users and their ability to perform necessary tasks while maintaining the integrity of your database.
Removing a User from MySQL
In MySQL, removing a user is a straightforward process that involves using the DROP USER statement. Removing a user is typically done when their access to the database is no longer required or when you want to clean up the user list.
To remove a user from MySQL, you can use the DROP USER statement with the appropriate syntax.
Here’s the syntax for removing a user:
DROP USER 'username'@'hostname';
In the syntax:
'username': This specifies the username of the user you want to remove.'hostname': This refers to the hostname or IP address associated with the user.
For example, let’s say you want to remove the user “john” from any host. The DROP USER statement would look like this:
DROP USER 'john'@'%';
By executing this command, you effectively remove the user “john” from the MySQL server, revoking all their privileges and access.
It’s important to note that removing a user does not automatically remove any associated metadata or database objects created by that user. If there are tables or other database objects created by the user, you need to explicitly remove them before removing the user.
When removing a user, ensure that you have considered the impact on any applications or systems that rely on that user for database access. Always backup your data before making any user modifications to avoid accidental data loss.
By using the DROP USER statement, you can easily remove a user from MySQL and maintain a clean and organized user management system within your database.